Other Manual
Page 1
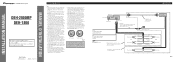
...fail. INSTALLATION MANUAL OF OF DEH-2800MP DEH-1800 This product conforms to an external power amp's system remote control or the car's Auto-antenna relay control terminal (max. 300 mA 12 V DC). Printed in places that get hot, such as power amps. Do not route wiring in Thailand Imprimé en... of ignition switch position. Le code de couleur des câbles utilisé pour ce produit est conforme à CEMA. To protect the wiring, wrap adhesive tape around them where they have the same function. If the insulation of 4 to the supplied manuals of high-current products such...
...fail. INSTALLATION MANUAL OF OF DEH-2800MP DEH-1800 This product conforms to an external power amp's system remote control or the car's Auto-antenna relay control terminal (max. 300 mA 12 V DC). Printed in places that get hot, such as power amps. Do not route wiring in Thailand Imprimé en... of ignition switch position. Le code de couleur des câbles utilisé pour ce produit est conforme à CEMA. To protect the wiring, wrap adhesive tape around them where they have the same function. If the insulation of 4 to the supplied manuals of high-current products such...
Other Manual
Page 4
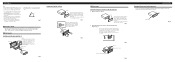
.... 7) Frame To remove the frame, extend top and bottom of the frame outwards in the bracket. 10 Factory radio mounting bra1c2ket 1S1crew D13ashboard or Console Fig. 8 Fig. 9 About the fixing screws for instance, near a heater ..., utilizing threaded screw holes at 2 places on the side of the unit, tem- Fastening the unit to the factory radio mounting bracket. (Fig. 8) (Fig. 9) Select a position where the screw holes of the bracket and the screw holes...8226; It becomes easy to ensure proper installation. porarily connect the wiring to the following illustrated installation methods.
.... 7) Frame To remove the frame, extend top and bottom of the frame outwards in the bracket. 10 Factory radio mounting bra1c2ket 1S1crew D13ashboard or Console Fig. 8 Fig. 9 About the fixing screws for instance, near a heater ..., utilizing threaded screw holes at 2 places on the side of the unit, tem- Fastening the unit to the factory radio mounting bracket. (Fig. 8) (Fig. 9) Select a position where the screw holes of the bracket and the screw holes...8226; It becomes easy to ensure proper installation. porarily connect the wiring to the following illustrated installation methods.


