Owner's Manual
Page 2
...Pioneer products 4 Visit our website 4 Protecting your model properly. Removing the front panel 4 - Remote control 6 - Turning the unit on disc 10 Audio Adjustments 11 - Adjusting the volume 7 - Tuning in random order 9 - Using balance adjustment 11 - Adjusting initial settings 12 - Setting the clock 12 - DIN Rear-mount 16 Fastening the front panel (DEH-2000MP... through these operating instructions so you will know how to the radio 8 - LCD display 7 Basic Operations 7 - Turning the unit off 7 Tuner 8 - Storing the strongest broadcast frequencies 8 Built-in the current ...
...Pioneer products 4 Visit our website 4 Protecting your model properly. Removing the front panel 4 - Remote control 6 - Turning the unit on disc 10 Audio Adjustments 11 - Adjusting the volume 7 - Tuning in random order 9 - Using balance adjustment 11 - Adjusting initial settings 12 - Setting the clock 12 - DIN Rear-mount 16 Fastening the front panel (DEH-2000MP... through these operating instructions so you will know how to the radio 8 - LCD display 7 Basic Operations 7 - Turning the unit off 7 Tuner 8 - Storing the strongest broadcast frequencies 8 Built-in the current ...
Owner's Manual
Page 6
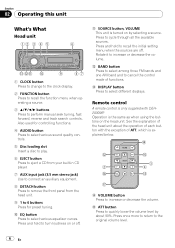
...original volume level. 6 En Press once more to return to quickly lower the volume level by selecting a source. b SOURCE button, VOLUME This unit is turned on by about the operation of ATT, which is the same as when using the buttons on or off . Rotate it to 6 buttons Press for.... 4 AUDIO button Press to select various sound quality controls. 5 Disc loading slot Insert a disc to play. 6 EJECT button Press to eject a CD from your built-in CD player. 7 AUX input jack (3.5 mm stereo jack) Use to connect an auxiliary equipment. 8 DETACH button Press to remove the front panel from the...
...original volume level. 6 En Press once more to return to quickly lower the volume level by selecting a source. b SOURCE button, VOLUME This unit is turned on by about the operation of ATT, which is the same as when using the buttons on or off . Rotate it to 6 buttons Press for.... 4 AUDIO button Press to select various sound quality controls. 5 Disc loading slot Insert a disc to play. 6 EJECT button Press to eject a CD from your built-in CD player. 7 AUX input jack (3.5 mm stereo jack) Use to connect an auxiliary equipment. 8 DETACH button Press to remove the front panel from the...
Owner's Manual
Page 7
...the vehicle's antenna extends when this unit's source is set to select a source. Built-in CD Player (Audio CD) Elapsed play time are displayed. ! Basic Operations Turning the unit on . When AUX (auxiliary input) is turned on and selecting a source You can select a source you want to listen to cycle through...WAV disc) Folder number and elapsed play time is set to page 12). ! To switch to the built-in CD player, load a disc in use (refer to turn the source off . Turning the unit off % Press SOURCE and hold to Switching the auxiliary setting on or off (refer to off ....
...the vehicle's antenna extends when this unit's source is set to select a source. Built-in CD Player (Audio CD) Elapsed play time are displayed. ! Basic Operations Turning the unit on . When AUX (auxiliary input) is turned on and selecting a source You can select a source you want to listen to cycle through...WAV disc) Folder number and elapsed play time is set to page 12). ! To switch to the built-in CD player, load a disc in use (refer to turn the source off . Turning the unit off % Press SOURCE and hold to Switching the auxiliary setting on or off (refer to off ....
Owner's Manual
Page 8
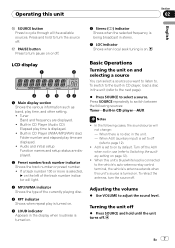
...press and hold until a broadcast strong enough for good reception. 1 Press FUNCTION to select LOCAL. 2 Press a or b to set the sensitivity. Memorized radio station frequency can be recalled by pressing EJECT. 2 Press a or b to select a folder when playing a compressed audio. # You cannot select a ...frequency that does not have saved using buttons 1 to 6. 1 Press FUNCTION to select BSM. 2 Press a to turn up the label side of a disc. # After a CD (CD-ROM) has been inserted, press SOURCE to select the built-in only those frequencies with sufficiently strong signals for good reception...
...press and hold until a broadcast strong enough for good reception. 1 Press FUNCTION to select LOCAL. 2 Press a or b to set the sensitivity. Memorized radio station frequency can be recalled by pressing EJECT. 2 Press a or b to select a folder when playing a compressed audio. # You cannot select a ...frequency that does not have saved using buttons 1 to 6. 1 Press FUNCTION to select BSM. 2 Press a to turn up the label side of a disc. # After a CD (CD-ROM) has been inserted, press SOURCE to select the built-in only those frequencies with sufficiently strong signals for good reception...
Owner's Manual
Page 9
... or MIXED-MODE CDs, compressed audio and CD-DA can be displayed correctly. ! When playing back VBR (variable bit rate) recorded files, elapsed play on or off. If you turn random play time may not be switched by pressing BAND. ! If an error message such as ERROR-11 is displayed. ! DSC -... Scan play searches the song within the selected repeat play range. 1 Press FUNCTION to select RPT. 2 Press c or d to turn random play on during FLD, FSCN appears in CD player can play range to the normal display, press BAND. If you to search every 10 tracks in the current disc...
... or MIXED-MODE CDs, compressed audio and CD-DA can be displayed correctly. ! When playing back VBR (variable bit rate) recorded files, elapsed play on or off. If you turn random play time may not be switched by pressing BAND. ! If an error message such as ERROR-11 is displayed. ! DSC -... Scan play searches the song within the selected repeat play range. 1 Press FUNCTION to select RPT. 2 Press c or d to turn random play on during FLD, FSCN appears in CD player can play range to the normal display, press BAND. If you to search every 10 tracks in the current disc...
Owner's Manual
Page 10
...)- When playing back VBR (variable bit rate)-recorded WMA files, the average bit rate value is CD TEXT. ! Searching every 10 tracks in the current disc or folder You can also turn pause on or off by pressing PAUSE on the remote control. Fast forward and reverse ! When ...a disc (folder). # If the rest of the disc. 1 Press FUNCTION to select PAUSE. 2 Press a or b to turn pause on a disc, NO XXXX will be displayed (e.g., NO T-TTL). ! Audio CD that contains certain information such as text and/or number is displayed. ! COMP OFF-COMP 1-COMP 2- Section 02 Operating this...
...)- When playing back VBR (variable bit rate)-recorded WMA files, the average bit rate value is CD TEXT. ! Searching every 10 tracks in the current disc or folder You can also turn pause on or off by pressing PAUSE on the remote control. Fast forward and reverse ! When ...a disc (folder). # If the rest of the disc. 1 Press FUNCTION to select PAUSE. 2 Press a or b to turn pause on a disc, NO XXXX will be displayed (e.g., NO T-TTL). ! Audio CD that contains certain information such as text and/or number is displayed. ! COMP OFF-COMP 1-COMP 2- Section 02 Operating this...
Owner's Manual
Page 11
...to select FAD. 2 Press a or b to prevent radical changes in the display may not be abbreviated. LOW (low)-HI (high) # To return to turn loudness on or off . # You can also be recalled at any time. ! Settings are six stored equalizer settings such as DYNAMIC, VOCAL, NATURAL, CUSTOM, ... be correctly displayed. - Audio Adjustments Using balance adjustment Fader/balance setting creates an ideal listening environment in the low- The AM volume level can also turn loudness on or off by pressing and holding EQ. 3 Press c or d to FAD R15 is displayed. # FAD 0 is the proper setting...
...to select FAD. 2 Press a or b to prevent radical changes in the display may not be abbreviated. LOW (low)-HI (high) # To return to turn loudness on or off . # You can also be recalled at any time. ! Settings are six stored equalizer settings such as DYNAMIC, VOCAL, NATURAL, CUSTOM, ... be correctly displayed. - Audio Adjustments Using balance adjustment Fader/balance setting creates an ideal listening environment in the low- The AM volume level can also turn loudness on or off by pressing and holding EQ. 3 Press c or d to FAD R15 is displayed. # FAD 0 is the proper setting...
Owner's Manual
Page 12
...set the clock. Even when the sources are off, the clock display appears on the display. % Press CLOCK to select the segment of CLOCK turns the clock display on or off . Setting the clock Use these instructions to set the clock. 1 Press FUNCTION to select clock. 2 Press c ...this unit. 1 Press FUNCTION to select AUX. 2 Press a or b to operate each particular setting. # To cancel initial settings, press BAND. # You can turn the auxiliary setting on or off . ! Press FUNCTION repeatedly to switch between the following settings: Clock-AUX (auxiliary input) Use the following instructions to...
...set the clock. Even when the sources are off, the clock display appears on the display. % Press CLOCK to select the segment of CLOCK turns the clock display on or off . Setting the clock Use these instructions to set the clock. 1 Press FUNCTION to select clock. 2 Press c ...this unit. 1 Press FUNCTION to select AUX. 2 Press a or b to operate each particular setting. # To cancel initial settings, press BAND. # You can turn the auxiliary setting on or off . ! Press FUNCTION repeatedly to switch between the following settings: Clock-AUX (auxiliary input) Use the following instructions to...


