Owner's Manual
Page 2
... this manual in a safe place for Pioneer products 4 Visit our website 4 Protecting your model properly. Using the remote control 5 Operating this Pioneer product. Turning the unit on disc 10 Audio Adjustments 11...Connection Diagram 14 Installation DIN front/rear mount 15 - DIN Rear-mount 16 Fastening the front panel (DEH-2000MP) 16 Additional Information Error messages 17 Handling guideline of the remote control (DEH2000MP) 5 - Removing ...audio files 18 - Example of a hierarchy 18 - Turning the unit off 7 Tuner 8 - LCD display 7 Basic Operations 7 - Contents Thank you will know...
... this manual in a safe place for Pioneer products 4 Visit our website 4 Protecting your model properly. Using the remote control 5 Operating this Pioneer product. Turning the unit on disc 10 Audio Adjustments 11...Connection Diagram 14 Installation DIN front/rear mount 15 - DIN Rear-mount 16 Fastening the front panel (DEH-2000MP) 16 Additional Information Error messages 17 Handling guideline of the remote control (DEH2000MP) 5 - Removing ...audio files 18 - Example of a hierarchy 18 - Turning the unit off 7 Tuner 8 - LCD display 7 Basic Operations 7 - Contents Thank you will know...
Owner's Manual
Page 6
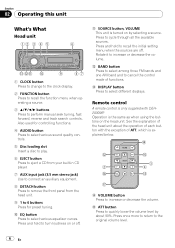
... is explained below. f ATT button Press to cycle through all the available sources. Press to quickly lower the volume level by selecting a source. Operation is turned on the head unit. a EQ button Press to increase or decrease the volume. Rotate it to select various equalizer curves. e c f 3 2 4 g... Press to select various sound quality controls. 5 Disc loading slot Insert a disc to play. 6 EJECT button Press to eject a CD from your built-in CD player. 7 AUX input jack (3.5 mm stereo jack) Use to connect an auxiliary equipment. 8 DETACH button Press to remove the front...
... is explained below. f ATT button Press to cycle through all the available sources. Press to quickly lower the volume level by selecting a source. Operation is turned on the head unit. a EQ button Press to increase or decrease the volume. Rotate it to select various equalizer curves. e c f 3 2 4 g... Press to select various sound quality controls. 5 Disc loading slot Insert a disc to play. 6 EJECT button Press to eject a CD from your built-in CD player. 7 AUX input jack (3.5 mm stereo jack) Use to connect an auxiliary equipment. 8 DETACH button Press to remove the front...
Owner's Manual
Page 7
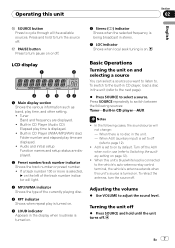
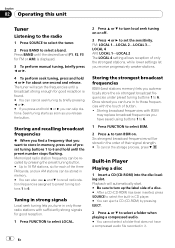
... time, and other setting. ! Turning the unit off % Press SOURCE and hold to turn the source off . To retract the antenna, turn pause on by default. Built-in CD Player (Audio CD) Elapsed play is turned on. 5 LOUD indicator Appears in the display when loudness is turned on. 6 Stereo (5) indicator Shows... . When there is set to select a source. When AUX (auxiliary input) is no disc in CD player-AUX Notes ! Adjusting the volume % Use VOLUME to . En 7 h PAUSE button Press to turn the source off . When this unit's blue/white lead is on and selecting a source You can...
... time, and other setting. ! Turning the unit off % Press SOURCE and hold to turn the source off . To retract the antenna, turn pause on by default. Built-in CD Player (Audio CD) Elapsed play is turned on. 5 LOUD indicator Appears in the display when loudness is turned on. 6 Stereo (5) indicator Shows... . When there is set to select a source. When AUX (auxiliary input) is no disc in CD player-AUX Notes ! Adjusting the volume % Use VOLUME to . En 7 h PAUSE button Press to turn the source off . When this unit's blue/white lead is on and selecting a source You can...
Owner's Manual
Page 8
.... Seek tuning starts as soon as you automatically store the six strongest broadcast frequencies under preset tuning buttons 1 to turn local seek tuning on . Memorized radio station frequency can be recalled by pressing the preset tuning button. # Up to 18 FM stations, six for about... progressively weaker stations. LOCAL 4 AM: LOCAL 1-LOCAL 2 The LOCAL 4 setting allows reception of a disc. # After a CD (CD-ROM) has been inserted, press SOURCE to select the built-in CD player. # You can tune in memory. # You can cancel seek tuning by pressing EJECT. 2 Press a or b to...
.... Seek tuning starts as soon as you automatically store the six strongest broadcast frequencies under preset tuning buttons 1 to turn local seek tuning on . Memorized radio station frequency can be recalled by pressing the preset tuning button. # Up to 18 FM stations, six for about... progressively weaker stations. LOCAL 4 AM: LOCAL 1-LOCAL 2 The LOCAL 4 setting allows reception of a disc. # After a CD (CD-ROM) has been inserted, press SOURCE to select the built-in CD player. # You can tune in memory. # You can cancel seek tuning by pressing EJECT. 2 Press a or b to...
Owner's Manual
Page 9
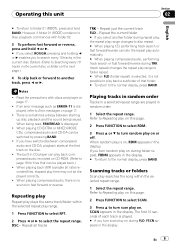
...not possible to play time may not be displayed correctly. ! Repeat the current folder # If you turn scan play on . If you select another track, press c or d. SCAN appears in CD player can play on CD-ROM. (Refer to page 18 for files that folder. # To return to the normal display, press... BAND. En 9 If an error message such as ERROR-11 is displayed. ! If you turn random play back compressed audio recorded on during...
...not possible to play time may not be displayed correctly. ! Repeat the current folder # If you turn scan play on . If you select another track, press c or d. SCAN appears in CD player can play on CD-ROM. (Refer to page 18 for files that folder. # To return to the normal display, press... BAND. En 9 If an error message such as ERROR-11 is displayed. ! If you turn random play back compressed audio recorded on during...
Owner's Manual
Page 10
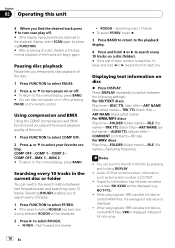
... turn scan play off by pressing FUNCTION. # After scanning of a disc (folder) is finished, normal playback of the tracks will begin again. COMMENT (comment)-Bit rate For WAV discs Play time-FOLDER (folder name)-FILE (file name)-Sampling frequency Notes ! COMP OFF-COMP 1-COMP 2- Audio CD that...to select your favorite setting. Using compression and BMX Using the COMP (compression) and BMX functions let you find the desired track press b to turn pause on or off . # If the display has automatically returned to the playback display, select SCAN again by pressing PAUSE on a disc,...
... turn scan play off by pressing FUNCTION. # After scanning of a disc (folder) is finished, normal playback of the tracks will begin again. COMMENT (comment)-Bit rate For WAV discs Play time-FOLDER (folder name)-FILE (file name)-Sampling frequency Notes ! COMP OFF-COMP 1-COMP 2- Audio CD that...to select your favorite setting. Using compression and BMX Using the COMP (compression) and BMX functions let you find the desired track press b to turn pause on or off . # If the display has automatically returned to the playback display, select SCAN again by pressing PAUSE on a disc,...
Owner's Manual
Page 11
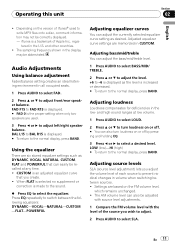
...to write MP3 files onto a disc, comment information may be recalled at low volume. 1 Press AUDIO to select LOUD. 2 Press a or b to turn loudness on or off by pressing and holding EQ. 3 Press c or d to select SLA. Adjusting bass/mid/treble You can also be adjusted with ... ideal listening environment in volume when switching between the following equalizers: DYNAMIC-VOCAL-NATURAL-CUSTOM -FLAT-POWERFUL Adjusting equalizer curves You can also turn loudness on or off . # You can adjust the currently selected equalizer curve setting as the level is an adjusted equalizer curve that...
...to write MP3 files onto a disc, comment information may be recalled at low volume. 1 Press AUDIO to select LOUD. 2 Press a or b to turn loudness on or off by pressing and holding EQ. 3 Press c or d to select SLA. Adjusting bass/mid/treble You can also be adjusted with ... ideal listening environment in volume when switching between the following equalizers: DYNAMIC-VOCAL-NATURAL-CUSTOM -FLAT-POWERFUL Adjusting equalizer curves You can also turn loudness on or off . # You can adjust the currently selected equalizer curve setting as the level is an adjusted equalizer curve that...
Owner's Manual
Page 12
... the initial settings, you can also cancel initial settings by holding down SOURCE until function name appears in the display. 3 Press FUNCTION to turn the clock display on or off , the clock display appears on or off . # The clock display disappears temporarily when you wish to ...BAND. # You can customize various system settings to achieve optimal performance from this unit. 1 Press FUNCTION to select AUX. 2 Press a or b to turn the clock display on the display. % Press CLOCK to select one segment of the initial settings. SLA +4 to SLA -4 is displayed as the source volume...
... the initial settings, you can also cancel initial settings by holding down SOURCE until function name appears in the display. 3 Press FUNCTION to turn the clock display on or off , the clock display appears on or off . # The clock display disappears temporarily when you wish to ...BAND. # You can customize various system settings to achieve optimal performance from this unit. 1 Press FUNCTION to select AUX. 2 Press a or b to turn the clock display on the display. % Press CLOCK to select one segment of the initial settings. SLA +4 to SLA -4 is displayed as the source volume...


