Owner's Manual
Page 2
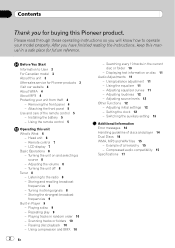
...through these operating instructions so you will know how to the radio 8 - Attaching the front panel 5 Use and care of discs and player 14 Dual Discs 14 WMA, MP3 and WAV files 15 - Installing the battery 5 - Remote control 7 - Listening to operate your unit from theft ... model 3 About this unit 3 After-sales service for buying this unit What's What 6 - Adjusting equalizer curves 11 - Using the remote control 5 Operating this Pioneer product. Adjusting the volume 8 - Adjusting loudness 12 - Turning the unit on disc 11 Audio Adjustments 11 - Using compression and BMX ...
...through these operating instructions so you will know how to the radio 8 - Attaching the front panel 5 Use and care of discs and player 14 Dual Discs 14 WMA, MP3 and WAV files 15 - Installing the battery 5 - Remote control 7 - Listening to operate your unit from theft ... model 3 About this unit 3 After-sales service for buying this unit What's What 6 - Adjusting equalizer curves 11 - Using the remote control 5 Operating this Pioneer product. Adjusting the volume 8 - Adjusting loudness 12 - Turning the unit on disc 11 Audio Adjustments 11 - Using compression and BMX ...
Owner's Manual
Page 5
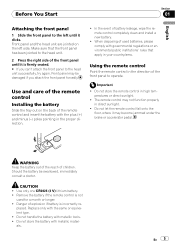
...longer. ! Use and care of explosion if battery is firmly seated. # If you attach the front panel forcedly. Remove the battery if the remote control is not used batteries, please comply with the same or equivalent type. ! In the event of children. Danger of the... remote control Installing the battery Slide the tray out on the left until it clicks. Using the remote control Point the remote control in direct sunlight. ! Do not store the remote control in your country/area. WARNING Keep the battery out ...
...longer. ! Use and care of explosion if battery is firmly seated. # If you attach the front panel forcedly. Remove the battery if the remote control is not used batteries, please comply with the same or equivalent type. ! In the event of children. Danger of the... remote control Installing the battery Slide the tray out on the left until it clicks. Using the remote control Point the remote control in direct sunlight. ! Do not store the remote control in your country/area. WARNING Keep the battery out ...
Owner's Manual
Page 7
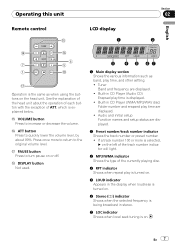
... Band and frequency are displayed. 2 Preset number/track number indicator Shows the track number or preset number. ! Built-in CD Player (Audio CD) Erapsed play time is displayed. ! Operating this unit Section 02 English Remote control LCD display f 1 2 e g 6 7 5 1 i h Operation is the same as band, play time, and other ...left of the track number indicator will light. 3 MP3/WMA indicator Shows the type of ATT, which is explained below. Built-in CD Player (WMA/MP3/WAV disc) Folder number and erapsed play time are displayed. ! g ATT button Press to increase or decrease the ...
... Band and frequency are displayed. 2 Preset number/track number indicator Shows the track number or preset number. ! Built-in CD Player (Audio CD) Erapsed play time is displayed. ! Operating this unit Section 02 English Remote control LCD display f 1 2 e g 6 7 5 1 i h Operation is the same as band, play time, and other ...left of the track number indicator will light. 3 MP3/WMA indicator Shows the type of ATT, which is explained below. Built-in CD Player (WMA/MP3/WAV disc) Folder number and erapsed play time are displayed. ! g ATT button Press to increase or decrease the ...
Owner's Manual
Page 10
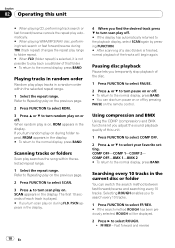
... the song within the selected repeat range. 1 Select the repeat range. Scanning tracks or folders Scan play on the remote control. Selecting ROUGH enables you temporarily stop playback of this unit # When playing CD, performing track search or fast forward/reverse cancels the repeat play automatically. # When playing WMA/MP3/WAV disc...
... the song within the selected repeat range. 1 Select the repeat range. Scanning tracks or folders Scan play on the remote control. Selecting ROUGH enables you temporarily stop playback of this unit # When playing CD, performing track search or fast forward/reverse cancels the repeat play automatically. # When playing WMA/MP3/WAV disc...
Other Manual
Page 2
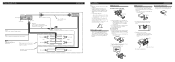
...less than 60°. 60° DIN Front/Rear-mount This unit can be fastened with RCA cables (sold separately) Power amp (sold separately) System remote control Red Connect to terminal controlled by using the optional amplifier. + Rear speaker ≠ + Rear speaker ≠ Installation Note: • Check all...terminal of the trim ring outwards to bend the metal tabs (90°) into both sides of unit chassis). Screw Dashboard or Console Factory radio mounting bracket Extend top and bottom of the power amp or auto-antenna relay control terminal (max. 300 mA 12 V DC). DIN ...
...less than 60°. 60° DIN Front/Rear-mount This unit can be fastened with RCA cables (sold separately) Power amp (sold separately) System remote control Red Connect to terminal controlled by using the optional amplifier. + Rear speaker ≠ + Rear speaker ≠ Installation Note: • Check all...terminal of the trim ring outwards to bend the metal tabs (90°) into both sides of unit chassis). Screw Dashboard or Console Factory radio mounting bracket Extend top and bottom of the power amp or auto-antenna relay control terminal (max. 300 mA 12 V DC). DIN ...


