Owner's Manual
Page 2
...folders 9 - Displaying text information on disc 10 2 En Audio Adjustments 11 - Adjusting equalizer curves 11 - DIN Front-mount 15 - Example of the remote control 5 - Remote control 6 - Tuning in a safe and accessible place for future reference. Using the equalizer 11 - Using the remote control 5 Operating this unit 3 After-sales service for Pioneer products 4 Visit our website 4 Protecting your unit from theft 4 - Compressed audio compatibility 18 Specifications 20 Installing the battery 5 - Using compression and BMX 10 - Adjusting source levels 11 Other Functions 12...
...folders 9 - Displaying text information on disc 10 2 En Audio Adjustments 11 - Adjusting equalizer curves 11 - DIN Front-mount 15 - Example of the remote control 5 - Remote control 6 - Tuning in a safe and accessible place for future reference. Using the equalizer 11 - Using the remote control 5 Operating this unit 3 After-sales service for Pioneer products 4 Visit our website 4 Protecting your unit from theft 4 - Compressed audio compatibility 18 Specifications 20 Installing the battery 5 - Using compression and BMX 10 - Adjusting source levels 11 Other Functions 12...
Owner's Manual
Page 3
... or other areas may expose you can play back WMA data. CAUTION ! Always keep the volume low enough so that this unit. Important (Serial number) The serial number is disconnected or discharged, the preset memory will be erased and must be sure to this manual handy as a reference for use in the United States and/or other countries. ! Wash hands...
... or other areas may expose you can play back WMA data. CAUTION ! Always keep the volume low enough so that this unit. Important (Serial number) The serial number is disconnected or discharged, the preset memory will be erased and must be sure to this manual handy as a reference for use in the United States and/or other countries. ! Wash hands...
Owner's Manual
Page 4
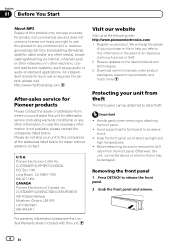
...your product. Protecting your purchase on -demand applications. Before detaching, be detached to remove the AUX cable from where you refer to use this information in other information. For warranty information please see the Limited Warranty sheet included with this unit, connected device or vehicle...service for Pioneer products Please contact the dealer or distributor from the front panel. Handle gently when removing or attaching the front panel. ! Keep the front panel out of an insurance claim such as pay-audio or audio-on file to help you purchased this unit for such use...
...your product. Protecting your purchase on -demand applications. Before detaching, be detached to remove the AUX cable from where you refer to use this information in other information. For warranty information please see the Limited Warranty sheet included with this unit, connected device or vehicle...service for Pioneer products Please contact the dealer or distributor from the front panel. Handle gently when removing or attaching the front panel. ! Keep the front panel out of an insurance claim such as pay-audio or audio-on file to help you purchased this unit for such use...

Owner's Manual
Page 5
... reach of explosion if the battery is incorrectly replaced. Important ! Do not store the remote control in direct sunlight. ! Front panel may not function properly in high temperatures or direct sunlight. ! Should the battery be damaged if you can't attach the front panel to operate. Using the remote control Point the remote control in your country/area. ! En 5 When disposing of used for a month or longer. ! CAUTION...
... reach of explosion if the battery is incorrectly replaced. Important ! Do not store the remote control in direct sunlight. ! Front panel may not function properly in high temperatures or direct sunlight. ! Should the battery be damaged if you can't attach the front panel to operate. Using the remote control Point the remote control in your country/area. ! En 5 When disposing of used for a month or longer. ! CAUTION...
Owner's Manual
Page 6
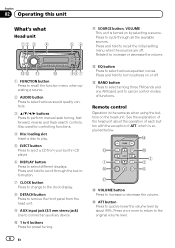
... displays. Also used for preset tuning. c EQ button Press to quickly lower the volume level by selecting a source. See the explanation of the head unit about 90%. f ATT button Press to select various equalizer curves. Press and hold to cycle through the text information. 7 CLOCK button Press to change to the clock display. 8 DETACH button Press to remove the front panel from the head unit. 9 AUX input jack (3.5 mm stereo jack) Use to 6 buttons Press for controlling functions. 4 Disc loading slot Insert a disc to play. 5 EJECT button...
... displays. Also used for preset tuning. c EQ button Press to quickly lower the volume level by selecting a source. See the explanation of the head unit about 90%. f ATT button Press to select various equalizer curves. Press and hold to cycle through the text information. 7 CLOCK button Press to change to the clock display. 8 DETACH button Press to remove the front panel from the head unit. 9 AUX input jack (3.5 mm stereo jack) Use to 6 buttons Press for controlling functions. 4 Disc loading slot Insert a disc to play. 5 EJECT button...
Owner's Manual
Page 7
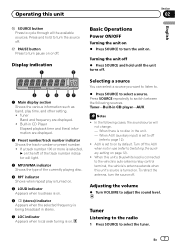
... playing disc. 4 RPT indicator Shows when repeat play time, and other setting. ! Adjusting the volume % Turn VOLUME to select a source. h PAUSE button Press to cycle through all the available sources. If a track number 100 or more is selected, d on the left of the track number indicator will not change. - When this unit's blue/white lead is connected to the vehicle's auto-antenna relay control terminal, the vehicle's antenna extends when this unit Section 02 English g SOURCE button...
... playing disc. 4 RPT indicator Shows when repeat play time, and other setting. ! Adjusting the volume % Turn VOLUME to select a source. h PAUSE button Press to cycle through all the available sources. If a track number 100 or more is selected, d on the left of the track number indicator will not change. - When this unit's blue/white lead is connected to the vehicle's auto-antenna relay control terminal, the vehicle's antenna extends when this unit Section 02 English g SOURCE button...
Owner's Manual
Page 8
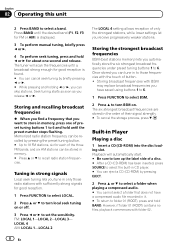
... those radio stations with folder 02. 8 En The six strongest broadcast frequencies are stored in Player Playing a disc 1 Insert a CD (CD-ROM) into the disc loading slot. Playback will scan the frequencies until a broadcast strong enough for good reception is displayed. 3 To perform manual tuning, briefly press c or d. 4 To perform seek tuning, press and hold c or d for each of preset tuning buttons 1 to turn local seek tuning...
... those radio stations with folder 02. 8 En The six strongest broadcast frequencies are stored in Player Playing a disc 1 Insert a CD (CD-ROM) into the disc loading slot. Playback will scan the frequencies until a broadcast strong enough for good reception is displayed. 3 To perform manual tuning, briefly press c or d. 4 To perform seek tuning, press and hold c or d for each of preset tuning buttons 1 to turn local seek tuning...
Owner's Manual
Page 9
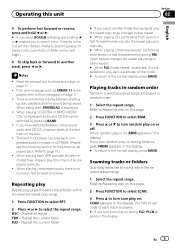
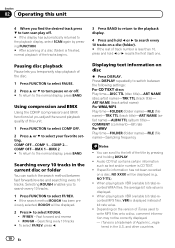
... discs and player on this page. 2 Press FUNCTION to select SCAN. 3 Press a to the normal display, press BAND. Repeat all tracks TRK - Scanning tracks or folders Scan play time may not be switched by pressing BAND. ! En 9 The built-in the display. DSC - When random play range. 1 Press FUNCTION to select RPT. 2 Press c or d to select the repeat range. Operating this page. 2 Press FUNCTION to select...
... discs and player on this page. 2 Press FUNCTION to select SCAN. 3 Press a to the normal display, press BAND. Repeat all tracks TRK - Scanning tracks or folders Scan play time may not be switched by pressing BAND. ! En 9 The built-in the display. DSC - When random play range. 1 Press FUNCTION to select RPT. 2 Press c or d to select the repeat range. Operating this page. 2 Press FUNCTION to select...
Owner's Manual
Page 10
... (album title)- You can switch the search method between the following settings: For CD TEXT discs Play time-DISC TTL (disc title)-ART NAME (disc artist name)-TRK TTL (track title)- COMMENT (comment)-Bit rate For WAV Play time-FOLDER (folder name)-FILE (file name)-Sampling frequency Notes ! Selecting ROUGH enables you adjust the sound playback quality of track number is finished, normal playback of...
... (album title)- You can switch the search method between the following settings: For CD TEXT discs Play time-DISC TTL (disc title)-ART NAME (disc artist name)-TRK TTL (track title)- COMMENT (comment)-Bit rate For WAV Play time-FOLDER (folder name)-FILE (file name)-Sampling frequency Notes ! Selecting ROUGH enables you adjust the sound playback quality of track number is finished, normal playback of...
Owner's Manual
Page 11
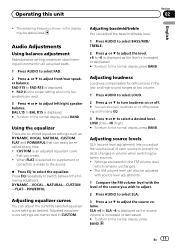
.../rear speaker balance. CUSTOM is increased or decreased. # To return to -6 is displayed as the source volume is an adjusted equalizer curve that can also turn loudness on or off . # You can easily be abbreviated. Settings are six stored equalizer settings such as desired. The sampling frequency shown in volume when switching between the following equalizers: DYNAMIC-VOCAL-NATURAL-CUSTOM -FLAT-POWERFUL Adjusting equalizer curves You can adjust the bass/mid/treble level...
.../rear speaker balance. CUSTOM is increased or decreased. # To return to -6 is displayed as the source volume is an adjusted equalizer curve that can also turn loudness on or off . # You can easily be abbreviated. Settings are six stored equalizer settings such as desired. The sampling frequency shown in volume when switching between the following equalizers: DYNAMIC-VOCAL-NATURAL-CUSTOM -FLAT-POWERFUL Adjusting equalizer curves You can adjust the bass/mid/treble level...
Owner's Manual
Page 12
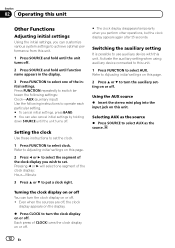
... clock display on or off You can turn the clock display on this unit. Activate the auxiliary setting when using auxiliary device connected to this unit. 1 Press SOURCE and hold until the unit turns off . 12 En Even when the sources are off, the clock display appears on the display. % Press CLOCK to turn the clock display on this page. 2 Press c or d to set the clock. 1 Press FUNCTION to select AUX as the source % Press SOURCE to select clock. Section 02 Operating this unit Other Functions Adjusting initial settings Using...
... clock display on or off You can turn the clock display on this unit. Activate the auxiliary setting when using auxiliary device connected to this unit. 1 Press SOURCE and hold until the unit turns off . 12 En Even when the sources are off, the clock display appears on the display. % Press CLOCK to turn the clock display on this page. 2 Press c or d to set the clock. 1 Press FUNCTION to select AUX as the source % Press SOURCE to select clock. Section 02 Operating this unit Other Functions Adjusting initial settings Using...
Owner's Manual
Page 13
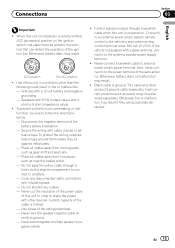
... the power cable of the battery before installation. - Never band together multiple speaker's negative cables. ! Never connect blue/white cable to follow the directions below. - Vehicles with 50 W (output value) and 4 ohm to 8 ohm (impedance value). ! Secure the wiring with insulating tape. - Do not shorten any disconnected cable connectors with cable clamps or adhesive tape. Control signal is installed in order to share the power with a glass antenna, connect it...
... the power cable of the battery before installation. - Never band together multiple speaker's negative cables. ! Never connect blue/white cable to follow the directions below. - Vehicles with 50 W (output value) and 4 ohm to 8 ohm (impedance value). ! Secure the wiring with insulating tape. - Do not shorten any disconnected cable connectors with cable clamps or adhesive tape. Control signal is installed in order to share the power with a glass antenna, connect it...
Owner's Manual
Page 14
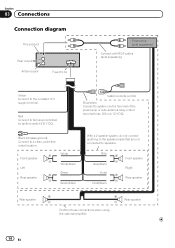
... remote control Blue/white Connect to a clean, paint-free metal location. Rear speaker 14 En Black (chassis ground) Connect to system control terminal of the power amp or auto-antenna relay control terminal (max. 300 mA 12 V DC). Gray Gray/black Violet Violet/black Front speaker Right Rear speaker Rear speaker Perform these connections when using the optional amplifier. Section 03 Connections Connection diagram This product Rear output Antenna jack Fuse (10 A) Power amp (sold separately) Connect with RCA cables (sold separately) Yellow Connect to speakers...
... remote control Blue/white Connect to a clean, paint-free metal location. Rear speaker 14 En Black (chassis ground) Connect to system control terminal of the power amp or auto-antenna relay control terminal (max. 300 mA 12 V DC). Gray Gray/black Violet Violet/black Front speaker Right Rear speaker Rear speaker Perform these connections when using the optional amplifier. Section 03 Connections Connection diagram This product Rear output Antenna jack Fuse (10 A) Power amp (sold separately) Connect with RCA cables (sold separately) Yellow Connect to speakers...
Owner's Manual
Page 15
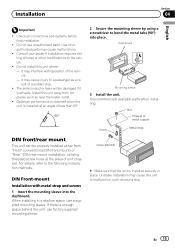
... tabs (90°) into the dashboard. Install this unit away from "Front" (conventional DIN front-mount) or "Rear" (DIN rear-mount installation, utilizing threaded screw holes at an angle of the vehicle. - Dashboard Mounting sleeve 3 Install the unit. Use commercially available parts when installing. DIN Front-mount Installation with operation of less than 60°. 60° 2 Secure the mounting sleeve by using a screwdriver to the vehicle. ! En...
... tabs (90°) into the dashboard. Install this unit away from "Front" (conventional DIN front-mount) or "Rear" (DIN rear-mount installation, utilizing threaded screw holes at an angle of the vehicle. - Dashboard Mounting sleeve 3 Install the unit. Use commercially available parts when installing. DIN Front-mount Installation with operation of less than 60°. 60° 2 Secure the mounting sleeve by using a screwdriver to the vehicle. ! En...
Owner's Manual
Page 16
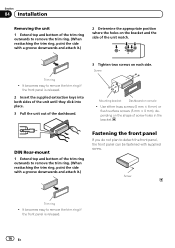
...Rear-mount 1 Extend top and bottom of the trim ring outwards to remove the trim ring. (When reattaching the trim ring, point the side with a groove downwards and attach it .) 2 Determine the appropriate position where the holes on the bracket and the side of the unit match. It becomes easy to detach the front panel...becomes easy to remove the trim ring. (When reattaching the trim ring, point the side with supplied screw. Screw Trim ring ! Section 04 Installation Removing the unit 1 Extend top and bottom of the trim ring outwards to remove the trim ring if the front panel is released. ...
...Rear-mount 1 Extend top and bottom of the trim ring outwards to remove the trim ring. (When reattaching the trim ring, point the side with a groove downwards and attach it .) 2 Determine the appropriate position where the holes on the bracket and the side of the unit match. It becomes easy to detach the front panel...becomes easy to remove the trim ring. (When reattaching the trim ring, point the side with supplied screw. Screw Trim ring ! Section 04 Installation Removing the unit 1 Extend top and bottom of the trim ring outwards to remove the trim ring if the front panel is released. ...
Owner's Manual
Page 17
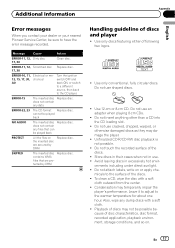
... player. ! ERROR-11, 12, Scratched disc Replace disc. 17, 30 ERROR-10, 11, Electrical or me12, 15, 17, 30, chanical A0 Turn the ignition switch OFF and back ON, or switch to a different source, then back to the warmer temperature for about one hour. Additional Information Appendix English Error messages When you contact your dealer or your nearest Pioneer Service Center, be played back PROTECT...
... player. ! ERROR-11, 12, Scratched disc Replace disc. 17, 30 ERROR-10, 11, Electrical or me12, 15, 17, 30, chanical A0 Turn the ignition switch OFF and back ON, or switch to a different source, then back to the warmer temperature for about one hour. Additional Information Appendix English Error messages When you contact your dealer or your nearest Pioneer Service Center, be played back PROTECT...
Owner's Manual
Page 18
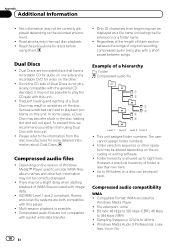
... numbers. Compatible format: WMA encoded by Windows Media Player ! File extension: .wma ! Sampling frequency: 32 kHz to 384 kbps (VBR) ! To prevent this, we recommend you refrain from the disc manufacturer for discs before using Dual Disc with this unit. ! Romeo and Joliet file systems are two-sided discs that have a recordable CD for audio on one side and a recordable DVD for video...
... numbers. Compatible format: WMA encoded by Windows Media Player ! File extension: .wma ! Sampling frequency: 32 kHz to 384 kbps (VBR) ! To prevent this, we recommend you refrain from the disc manufacturer for discs before using Dual Disc with this unit. ! Romeo and Joliet file systems are two-sided discs that have a recordable CD for audio on one side and a recordable DVD for video...

Owner's Manual
Page 19
MP3i (MP3 interactive), mp3 PRO: No WAV ! File extension: .wav ! Quantization bits: 8 and 16 (LPCM), 4 (MS ADPCM) ! Compatible ID3 tag version: 1.0, 1.1, 2.2, 2.3, 2.4 (ID3 tag Version 2.x is given priority than Version 1.x.) ! Sampling frequency: 16 kHz to 44.1 kHz (MS ADPCM) Appendix English En 19 Sampling frequency: 16 kHz to 48 kHz (LPCM), 22.05 kHz to 48 kHz (32, 44.1, 48 kHz for emphasis) ! Additional Information MP3 ! M3u playlist: No ! File extension: .mp3 ! Compatible format: Linear PCM (LPCM), MS ADPCM ! Bit rate: 8 kbps to 320 kbps !
MP3i (MP3 interactive), mp3 PRO: No WAV ! File extension: .wav ! Quantization bits: 8 and 16 (LPCM), 4 (MS ADPCM) ! Compatible ID3 tag version: 1.0, 1.1, 2.2, 2.3, 2.4 (ID3 tag Version 2.x is given priority than Version 1.x.) ! Sampling frequency: 16 kHz to 44.1 kHz (MS ADPCM) Appendix English En 19 Sampling frequency: 16 kHz to 48 kHz (LPCM), 22.05 kHz to 48 kHz (32, 44.1, 48 kHz for emphasis) ! Additional Information MP3 ! M3u playlist: No ! File extension: .mp3 ! Compatible format: Linear PCM (LPCM), MS ADPCM ! Bit rate: 8 kbps to 320 kbps !
Owner's Manual
Page 20
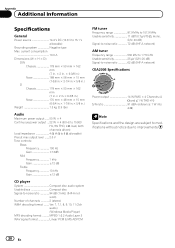
..., both channels driven) Load impedance 4 W (4 W to 8 W allowable) Preout max output level ....... 2.0 V Tone controls: Bass Frequency 100 Hz Gain 13dB Mid Frequency 1 kHz Gain 12 dB Treble Frequency 10 kHz Gain 12 dB CD player System Compact disc audio system Usable discs Compact disc Signal-to improvements. 20 En Appendix Additional Information Specifications General Power source 14.4 V DC (10.8 V to 15.1 V allowable) Grounding system Negative type Max. work) Number of channels 2 (stereo) WMA decoding...
..., both channels driven) Load impedance 4 W (4 W to 8 W allowable) Preout max output level ....... 2.0 V Tone controls: Bass Frequency 100 Hz Gain 13dB Mid Frequency 1 kHz Gain 12 dB Treble Frequency 10 kHz Gain 12 dB CD player System Compact disc audio system Usable discs Compact disc Signal-to improvements. 20 En Appendix Additional Information Specifications General Power source 14.4 V DC (10.8 V to 15.1 V allowable) Grounding system Negative type Max. work) Number of channels 2 (stereo) WMA decoding...
Owner's Manual
Page 62
...3588 9樓901-6 0852) 2848-6488 Published by Pioneer Corporation. PIONEER CORPORATION 4-1, MEGURO 1-CHOME, MEGURO-KU TOKYO 153-8654, JAPAN PIONEER ELECTRONICS (USA) INC. Box 1540, Long Beach, California 90801-1540, U.S.A. Copyright © 2008 by Pioneer Corporation. Tous droits réservés. LTD. ...253 Alexandra Road, #04-01, Singapore 159936 TEL: 65-6472-7555 PIONEER ELECTRONICS AUSTRALIA PTY. LTD. 178-184 Boundary Road, Braeside, Victoria 3195, Australia TEL: (03) 9586-6300 PIONEER ELECTRONICS OF CANADA, INC. 300 Allstate Parkway, Markham, Ontario L3R 0P2, Canada...
...3588 9樓901-6 0852) 2848-6488 Published by Pioneer Corporation. PIONEER CORPORATION 4-1, MEGURO 1-CHOME, MEGURO-KU TOKYO 153-8654, JAPAN PIONEER ELECTRONICS (USA) INC. Box 1540, Long Beach, California 90801-1540, U.S.A. Copyright © 2008 by Pioneer Corporation. Tous droits réservés. LTD. ...253 Alexandra Road, #04-01, Singapore 159936 TEL: 65-6472-7555 PIONEER ELECTRONICS AUSTRALIA PTY. LTD. 178-184 Boundary Road, Braeside, Victoria 3195, Australia TEL: (03) 9586-6300 PIONEER ELECTRONICS OF CANADA, INC. 300 Allstate Parkway, Markham, Ontario L3R 0P2, Canada...


