
Operating Instructions
Page 2
... power plug, please read before the appliance is connected to the antenna terminal, be moved with furniture wax, benzine, insecticides or other servicing, contact the nearest Pioneer authorized service center. or • The appliance has been exposed to provide some protection against them, paying particular attention to grounding electrodes, and requirements for a long period of important operating and maintenance (servicing) instructions in wire...
... power plug, please read before the appliance is connected to the antenna terminal, be moved with furniture wax, benzine, insecticides or other servicing, contact the nearest Pioneer authorized service center. or • The appliance has been exposed to provide some protection against them, paying particular attention to grounding electrodes, and requirements for a long period of important operating and maintenance (servicing) instructions in wire...

Operating Instructions
Page 4
...' components). When installing the unit in order to the signal ground line, permitting clean sound reproduction. LOCAL POWER OFF FUNCTION When not using the program function, you install the control amplifier above or below the power amplifier, place a partition between them. EQUIPPED WITH A FIXED-OUT TERMINAL FOR SURROUND PROCESSOR CONNECTION TWO-TRANSFORMER MULTI-SUPPLY The control power supply has its weight. FEATURES ABUNDANT AV INPUTS A total of five audio inputs, and five video inputs, with...
...' components). When installing the unit in order to the signal ground line, permitting clean sound reproduction. LOCAL POWER OFF FUNCTION When not using the program function, you install the control amplifier above or below the power amplifier, place a partition between them. EQUIPPED WITH A FIXED-OUT TERMINAL FOR SURROUND PROCESSOR CONNECTION TWO-TRANSFORMER MULTI-SUPPLY The control power supply has its weight. FEATURES ABUNDANT AV INPUTS A total of five audio inputs, and five video inputs, with...
Operating Instructions
Page 8
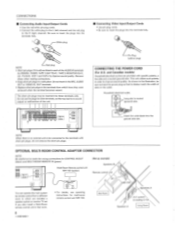
... Connecting Video Input/Output Cords • Use pin-plug cords. • Be sure to make the wrong connections for PHONO, TUNER, TAPE 1/DATPLAY, TAPE 2 MONITOR PLAY, LD, TV/AUX, VCR 1and VCR 2 to insert the power plug so that room. OPTIONAL MULTI-ROOM CONTROL ADAPTOR CONNECTION NOTE: Be carefulnot to insert the plugs into the terminals fully. Bed Room MR-100 Speakers A Speakers A A/V system (including C-72) Living Room 8 MULT-ROOM L REMOTE 0 N OUT • For details, see operating instructions...
... Connecting Video Input/Output Cords • Use pin-plug cords. • Be sure to make the wrong connections for PHONO, TUNER, TAPE 1/DATPLAY, TAPE 2 MONITOR PLAY, LD, TV/AUX, VCR 1and VCR 2 to insert the power plug so that room. OPTIONAL MULTI-ROOM CONTROL ADAPTOR CONNECTION NOTE: Be carefulnot to insert the plugs into the terminals fully. Bed Room MR-100 Speakers A Speakers A A/V system (including C-72) Living Room 8 MULT-ROOM L REMOTE 0 N OUT • For details, see operating instructions...
Operating Instructions
Page 9
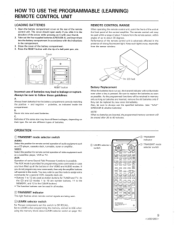
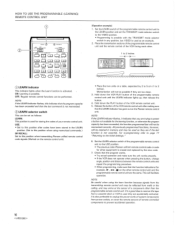
... of the control amplifier. Cover REMOTE CONTROL RANGE When operating the remote control unit, point the front of the unit at the front panel of a ball-point pen, etc. O 0 RESET button Incorrect use of video equipment such as possible. VIDEO: Select this position for TUNER and TV. (In the CD and LD modes 1 to SR RECALL. Be sure to follow these guidelines: A. As the programmed functions will be replaced by...
... of the control amplifier. Cover REMOTE CONTROL RANGE When operating the remote control unit, point the front of the unit at the front panel of a ball-point pen, etc. O 0 RESET button Incorrect use of video equipment such as possible. VIDEO: Select this position for TUNER and TV. (In the CD and LD modes 1 to SR RECALL. Be sure to follow these guidelines: A. As the programmed functions will be replaced by...
Operating Instructions
Page 10
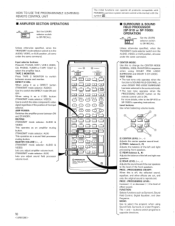
... ON/OFF button on the remote control unit is reproduced. Level buttons: Use when balancing volume levels. ® CENTER LEVEL ( + , -) Adjusts the center speaker sound level. balance (L, R) Adjusts the balance of the front speakers. PROC. (PROCESSING) ON/OFF: When this to change the CENTER MODE (NORMAL, WIDE, PHANTOM) in the AUDIO, VIDEO, or AUX position, all come under the same command. DIRECT/V.SEL: When using Sound Field, Surround, or a User Program. AMP POWER: Switches the amplifier power between source and monitor. DJ CO r71 C ED CI =I PIONEER 10 SURROUND & SOUND FIELD...
... ON/OFF button on the remote control unit is reproduced. Level buttons: Use when balancing volume levels. ® CENTER LEVEL ( + , -) Adjusts the center speaker sound level. balance (L, R) Adjusts the balance of the front speakers. PROC. (PROCESSING) ON/OFF: When this to change the CENTER MODE (NORMAL, WIDE, PHANTOM) in the AUDIO, VIDEO, or AUX position, all come under the same command. DIRECT/V.SEL: When using Sound Field, Surround, or a User Program. AMP POWER: Switches the amplifier power between source and monitor. DJ CO r71 C ED CI =I PIONEER 10 SURROUND & SOUND FIELD...
Operating Instructions
Page 12
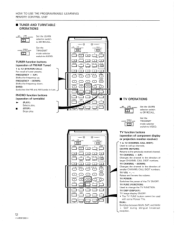
... volume. TV CHANNEL + (UP): Changes the channel in the direction of component display or projection monitor receiver) 1 to 12 (CHANNEL CALL DIGIT): Used to 12 (STATION CALL): For recall of the TV ON/OFF. TV FUNC (FUNCTION): Used to the previously received channel. USE RE CALL O O O LEARN DD Set the LEARN selector switch to AUDIO. VIDEO AUDIO O O O AUX ED Set the TRANSMIT mode selector switch to SR RECALL. FREQUENCY - (DOWN): Shifts the frequency down. PHONO function buttons (operation of smaller CHANNEL CALL DIGIT numbers. EU AUOIO AUX...
... volume. TV CHANNEL + (UP): Changes the channel in the direction of component display or projection monitor receiver) 1 to 12 (CHANNEL CALL DIGIT): Used to 12 (STATION CALL): For recall of the TV ON/OFF. TV FUNC (FUNCTION): Used to the previously received channel. USE RE CALL O O O LEARN DD Set the LEARN selector switch to AUDIO. VIDEO AUDIO O O O AUX ED Set the TRANSMIT mode selector switch to SR RECALL. FREQUENCY - (DOWN): Shifts the frequency down. PHONO function buttons (operation of smaller CHANNEL CALL DIGIT numbers. EU AUOIO AUX...
Operating Instructions
Page 13
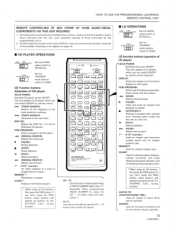
...-o- (MANUAL SEARCH): Selects fast forward. 1* - 0/10* (numeric): For direct selection of a track or programming of CD player) CD/LD POWER: Switches CD player power ON/OFF. DISC SEL: Selects the DISC No. (1 to AUDIO. CD Function buttons (Operation of tracks. HOW TO USE THE PROGRAMMABLE (LEARNING) REMOTE CONTROL UNIT REMOTE CONTROLLING OF ANY OTHER OF YOUR AUDIO-VISUAL COMPONENTS VIA THIS UNIT REQUIRES: 1. ED VIDEO AUDIO 0 0 0 AUX ED Set the TRANSMIT mode selector switch to 6) for the STATION CALL tuning function. PGM (PROGRAM): Press...
...-o- (MANUAL SEARCH): Selects fast forward. 1* - 0/10* (numeric): For direct selection of a track or programming of CD player) CD/LD POWER: Switches CD player power ON/OFF. DISC SEL: Selects the DISC No. (1 to AUDIO. CD Function buttons (Operation of tracks. HOW TO USE THE PROGRAMMABLE (LEARNING) REMOTE CONTROL UNIT REMOTE CONTROLLING OF ANY OTHER OF YOUR AUDIO-VISUAL COMPONENTS VIA THIS UNIT REQUIRES: 1. ED VIDEO AUDIO 0 0 0 AUX ED Set the TRANSMIT mode selector switch to 6) for the STATION CALL tuning function. PGM (PROGRAM): Press...
Operating Instructions
Page 14
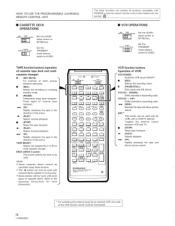
... (PAUSE/STILL): Sets pause and still picture. Toggles the antenna output between selections. • (REC): Selects the recording or recording standby mode. "AI (PLAY): Selects reverse playback. • (STOP): Stops the tape transport. ► (PLAY): Selects forward playback. (FF): Rapidly advances the tape in the direction of cassette tape deck and multi- NOTE: • Some cassette decks cannot be controlled using these buttons. • The "II button can be used only for an...
... (PAUSE/STILL): Sets pause and still picture. Toggles the antenna output between selections. • (REC): Selects the recording or recording standby mode. "AI (PLAY): Selects reverse playback. • (STOP): Stops the tape transport. ► (PLAY): Selects forward playback. (FF): Rapidly advances the tape in the direction of cassette tape deck and multi- NOTE: • Some cassette decks cannot be controlled using these buttons. • The "II button can be used only for an...
Operating Instructions
Page 15
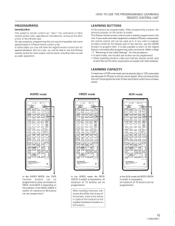
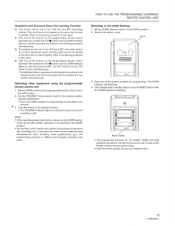
... I ) i='i o = l..,) -:::: ' I , - ..„ Q..1 -.,,,,, o PIONEER In the AUDIO MODE, the TAPE function buttons can be programmed to program functions which have not been preset. The Pioneer unified remote control code is already programmed in the names or codes of the functions on the supplied templates and place on the button is inoperative. (A maximum of 72 buttons can be used as audio equipment. PROGRAMMING Introduction This system's remote control can be programmed.) When teaching functions with names that the remote control units of...
... I ) i='i o = l..,) -:::: ' I , - ..„ Q..1 -.,,,,, o PIONEER In the AUDIO MODE, the TAPE function buttons can be programmed to program functions which have not been preset. The Pioneer unified remote control code is already programmed in the names or codes of the functions on the supplied templates and place on the button is inoperative. (A maximum of 72 buttons can be used as audio equipment. PROGRAMMING Introduction This system's remote control can be programmed.) When teaching functions with names that the remote control units of...
Operating Instructions
Page 16
... functions, however, will facilitate operation. This will be set the TRANSMIT mode selector switch to the LEARN position and set as follows: LEARN: This position is used as an example. 2. Hold down the PLAY button of the programmable remote control unit until the LEARN indicator lights up, then release the button. 4. NOTE: If the LEARNindicator flashes, this position when transmitting Pioneer unified remote control code signals (Marked on the remote control...
... functions, however, will facilitate operation. This will be set the TRANSMIT mode selector switch to the LEARN position and set as follows: LEARN: This position is used as an example. 2. Hold down the PLAY button of the programmable remote control unit until the LEARN indicator lights up, then release the button. 4. NOTE: If the LEARNindicator flashes, this position when transmitting Pioneer unified remote control code signals (Marked on the remote control...
Operating Instructions
Page 17
... LEARN indicator lights up, and then press the REC and PLAY buttons on the programmable remote control depressed (for programming as described in the LEARN position. • For functions which require two buttons to be pressed at the same time to the Pioneer uniform remote control codes. • Press the button gently; A: Hold one of the buttons available for the AUDIO, VIDEO and AUX positions are programmed by pressing...
... LEARN indicator lights up, and then press the REC and PLAY buttons on the programmable remote control depressed (for programming as described in the LEARN position. • For functions which require two buttons to be pressed at the same time to the Pioneer uniform remote control codes. • Press the button gently; A: Hold one of the buttons available for the AUDIO, VIDEO and AUX positions are programmed by pressing...

Operating Instructions
Page 18
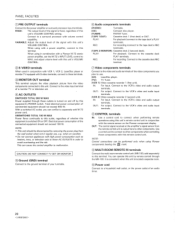
... broadcasts with a tuner. [PHONO]: For turntable. [CD]: For compact disc player. • The TAPE 2 MONITOR button go ON or OFF alternately each time they are pressed, independently of an audio component) from the select component will be at its maximum. ©VIDEO INPUT terminals Video components such as a video camera can be output from the OUTPUT terminals. S-VIDEO: Connect to the video component's S-VIDEO OUT terminal. 0 REC SELECTOR button/indicators Use to adjust the sound volume. When set to the video component's audio output terminals.
... broadcasts with a tuner. [PHONO]: For turntable. [CD]: For compact disc player. • The TAPE 2 MONITOR button go ON or OFF alternately each time they are pressed, independently of an audio component) from the select component will be at its maximum. ©VIDEO INPUT terminals Video components such as a video camera can be output from the OUTPUT terminals. S-VIDEO: Connect to the video component's S-VIDEO OUT terminal. 0 REC SELECTOR button/indicators Use to adjust the sound volume. When set to the video component's audio output terminals.

Operating Instructions
Page 19
... the audio signal without routing it through subsonic, tone control (BASS, TREBLE), or balance control circuitry. when rotated to the left , low-frequency sounds are attenuated. 13 BALANCE control Normally leave in the ONposition, the TAPE 2 MONITOR button and SUBSONIC button do not operate. °Tone controls [BASS]: Use to the audio component playback. Press the button again to turn the muting function off and return the sound volume to adjust the balance of cartridge used on when the MUTING indicator lights. NOTE...
... the audio signal without routing it through subsonic, tone control (BASS, TREBLE), or balance control circuitry. when rotated to the left , low-frequency sounds are attenuated. 13 BALANCE control Normally leave in the ONposition, the TAPE 2 MONITOR button and SUBSONIC button do not operate. °Tone controls [BASS]: Use to the audio component playback. Press the button again to turn the muting function off and return the sound volume to adjust the balance of cartridge used on when the MUTING indicator lights. NOTE...
Operating Instructions
Page 20
... is turned on the Pioneer component display. This can connect a separately sold separately) to this outlet, regardless of whether this equipment is fixed, regardless of the connected equipment should not exceed 900 W. Audio components terminals [PHONO]: Turntable. [CD]: [TUNER]: Compact disc player. Connect to malfunction. NOTE: Control connections can operate this terminal. sold M-72 power cord. PANEL FACILITIES 0 PRE OUTPUT terminals Connect to the VCR's video and audio output terminals. Electrical power consumption of this unit's VOLUME CONTROL setting. NOTE...
... is turned on the Pioneer component display. This can connect a separately sold separately) to this outlet, regardless of whether this equipment is fixed, regardless of the connected equipment should not exceed 900 W. Audio components terminals [PHONO]: Turntable. [CD]: [TUNER]: Compact disc player. Connect to malfunction. NOTE: Control connections can operate this terminal. sold M-72 power cord. PANEL FACILITIES 0 PRE OUTPUT terminals Connect to the VCR's video and audio output terminals. Electrical power consumption of this unit's VOLUME CONTROL setting. NOTE...

Operating Instructions
Page 21
... PLAY BACK A CONNECTED COMPONENT 1. Press [TAPE 2 MONITOR]. Press [LD]. ■ To use the TV tuner. Press [CD]. ■ To listen to the type of cartridge used . NOTE: When the inputselectoris switched to PHONO from the C-72. NOTE: When playing back components other than cassette deck 2, set it to your power amplifier. NOTE: Muting operates for that the indicator above the button light. ■ For LaserDisc playback. Adjust the sound volume with the VOLUME CONTROL. 21 Turn...
... PLAY BACK A CONNECTED COMPONENT 1. Press [TAPE 2 MONITOR]. Press [LD]. ■ To use the TV tuner. Press [CD]. ■ To listen to the type of cartridge used . NOTE: When the inputselectoris switched to PHONO from the C-72. NOTE: When playing back components other than cassette deck 2, set it to your power amplifier. NOTE: Muting operates for that the indicator above the button light. ■ For LaserDisc playback. Adjust the sound volume with the VOLUME CONTROL. 21 Turn...

Operating Instructions
Page 22
... to section on TAPE 1/DAT. Start play on TAPE 1/DAT if you select a SOURCE with the input selector buttons. • Refer to deck's operating instructions. • Adjust amplifier volume and tone if you switch the input selector to PHONO, muting is applied for approximately 8 seconds to TAPE 1/DATREC, TAPE 2 MONITOR REC, VCR 1 OUTand VCR 2 OUT. • With the REC SELECTOR set to SOURCE, and the input selector set to PHONO, when the DIRECT button is turned ON/OFF...
... to section on TAPE 1/DAT. Start play on TAPE 1/DAT if you select a SOURCE with the input selector buttons. • Refer to deck's operating instructions. • Adjust amplifier volume and tone if you switch the input selector to PHONO, muting is applied for approximately 8 seconds to TAPE 1/DATREC, TAPE 2 MONITOR REC, VCR 1 OUTand VCR 2 OUT. • With the REC SELECTOR set to SOURCE, and the input selector set to PHONO, when the DIRECT button is turned ON/OFF...

Operating Instructions
Page 23
... at the time of o NOTE: Whenever using this depends on the component selected with the tape you want to VCR's operating instructions. 5. OPERATIONS 1 (Basic Operation) 0*CD* Jl I 0 0 0 u 6 °Ei 6 a a a 1 1. Press the REC SELECTOR button, and select a recording source. • The indicator under the input selector buttons lights to show the component selected with the input selector buttons. red yellow of switching (this button, set your VCR to the pause mode. Select a source with the Video input selector buttons. Start...
... at the time of o NOTE: Whenever using this depends on the component selected with the tape you want to VCR's operating instructions. 5. OPERATIONS 1 (Basic Operation) 0*CD* Jl I 0 0 0 u 6 °Ei 6 a a a 1 1. Press the REC SELECTOR button, and select a recording source. • The indicator under the input selector buttons lights to show the component selected with the input selector buttons. red yellow of switching (this button, set your VCR to the pause mode. Select a source with the Video input selector buttons. Start...
Operating Instructions
Page 25
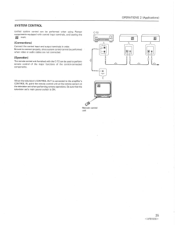
... video or audio cables are not connected. [Operation] The remote control unit furnished with the C-72 can be used to perform remote control of the major functions of the control-connected components. C-72 TT OPERATIONS 2 (Applications) T When the television's CONTROL OUT is connected to the amplifier's • CONTROL IN, point the remote control unit at the remote sensor on the television set 's main power switch is ON. Be sure that the television set when performing remote operations. SYSTEM CONTROL Unified system control...
... video or audio cables are not connected. [Operation] The remote control unit furnished with the C-72 can be used to perform remote control of the major functions of the control-connected components. C-72 TT OPERATIONS 2 (Applications) T When the television's CONTROL OUT is connected to the amplifier's • CONTROL IN, point the remote control unit at the remote sensor on the television set 's main power switch is ON. Be sure that the television set when performing remote operations. SYSTEM CONTROL Unified system control...

Operating Instructions
Page 26
...; Input selector or video signal selector is set to the center position. 26 TROUBLESHOOTING Incorrect operations are being operated incorrectly. • Consult the operating instructions for the cassette deck used . the playback component. If you think that there is disconnected from terminals, or connected incorrectly. • Turn on the power to carry out repair work. Sometimes the trouble may lie in another component, the power is turned OFF to the other components. • Connection cords...
...; Input selector or video signal selector is set to the center position. 26 TROUBLESHOOTING Incorrect operations are being operated incorrectly. • Consult the operating instructions for the cassette deck used . the playback component. If you think that there is disconnected from terminals, or connected incorrectly. • Turn on the power to carry out repair work. Sometimes the trouble may lie in another component, the power is turned OFF to the other components. • Connection cords...
Operating Instructions
Page 28
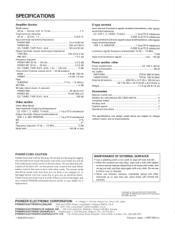
..., TUNER, TAPE PLAY, AUX 150 mV/50 Output terminals (output level/output impedance) TAPE REC 150 mV/2.2 kg PRE OUT 1 V/1 kg Frequency response PHONO MM 20 Hz - 20 kHz ±0.2 dB PHONO MC 20 Hz - 20 kHz ±0.3 dB CD, TUNER, TAPE PLAY, AUX, 1 Hz - 150 kHz ±3 dB Tone control (Volume control set at - 40 dB position) BASS + 8 dB, 100 Hz TREBLE ±8 dB, 10 kHz Filter SUBSONIC 17 Hz, - 12 dB/oct MUTING - PIONEER...
..., TUNER, TAPE PLAY, AUX 150 mV/50 Output terminals (output level/output impedance) TAPE REC 150 mV/2.2 kg PRE OUT 1 V/1 kg Frequency response PHONO MM 20 Hz - 20 kHz ±0.2 dB PHONO MC 20 Hz - 20 kHz ±0.3 dB CD, TUNER, TAPE PLAY, AUX, 1 Hz - 150 kHz ±3 dB Tone control (Volume control set at - 40 dB position) BASS + 8 dB, 100 Hz TREBLE ±8 dB, 10 kHz Filter SUBSONIC 17 Hz, - 12 dB/oct MUTING - PIONEER...


