Owner's Manual
Page 5
... 97 Setting for rear view camera (back up camera) 97 Setting the clock 98 Selecting video on rear display 98 DVD Setup Introduction of DVD setup adjustments 99 Setting the subtitle language 99 Setting the audio language 100 Setting the menu language 100 Switching the assist ...background display 108 Adjusting the response positions of the touch panels (Touch Panel Calibration) 109 Displaying the AVG-VDP1 (Pioneer Vehicle Dynamics Processor) 109 Using the AUX source 110 Using the external unit 111 Setting remote control code type 111 Using the preprogrammed function 112 Additional Information ...
... 97 Setting for rear view camera (back up camera) 97 Setting the clock 98 Selecting video on rear display 98 DVD Setup Introduction of DVD setup adjustments 99 Setting the subtitle language 99 Setting the audio language 100 Setting the menu language 100 Switching the assist ...background display 108 Adjusting the response positions of the touch panels (Touch Panel Calibration) 109 Displaying the AVG-VDP1 (Pioneer Vehicle Dynamics Processor) 109 Using the AUX source 110 Using the external unit 111 Setting remote control code type 111 Using the preprogrammed function 112 Additional Information ...
Owner's Manual
Page 21
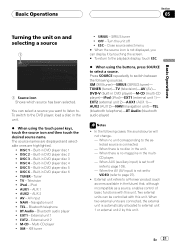
...103). - External unit refers to select a source. To switch to the DVD player, load a disc in the unit. % When using the buttons, press SOURCE to a Pioneer product (such as ones available in the multiCD player. - Built-in DVD player)-M-CD (multi-CD player)-iPod (iPod)-EXT1 (external unit 1)- AUX1... display, touch ESC. % When using the touch panel keys, touch the source icon and then touch the desired source name. DVD-V (built-in DVD player disc 5 ! When AUX (auxiliary input) is not displayed, you want to listen to external unit 1 or external unit 2 by touching the screen. ...
...103). - External unit refers to select a source. To switch to the DVD player, load a disc in the unit. % When using the buttons, press SOURCE to a Pioneer product (such as ones available in the multiCD player. - Built-in DVD player)-M-CD (multi-CD player)-iPod (iPod)-EXT1 (external unit 1)- AUX1... display, touch ESC. % When using the touch panel keys, touch the source icon and then touch the desired source name. DVD-V (built-in DVD player disc 5 ! When AUX (auxiliary input) is not displayed, you want to listen to external unit 1 or external unit 2 by touching the screen. ...

Owner's Manual
Page 83
... field. ! ACTOR'S STAGE (actor's stage) ! External unit 1 and external unit 2 are output from the front or rear speakers, turn on the HPF (high pass filter). AUX (auxiliary input) and AV (AV input) are set to the same source level adjustment volume automatically. ! Video CD, CD and compressed audio are set to...
... field. ! ACTOR'S STAGE (actor's stage) ! External unit 1 and external unit 2 are output from the front or rear speakers, turn on the HPF (high pass filter). AUX (auxiliary input) and AV (AV input) are set to the same source level adjustment volume automatically. ! Video CD, CD and compressed audio are set to...

Owner's Manual
Page 87
...two-channel sources to select Lt/Rt. ! External unit 1 and external unit 2 are set to the same source level adjustment volume automatically. AUX (auxiliary input) and AV (AV input) are set to the same source level adjustment volume automatically. ! Using the dynamic range control The ...dynamic range refers to select Lo/Ro. When playing other than the DVD disc, you can be restored (decoded). Using the Dolby Pro Logic II Only when the multi-channel processor (e.g., DEQ-P8000) is ...
...two-channel sources to select Lt/Rt. ! External unit 1 and external unit 2 are set to the same source level adjustment volume automatically. AUX (auxiliary input) and AV (AV input) are set to the same source level adjustment volume automatically. ! Using the dynamic range control The ...dynamic range refers to select Lo/Ro. When playing other than the DVD disc, you can be restored (decoded). Using the Dolby Pro Logic II Only when the multi-channel processor (e.g., DEQ-P8000) is ...

Owner's Manual
Page 103
Set each AUX source to ON when using an auxiliary amp. When the multi-channel processor (e.g., DEQ-P8000) is not displayed, you cannot operate this function. 1 Touch REAR ... This unit's rear output (rear speaker leads output) can be activated individually. For more information about connecting or using auxiliary devices, refer to Using the AUX source on page 110. % Touch AUX1/AUX2 on the initial menu to turn this unit off , touch AUX1/ AUX2 again. 2 Using the initial settings, you...
Set each AUX source to ON when using an auxiliary amp. When the multi-channel processor (e.g., DEQ-P8000) is not displayed, you cannot operate this function. 1 Touch REAR ... This unit's rear output (rear speaker leads output) can be activated individually. For more information about connecting or using auxiliary devices, refer to Using the AUX source on page 110. % Touch AUX1/AUX2 on the initial menu to turn this unit off , touch AUX1/ AUX2 again. 2 Using the initial settings, you...

Owner's Manual
Page 110
...'s manual. # You can only make this type of the alphabet. For more details, refer to the installation manual. Setting the AUX title The title displayed for the AUX source can be changed. 1 After you touch b it will display alphabet, numbers or symbols in memory. 6 Touch ESC to ... ABC to select the desired character type. About AUX connection method You have selected AUX as the CD-RB20/CD-RB10 (sold separetely) to connect this unit. Selecting AUX as the source % Touch the source icon and then touch AUX to select AUX as AUX source and assigned to this unit. When connected,...
...'s manual. # You can only make this type of the alphabet. For more details, refer to the installation manual. Setting the AUX title The title displayed for the AUX source can be changed. 1 After you touch b it will display alphabet, numbers or symbols in memory. 6 Touch ESC to ... ABC to select the desired character type. About AUX connection method You have selected AUX as the CD-RB20/CD-RB10 (sold separetely) to connect this unit. Selecting AUX as the source % Touch the source icon and then touch AUX to select AUX as AUX source and assigned to this unit. When connected,...

Other Manual
Page 2
... PARKING BRAKE SWITCH. Connecting the Units Connecting the power cord IP-BUS input (Blue) 16 cm (6-1/4 in.) Violet/white Refer to Fig. 4. 20 cm (7-7/8 in.) AUX input jack 15 cm Antenna cable (5-7/8 in .) Blue/white To system control terminal of equipment. DEQ-P8000) to this lead to the Audio Mute lead...
... PARKING BRAKE SWITCH. Connecting the Units Connecting the power cord IP-BUS input (Blue) 16 cm (6-1/4 in.) Violet/white Refer to Fig. 4. 20 cm (7-7/8 in.) AUX input jack 15 cm Antenna cable (5-7/8 in .) Blue/white To system control terminal of equipment. DEQ-P8000) to this lead to the Audio Mute lead...


