
Owner's Manual
Page 2
... 15 Using iPod 15 Using the AVG-VDP1 (Pioneer Vehicle Dynamics Processor) 15 Using the rear display 15 Using Bluetooth wireless technology 16 What's What Head unit 17 Remote control 18 Basic Operations Turning the unit on and selecting a source 21 Loading/Ejecting discs 22 Adjusting the flap angle 23 Adjusting the volume 23 Turning the unit off 23 Touch panel key basic operation 24 Tuner Listening to another title 30 Stopping playback 30 Pausing DVD video playback...
... 15 Using iPod 15 Using the AVG-VDP1 (Pioneer Vehicle Dynamics Processor) 15 Using the rear display 15 Using Bluetooth wireless technology 16 What's What Head unit 17 Remote control 18 Basic Operations Turning the unit on and selecting a source 21 Loading/Ejecting discs 22 Adjusting the flap angle 23 Adjusting the volume 23 Turning the unit off 23 Touch panel key basic operation 24 Tuner Listening to another title 30 Stopping playback 30 Pausing DVD video playback...

Owner's Manual
Page 4
... Using preset numbers 78 Making a call by entering phone number 78 Clearing memory 79 Setting automatic answering 79 Setting automatic rejecting 79 Switching the ring tone 79 Echo canceling and noise reduction 79 Displaying BD (Bluetooth Device) address 79 Audio Adjustments Introduction of audio adjustments 80 Using balance adjustment 80 Using the equalizer 81 Adjusting loudness 82 Using subwoofer output 82 Using nonfading output 82 Using the high pass filter 83 Adjusting source levels 83 Staging for car environment 83 Digital Signal...
... Using preset numbers 78 Making a call by entering phone number 78 Clearing memory 79 Setting automatic answering 79 Setting automatic rejecting 79 Switching the ring tone 79 Echo canceling and noise reduction 79 Displaying BD (Bluetooth Device) address 79 Audio Adjustments Introduction of audio adjustments 80 Using balance adjustment 80 Using the equalizer 81 Adjusting loudness 82 Using subwoofer output 82 Using nonfading output 82 Using the high pass filter 83 Adjusting source levels 83 Staging for car environment 83 Digital Signal...
Owner's Manual
Page 5
... distorted sound 105 Changing languages for CAUTION 105 Resetting the audio functions 105 Entering PIN code for Bluetooth wireless connection 105 Extending the vehicle's antenna 106 Other Functions Adjusting the screen 107 Selecting the background display 108 Adjusting the response positions of the touch panels (Touch Panel Calibration) 109 Displaying the AVG-VDP1 (Pioneer Vehicle Dynamics Processor) 109 Using the AUX source 110 Using the external unit 111 Setting remote control code type 111 Using the preprogrammed function 112 Additional Information Troubleshooting 113 Error messages 115...
... distorted sound 105 Changing languages for CAUTION 105 Resetting the audio functions 105 Entering PIN code for Bluetooth wireless connection 105 Extending the vehicle's antenna 106 Other Functions Adjusting the screen 107 Selecting the background display 108 Adjusting the response positions of the touch panels (Touch Panel Calibration) 109 Displaying the AVG-VDP1 (Pioneer Vehicle Dynamics Processor) 109 Using the AUX source 110 Using the external unit 111 Setting remote control code type 111 Using the preprogrammed function 112 Additional Information Troubleshooting 113 Error messages 115...

Owner's Manual
Page 12
... Pioneer service station regarding the satellite radio tuner that the Satellite Radio Tuner for Pioneer (i.e., XM tuner and Sirius satellite tuner which are sold separately) can use direct satellite-to-receiver broadcasting technology to Changing the wide screen mode on page 107. "SAT Radio", the SAT Radio logo and all related marks are playing. Extended exposure to the video image you can be controlled by the appearance of spots, colored stripes, etc. Changing the wide screen...
... Pioneer service station regarding the satellite radio tuner that the Satellite Radio Tuner for Pioneer (i.e., XM tuner and Sirius satellite tuner which are sold separately) can use direct satellite-to-receiver broadcasting technology to Changing the wide screen mode on page 107. "SAT Radio", the SAT Radio logo and all related marks are playing. Extended exposure to the video image you can be controlled by the appearance of spots, colored stripes, etc. Changing the wide screen...

Owner's Manual
Page 13
... display 1 Turn the ignition switch OFF. When using this is selected, correct operation may be possible even if you are watching a DVD and attempt to its initial (factory) settings, switch your engine ON or set to ACC ON before pressing RESET. To cancel the feature demo, press and hold ENTERTAINMENT (ENT) again. If the unit fails to using with AVG-VDP1, if you press RESET, be connected...
... display 1 Turn the ignition switch OFF. When using this is selected, correct operation may be possible even if you are watching a DVD and attempt to its initial (factory) settings, switch your engine ON or set to ACC ON before pressing RESET. To cancel the feature demo, press and hold ENTERTAINMENT (ENT) again. If the unit fails to using with AVG-VDP1, if you press RESET, be connected...
Owner's Manual
Page 21
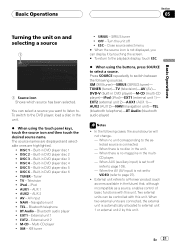
... external unit is set to VIDEO (refer to external unit 1 or external unit 2 by touching the screen. # To return to the playback display, touch ESC. % When using the touch panel keys, touch the source icon and then touch the desired source name. Built-in DVD player disc 3 ! Built-in DVD player disc 2 ! DISC 4 - Tuner ! iPod - TEL - M-CD - OFF - Turn the unit off (refer to a Pioneer product (such as ones available in the future) that, although incompatible as a source, enables control of basic functions...
... external unit is set to VIDEO (refer to external unit 1 or external unit 2 by touching the screen. # To return to the playback display, touch ESC. % When using the touch panel keys, touch the source icon and then touch the desired source name. Built-in DVD player disc 3 ! Built-in DVD player disc 2 ! DISC 4 - Tuner ! iPod - TEL - M-CD - OFF - Turn the unit off (refer to a Pioneer product (such as ones available in the future) that, although incompatible as a source, enables control of basic functions...

Owner's Manual
Page 22
... holder. NO DISC is displayed for damage before inserting it again. ! When this unit's source is up. For details concerning about ejecting a disc, refer to eject the disc, and check the disc for an empty holder. 2 Touch LOAD next to the vehicle's auto-antenna relay control terminal, the vehicle's antenna extends when this unit's blue/white lead is connected to the holder you insert a disc the disc does not play, check...
... holder. NO DISC is displayed for damage before inserting it again. ! When this unit's source is up. For details concerning about ejecting a disc, refer to eject the disc, and check the disc for an empty holder. 2 Touch LOAD next to the vehicle's auto-antenna relay control terminal, the vehicle's antenna extends when this unit's blue/white lead is connected to the holder you insert a disc the disc does not play, check...

Owner's Manual
Page 33
... languages using DVD SETUP. With some DVDs, switching between languages/audio systems using DVD SETUP. Touching SUB TITLE during fast forward/fast reverse, pause or slow motion playback returns you to Setting the angle icon display on a DVD's package indicates it features multi-angle scenes. Turn angle icon display on or off using SUB TITLE on the remote control. ! En 33 You can also switch between subtitle languages may only be possible using a menu display...
... languages using DVD SETUP. With some DVDs, switching between languages/audio systems using DVD SETUP. Touching SUB TITLE during fast forward/fast reverse, pause or slow motion playback returns you to Setting the angle icon display on a DVD's package indicates it features multi-angle scenes. Turn angle icon display on or off using SUB TITLE on the remote control. ! En 33 You can also switch between subtitle languages may only be possible using a menu display...

Owner's Manual
Page 69
... unit. MENU appears on the display. # You can also display MENU by pressing and holding c or d button on the unit or holding the joystick on the remote control. 2 Touch FUNCTION to the playback display, touch ESC. The function names are displayed and operable ones are highlighted. # To return to the previous display, touch BACK. # To return to display the function names. Playing songs on page 105. Touching o once skips to turn the connection open on the player...
... unit. MENU appears on the display. # You can also display MENU by pressing and holding c or d button on the unit or holding the joystick on the remote control. 2 Touch FUNCTION to the playback display, touch ESC. The function names are displayed and operable ones are highlighted. # To return to the previous display, touch BACK. # To return to display the function names. Playing songs on page 105. Touching o once skips to turn the connection open on the player...

Owner's Manual
Page 85
... FM as the source, you cannot switch to SLA. # When playing other than 96 kHz sampling frequency, you automatically adjust the speaker output levels and inserts a delay time to this unit to control multi-channel processor (e.g. Using the position selector One way to assure a more than the DVD disc, you can use audio functions. MENU appears on the multi-channel processor connected to match the number and position of...
... FM as the source, you cannot switch to SLA. # When playing other than 96 kHz sampling frequency, you automatically adjust the speaker output levels and inserts a delay time to this unit to control multi-channel processor (e.g. Using the position selector One way to assure a more than the DVD disc, you can use audio functions. MENU appears on the multi-channel processor connected to match the number and position of...

Owner's Manual
Page 89
... When playing a 2-channel mono source with Pro Logic turned on, there may indicate that the subwoofer's output and bass content you touch c or d selects the speaker in the following order: Speaker FRONT CENTER REAR SUB WOOFER PHASE Setting SMALL-LARGE OFF-SMALL-LARGE OFF-SMALL-LARGE ON-OFF REVERSE-NORMAL FRONT (front speakers)-CENTER (center speaker)-REAR (rear speakers)- Digital Signal Processor Section 19 Digital Signal Processor 1 Touch SPEAKER SETTING on the DSP function menu. 2 Touch...
... When playing a 2-channel mono source with Pro Logic turned on, there may indicate that the subwoofer's output and bass content you touch c or d selects the speaker in the following order: Speaker FRONT CENTER REAR SUB WOOFER PHASE Setting SMALL-LARGE OFF-SMALL-LARGE OFF-SMALL-LARGE ON-OFF REVERSE-NORMAL FRONT (front speakers)-CENTER (center speaker)-REAR (rear speakers)- Digital Signal Processor Section 19 Digital Signal Processor 1 Touch SPEAKER SETTING on the DSP function menu. 2 Touch...

Owner's Manual
Page 95
... this unit is connected to ON or ACC. Auto TA and EQ changes the audio settings as possible, with an LPF, turn it off . Carrying out auto TA and EQ 1 Stop the car in the center of the headrest of the LPF on active subwoofers or external amps. ! If the car's air conditioner or heater is connected to the influence of the driver's seat, facing forward, using...
... this unit is connected to ON or ACC. Auto TA and EQ changes the audio settings as possible, with an LPF, turn it off . Carrying out auto TA and EQ 1 Stop the car in the center of the headrest of the LPF on active subwoofers or external amps. ! If the car's air conditioner or heater is connected to the influence of the driver's seat, facing forward, using...

Owner's Manual
Page 97
... - Setting for rear view camera (back up the rear view camera set up camera) CAUTION Pioneer recommends the use of each source, touch ESC. En 97 Switch the AV input setting depending on your dealer.) ! VIDEO - EXT-V - When the gear shift is automatically returned to watch video of a connected video unit as portable video player) ! MENU appears on the display. ! The setup function names are displayed and operable ones are driving forward, change the rear view camera setting. ! Note If you set - Setting the AV input You can also display MENU by error...
... - Setting for rear view camera (back up the rear view camera set up camera) CAUTION Pioneer recommends the use of each source, touch ESC. En 97 Switch the AV input setting depending on your dealer.) ! VIDEO - EXT-V - When the gear shift is automatically returned to watch video of a connected video unit as portable video player) ! MENU appears on the display. ! The setup function names are displayed and operable ones are driving forward, change the rear view camera setting. ! Note If you set - Setting the AV input You can also display MENU by error...
Owner's Manual
Page 98
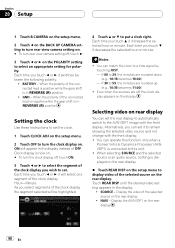
... AVG-VDP1 on the display. Section 20 Setup 1 Touch B.CAMERA on the setup menu. 2 Touch c on the BACK UP CAMERA setting to turn rear view camera setting on. # To turn rear view camera setting off, touch d. 3 Touch c or d on the POLARITY setting to set. Selecting video on the setup menu to the AVG-VDP1 image with the front display. ! When selecting SOURCE and the selected source is an audio source, nothing is in REVERSE (R) position Setting the clock Use these instructions to set it increases the selected hour...
... AVG-VDP1 on the display. Section 20 Setup 1 Touch B.CAMERA on the setup menu. 2 Touch c on the BACK UP CAMERA setting to turn rear view camera setting on. # To turn rear view camera setting off, touch d. 3 Touch c or d on the POLARITY setting to set. Selecting video on the setup menu to the AVG-VDP1 image with the front display. ! When selecting SOURCE and the selected source is an audio source, nothing is in REVERSE (R) position Setting the clock Use these instructions to set it increases the selected hour...

Owner's Manual
Page 101
... the DVD visual menu. 2 Touch any of the screen ! LEVEL 7 to restrict children from viewing violent and adult-oriented scenes. Parental lock of this case, playback will begin when the correct code number is possible Notes ! Setting the parental lock Some DVD video discs let you select PANSCAN setting. Playback of your desired level. ! The parental lock level is possible ! A wide screen display has a width-to the disc's instructions...
... the DVD visual menu. 2 Touch any of the screen ! LEVEL 7 to restrict children from viewing violent and adult-oriented scenes. Parental lock of this case, playback will begin when the correct code number is possible Notes ! Setting the parental lock Some DVD video discs let you select PANSCAN setting. Playback of your desired level. ! The parental lock level is possible ! A wide screen display has a width-to the disc's instructions...

Owner's Manual
Page 105
... LOW. CD-BTB200) is outputted). Initial Setup Section 22 Initial Setup % Touch NAVI MIX on the initial menu to switch the mixing of your desired language. Setting an equalizer level high can only operate this unit are reset. # To cancel resetting the audio functions, touch CANCEL. Reset completed is switched. PIN code input display appears. 2 Touch 0 to 9 to enter the Bluetooth audio player PIN code in this unit, you touch CAUTION, the language for CAUTION is displayed and the audio settings are prohibited while driving...
... LOW. CD-BTB200) is outputted). Initial Setup Section 22 Initial Setup % Touch NAVI MIX on the initial menu to switch the mixing of your desired language. Setting an equalizer level high can only operate this unit are reset. # To cancel resetting the audio functions, touch CANCEL. Reset completed is switched. PIN code input display appears. 2 Touch 0 to 9 to enter the Bluetooth audio player PIN code in this unit, you touch CAUTION, the language for CAUTION is displayed and the audio settings are prohibited while driving...

Owner's Manual
Page 124
... of a conventional disc. Parental lock Some DVD video discs with search functions. Playback control (PBC) This is done with higher sampling frequency and bit rate than 2 sessions on one camera at a time are recorded with files on a single disc, letting you choose as desired. Using menu displays provided by Video CDs with PBC lets you set by a working group (MPEG) of simple interactive software and software with violent or...
... of a conventional disc. Parental lock Some DVD video discs with search functions. Playback control (PBC) This is done with higher sampling frequency and bit rate than 2 sessions on one camera at a time are recorded with files on a single disc, letting you choose as desired. Using menu displays provided by Video CDs with PBC lets you set by a working group (MPEG) of simple interactive software and software with violent or...

Other Manual
Page 1
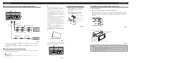
... ignition switch. (Fig. 1) F ACC O F O T T ACC position No ACC position Fig. 1 • The black lead is being used while the vehicle is ground. Also, Rear Displays should . • Never feed power to the power terminal of 4 to the products or fire. If the insulation of the unit and tapping into the engine compartment to connect to an external power amp's system remote control or the car's Auto-antenna relay control...
... ignition switch. (Fig. 1) F ACC O F O T T ACC position No ACC position Fig. 1 • The black lead is being used while the vehicle is ground. Also, Rear Displays should . • Never feed power to the power terminal of 4 to the products or fire. If the insulation of the unit and tapping into the engine compartment to connect to an external power amp's system remote control or the car's Auto-antenna relay control...

Other Manual
Page 2
... with Mute function, wire this lead to the Audio Mute lead on the vehicle model. The subwoofer output of any connections. Fig. 3 If not, keep the Audio Mute lead free of this unit, a separately sold multi-channel processor (DEQ-P8000) to this unit, do not connect anything to the speaker leads and system remote control (blue/white). Fuse resistor Orange/white To lighting switch terminal. Fuse (10 A) Black (ground) To vehicle (metal) body. + Front speaker ≠ Left + Rear speaker ≠ White White/black...
... with Mute function, wire this lead to the Audio Mute lead on the vehicle model. The subwoofer output of any connections. Fig. 3 If not, keep the Audio Mute lead free of this unit, a separately sold multi-channel processor (DEQ-P8000) to this unit, do not connect anything to the speaker leads and system remote control (blue/white). Fuse resistor Orange/white To lighting switch terminal. Fuse (10 A) Black (ground) To vehicle (metal) body. + Front speaker ≠ Left + Rear speaker ≠ White White/black...
Other Manual
Page 4
... each side. Remote control unit Velcro tape (small) (hard) Velcro tape (small) (soft) Fig.11 Fig. 9 • The cords must not cover up properly, and the unit and the system work properly. • Use only the parts included with RCA input jacks Fig. 8 • It is necessary to set AV INPUT to VIDEO on the SETUP menu when connecting to DVD player. WARNING: • NEVER install the display in the figure...
... each side. Remote control unit Velcro tape (small) (hard) Velcro tape (small) (soft) Fig.11 Fig. 9 • The cords must not cover up properly, and the unit and the system work properly. • Use only the parts included with RCA input jacks Fig. 8 • It is necessary to set AV INPUT to VIDEO on the SETUP menu when connecting to DVD player. WARNING: • NEVER install the display in the figure...


