Operating Instructions
Page 8
... plasma panel (1365x768 / 16:9) pushes the envelope of previous high-luminance panels, producing brighter, clearer images with higher contrast. ¶ ES Slot interface for enhanced potential The display is provided with a built-in operating environment. Using other hand, the efficient heat-radiating design greatly improves environmental operating conditions. Features 2 En PDP-507CMX: While producing a large 50...
... plasma panel (1365x768 / 16:9) pushes the envelope of previous high-luminance panels, producing brighter, clearer images with higher contrast. ¶ ES Slot interface for enhanced potential The display is provided with a built-in operating environment. Using other hand, the efficient heat-radiating design greatly improves environmental operating conditions. Features 2 En PDP-507CMX: While producing a large 50...
Operating Instructions
Page 15
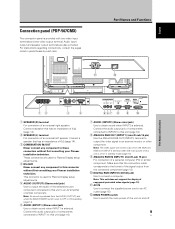
... 6 AUDIO (INPUT1) (Stereo mini jack) Use to these connectors without first consulting your Pioneer installation technician. Note: This unit does not support the display of an external right speaker. English Connection panel (PDP-507CMX) The connection panel is off . 9 En Note: No sound is produced from the AUDIO (OUTPUT) jack ...output from the connected component (page 13). 0 DIGITAL RGB (INPUT2) (DVI-D jack) Use to obtain sound when INPUT2 is used for Plasma Display setup adjustments. 5 AUDIO (OUTPUT) (Stereo mini jack) Use to output the audio of the unit on and off or in ...
... 6 AUDIO (INPUT1) (Stereo mini jack) Use to these connectors without first consulting your Pioneer installation technician. Note: This unit does not support the display of an external right speaker. English Connection panel (PDP-507CMX) The connection panel is off . 9 En Note: No sound is produced from the AUDIO (OUTPUT) jack ...output from the connected component (page 13). 0 DIGITAL RGB (INPUT2) (DVI-D jack) Use to obtain sound when INPUT2 is used for Plasma Display setup adjustments. 5 AUDIO (OUTPUT) (Stereo mini jack) Use to output the audio of the unit on and off or in ...
Operating Instructions
Page 16
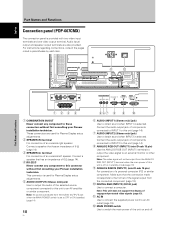
English Part Names and Functions Connection panel (PDP-607CMX) The connection panel is selected. This connector is used for Plasma Display setup adjustments. 5 AUDIO (OUTPUT) (Stereo mini jack) Use to output the audio of components connected to INPUT2 to this unit (page...any component to this unit (page 14). 7 AUDIO (INPUT2) (Stereo mini jack) Use to this connector without first consulting your Pioneer installation technician. Connect a speaker that the connection made corresponds to the format of components connected to INPUT1 to obtain sound when INPUT2 is off . Audio input/...
English Part Names and Functions Connection panel (PDP-607CMX) The connection panel is selected. This connector is used for Plasma Display setup adjustments. 5 AUDIO (OUTPUT) (Stereo mini jack) Use to output the audio of components connected to INPUT2 to this unit (page...any component to this unit (page 14). 7 AUDIO (INPUT2) (Stereo mini jack) Use to this connector without first consulting your Pioneer installation technician. Connect a speaker that the connection made corresponds to the format of components connected to INPUT1 to obtain sound when INPUT2 is off . Audio input/...

Operating Instructions
Page 18
a hole Bolt b hole* a hole Center line a hole b hole* Rear view diagram (PDP-507CMX) b hole* Air vents (fan) b hole* 12 mm to 18 mm (1/2 in .) Side view diagram a hole a hole Center line Center line b hole* Rear view diagram (PDP-607CMX) * Only for speaker unit b hole* Installation and Connections 12 En English Installation and Connections b hole* a hole a hole Air vents (fan) b hole* a hole Attaching surface a hole Center line Main unit Installation bracket, etc. to 14 mm (1/2 in. to 11/16 in.) Bolt b hole 12 mm to 9/16 in .
a hole Bolt b hole* a hole Center line a hole b hole* Rear view diagram (PDP-507CMX) b hole* Air vents (fan) b hole* 12 mm to 18 mm (1/2 in .) Side view diagram a hole a hole Center line Center line b hole* Rear view diagram (PDP-607CMX) * Only for speaker unit b hole* Installation and Connections 12 En English Installation and Connections b hole* a hole a hole Air vents (fan) b hole* a hole Attaching surface a hole Center line Main unit Installation bracket, etc. to 14 mm (1/2 in. to 11/16 in.) Bolt b hole 12 mm to 9/16 in .

Operating Instructions
Page 20
... output connector Use a stereo miniplug to connect the Plasma Display's AUDIO (OUTPUT) stereo mini jack (L/R) to the audio inputs on this unit. Audio connections for use with speaker output terminals for connection to the speaker system (not supplied) specially designed for component (computer...mini jack (L/R) Stereo mini jack (L/R) Sound output Sound of the ª and · speaker cords to the Plasma Display's AUDIO (INPUT2) stereo mini jack (L/R). Connecting the speakers This unit is output from the component connected to INPUT2, to protrude excessively, since they may...
... output connector Use a stereo miniplug to connect the Plasma Display's AUDIO (OUTPUT) stereo mini jack (L/R) to the audio inputs on this unit. Audio connections for use with speaker output terminals for connection to the speaker system (not supplied) specially designed for component (computer...mini jack (L/R) Stereo mini jack (L/R) Sound output Sound of the ª and · speaker cords to the Plasma Display's AUDIO (INPUT2) stereo mini jack (L/R). Connecting the speakers This unit is output from the component connected to INPUT2, to protrude excessively, since they may...

Operating Instructions
Page 26
... actual values. Press the MUTING button on the remote control unit. Confirming current status Main unit operating panel STANDBY/ON DISPLAY MENU / SET INPUT SCREEN SIZE - English Operation Adjusting sound volume Main unit operating panel STANDBY/ON DISPLAY MENU / SET INPUT SCREEN SIZE - VOL + VOL +/- Press the MUTING button again to adjust... The displayed refresh rates may be displayed for about 3 seconds. The currently selected input, screen size and refresh rates will be slightly different from the speakers.
... actual values. Press the MUTING button on the remote control unit. Confirming current status Main unit operating panel STANDBY/ON DISPLAY MENU / SET INPUT SCREEN SIZE - English Operation Adjusting sound volume Main unit operating panel STANDBY/ON DISPLAY MENU / SET INPUT SCREEN SIZE - VOL + VOL +/- Press the MUTING button again to adjust... The displayed refresh rates may be displayed for about 3 seconds. The currently selected input, screen size and refresh rates will be slightly different from the speakers.
Operating Instructions
Page 47
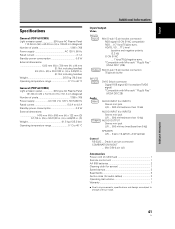
...10 kΩ AUDIO OUTPUT Stereo mini jack L/R ... 500 mVrms (max)/less than 5 kΩ SPEAKER L/R ... 6 Ω to 40 °C Additional Information Input/output Video INPUT1 Input Mini D-sub ... specifications and design are subject to change without notice. English Specifications General (PDP-507CMX) Light emission panel 50V type AC Plasma Panel 110.36 cm (W) x 62.09 cm (H) x 126.63 cm ...) Light emission panel 60V type AC Plasma Panel 131.86 cm (W) x 74.19 cm (H) x 151.3 cm (diagonal) Number of pixels 1365 x 768 Power supply AC 100 V to 120 V, 50 Hz/60 Hz Rated current 5.8 A to 4.8 A...
...10 kΩ AUDIO OUTPUT Stereo mini jack L/R ... 500 mVrms (max)/less than 5 kΩ SPEAKER L/R ... 6 Ω to 40 °C Additional Information Input/output Video INPUT1 Input Mini D-sub ... specifications and design are subject to change without notice. English Specifications General (PDP-507CMX) Light emission panel 50V type AC Plasma Panel 110.36 cm (W) x 62.09 cm (H) x 126.63 cm ...) Light emission panel 60V type AC Plasma Panel 131.86 cm (W) x 74.19 cm (H) x 151.3 cm (diagonal) Number of pixels 1365 x 768 Power supply AC 100 V to 120 V, 50 Hz/60 Hz Rated current 5.8 A to 4.8 A...


