
User manual
Page 1
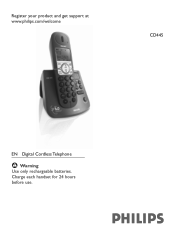
Warning Use only rechargeable batteries. Charge each handset for 24 hours before use. Register your product and get support at www.philips.com/welcome CD445 EN Digital Cordless Telephone !
Warning Use only rechargeable batteries. Charge each handset for 24 hours before use. Register your product and get support at www.philips.com/welcome CD445 EN Digital Cordless Telephone !
User manual
Page 3
... connection 5 1.5 Safety precautions 5 1.6 Warranty 5 1.7 Conformity 5 1.8 Environmental care 5 2 Your phone 6 2.1 What's in the box 6 2.2 Overview of the phone 7 2.2.1 Handset 7 2.2.2 Display icons on the handset 9 2.2.3 Base station 10 3 Getting started 11 3.1 Connect the base station 11 3.2 Install rechargeable batteries 11 3.3 Place the... How to set the date and time format 20 5.6 Personal settings 20 5.6.1 Handset tone 20 5.6.2 How to adjust the contrast 22 5.6.3 How to rename the handset 22 5.6.4 How to set the auto pick-up 22 5.6.5 How to set the...
... connection 5 1.5 Safety precautions 5 1.6 Warranty 5 1.7 Conformity 5 1.8 Environmental care 5 2 Your phone 6 2.1 What's in the box 6 2.2 Overview of the phone 7 2.2.1 Handset 7 2.2.2 Display icons on the handset 9 2.2.3 Base station 10 3 Getting started 11 3.1 Connect the base station 11 3.2 Install rechargeable batteries 11 3.3 Place the... How to set the date and time format 20 5.6 Personal settings 20 5.6.1 Handset tone 20 5.6.2 How to adjust the contrast 22 5.6.3 How to rename the handset 22 5.6.4 How to set the auto pick-up 22 5.6.5 How to set the...
User manual
Page 4
...23 5.7.3 Call barring 23 5.7.4 Baby call 23 5.7.5 How to manually select a base station 24 5.7.6 How to register an additional handset 24 5.7.7 How to unregister a handset 25 5.7.8 How to change the master PIN 25 5.7.9 How to reset to default settings 25 5.7.10 How to set the prefix number... machine mode 30 6.6.2 How to set ring delay 31 6.6.3 How to set message tone 31 6.6.4 Remote control access 31 6.6.5 Call screening on handset 32 6.6.6 Call screening on base 32 7 Default settings 33 8 Menu structure 34 9 Frequently asked questions 37 10 Index 39 11 FCC and ...
...23 5.7.3 Call barring 23 5.7.4 Baby call 23 5.7.5 How to manually select a base station 24 5.7.6 How to register an additional handset 24 5.7.7 How to unregister a handset 25 5.7.8 How to change the master PIN 25 5.7.9 How to reset to default settings 25 5.7.10 How to set the prefix number... machine mode 30 6.6.2 How to set ring delay 31 6.6.3 How to set message tone 31 6.6.4 Remote control access 31 6.6.5 Call screening on handset 32 6.6.6 Call screening on base 32 7 Default settings 33 8 Menu structure 34 9 Frequently asked questions 37 10 Index 39 11 FCC and ...
User manual
Page 5
...the product on the bed, sofa, rug, or other risks. Immersion of the telephone or handset in water could result in the cabinet back or bottom are provided for wet locations. 16 ... does not operate normally by persons walking on it. 8 Do not overload wall outlets and extension cords as this product from lightning. Important Safety Instructions 3 Never spill liquid of any kind into... Do not allow anything to rest on the power cord. however, when using a telephone (other than a cordless type) during a lightning storm. 15 Never install telephone jacks in a bathtub, shower or pool. Do not ...
...the product on the bed, sofa, rug, or other risks. Immersion of the telephone or handset in water could result in the cabinet back or bottom are provided for wet locations. 16 ... does not operate normally by persons walking on it. 8 Do not overload wall outlets and extension cords as this product from lightning. Important Safety Instructions 3 Never spill liquid of any kind into... Do not allow anything to rest on the power cord. however, when using a telephone (other than a cordless type) during a lightning storm. 15 Never install telephone jacks in a bathtub, shower or pool. Do not ...
User manual
Page 6
...the battery(ies) could increase internal cell pressure and rupture the discharged battery(ies). (Applies to the eyes or skin. Use only Philips Multi-Life 750mAh rechargeable NimH batteries. The only way to use after cold storage. 12 If your product uses rechargeable battery(ies), ...product requires an electrical supply of 120 volts, single phase alternating current, excluding IT installations defined in standard UL 60950. 1.3 Battery requirements The handset requires power source of two rechargeable NiMH batteries, size AAA 1.2V 750mAh (Hr11/45). 19 Do not use the telephone to report a...
...the battery(ies) could increase internal cell pressure and rupture the discharged battery(ies). (Applies to the eyes or skin. Use only Philips Multi-Life 750mAh rechargeable NimH batteries. The only way to use after cold storage. 12 If your product uses rechargeable battery(ies), ...product requires an electrical supply of 120 volts, single phase alternating current, excluding IT installations defined in standard UL 60950. 1.3 Battery requirements The handset requires power source of two rechargeable NiMH batteries, size AAA 1.2V 750mAh (Hr11/45). 19 Do not use the telephone to report a...
User manual
Page 7
... from the electrical outlet. The warranty informations are available on www.p4c.philips.com. 1.7 Conformity The Declaration of conformity is recommended that you to high voltages. • Do not allow the handset to come into contact with liquids or moisture. • Do not...• Young children should be supervised to the apparatus and is always easily accessible. 1.4 Telephone connection The voltage on www.p4c.philips.com. 1.8 Environmental care Please remember to observe the local regulations regarding the disposal of your packaging materials, exhausted batteries and old ...
... from the electrical outlet. The warranty informations are available on www.p4c.philips.com. 1.7 Conformity The Declaration of conformity is recommended that you to high voltages. • Do not allow the handset to come into contact with liquids or moisture. • Do not...• Young children should be supervised to the apparatus and is always easily accessible. 1.4 Telephone connection The voltage on www.p4c.philips.com. 1.8 Environmental care Please remember to observe the local regulations regarding the disposal of your packaging materials, exhausted batteries and old ...
User manual
Page 8
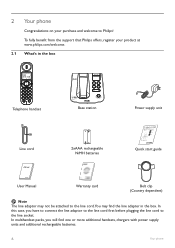
... first before plugging the line cord to the line socket. 2 Your phone Congratulations on your product at www.philips.com/welcome. 2.1 What's in the box. To fully benefit from the support that Philips offers, register your purchase and welcome to the line cord.You may not be attached to... Philips! In this case, you will find the line adapter in the box Telephone handset Line cord Base station -+ +- 2xAAA rechargeable NiMH batteries Power supply unit Quick start guide User Manual Warranty card Belt ...
... first before plugging the line cord to the line socket. 2 Your phone Congratulations on your product at www.philips.com/welcome. 2.1 What's in the box. To fully benefit from the support that Philips offers, register your purchase and welcome to the line cord.You may not be attached to... Philips! In this case, you will find the line adapter in the box Telephone handset Line cord Base station -+ +- 2xAAA rechargeable NiMH batteries Power supply unit Quick start guide User Manual Warranty card Belt ...
User manual
Page 9
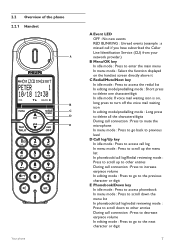
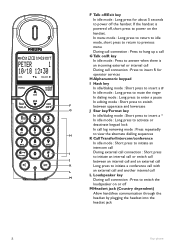
2.2 Overview of the phone 2.2.1 Handset A B C D E Your phone A Event LED OFF : No new events RED BLINKING : Unread events (example : a missed call if you have subscribed the Caller Line Identification Service (CLI) ...from your network provider.) B Menu/OK key In idle mode : Press to enter the main menu In menu mode : Select the function displayed on the handset screen directly above it C Redial/Mute/Next key In idle mode : Press to access the redial list In editing mode/predialling mode : Short press to...
2.2 Overview of the phone 2.2.1 Handset A B C D E Your phone A Event LED OFF : No new events RED BLINKING : Unread events (example : a missed call if you have subscribed the Caller Line Identification Service (CLI) ...from your network provider.) B Menu/OK key In idle mode : Press to enter the main menu In menu mode : Select the function displayed on the handset screen directly above it C Redial/Mute/Next key In idle mode : Press to access the redial list In editing mode/predialling mode : Short press to...
User manual
Page 10
... an incoming external or internal call During call connection : Press to insert R for about 5 seconds to power off the handset. During call connection : Press to hang up a call G Talk on/R key In idle mode : Press to answer when there is powered off MHeadset jack (Country ... external call and another internal call L Loudspeaker key M During call connection : Press to switch the loudspeaker on or off , short press to power on the handset.
... an incoming external or internal call During call connection : Press to insert R for about 5 seconds to power off the handset. During call connection : Press to hang up a call G Talk on/R key In idle mode : Press to answer when there is powered off MHeadset jack (Country ... external call and another internal call L Loudspeaker key M During call connection : Press to switch the loudspeaker on or off , short press to power on the handset.
User manual
Page 11
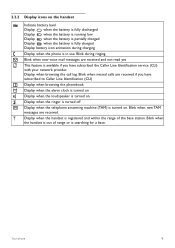
Blink when the handset is out of the base station. Your phone 9 Blink when new voice mail messages are received and not read yet This ... loudspeaker is turned on Display when the ringer is turned off Display when the telephone answering machine (TAM) is turned on the handset Indicate battery level Display when the battery is fully discharged Display when the battery is running low Display when the battery is partially ... your network provider. Display when browsing the call log. Blink when missed calls are received. 2.2.2 Display icons on . Display when the handset is in use.
Blink when the handset is out of the base station. Your phone 9 Blink when new voice mail messages are received and not read yet This ... loudspeaker is turned on Display when the ringer is turned off Display when the telephone answering machine (TAM) is turned on the handset Indicate battery level Display when the battery is fully discharged Display when the battery is running low Display when the battery is partially ... your network provider. Display when browsing the call log. Blink when missed calls are received. 2.2.2 Display icons on . Display when the handset is in use.
User manual
Page 12
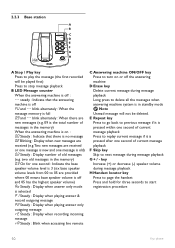
... C Answering machine ON/OFF key Press to turn on or off the answering machine D Erase key Delete current message during message playback H Handset locator key Press to page the handset Press and hold for one message is old) 02 Steady : Display number of current message playback Press to replay current message if...
... C Answering machine ON/OFF key Press to turn on or off the answering machine D Erase key Delete current message during message playback H Handset locator key Press to page the handset Press and hold for one message is old) 02 Steady : Display number of current message playback Press to replay current message if...
User manual
Page 13
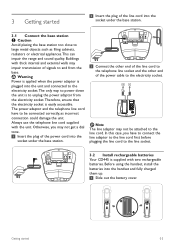
... as incorrect connection could damage the unit. Warning Power is applied when the power adaptor is plugged into the handset and fully charged them up. 1 Slide out the battery cover. Before using the handset, install the batteries into the unit and connected to the electricity socket.The only way to power down...
... as incorrect connection could damage the unit. Warning Power is applied when the power adaptor is plugged into the handset and fully charged them up. 1 Slide out the battery cover. Before using the handset, install the batteries into the unit and connected to the electricity socket.The only way to power down...

User manual
Page 14
... battery is fully charged, the talk time of your phone is approximately 12 hours and the standby time is approximately 150 hours. 1 Place the handset on the charging cradle of the base station 2 Leave it according to the country of countries • Available country will display on your phone ... show the WELCOME screen again. 2 Press / to scroll to your country 3 Press to confirm your selection • Your phone is pressed, the handset will go back to WELCOME screen for a few minutes, the WELCOME screen appears. Follow these steps to configure your country, the WELCOME screen may not...
... battery is fully charged, the talk time of your phone is approximately 12 hours and the standby time is approximately 150 hours. 1 Place the handset on the charging cradle of the base station 2 Leave it according to the country of countries • Available country will display on your phone ... show the WELCOME screen again. 2 Press / to scroll to your country 3 Press to confirm your selection • Your phone is pressed, the handset will go back to WELCOME screen for a few minutes, the WELCOME screen appears. Follow these steps to configure your country, the WELCOME screen may not...

User manual
Page 15
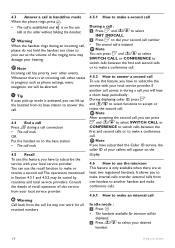
... entry will be displayed instead. 4.1.6 Call timer The call timer shows the duration of your current call when you hang up your phone. Tip The handset stores the last 10 numbers dialed. It is shown in minutes and seconds format (MM:SS). 4.2 Answer a call When the phone rings, press . • The...
... entry will be displayed instead. 4.1.6 Call timer The call timer shows the duration of your current call when you hang up your phone. Tip The handset stores the last 10 numbers dialed. It is shown in minutes and seconds format (MM:SS). 4.2 Answer a call When the phone rings, press . • The...
User manual
Page 16
...station • The call ends. 4.5 Recall To use the recall function to make an internal call In idle mode : 1 Press • The handsets available for all received numbers. 4.5.1 How to make a conference call. Warning Call back from the call list may not work for intercom will be aborted... periodically : During displaying caller ID, press and / to select functions to use this service from its base station to the caller without holding the handset. ! Note Incoming call has priority over other status in during a call, you will appear on the display. 4.6 How to accept or reject ...
...station • The call ends. 4.5 Recall To use the recall function to make an internal call In idle mode : 1 Press • The handsets available for all received numbers. 4.5.1 How to make a conference call. Warning Call back from the call list may not work for intercom will be aborted... periodically : During displaying caller ID, press and / to select functions to use this service from its base station to the caller without holding the handset. ! Note Incoming call has priority over other status in during a call, you will appear on the display. 4.6 How to accept or reject ...
User manual
Page 17
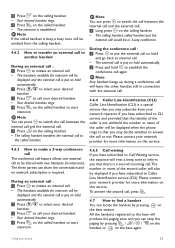
...number or name of the caller will be displayed when the phone rings so that you can locate the handset by pressing / / / on the handset or on the called handset to start intercom Note You can share the conversation and no network subscription is put the external call is ...the internal call and the external call. 5 Long press on hold automatically. 2 Press and hold to establish the conference call again Note Any handset hangs up during a conference call would be emitted from your network provider for more information on the base station. Please contact your network operator....
...number or name of the caller will be displayed when the phone rings so that you can locate the handset by pressing / / / on the handset or on the called handset to start intercom Note You can share the conversation and no network subscription is put the external call is ...the internal call and the external call. 5 Long press on hold automatically. 2 Press and hold to establish the conference call again Note Any handset hangs up during a conference call would be emitted from your network provider for more information on the base station. Please contact your network operator....

User manual
Page 18
... an active role in the development of international EMF and safety standards, enabling Philips to you during a call. A maximum of nine of your phone Each phone number can have more than one handset, each handset has its own phonebook. 16 Use more of the stored phone numbers can store... up to stay well within the EMF standards applicable at the time of your phone 5.1 Call in progress. Philips is committed to scientific evidence available today. 5. Philips confirms that if...
... an active role in the development of international EMF and safety standards, enabling Philips to you during a call. A maximum of nine of your phone Each phone number can have more than one handset, each handset has its own phonebook. 16 Use more of the stored phone numbers can store... up to stay well within the EMF standards applicable at the time of your phone 5.1 Call in progress. Philips is committed to scientific evidence available today. 5. Philips confirms that if...
User manual
Page 20
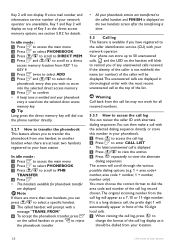
...How to access the call log You can review the caller ID with alternate dialing sequences.You can press / to select a specific handset. 5 The called handset or press to the caller identification service (CLI) with the most recent unanswered call log record chosen.The original incoming number from your ... Warning Call back from the call list may not work for phonebook transfer are unavailable, Key 1 and Key 2 will display on the handset will not display. Key 2 will blink to 50 unanswered calls. If voice mail number and information service number of your phonebook entry is...
...How to access the call log You can review the caller ID with alternate dialing sequences.You can press / to select a specific handset. 5 The called handset or press to the caller identification service (CLI) with the most recent unanswered call log record chosen.The original incoming number from your ... Warning Call back from the call list may not work for phonebook transfer are unavailable, Key 1 and Key 2 will display on the handset will not display. Key 2 will blink to 50 unanswered calls. If voice mail number and information service number of your phonebook entry is...
User manual
Page 22
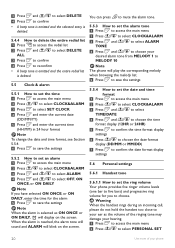
... Press / to select PERSONAL SET 20 Use more of your desired alarm tone from MELODY 1 to choose. ! Warning When the handset rings during an incoming call, please do not hold the handset too close to your ear as ON ONCE or ON DAILY, will display on the screen. When the alarm is... display settings 6 Press / to choose the date format display (DD/MM or MM/DD) 7 Press to confirm the date format display settings 5.6 Personal settings 5.6.1 Handset tone 5.6.1.1 How to set the ring volume Your phone provides five ringer volume levels (one bar to five bars) and progressive ring volume for you...
... Press / to select PERSONAL SET 20 Use more of your desired alarm tone from MELODY 1 to choose. ! Warning When the handset rings during an incoming call, please do not hold the handset too close to your ear as ON ONCE or ON DAILY, will display on the screen. When the alarm is... display settings 6 Press / to choose the date format display (DD/MM or MM/DD) 7 Press to confirm the date format display settings 5.6 Personal settings 5.6.1 Handset tone 5.6.1.1 How to set the ring volume Your phone provides five ringer volume levels (one bar to five bars) and progressive ring volume for you...
User manual
Page 23
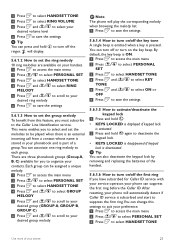
...on/off the ringer. By default, the key beep is ON. 1 Press to access the main menu 2 Press / to select PERSONAL SET 3 Press to select HANDSET TONE 4 Press and / to select KEY TONE 5 Press OFF and / to select ON or 6 Press to save the settings 5.6.1.5 How to activate/deactivate the... display. 5.6.1.2 How to set the melodies to be assigned a unique melody. 1 Press to access the main menu 2 Press / to select PERSONAL SET 3 Press to select HANDSET TONE 4 Press and / to select GROUP MELODY 5 Press and / to scroll to your desired group (GROUP A, GROUP B, GROUP C) 6 Press and / to scroll to ...
...on/off the ringer. By default, the key beep is ON. 1 Press to access the main menu 2 Press / to select PERSONAL SET 3 Press to select HANDSET TONE 4 Press and / to select KEY TONE 5 Press OFF and / to select ON or 6 Press to save the settings 5.6.1.5 How to activate/deactivate the... display. 5.6.1.2 How to set the melodies to be assigned a unique melody. 1 Press to access the main menu 2 Press / to select PERSONAL SET 3 Press to select HANDSET TONE 4 Press and / to select GROUP MELODY 5 Press and / to scroll to your desired group (GROUP A, GROUP B, GROUP C) 6 Press and / to scroll to ...


