User manual
Page 5
... Set/Change PIN 16 - Philips TV Slideshow Format with portable memory 31 Annex 2 - Philips TV USB 35 Español Care of the screen See Tips, p. 27. ° End of life directives Philips is paying a lot of the remote control 6 Control Buttons on the TV 7 TV settings 8 Settings assistant 8... Standard settings 8 To use the menus 9 Introduction 9 How to navigate through the TV menus 9 Demo...9 Picture menu 10 - At the ...
... Set/Change PIN 16 - Philips TV Slideshow Format with portable memory 31 Annex 2 - Philips TV USB 35 Español Care of the screen See Tips, p. 27. ° End of life directives Philips is paying a lot of the remote control 6 Control Buttons on the TV 7 TV settings 8 Settings assistant 8... Standard settings 8 To use the menus 9 Introduction 9 How to navigate through the TV menus 9 Demo...9 Picture menu 10 - At the ...
User manual
Page 7
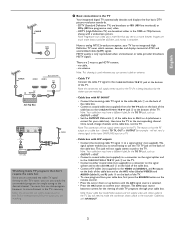
... (not supplied) from your cable box, first press the SOURCE button on the remote control. • Press the cursor down or up buttons until the AV2 signal source is more distinct ... analog NTSC broadcast reception, your cable box Audio/Video outputs will not supply video and stereo audio to the TV, you are broadcast as OUTPUT or OUT. • Set the OUTPUT CH switch 3 of the cable box... supplied) to a connector on the signal splitter and to the CABLE/ANTENNA 75 Ω : jack 2 on the TV. • Connect another coaxial cable (not supplied) to a connector on the signal splitter and to the cable IN...
... (not supplied) from your cable box, first press the SOURCE button on the remote control. • Press the cursor down or up buttons until the AV2 signal source is more distinct ... analog NTSC broadcast reception, your cable box Audio/Video outputs will not supply video and stereo audio to the TV, you are broadcast as OUTPUT or OUT. • Set the OUTPUT CH switch 3 of the cable box... supplied) to a connector on the signal splitter and to the CABLE/ANTENNA 75 Ω : jack 2 on the TV. • Connect another coaxial cable (not supplied) to a connector on the signal splitter and to the cable IN...
User manual
Page 8
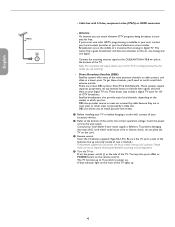
... DBS also provides service in your area for offair DTV broadcasts. Antenna Via antenna you to digital TV. Connect the incoming antenna signal to power up . " Refer to the TV if it on the remote control. These boxes may also press +CH- Consult your local dealer if your mains supply is ...available in the middle of the TV. or POWER button on the wall, connect all your TV or before hanging it is marked.) The ...
... DBS also provides service in your area for offair DTV broadcasts. Antenna Via antenna you to digital TV. Connect the incoming antenna signal to power up . " Refer to the TV if it on the remote control. These boxes may also press +CH- Consult your local dealer if your mains supply is ...available in the middle of the TV. or POWER button on the wall, connect all your TV or before hanging it is marked.) The ...
User manual
Page 9
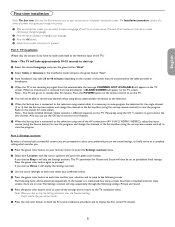
... to on the TV screen. The newly installed channels maybe sorted in total. Note: When you skip or stop the Settings Assistant, then the Standard settings Philips selected for Picture and Sound will go on to 40 minutes depending on screen continuously change language.) é Press...the Settings assistant. If you choose Home it is mentioned how many screens there are prompted to select your remote control to proceed. Part 1: TV installation (Please skip this TV. The Settings assistant will display the Settings assistant. When no cable connected to proceed. Please key using ...
... to on the TV screen. The newly installed channels maybe sorted in total. Note: When you skip or stop the Settings Assistant, then the Standard settings Philips selected for Picture and Sound will go on to 40 minutes depending on screen continuously change language.) é Press...the Settings assistant. If you choose Home it is mentioned how many screens there are prompted to select your remote control to proceed. Part 1: TV installation (Please skip this TV. The Settings assistant will display the Settings assistant. When no cable connected to proceed. Please key using ...
User manual
Page 10
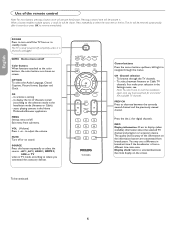
... second time will activate the function. Press repeatedly to start the installation again once you connected the accessory devices. POWER Press to navigate through the TV channels. - SOURCE Press this button repeatedly to activate a setting - CC ACTIVE CTRL OPTION Cursor buttons Press the cursor buttons up/down, left.../right to turn on screen. PREV CH Press to standby mode. You may see . English Française Use of the remote control Note: For most buttons pressing a button once will de-activate it is from sub-menu. DEMO Demo menu on/off . CH Channel ...
... second time will activate the function. Press repeatedly to start the installation again once you connected the accessory devices. POWER Press to navigate through the TV channels. - SOURCE Press this button repeatedly to activate a setting - CC ACTIVE CTRL OPTION Cursor buttons Press the cursor buttons up/down, left.../right to turn on screen. PREV CH Press to standby mode. You may see . English Française Use of the remote control Note: For most buttons pressing a button once will de-activate it is from sub-menu. DEMO Demo menu on/off . CH Channel ...

User manual
Page 11
... of all channels marked as possible. to summon the Settings menu without the remote control. The MENU button can make subtitles visible with the cursor up /down . Press this button to select the TV channels or sources. Automatic Super zoom 4:3 Movie expand 14:9 Movie expand 16... not all incoming signals in Movie expand 14:9, Movie expand 16:9 or Super zoom picture format, you can be used to switch the TV on your remote be available. subchannels). buttons to adjust the volume. • the + CHANNEL - buttons to summon a list of your preference. English...
... of all channels marked as possible. to summon the Settings menu without the remote control. The MENU button can make subtitles visible with the cursor up /down . Press this button to select the TV channels or sources. Automatic Super zoom 4:3 Movie expand 14:9 Movie expand 16... not all incoming signals in Movie expand 14:9, Movie expand 16:9 or Super zoom picture format, you can be used to switch the TV on your remote be available. subchannels). buttons to adjust the volume. • the + CHANNEL - buttons to summon a list of your preference. English...
User manual
Page 13
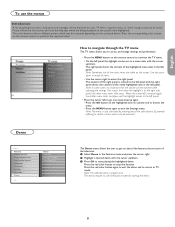
How to navigate through the TV menu The TV menu allows you to access and change settings and preferences. • Press the MENU button on the remote control to exit the Settings menu. On the left panel the highlight can be watched while adjusting the settings. This means that when the highlight.../down . Press the red color button again to exit the demo and to return to stop the function. Press the corresponding color button on the remote control to dismiss the menu. - Press the OK button on the highlighted item to activate and to perform the required action. English Française...
How to navigate through the TV menu The TV menu allows you to access and change settings and preferences. • Press the MENU button on the remote control to exit the Settings menu. On the left panel the highlight can be watched while adjusting the settings. This means that when the highlight.../down . Press the red color button again to exit the demo and to return to stop the function. Press the corresponding color button on the remote control to dismiss the menu. - Press the OK button on the highlighted item to activate and to perform the required action. English Française...
User manual
Page 14
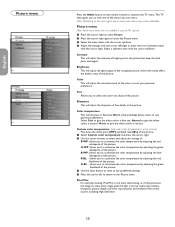
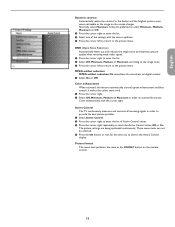
..., improving contrast, sharpness, picture depth, and color reproduction and brilliance from every source, including High Definition. 10 Note: Depending on the remote control to customize the color temperature by adjusting the blue whitepoint of the picture. Color This will adjust the sharpness of fine details in ...to the Picture menu. " Select the menu items with the cursor up /down . ' Adjust the settings with the cursor up /down . The TV menu gives you an overview of the menus you to give the white colors a neutral, Warm to customize the color temperature by adjusting the green...
..., improving contrast, sharpness, picture depth, and color reproduction and brilliance from every source, including High Definition. 10 Note: Depending on the remote control to customize the color temperature by adjusting the blue whitepoint of the picture. Color This will adjust the sharpness of fine details in ...to the Picture menu. " Select the menu items with the cursor up /down . ' Adjust the settings with the cursor up /down . The TV menu gives you an overview of the menus you to give the white colors a neutral, Warm to customize the color temperature by adjusting the green...
User manual
Page 15
...with the cursor right. It may be selected. ' Press the OK button or wait for the time out to the image noise. Active Control The TV continuously measures and corrects all incoming signals in order to the picture menu. " Press the cursor left to return to select the Active Control values... Off or On. Picture format This menu item performs the same as the image on the remote control. 11 English Française Español Dynamic contrast Automatically makes the contrast in the darker and the brighter picture areas more vivid...
...with the cursor right. It may be selected. ' Press the OK button or wait for the time out to the image noise. Active Control The TV continuously measures and corrects all incoming signals in order to the picture menu. " Press the cursor left to return to select the Active Control values... Off or On. Picture format This menu item performs the same as the image on the remote control. 11 English Française Español Dynamic contrast Automatically makes the contrast in the darker and the brighter picture areas more vivid...
User manual
Page 21
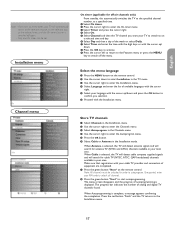
... digit keys or with the Installation menu. When Autoprogramming is selected, the TV will detect cable company supplied signals and will search for antenna TV (NTSC and ATSC) channels available in the TV menu. From now on the remote control. é Use the cursor down . ! Select the menu language... & Press the MENU button on , every week, your cable TV provider and connection of available languages ...
... digit keys or with the Installation menu. When Autoprogramming is selected, the TV will detect cable company supplied signals and will search for antenna TV (NTSC and ATSC) channels available in the TV menu. From now on the remote control. é Use the cursor down . ! Select the menu language... & Press the MENU button on , every week, your cable TV provider and connection of available languages ...
User manual
Page 22
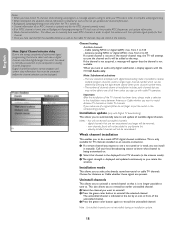
... channel you want to do not forget to reinstall the uninstalled channel. Note: Subchannel selections - The new standards employed with Digital TV broadcasting) This allows you to automatically tune to and update all the possible ATSC frequencies and update information. • Weak channel ... to manually tune weak ATSC channels in the list by pressing the digit remote control direct-acces channel number entry. - this will appear that are stored in Background Autoprogramming the TV shall scan all available digital channels. Note: Digital Channel selection delay Due ...
... channel you want to do not forget to reinstall the uninstalled channel. Note: Subchannel selections - The new standards employed with Digital TV broadcasting) This allows you to automatically tune to and update all the possible ATSC frequencies and update information. • Weak channel ... to manually tune weak ATSC channels in the list by pressing the digit remote control direct-acces channel number entry. - this will appear that are stored in Background Autoprogramming the TV shall scan all available digital channels. Note: Digital Channel selection delay Due ...
User manual
Page 25
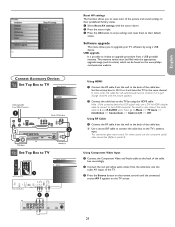
...reset them to their predefined factory states. & Select Reset AV settings with the appropriate upgrade image (and structure) which can be found on the TV screen. Using HDMI & Connect the RF cable from the cable box into the audio AV inputs of the cable box. Using Component Video Input... portable memory. Just change channels until the connected source AV 1 appears on the www.philips. " Press the Source button on the remote control until the picture appears. é Connect the cable box to the TV by using the HDMI cable. Software upgrade This menu allows you to reset most of ...
...reset them to their predefined factory states. & Select Reset AV settings with the appropriate upgrade image (and structure) which can be found on the TV screen. Using HDMI & Connect the RF cable from the cable box into the audio AV inputs of the cable box. Using Component Video Input... portable memory. Just change channels until the connected source AV 1 appears on the www.philips. " Press the Source button on the remote control until the picture appears. é Connect the cable box to the TV by using the HDMI cable. Software upgrade This menu allows you to reset most of ...
User manual
Page 26
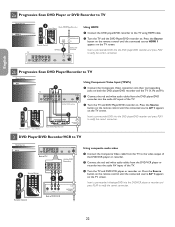
...audio cables from the DVD/VCR player or recorder into the audio AV inputs of the TV. Press the Source button on the remote control until the connected source AV 1 appears on . " Turn the TV and DVD Player/DVD recorder on . English Française 2a Progressive Scan DVD ... DVD into the DVD player/DVD recorder and press PLAY to verify the correct connection. 2b Progressive Scan DVD Player/Recorder to TV Next Source TV AV 1 AV 2 HDMI 1 HDMI 2 Side 3 Remote Control Source Button 1 AUDIO OUT (DIGITAL) HDMI 2 CABLE / ANTENNA HDMI 1 Add for DVD Recording 3 Source Button AUDIO OUT ...
...audio cables from the DVD/VCR player or recorder into the audio AV inputs of the TV. Press the Source button on the remote control until the connected source AV 1 appears on . " Turn the TV and DVD Player/DVD recorder on . English Française 2a Progressive Scan DVD ... DVD into the DVD player/DVD recorder and press PLAY to verify the correct connection. 2b Progressive Scan DVD Player/Recorder to TV Next Source TV AV 1 AV 2 HDMI 1 HDMI 2 Side 3 Remote Control Source Button 1 AUDIO OUT (DIGITAL) HDMI 2 CABLE / ANTENNA HDMI 1 Add for DVD Recording 3 Source Button AUDIO OUT ...
User manual
Page 27
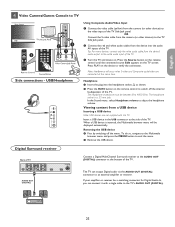
... the headphone socket * as shown. é Press the MUTE button on the device to the white audio input of the TV. Press PLAY on the remote control to the TV Side Jack panel. é Connect the red and white audio cables from the device's audio output to verify the connection.... Audio In, you can output Digital audio via the AUDIO OUT (DIGITAL) connector to adjust the headphone volume. " Turn the TV and device on the TV screen. Press the Source button on the remote control until the connected source Side appears on . The headphone impedance must be displayed automatically. The...
... the headphone socket * as shown. é Press the MUTE button on the device to the white audio input of the TV. Press PLAY on the remote control to the TV Side Jack panel. é Connect the red and white audio cables from the device's audio output to verify the connection.... Audio In, you can output Digital audio via the AUDIO OUT (DIGITAL) connector to adjust the headphone volume. " Turn the TV and device on the TV screen. Press the Source button on the remote control until the connected source Side appears on . The headphone impedance must be displayed automatically. The...
User manual
Page 28
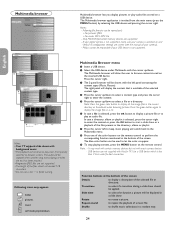
...is not supported, make sure your camera is switched on the inserted USB device. English Française Español Notes: • Your TV supports slide shows with the left to keep music playing and switch back to the Multimedia menu. ! in the current directory as thumbnails when ... the OK button to let the color re-appear. ç To stop playing content, press the MENU button on the remote control. Following file formats can be responsible if your camera). - Philips cannot be used to start a slide show should not exceed 128 characters. • Do not use a dot "." The ...
...is not supported, make sure your camera is switched on the inserted USB device. English Française Español Notes: • Your TV supports slide shows with the left to keep music playing and switch back to the Multimedia menu. ! in the current directory as thumbnails when ... the OK button to let the color re-appear. ç To stop playing content, press the MENU button on the remote control. Following file formats can be responsible if your camera). - Philips cannot be used to start a slide show should not exceed 128 characters. • Do not use a dot "." The ...
User manual
Page 30
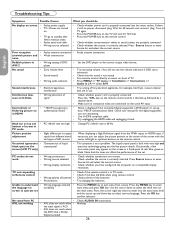
... you have configured the computer on accidently main menu and press OK key. Black bar on authentication failed in TV mode. • Check if the blue led blink when using remote control. • Wrong polarity of batteries • Check polarity of the set -up /down to select ...down buttons on the same AV input. The liquid crystal panel is correctly selected. TV not responding to enter the language on a compatible display resolution. Press the MENU key to Remote control • Check if the remote control is in HDMI • Noise is not a problem. PC modes do...
... you have configured the computer on accidently main menu and press OK key. Black bar on authentication failed in TV mode. • Check if the blue led blink when using remote control. • Wrong polarity of batteries • Check polarity of the set -up /down to select ...down buttons on the same AV input. The liquid crystal panel is correctly selected. TV not responding to enter the language on a compatible display resolution. Press the MENU key to Remote control • Check if the remote control is in HDMI • Noise is not a problem. PC modes do...
User manual
Page 37
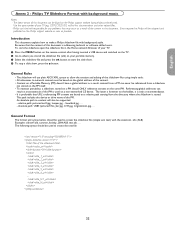
... the device or drive name of this document. The following syntax should ONLY reference content on the Philips support website as soon as possible. Philips TV Slideshow Format with background audio. The latest version of the slideshow audio_url 30 slide_1_url slide_2_url slide_3_url slide_4_url ... a result of the content. • Content on your TV. & Press the MENU button on the remote control after having inserted a USB device and switched on the Philips support website (www.philips.com/welcome). Philips can result in this document is stored. English Française...
... the device or drive name of this document. The following syntax should ONLY reference content on the Philips support website as soon as possible. Philips TV Slideshow Format with background audio. The latest version of the slideshow audio_url 30 slide_1_url slide_2_url slide_3_url slide_4_url ... a result of the content. • Content on your TV. & Press the MENU button on the remote control after having inserted a USB device and switched on the Philips support website (www.philips.com/welcome). Philips can result in this document is stored. English Française...
Leaflet
Page 3
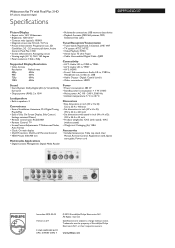
... top stand, User Manual, Remote Control, Registration card, Quick start guide, Power cord • Issue date 2010-03-03 Version: 2.2.9 12 NC: 8670 000 26111 UPC: 6 09585 12342 7 © 2010 Koninklijke Philips Electronics N.V. www.philips.com or their respective owners. Widescreen flat TV with Pixel Plus 3 HD 50" plasma integrated digital Specifications 50PFP5332D/37 Picture/Display •...
... top stand, User Manual, Remote Control, Registration card, Quick start guide, Power cord • Issue date 2010-03-03 Version: 2.2.9 12 NC: 8670 000 26111 UPC: 6 09585 12342 7 © 2010 Koninklijke Philips Electronics N.V. www.philips.com or their respective owners. Widescreen flat TV with Pixel Plus 3 HD 50" plasma integrated digital Specifications 50PFP5332D/37 Picture/Display •...


