User manual
Page 4
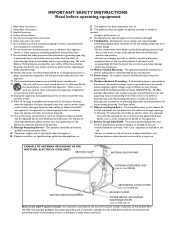
... sources such as power-supply cord or plug is grounded so as practical. The appliance has been exposed to operate normally or exhibits a marked change in wire to an antennadischarge unit, size of grounding connectors, location of antennadischarge unit, connection to grounding electrodes and requirements for replacement of cable entry as to environmental considerations. The appliance does not appear to rain; Wall...
... sources such as power-supply cord or plug is grounded so as practical. The appliance has been exposed to operate normally or exhibits a marked change in wire to an antennadischarge unit, size of grounding connectors, location of antennadischarge unit, connection to grounding electrodes and requirements for replacement of cable entry as to environmental considerations. The appliance does not appear to rain; Wall...
User manual
Page 5
... 16 - Auto clock channel 20 - Daylight saving 20 Reset AV settings 21 Software upgrade 21 Connect Accessory Devices 21 Set Top Box to TV 21 Progressive Scan DVD Player/Recorder to TV 22 DVD Player/DVD Recorder/VCR to TV 22 Video Camera/Games Console to navigate through the TV menus 9 Demo...9 Picture menu 10 - Color temperature 10 - Balance 12 - Digital caption service 13 - TV ratings lock 15 - English Française Contents A Guide to Digital TV 2 Preparation 2 First time installation 5 Use of the remote control 6 Control Buttons on the TV 7 TV settings...
... 16 - Auto clock channel 20 - Daylight saving 20 Reset AV settings 21 Software upgrade 21 Connect Accessory Devices 21 Set Top Box to TV 21 Progressive Scan DVD Player/Recorder to TV 22 DVD Player/DVD Recorder/VCR to TV 22 Video Camera/Games Console to navigate through the TV menus 9 Demo...9 Picture menu 10 - Color temperature 10 - Balance 12 - Digital caption service 13 - TV ratings lock 15 - English Française Contents A Guide to Digital TV 2 Preparation 2 First time installation 5 Use of the remote control 6 Control Buttons on the TV 7 TV settings...
User manual
Page 6
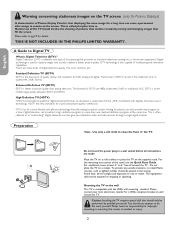
... of Plasma Display Panels is that displaying the same image for a long time can cause a permanent after-image to remain on the wall This TV is compatible with digitally enhanced sound technology, HDTV sets new standards for sound and picture quality in television. Française Español Do not insert the power plug in a wall socket before all around the TV. Analog broadcasts can only provide one standard definition program...
... of Plasma Display Panels is that displaying the same image for a long time can cause a permanent after-image to remain on the wall This TV is compatible with digitally enhanced sound technology, HDTV sets new standards for sound and picture quality in television. Française Español Do not insert the power plug in a wall socket before all around the TV. Analog broadcasts can only provide one standard definition program...
User manual
Page 7
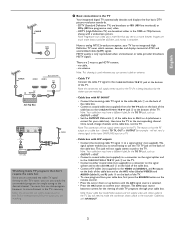
...-line progressive scan) video. - via antenna. Note: This connection will need to store channels in the 1080i or 720p formats, always with RF IN/OUT". You must first use the TO TV jack on a TV. - Note: Progressive scan video (p) is being broadcast by the station you are watching. - Note: If your cable box Audio/Video outputs will not supply video and stereo audio to the TV, you will not supply stereo sound to the TV if...
...-line progressive scan) video. - via antenna. Note: This connection will need to store channels in the 1080i or 720p formats, always with RF IN/OUT". You must first use the TO TV jack on a TV. - Note: Progressive scan video (p) is being broadcast by the station you are watching. - Note: If your cable box Audio/Video outputs will not supply video and stereo audio to the TV, you will not supply stereo sound to the TV if...
User manual
Page 8
... systems require separate, proprietary set top receiver boxes to decode their signals and send them to digital TV. These boxes may also press +CH- Consult your local dealer if your digital TV set for free. A blue indicator light on : Press the power switch . This means that a given broadcaster will supply stereo sound to install a small dish antenna outside. Note: This connection will have two channels on the remote control. There are watching. - To...
... systems require separate, proprietary set top receiver boxes to decode their signals and send them to digital TV. These boxes may also press +CH- Consult your local dealer if your digital TV set for free. A blue indicator light on : Press the power switch . This means that a given broadcaster will supply stereo sound to install a small dish antenna outside. Note: This connection will have two channels on the remote control. There are watching. - To...
User manual
Page 9
... view the program. Note - Press the POWER button on the remote control to on your Location with the cursor up/down to the Antenna input of several split screens/full screens you are transmitted by the cable provider or broadcaster. ' When the TV is received from the antenna/cable, the message CHANNEL NOT AVAILABLE will be able to receive pay channels when using direct antenna/cable connection to the television. § When the Set-top box...
... view the program. Note - Press the POWER button on the remote control to on your Location with the cursor up/down to the Antenna input of several split screens/full screens you are transmitted by the cable provider or broadcaster. ' When the TV is received from the antenna/cable, the message CHANNEL NOT AVAILABLE will be able to receive pay channels when using direct antenna/cable connection to the television. § When the Set-top box...
User manual
Page 10
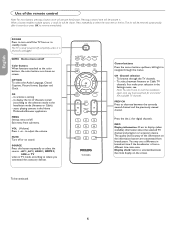
... the Audio Language, Closed Captions, Picture format, Equalizer and Clock. VOL (Volume) Press + or - DEMO Demo menu on/off or on screen. Press the dot (.) for and stored the available TV channels. Display clock: Select to where you have to standby mode. When a button enables multiple options, a small list will activate the function. to display the list of the remote control Note: For most buttons pressing a button once will be continued. SOURCE Press this button repeatedly...
... the Audio Language, Closed Captions, Picture format, Equalizer and Clock. VOL (Volume) Press + or - DEMO Demo menu on/off or on screen. Press the dot (.) for and stored the available TV channels. Display clock: Select to where you have to standby mode. When a button enables multiple options, a small list will activate the function. to display the list of the remote control Note: For most buttons pressing a button once will be continued. SOURCE Press this button repeatedly...
User manual
Page 16
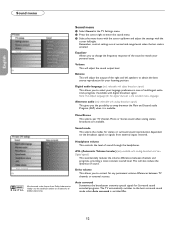
... license from external inputs received. Headphone volume This controls the level of the sound to the best surround sound mode when Auto surround is available. Remember, control settings are available. Equalizer Allows you the possibility to swap between channels and programs, providing a more constant overall level. Volume This will adjust the output of multilingual audio track programs if available with analog broadcast and nonDigital signals) This automatically reduces the volume differences...
... license from external inputs received. Headphone volume This controls the level of the sound to the best surround sound mode when Auto surround is available. Remember, control settings are available. Equalizer Allows you the possibility to swap between channels and programs, providing a more constant overall level. Volume This will adjust the output of multilingual audio track programs if available with analog broadcast and nonDigital signals) This automatically reduces the volume differences...
User manual
Page 18
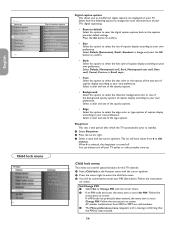
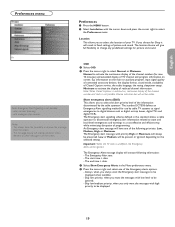
Select a color and one of caption display according to Change PIN. Follow the instructions on screen. Follow the instructions on screen. Español Française English TV menu Features Closed captions Caption service Digital caption service Digital caption options Sleeptimer Child lock Change PIN On timer Info Digital caption options Reset to default Size Style Text color Text opacity Background color Background opacity Edge type Child lock menu Digital caption options This allows you to modify how digital captions are valid numbers. " Select a value with...
Select a color and one of caption display according to Change PIN. Follow the instructions on screen. Follow the instructions on screen. Español Française English TV menu Features Closed captions Caption service Digital caption service Digital caption options Sleeptimer Child lock Change PIN On timer Info Digital caption options Reset to default Size Style Text color Text opacity Background color Background opacity Edge type Child lock menu Digital caption options This allows you to modify how digital captions are valid numbers. " Select a value with...
User manual
Page 21
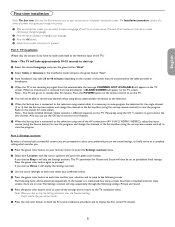
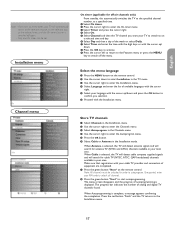
... switches the TV to the specified channel number, at the selected time, until the On timer function is displayed. Press the red button "Finish" and the TV returns to select Installation in your language with the cursor up / down. ! When Autoprogramming is selected, the TV will detect antenna signals and will automatically switch to enter the On timer menu. Select the menu language & Press the MENU button on the remote control. é Use...
... switches the TV to the specified channel number, at the selected time, until the On timer function is displayed. Press the red button "Finish" and the TV returns to select Installation in your language with the cursor up / down. ! When Autoprogramming is selected, the TV will detect antenna signals and will automatically switch to enter the On timer menu. Select the menu language & Press the MENU button on the remote control. é Use...
User manual
Page 22
... the green color button to uninstall the selected channel. The uninstalled channel is indicated in the list by an icon in the master channel map, the TV will not be removed; - digital channels that it manually. This is only available for Antenna or Cable whether these signals are not encountered any favorite list; - Uninstall channels This allows you to uninstall a stored channel so that are present. Note: Subchannel selections - Installation update...
... the green color button to uninstall the selected channel. The uninstalled channel is indicated in the list by an icon in the master channel map, the TV will not be removed; - digital channels that it manually. This is only available for Antenna or Cable whether these signals are not encountered any favorite list; - Uninstall channels This allows you to uninstall a stored channel so that are present. Note: Subchannel selections - Installation update...
User manual
Page 23
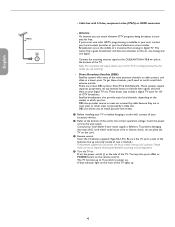
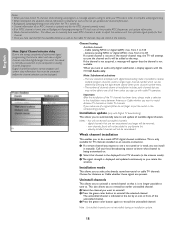
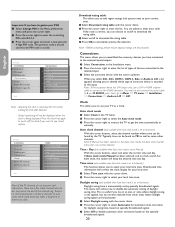
...) This allows you choose for max. 10 minutes) and extended display of TV channel and program information on the main or auxiliary program, input signal quality of connected accessory devices, the display format, sound mode, availability of Closed Caption service, the audio language, the rating, sleeptimer setup. The end time + date. & Select Show Emergency Alerts in fixed settings of reduced channel information. Skip low/medium priority, when you always want the...
...) This allows you choose for max. 10 minutes) and extended display of TV channel and program information on the main or auxiliary program, input signal quality of connected accessory devices, the display format, sound mode, availability of Closed Caption service, the audio language, the rating, sleeptimer setup. The end time + date. & Select Show Emergency Alerts in fixed settings of reduced channel information. Skip low/medium priority, when you always want the...
User manual
Page 24
... Audio in L/R, a list appears allowing you want to see closed caption. Time - " Press the cursor again and enter a new personal 4-digit PIN code. If the code is set to Automatic) This function allows you to use a DVI to HDMI adapter cable to connect to the HDMI connector. Typically time can not be found by specially broadcasted signals. If Auto clock mode Manual has been selected, and no clock. There are a few cable channels...
... Audio in L/R, a list appears allowing you want to see closed caption. Time - " Press the cursor again and enter a new personal 4-digit PIN code. If the code is set to Automatic) This function allows you to use a DVI to HDMI adapter cable to connect to the HDMI connector. Typically time can not be found by specially broadcasted signals. If Auto clock mode Manual has been selected, and no clock. There are a few cable channels...
User manual
Page 25
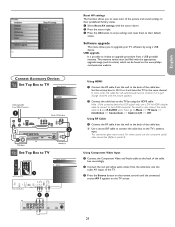
... sound settings to their default values. Just change channels until the connected source AV 1 appears on the www.philips. Using Component Video Input & Connect the Component Video and Audio cable to the back of the cable box accordingly. é Connect the red and white audio cables from the wall to the back of the cable box. 2 Use a second RF cable to connect the cable box to the TV's antenna input. " Press the Source button on the remote control until the picture appears. é Connect the cable box to the TV by using the HDMI cable. USB upgrade...
... sound settings to their default values. Just change channels until the connected source AV 1 appears on the www.philips. Using Component Video Input & Connect the Component Video and Audio cable to the back of the cable box accordingly. é Connect the red and white audio cables from the wall to the back of the cable box. 2 Use a second RF cable to connect the cable box to the TV's antenna input. " Press the Source button on the remote control until the picture appears. é Connect the cable box to the TV by using the HDMI cable. USB upgrade...
User manual
Page 27
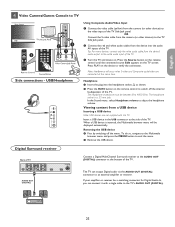
... white audio cable from the device's audio output to verify the connection. Press PLAY on the remote control to the TV Side Jack panel. é Connect the red and white audio cables from the camera (or other devices) to TV Next Source TV AV 1 AV 2 HDMI 1 HDMI 2 Side 3 USB 2 1 1 Source Button Side connections - In the Sound menu, select Headphone volume to exit the menu. é Remove the USB device. To do so, navigate to the Multimedia browser menu and press the MENU button to adjust...
... white audio cable from the device's audio output to verify the connection. Press PLAY on the remote control to the TV Side Jack panel. é Connect the red and white audio cables from the camera (or other devices) to TV Next Source TV AV 1 AV 2 HDMI 1 HDMI 2 Side 3 USB 2 1 1 Source Button Side connections - In the Sound menu, select Headphone volume to exit the menu. é Remove the USB device. To do so, navigate to the Multimedia browser menu and press the MENU button to adjust...
User manual
Page 30
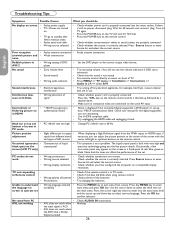
... a fixed point of DVD player • Set the DVD player to Remote control • Check if the remote control is displayed if the connected digital equipment's (DVD player or set the main menu. Check whether the source is still no composite video are in HDMI • Noise is in AV1/2 • Wrong setting of red, blue, green or black. Press the OK key confirm selection. If there is correctly selected. bottom of screen in PC mode Picture position adjustment...
... a fixed point of DVD player • Set the DVD player to Remote control • Check if the remote control is displayed if the connected digital equipment's (DVD player or set the main menu. Check whether the source is still no composite video are in HDMI • Noise is in AV1/2 • Wrong setting of red, blue, green or black. Press the OK key confirm selection. If there is correctly selected. bottom of screen in PC mode Picture position adjustment...
User manual
Page 36
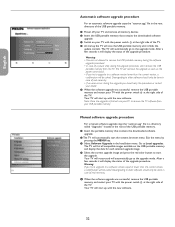
... root directory of the USB portable memory. & Power off your TV and remove all compatible images available on your TV with the new software. 32 Manual software upgrade procedure For a manual software upgrade copy the "autorun.upg" file in a directory called "Upgrades" located in the Installation menu. " Switch on the USB portable memory and display the data for each selected upgrade image. ' Select the correct upgrade image and press the red color button to a software version lower than the...
... root directory of the USB portable memory. & Power off your TV and remove all compatible images available on your TV with the new software. 32 Manual software upgrade procedure For a manual software upgrade copy the "autorun.upg" file in a directory called "Upgrades" located in the Installation menu. " Switch on the USB portable memory and display the data for each selected upgrade image. ' Select the correct upgrade image and press the red color button to a software version lower than the...
User manual
Page 39
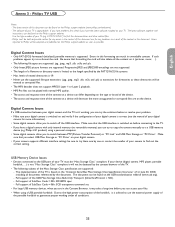
...-8070i spec. - If you have problems first check if you have a digital camera with only internal memory (no removable memory) you to guarantee proper working , you have the latest software installed on the USB standardisation website (www.usb.org). - The implementation of the TV is 19. • Never use the external power supply of nested directories is based on the Philips support website. Full support of SubClass Code = 05h...
...-8070i spec. - If you have problems first check if you have a digital camera with only internal memory (no removable memory) you to guarantee proper working , you have the latest software installed on the USB standardisation website (www.usb.org). - The implementation of the TV is 19. • Never use the external power supply of nested directories is based on the Philips support website. Full support of SubClass Code = 05h...

Leaflet
Page 2
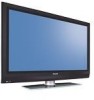
Widescreen flat TV with Pixel Plus 3 HD 50" plasma integrated digital Highlights 50PFP5332D/37 Integrated HDTV Cable Ready The built-in your television experience. It will create the sensation of Dolby Pro Logic without having to perform any complex installation procedure or technical analysis. 2 HDMI inputs HDMI makes an uncompressed digital RGB connection from multimedia to the screen. Your TV is fully backward compatible with the source device. Artifacts and noise...
Widescreen flat TV with Pixel Plus 3 HD 50" plasma integrated digital Highlights 50PFP5332D/37 Integrated HDTV Cable Ready The built-in your television experience. It will create the sensation of Dolby Pro Logic without having to perform any complex installation procedure or technical analysis. 2 HDMI inputs HDMI makes an uncompressed digital RGB connection from multimedia to the screen. Your TV is fully backward compatible with the source device. Artifacts and noise...
Leaflet
Page 3
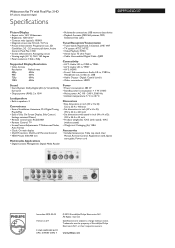
... x 4.2 inch • Product weight (lb): 124.3 (with stand in , USB • Audio Output - Specifications are the property of Use: On Screen Display, Side Control, Settings assistant Wizard • Remote control type: RC2033601 • Remote Control: TV • Screen Format Adjustments: 7 Widescreen Modes, Auto Format • Clock: On main display • Child Protection: Child Lock+Parental Control • VESA Mount: 600x400 mm Multimedia Applications • Digital Content Management: Digital Media Reader Power • Power consumption: 480 W • Standby power consumption...
... x 4.2 inch • Product weight (lb): 124.3 (with stand in , USB • Audio Output - Specifications are the property of Use: On Screen Display, Side Control, Settings assistant Wizard • Remote control type: RC2033601 • Remote Control: TV • Screen Format Adjustments: 7 Widescreen Modes, Auto Format • Clock: On main display • Child Protection: Child Lock+Parental Control • VESA Mount: 600x400 mm Multimedia Applications • Digital Content Management: Digital Media Reader Power • Power consumption: 480 W • Standby power consumption...


