
User manual
Page 1
Need help at www.p4c.philips.com or call 1-800-531-0039 while with your product. If you have read your instructions and still need assistance you for quick tips that your using your User Manual first for choosing Philips. Read your Philips product more enjoyable. User Manual Color TV 14PT6441/37 20PT6441/37 20PT6341/37 20PT5441/37 Thank you may access our online help fast? Model No.: Serial No.: 3141 055 22591
Need help at www.p4c.philips.com or call 1-800-531-0039 while with your product. If you have read your instructions and still need assistance you for quick tips that your using your User Manual first for choosing Philips. Read your Philips product more enjoyable. User Manual Color TV 14PT6441/37 20PT6441/37 20PT6341/37 20PT5441/37 Thank you may access our online help fast? Model No.: Serial No.: 3141 055 22591

User manual
Page 2
... Basic Connection 1 AutoPicture™ Control 25 Audio/Video Connections AutoSound™ Control 25 AV Input Jacks 4 Basic Remote Operation 3 Component Video Input Jacks 7 Basic Television Operation 3 Front (Side) Audio/Video Input Jacks . . .5 Cable Box Connection 2 Headphone Jack 5 Channel Edit 14 AV Output Jacks 8 Closed Caption Control 25 S-Video Input Jacks 6 Factory Service Locations 30-31 AutoLock™ Controls Format Controls 17 Access Code 19 Language Controls 11 Block All Channels 21 Limited Warranty 32 Block Channels 20 Picture Menu Controls 15...
... Basic Connection 1 AutoPicture™ Control 25 Audio/Video Connections AutoSound™ Control 25 AV Input Jacks 4 Basic Remote Operation 3 Component Video Input Jacks 7 Basic Television Operation 3 Front (Side) Audio/Video Input Jacks . . .5 Cable Box Connection 2 Headphone Jack 5 Channel Edit 14 AV Output Jacks 8 Closed Caption Control 25 S-Video Input Jacks 6 Factory Service Locations 30-31 AutoLock™ Controls Format Controls 17 Access Code 19 Language Controls 11 Block All Channels 21 Limited Warranty 32 Block Channels 20 Picture Menu Controls 15...
User manual
Page 3
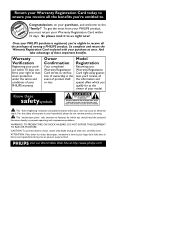
... advantage of lightning" indicates uninsulated material within 10 days. Owner Confirmation Your completed Warranty Registration Card serves as the owner of owning a PHILIPS product. NO USER-SERVICEABLE PARTS INSIDE. CAUTION: To prevent electric shock, match wide blade of plug to receive all the privileges of your model. Return your Warranty Registration Card today to ensure you receive all the benefits...
... advantage of lightning" indicates uninsulated material within 10 days. Owner Confirmation Your completed Warranty Registration Card serves as the owner of owning a PHILIPS product. NO USER-SERVICEABLE PARTS INSIDE. CAUTION: To prevent electric shock, match wide blade of plug to receive all the privileges of your model. Return your Warranty Registration Card today to ensure you receive all the benefits...
User manual
Page 4
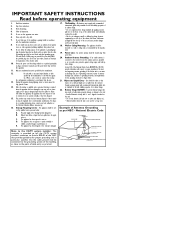
... the grounding electrode. All televisions must comply with the manufacturers instructions. 8. Power Lines - Outdoor Antenna Grounding - Example of antennadischarge unit, connection to rain or moisture, does not operate normally, or has been dropped. 15. Follow all warnings. 4. Clean only with a cart, stand, tripod, bracket, or table specified by the manufacturer. 12. Install in performance; A polarized plug has two blades with...
... the grounding electrode. All televisions must comply with the manufacturers instructions. 8. Power Lines - Outdoor Antenna Grounding - Example of antennadischarge unit, connection to rain or moisture, does not operate normally, or has been dropped. 15. Follow all warnings. 4. Clean only with a cart, stand, tripod, bracket, or table specified by the manufacturer. 12. Install in performance; A polarized plug has two blades with...
User manual
Page 6
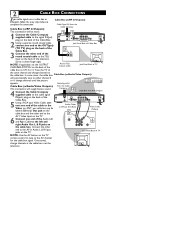
... the Cable Box. 5 Using a RCA type Video Cable, connect one end to the left and right Audio Out L & R jacks on the back of TV cable box to the same channel and change channels at the cable box, not the television. Cable Signal IN from the Cable Company 4 Cable Box with A/V Outputs TO TV/VCR CABLE IN VIDEO AUDIO IN SPDIF IN OUT R L IR DVD-D OUT S-VIDEO AUDIO OUT Y Pb Pr USB TV PASSCARD OPTICAL SPDIF Audio Cables L (White) & R (Red) 5 Video Cable (Yellow) AV1 Video Input on the TV. 6 Connect one...
... the Cable Box. 5 Using a RCA type Video Cable, connect one end to the left and right Audio Out L & R jacks on the back of TV cable box to the same channel and change channels at the cable box, not the television. Cable Signal IN from the Cable Company 4 Cable Box with A/V Outputs TO TV/VCR CABLE IN VIDEO AUDIO IN SPDIF IN OUT R L IR DVD-D OUT S-VIDEO AUDIO OUT Y Pb Pr USB TV PASSCARD OPTICAL SPDIF Audio Cables L (White) & R (Red) 5 Video Cable (Yellow) AV1 Video Input on the TV. 6 Connect one...
User manual
Page 8
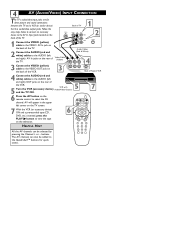
... direct picture and sound connections between the TV and a VCR (or similar device) that has audio/video output jacks. 4 AV (AUDIO/VIDEO) INPUT CONNECTION The TV's audio/video input jacks are for quick access. AV will appear in the upper left corner on the TV screen. 7 With the VCR (or accessory device) ON and a prerecorded tape (CD, DVD, etc.) inserted, press the PLAY ᮣ button to the VIDEO OUT jack on the back of Typical VCR 4 Connect the AUDIO (red...
... direct picture and sound connections between the TV and a VCR (or similar device) that has audio/video output jacks. 4 AV (AUDIO/VIDEO) INPUT CONNECTION The TV's audio/video input jacks are for quick access. AV will appear in the upper left corner on the TV screen. 7 With the VCR (or accessory device) ON and a prerecorded tape (CD, DVD, etc.) inserted, press the PLAY ᮣ button to the VIDEO OUT jack on the back of Typical VCR 4 Connect the AUDIO (red...

User manual
Page 10
... jacks on the rear of the VCR. 3 Turn the VCR and the TV ON. 4 Press the AV button or the CH + or CH - buttons on the remote to scroll the channels until SVHS appears in 75‰ VIDEO Y L S-VIDEO Pb AUDIO R Pr 1 Back of the TV. 6 S-VIDEO (S-VHS) INPUT CONNECTIONS The S(uper)-Video connection on the rear NOTE: When using additional accessories, only one end the AUDIO (red and white) CABLES to...
... jacks on the rear of the VCR. 3 Turn the VCR and the TV ON. 4 Press the AV button or the CH + or CH - buttons on the remote to scroll the channels until SVHS appears in 75‰ VIDEO Y L S-VIDEO Pb AUDIO R Pr 1 Back of the TV. 6 S-VIDEO (S-VHS) INPUT CONNECTIONS The S(uper)-Video connection on the rear NOTE: When using additional accessories, only one end the AUDIO (red and white) CABLES to...
User manual
Page 11
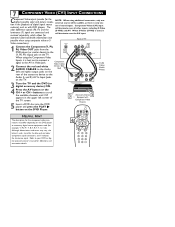
.... When S-Video (S-VHS) is best not to connect a signal to scroll the available channels until CVI appears in Video Jack. Refer to your DVD or digital accessory owner's manual for the blue and red color component signal connectors, and Y indicates the luminance signal. Back of TV Video connections). 1 Connect the Component (Y, Pb, Pr) Video OUT jacks from the DVD player (or similar device) to the Audio (L and R) AV In Input Jacks COMP VIDEO Y Pb S-VIDEO VIDEO AUDIO R OUT OUT OUT Audio Cables (Red & White...
.... When S-Video (S-VHS) is best not to connect a signal to scroll the available channels until CVI appears in Video Jack. Refer to your DVD or digital accessory owner's manual for the blue and red color component signal connectors, and Y indicates the luminance signal. Back of TV Video connections). 1 Connect the Component (Y, Pb, Pr) Video OUT jacks from the DVD player (or similar device) to the Audio (L and R) AV In Input Jacks COMP VIDEO Y Pb S-VIDEO VIDEO AUDIO R OUT OUT OUT Audio Cables (Red & White...

User manual
Page 12
Set the audio system's volume to connect an external audio system for better sound reproduction. AUDIO SYSTEM CONNECTION: Back of TV 1 AV Out CVI AV In VIDEO Y L Pb AUDIO R Pr S-VIDEO 1 R L AUX/TV INPUT PHONO INPUT Audio Cables (Red and White) SECOND VCR CONNECTION: NOTE: Refer to panel number 4 for proper connection) Connect the other end to the VIDEO IN plug on the second VCR. 2 Connect one end of the red and white Audio cable from the AV Out AUDIO L and R plugs on...
Set the audio system's volume to connect an external audio system for better sound reproduction. AUDIO SYSTEM CONNECTION: Back of TV 1 AV Out CVI AV In VIDEO Y L Pb AUDIO R Pr S-VIDEO 1 R L AUX/TV INPUT PHONO INPUT Audio Cables (Red and White) SECOND VCR CONNECTION: NOTE: Refer to panel number 4 for proper connection) Connect the other end to the VIDEO IN plug on the second VCR. 2 Connect one end of the red and white Audio cable from the AV Out AUDIO L and R plugs on...
User manual
Page 13
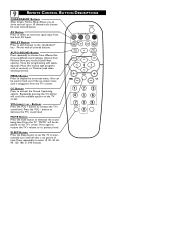
...'s volume to activate the Closed Captioning options. AV Button Press to back out of time. Choose from the front AV Inputs. Buttons Press the VOL + button to 10 channels you choose for musical type programs such as concerts), or Theatre (used to select an accessory signal input from Personal (how you set period of the on -screen menu. Also can VOL be displayed on the TV screen. 9 REMOTE CONTROL BUTTON DESCRIPTIONS QUADRASURF Buttons (Red, Green...
...'s volume to activate the Closed Captioning options. AV Button Press to back out of time. Choose from the front AV Inputs. Buttons Press the VOL + button to 10 channels you choose for musical type programs such as concerts), or Theatre (used to select an accessory signal input from Personal (how you set period of the on -screen menu. Also can VOL be displayed on the TV screen. 9 REMOTE CONTROL BUTTON DESCRIPTIONS QUADRASURF Buttons (Red, Green...
User manual
Page 14
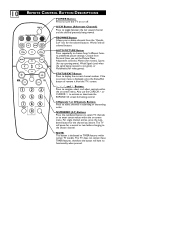
... TIMER features, therefore the button will pause for video games). Also use the CURSOR 3 or CURSOR 4 to activate or deactivate the EXPAND 4:3 screen formatting control. Works with all colored buttons. For single channel entries, press the numbered button for the channel you to delete channels from the TV's screen. 3, 4, 1, and 2 Buttons Press to navigate, select, and adjust controls within the on or off. FROWNIE Button Allows you desire. Choose from 5 different factory predefined picture settings...
... TIMER features, therefore the button will pause for video games). Also use the CURSOR 3 or CURSOR 4 to activate or deactivate the EXPAND 4:3 screen formatting control. Works with all colored buttons. For single channel entries, press the numbered button for the channel you to delete channels from the TV's screen. 3, 4, 1, and 2 Buttons Press to navigate, select, and adjust controls within the on or off. FROWNIE Button Allows you desire. Choose from 5 different factory predefined picture settings...
User manual
Page 15
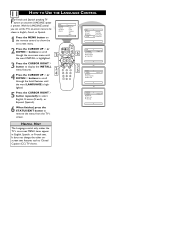
... TV owners an onscreen LANGUAGE option is highlighted. auto. Main Picture Sound Features Install 1 Press the MENU button on the remote control to show the on-screen menu. 2 Press the CURSOR UP 3 or DOWN 4 buttons to scroll though the on -screen menu to scroll 4 through the Install features until 1 the word INSTALL is present. Brightness Color Picture Sharpness Tint More... 2 46 Main Picture Sound Features Install Language Tuner Mode Auto Program Channel Edit Install Language Tuner Mode Auto Program Channel Edit English 3 Press...
... TV owners an onscreen LANGUAGE option is highlighted. auto. Main Picture Sound Features Install 1 Press the MENU button on the remote control to show the on-screen menu. 2 Press the CURSOR UP 3 or DOWN 4 buttons to scroll though the on -screen menu to scroll 4 through the Install features until 1 the word INSTALL is present. Brightness Color Picture Sharpness Tint More... 2 46 Main Picture Sound Features Install Language Tuner Mode Auto Program Channel Edit Install Language Tuner Mode Auto Program Channel Edit English 3 Press...

User manual
Page 16
... ANTENNA, CABLE, or AUTO mode. 12 HOW TO USE THE TUNER MODE CONTROL T he TUNER MODE control allows you to change the TV's input signal to look for the TV to know what type of signal it detects when the AUTO PROGRAM feature is selected, channels 1125 are available. Main Picture Sound Features Install Language Tuner Mode Auto Program Channel Edit 1 Press the MENU button on the remote to show the on-screen menu. 2 Press the CURSOR UP 3 or DOWN 4 buttons to the correct mode based...
... ANTENNA, CABLE, or AUTO mode. 12 HOW TO USE THE TUNER MODE CONTROL T he TUNER MODE control allows you to change the TV's input signal to look for the TV to know what type of signal it detects when the AUTO PROGRAM feature is selected, channels 1125 are available. Main Picture Sound Features Install Language Tuner Mode Auto Program Channel Edit 1 Press the MENU button on the remote to show the on-screen menu. 2 Press the CURSOR UP 3 or DOWN 4 buttons to the correct mode based...

User manual
Page 17
... area (or Cable TV) channels. Note: Make sure the antenna or cable signal connection has been completed before AUTO PROGRAM is highlighted. 3 Press the CURSOR RIGHT 2 button to display the INSTALL menu features. 2 4 1 2 VOL 4 4 Press CURSOR UP 3 or DOWN 4 buttons to the correct mode based on -screen menu until the words AUTO PROGRAM are available. Install Language Tuner Mode Auto Program Channel Edit 6 3 Auto Program Channel 12 Auto Program Channel 13 Auto Program Channel 14 5 Press the CURSOR RIGHT 2 button to remove the menu from the TV...
... area (or Cable TV) channels. Note: Make sure the antenna or cable signal connection has been completed before AUTO PROGRAM is highlighted. 3 Press the CURSOR RIGHT 2 button to display the INSTALL menu features. 2 4 1 2 VOL 4 4 Press CURSOR UP 3 or DOWN 4 buttons to the correct mode based on -screen menu until the words AUTO PROGRAM are available. Install Language Tuner Mode Auto Program Channel Edit 6 3 Auto Program Channel 12 Auto Program Channel 13 Auto Program Channel 14 5 Press the CURSOR RIGHT 2 button to remove the menu from the TV...

User manual
Page 18
... -screen menu until the words CHANNEL EDIT are used, those channels will indicate that have not been skipped. buttons. 9 When finished, press the STATUS/EXIT button to show the onscreen menu. you to a specific numbered chan- nel that you can also use the NUMBERED buttons to go directly to ADD or DELETE channels from the screen. Brightness Color Picture Sharpness Tint More... 2 49 3 5 8 6 6 8 Main Picture Sound Features Install Language Tuner Mode Auto Program Channel Edit Install Language Tuner Mode Auto Program Channel...
... -screen menu until the words CHANNEL EDIT are used, those channels will indicate that have not been skipped. buttons. 9 When finished, press the STATUS/EXIT button to show the onscreen menu. you to a specific numbered chan- nel that you can also use the NUMBERED buttons to go directly to ADD or DELETE channels from the screen. Brightness Color Picture Sharpness Tint More... 2 49 3 5 8 6 6 8 Main Picture Sound Features Install Language Tuner Mode Auto Program Channel Edit Install Language Tuner Mode Auto Program Channel...
User manual
Page 22
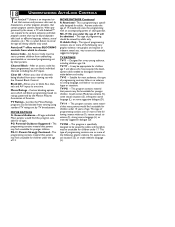
..., etc.). TV-MA -- AutoLock™ offers various BLOCKING controls from which will be admitted. - After an access code has been programmed, you clear all ages. Just like the Movie Ratings, programs can be blocked from viewing using standard TV ratings set to the content advisories and block program content that many parents would find unsuitable for children under the age...
..., etc.). TV-MA -- AutoLock™ offers various BLOCKING controls from which will be admitted. - After an access code has been programmed, you clear all ages. Just like the Movie Ratings, programs can be blocked from viewing using standard TV ratings set to the content advisories and block program content that many parents would find unsuitable for children under the age...

User manual
Page 23
... to set a personal access code: Main Picture Sound Features Install AutoLock Format Features AutoLock Format Timer Start Time Stop Time Channel Activate Display 1 Press the MENU button on the screen, and you will need to block channels and get a better understanding of the rating terms for certain programming. "INCORRECT CODE" will appear on the remote to enter a "New Code." Enter your new code and then display the AutoLock™ menu options. Proceed to the next panel...
... to set a personal access code: Main Picture Sound Features Install AutoLock Format Features AutoLock Format Timer Start Time Stop Time Channel Activate Display 1 Press the MENU button on the screen, and you will need to block channels and get a better understanding of the rating terms for certain programming. "INCORRECT CODE" will appear on the remote to enter a "New Code." Enter your new code and then display the AutoLock™ menu options. Proceed to the next panel...
User manual
Page 30
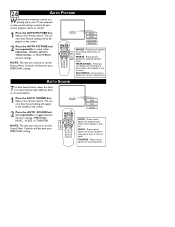
..., MUSIC, VOICE, or THEATRE) NOTE: The way you choose to select either PERSONAL, MOVIES, SPORTS, WEAK SIGNAL, or MULTIMEDIA picture settings. WEAK SIGNAL - Preset picture options for watching sporting events. Preset picture options for watching movies. AUTO SOUND T he Auto Sound feature allows the listener to set sound options. 1 Press the AUTO SOUND button on the remote control. The current Auto Sound setting will become your PERSONAL setting. Preset sound options for use with video gaming.
..., MUSIC, VOICE, or THEATRE) NOTE: The way you choose to select either PERSONAL, MOVIES, SPORTS, WEAK SIGNAL, or MULTIMEDIA picture settings. WEAK SIGNAL - Preset picture options for watching sporting events. Preset picture options for watching movies. AUTO SOUND T he Auto Sound feature allows the listener to set sound options. 1 Press the AUTO SOUND button on the remote control. The current Auto Sound setting will become your PERSONAL setting. Preset sound options for use with video gaming.
User manual
Page 33
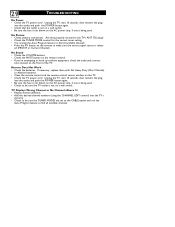
... POWER button again. • Check that the outlet is not on a wall switch. • Be sure the fuse is not blown on a wall switch. 29 TROUBLESHOOTING No Power • Check the TV power cord. Unplug the TV, wait 10 seconds, then reinsert the plug into the TV's memory. • Check to be sure the TUNER MODES are set to the CABLE option and run the Auto Program...
... POWER button again. • Check that the outlet is not on a wall switch. • Be sure the fuse is not blown on a wall switch. 29 TROUBLESHOOTING No Power • Check the TV power cord. Unplug the TV, wait 10 seconds, then reinsert the plug into the TV's memory. • Check to be sure the TUNER MODES are set to the CABLE option and run the Auto Program...

Leaflet
Page 2
...sound dimension. Component Video Input (YPbPr) Component Video is an audio technology from left and right in such a way that dramatically magnifies the sound field to immerse you to connect external devices like audio equipment, games and video cameras. Specifications are the property of Koninklijke Philips Electronics N.V. TV 20" real flat Specifications 20PT6341/37 Highlights Picture/Display • Aspect ratio: 4:3 • Visible screen diagonal (inch): 20 inch • Display screen type: Real Flat picture tube • Picture enhancement: Contrast Plus, AutoPicture (5 modes...
...sound dimension. Component Video Input (YPbPr) Component Video is an audio technology from left and right in such a way that dramatically magnifies the sound field to immerse you to connect external devices like audio equipment, games and video cameras. Specifications are the property of Koninklijke Philips Electronics N.V. TV 20" real flat Specifications 20PT6341/37 Highlights Picture/Display • Aspect ratio: 4:3 • Visible screen diagonal (inch): 20 inch • Display screen type: Real Flat picture tube • Picture enhancement: Contrast Plus, AutoPicture (5 modes...


