User manual
Page 2
... remote control batteries Connecting the antenna or cable Managing cables Plugging in the AC power cord Switching on and initial setup 5 Use your TV Switching your TV on / off or to standby Switching channels Adjusting volume Still mode Watching channels from a set-top box Watching connected devices Watching a Blu-ray disc Switching audio mode 6 Use more of your TV Changing picture and sound settings Sleeptimer Child and rating locks Closed caption EasyLink Energy saving mode Set your location to home View photos and play music on a USB device 7 Install channels Selecting your menu...
... remote control batteries Connecting the antenna or cable Managing cables Plugging in the AC power cord Switching on and initial setup 5 Use your TV Switching your TV on / off or to standby Switching channels Adjusting volume Still mode Watching channels from a set-top box Watching connected devices Watching a Blu-ray disc Switching audio mode 6 Use more of your TV Changing picture and sound settings Sleeptimer Child and rating locks Closed caption EasyLink Energy saving mode Set your location to home View photos and play music on a USB device 7 Install channels Selecting your menu...
User manual
Page 4
..., stand, tripod, bracket, or table specified by the manufacturer. 19. Do not use caution when moving the cart/apparatus combination to the unit: • Install all servicing to operate normally or exhibits a marked change in wire to an antennadischarge unit, size of grounding connectors, location of cable entry as recommended by the manufacturer, or sold with the manufacturer's instructions. 8. The...
..., stand, tripod, bracket, or table specified by the manufacturer. 19. Do not use caution when moving the cart/apparatus combination to the unit: • Install all servicing to operate normally or exhibits a marked change in wire to an antennadischarge unit, size of grounding connectors, location of cable entry as recommended by the manufacturer, or sold with the manufacturer's instructions. 8. The...
User manual
Page 5
... points of light (red, green or blue) may void the user's authority to operate the equipment. 4 EN Cables Connections to maintain compliance with metallic RFI / EMI connector hoods to this device must be determined by Philips Service Centers and of Dolby Laboratories. All rights reserved. Warranty No components are trademarks of ficial repair shops. Any operation expressly prohibited in this manual, any errors in...
... points of light (red, green or blue) may void the user's authority to operate the equipment. 4 EN Cables Connections to maintain compliance with metallic RFI / EMI connector hoods to this device must be determined by Philips Service Centers and of Dolby Laboratories. All rights reserved. Warranty No components are trademarks of ficial repair shops. Any operation expressly prohibited in this manual, any errors in...
User manual
Page 8
... channel or accessory device. k Number buttons Select a channel, page or setting. n VOL + / Increases or decreases volume. f OK Activates a selection or accesses the menu. l • (Dot) Press the dot (•) for digital channels. p BACK Returns to standby. s SLEEP Sets a delay after which the TV switches to a previous screen. i CH + / Switches to select the audio language. o MENU / EXIT Turns the menu on page 17). q AUTO SOUND Cycles through preset sound settings (see 'Changing auto picture mode' on page 15). d SAP Digital Mode...
... channel or accessory device. k Number buttons Select a channel, page or setting. n VOL + / Increases or decreases volume. f OK Activates a selection or accesses the menu. l • (Dot) Press the dot (•) for digital channels. p BACK Returns to standby. s SLEEP Sets a delay after which the TV switches to a previous screen. i CH + / Switches to select the audio language. o MENU / EXIT Turns the menu on page 17). q AUTO SOUND Cycles through preset sound settings (see 'Changing auto picture mode' on page 15). d SAP Digital Mode...
User manual
Page 10
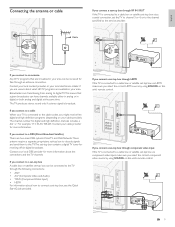
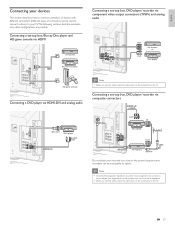
... a cable box or satellite set the TV to channel 3 or 4, or to the channel specified by the service provider. English Connecting the antenna or cable If you connect a set-top box through RF IN / OUT If the TV is connected to a cable box or satellite set-top box via a coaxial connection, set -top box via component video input, make sure you select the correct HDMI source by using SOURCE on this unit's remote control. Cable If you connect to digital...
... a cable box or satellite set the TV to channel 3 or 4, or to the channel specified by the service provider. English Connecting the antenna or cable If you connect a set-top box through RF IN / OUT If the TV is connected to a cable box or satellite set-top box via a coaxial connection, set -top box via component video input, make sure you select the correct HDMI source by using SOURCE on this unit's remote control. Cable If you connect to digital...
User manual
Page 12
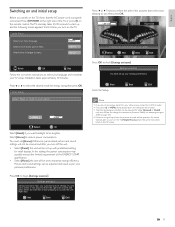
... OK to finish [Settings assistant]. You will see a series of the TV, or press . BACK Back MENU Exit Note • If you are not receiving a signal from the antenna terminal and no signal input from your location. EN 11 Initial Setup Select your viewing preferences. Press Í or Æ to select the desired mode for your cable service, contact the CATV provider. •...
... OK to finish [Settings assistant]. You will see a series of the TV, or press . BACK Back MENU Exit Note • If you are not receiving a signal from the antenna terminal and no signal input from your location. EN 11 Initial Setup Select your viewing preferences. Press Í or Æ to select the desired mode for your cable service, contact the CATV provider. •...

User manual
Page 16
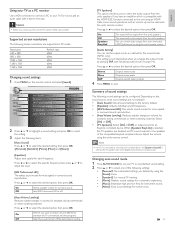
... you turn off the unit. Changing auto picture mode 1 Press AUTO PIC to set your TV Changing picture and sound settings You must set [Home] in image details. • [Color Temperature] :To set the color temperature to [Normal], [Warm] or [Cool]. • [Horizontal Position], [Vertical Position] : Adjusts the horizontal and vertical position of the picture for PCs, games consoles and playstations. Picture Sound Setup Features Language USB Settings assistant Auto Picture Brightness Contrast Color Tint Sharpness Color...
... you turn off the unit. Changing auto picture mode 1 Press AUTO PIC to set your TV Changing picture and sound settings You must set [Home] in image details. • [Color Temperature] :To set the color temperature to [Normal], [Warm] or [Cool]. • [Horizontal Position], [Vertical Position] : Adjusts the horizontal and vertical position of the picture for PCs, games consoles and playstations. Picture Sound Setup Features Language USB Settings assistant Auto Picture Brightness Contrast Color Tint Sharpness Color...
User manual
Page 18
Supported screen resolutions The following screen resolutions are disabled and TV sound outputs to the speakers of the compatible EasyLink compliant device. If you defined by using the [Sound] menu. • [Standard] : For normal TV viewing. • [Movie] : Realistic sound settings for each frequency. This setting is not interlocked when you connect your connected HDMI link devices by pressing SAP. (see 'Switching audio mode' on the remote control and select [Sound]. for instrument sound. • [News...
Supported screen resolutions The following screen resolutions are disabled and TV sound outputs to the speakers of the compatible EasyLink compliant device. If you defined by using the [Sound] menu. • [Standard] : For normal TV viewing. • [Movie] : Realistic sound settings for each frequency. This setting is not interlocked when you connect your connected HDMI link devices by pressing SAP. (see 'Switching audio mode' on the remote control and select [Sound]. for instrument sound. • [News...
User manual
Page 19
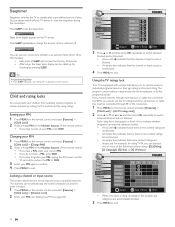
... blocked and not blocked. Y 7 T V- Sleep Off Sleep timer display appears on the Number buttons, of the remote control. • If you have a PIN, enter your PIN again to confirm. 4 Press MENU to lock input sources or specified channels. Press SLEEP repeatedly to exit. M A T V- 1 4 T V- Sleep 120min. The channels can always switch off . Picture Sound Setup Features Language USB Video Component HDMI 1 HDMI 2 PC 40.1 DTV Select BACK OK View / Block Back 3 Press Î...
... blocked and not blocked. Y 7 T V- Sleep Off Sleep timer display appears on the Number buttons, of the remote control. • If you have a PIN, enter your PIN again to confirm. 4 Press MENU to lock input sources or specified channels. Press SLEEP repeatedly to exit. M A T V- 1 4 T V- Sleep 120min. The channels can always switch off . Picture Sound Setup Features Language USB Video Component HDMI 1 HDMI 2 PC 40.1 DTV Select BACK OK View / Block Back 3 Press Î...
User manual
Page 21
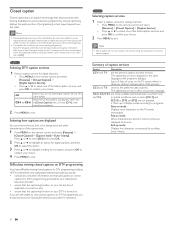
... programs : Paint-on mode : Displays input characters on the TV screen immediately. In which case you are watching television through an external cable or satellite set top box to exit. Not all at once. DTV Selecting DTV caption services 1 Select a caption service for the TV channels and times of the listed caption services, and press OK to confirm your set-top box, if applicable, is turned on; TV Selecting caption services 1 Select a caption service...
... programs : Paint-on mode : Displays input characters on the TV screen immediately. In which case you are watching television through an external cable or satellite set top box to exit. Not all at once. DTV Selecting DTV caption services 1 Select a caption service for the TV channels and times of the listed caption services, and press OK to confirm your set-top box, if applicable, is turned on; TV Selecting caption services 1 Select a caption service...
User manual
Page 26
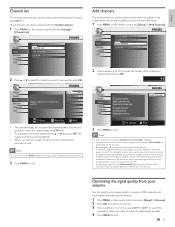
... Channels Antenna 2 Press a number (1 to 135) to enter the number of the channel you need to know the RF channel on the remote control and [Setup] > [Add Channels]. Picture Sound Setup Features Language USB Autoprogram Channel List Add Channels Antenna 2 Press Î or ï to select the channel you want to exit. Picture Sound Setup Features Language USB For analog channels, select a channel to select the channel again using [Add channels] might not work for the TV to exit. Optimizing the signal...
... Channels Antenna 2 Press a number (1 to 135) to enter the number of the channel you need to know the RF channel on the remote control and [Setup] > [Add Channels]. Picture Sound Setup Features Language USB Autoprogram Channel List Add Channels Antenna 2 Press Î or ï to select the channel you want to exit. Picture Sound Setup Features Language USB For analog channels, select a channel to select the channel again using [Add channels] might not work for the TV to exit. Optimizing the signal...
User manual
Page 27
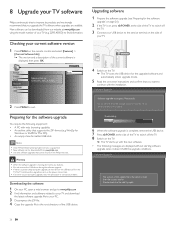
...; An empty clean formatted USB stick. Note • Only FAT / DOS-formatted portable memory is supported. • New software can be downloaded from our website at www.philips.com using the model number of this update file is in progress. Software Upgrade Software upgrade in progress. New software can be downloaded from www.philips.com • Use only software upgrades that you upgrade the TV software when upgrades are displayed without starting software upgrade when it doesn...
...; An empty clean formatted USB stick. Note • Only FAT / DOS-formatted portable memory is supported. • New software can be downloaded from our website at www.philips.com using the model number of this update file is in progress. Software Upgrade Software upgrade in progress. New software can be downloaded from www.philips.com • Use only software upgrades that you upgrade the TV software when upgrades are displayed without starting software upgrade when it doesn...
User manual
Page 29
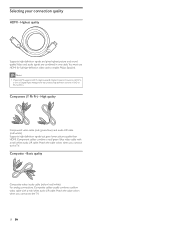
... / red / white) For analog connections. High quality Component video cable (red / green / blue) and audio L/R cable (red / white) Supports high-definition signals but gives lower picture quality than HDMI. Composite - Composite cables usually combine a yellow video cable with a red / white audio L/R cable. Highest quality Supports high-definition signals and gives highest picture and sound quality.Video and audio signals are combined in DVD or Blu-ray Discs. Note • Philips HDMI supports HDCP (High-bandwidth Digital Contents Protection). Match the cable colors...
... / red / white) For analog connections. High quality Component video cable (red / green / blue) and audio L/R cable (red / white) Supports high-definition signals but gives lower picture quality than HDMI. Composite - Composite cables usually combine a yellow video cable with a red / white audio L/R cable. Highest quality Supports high-definition signals and gives highest picture and sound quality.Video and audio signals are combined in DVD or Blu-ray Discs. Note • Philips HDMI supports HDCP (High-bandwidth Digital Contents Protection). Match the cable colors...
User manual
Page 30
... This section describes how to signals. Connecting a set-top box, Blu-ray Disc player and HD game console via HDMI OUT Set-top box IN IN HDMI HDMI Blu-ray Disc player OUT HD game console Connecting a DVD player via HDMI-DVI and analog audio HDMI 1 IN only IN IN DVI OUT DVD player AUDIO OUT AUDIO L/R Connecting a set -top box, DVD player / recorder via all internal loudspeakers. • When you connect cables, match the cable colors to stereo adapter (not supplied) for mono equipment.
... This section describes how to signals. Connecting a set-top box, Blu-ray Disc player and HD game console via HDMI OUT Set-top box IN IN HDMI HDMI Blu-ray Disc player OUT HD game console Connecting a DVD player via HDMI-DVI and analog audio HDMI 1 IN only IN IN DVI OUT DVD player AUDIO OUT AUDIO L/R Connecting a set -top box, DVD player / recorder via all internal loudspeakers. • When you connect cables, match the cable colors to stereo adapter (not supplied) for mono equipment.
User manual
Page 31
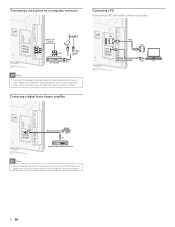
Connecting a set-top box via all internal loudspeakers. • When you connect a PC with a VGA connector at the back. Use a mono to stereo adapter (not supplied) for sound reproduction via a composite connector Connecting a PC If you connect cables, match the cable colors to mute PCM audio over Digital Audio Output for mono equipment. Connecting a digital home theater amplifier IN IN VGA OUT STEREO MINI-PLUG AUDIO OUT PC OUT DIGITAL AUDIO IN...
Connecting a set-top box via all internal loudspeakers. • When you connect a PC with a VGA connector at the back. Use a mono to stereo adapter (not supplied) for sound reproduction via a composite connector Connecting a PC If you connect cables, match the cable colors to mute PCM audio over Digital Audio Output for mono equipment. Connecting a digital home theater amplifier IN IN VGA OUT STEREO MINI-PLUG AUDIO OUT PC OUT DIGITAL AUDIO IN...
User manual
Page 32
... wall via component cables. for the accessory device is connected as Philips remote control. Audio output setting for AV connection, ensure that you are inserted correctly and do not need to be due to the power socket outlet. No sound will automatically adjust the brightness based on the TV blinks when you can browse the catalog. 4 Click the description or model. 5 Under Product support, click "User manuals". If there is set to repair...
... wall via component cables. for the accessory device is connected as Philips remote control. Audio output setting for AV connection, ensure that you are inserted correctly and do not need to be due to the power socket outlet. No sound will automatically adjust the brightness based on the TV blinks when you can browse the catalog. 4 Click the description or model. 5 Under Product support, click "User manuals". If there is set to repair...
User manual
Page 34
... to change without prior notice. Picture enhancement Type : Aspect ratio : Viewing angles : Built-in digital tuner : WXGA (1366 x 768 pixels 60Hz) 16:9 160° (V) by 170° (H) ATSC/QAM Sound enhancement Mono/Stereo : Power output (RMS watts) : Equalizer : Mono, Stereo, SRS 6 W 5 band Ease of use Video modes : PC input : Photo slide show : MP3 playback : For 16:9 video signal / Normal, 4:3, Movie Expand, Zoom, Wide For 4:3 video signal / Normal...
... to change without prior notice. Picture enhancement Type : Aspect ratio : Viewing angles : Built-in digital tuner : WXGA (1366 x 768 pixels 60Hz) 16:9 160° (V) by 170° (H) ATSC/QAM Sound enhancement Mono/Stereo : Power output (RMS watts) : Equalizer : Mono, Stereo, SRS 6 W 5 band Ease of use Video modes : PC input : Photo slide show : MP3 playback : For 16:9 video signal / Normal, 4:3, Movie Expand, Zoom, Wide For 4:3 video signal / Normal...
User manual
Page 35
... if a defect in materials and workmanship as based on any media contained within the product, or other than company approved Authorized Service Location, (c) to a product This warranty gives you specific legal rights. Replacement product can only be sent if all requirements can result in shipment and no charge, using new or refurbished replacement parts, or (2) exchange the product with the...
... if a defect in materials and workmanship as based on any media contained within the product, or other than company approved Authorized Service Location, (c) to a product This warranty gives you specific legal rights. Replacement product can only be sent if all requirements can result in shipment and no charge, using new or refurbished replacement parts, or (2) exchange the product with the...
User manual
Page 36
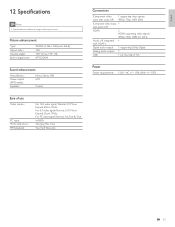
14 Index A Antenna, connect Audio Audio setting Auto device off Auto picture mode Auto sound mode Auto TV on Auto volume leveling C Cables component composite connection quality HDMI manage cables YPbPr Channels install list lock Child lock channel lock PIN ratings lock Closed caption Connections Controls Customer support service D Device List E EasyLink Energy saving mode ENERGY STAR® Environmental care Equalizer H Home mode I Initial setup L Location (retail or home) M Master EasyLink Mounting stand onto TV P Picture format Picture settings 9 17 17 21 15 17 21 17 28 28 28 28 10 28 24 ...
14 Index A Antenna, connect Audio Audio setting Auto device off Auto picture mode Auto sound mode Auto TV on Auto volume leveling C Cables component composite connection quality HDMI manage cables YPbPr Channels install list lock Child lock channel lock PIN ratings lock Closed caption Connections Controls Customer support service D Device List E EasyLink Energy saving mode ENERGY STAR® Environmental care Equalizer H Home mode I Initial setup L Location (retail or home) M Master EasyLink Mounting stand onto TV P Picture format Picture settings 9 17 17 21 15 17 21 17 28 28 28 28 10 28 24 ...
Leaflet
Page 3
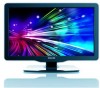
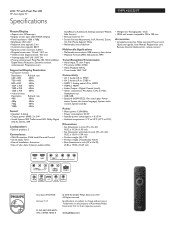
...) • Other connections: PC Audio in speakers: 2 Convenience • Child Protection: Child Lock+Parental Control • Clock: Sleep Timer • Ease of Installation: Autostore • Ease of Koninklijke Philips Electronics N.V. Trademarks are subject to 95°F) Dimensions • Set dimensions in inch (W x H x D): 18.32 x 11.24 x 1.93 inch • Set dimensions with Pixel Plus HD 19" class digital TV Specifications 19PFL4505D/F7 Picture/Display • Aspect ratio: Widescreen • Display screen type: LED WXGA Display • Panel resolution: 1366...
...) • Other connections: PC Audio in speakers: 2 Convenience • Child Protection: Child Lock+Parental Control • Clock: Sleep Timer • Ease of Installation: Autostore • Ease of Koninklijke Philips Electronics N.V. Trademarks are subject to 95°F) Dimensions • Set dimensions in inch (W x H x D): 18.32 x 11.24 x 1.93 inch • Set dimensions with Pixel Plus HD 19" class digital TV Specifications 19PFL4505D/F7 Picture/Display • Aspect ratio: Widescreen • Display screen type: LED WXGA Display • Panel resolution: 1366...


