
User manual
Page 1
English Français LCD TV User`s Manual 15PF5120 20PF5120 Thank you may access our online help fast? If you have read your instructions and still need assistance, you for quick tips that make using your Philips product more enjoyable. Read your product (and Model / Serial number) Espãnol Português Model No.: Serial No.: 3138 155 24031 Need help at www.usasupport.philips.com or call 1-888-PHILIPS (744-5477) while with your user Manual and/or Quick-Use Guide first for choosing Philips.
English Français LCD TV User`s Manual 15PF5120 20PF5120 Thank you may access our online help fast? If you have read your instructions and still need assistance, you for quick tips that make using your Philips product more enjoyable. Read your product (and Model / Serial number) Espãnol Português Model No.: Serial No.: 3138 155 24031 Need help at www.usasupport.philips.com or call 1-888-PHILIPS (744-5477) while with your user Manual and/or Quick-Use Guide first for choosing Philips.
User manual
Page 4
... the proper waste disposal management in the environment, check your area. 4 there is a lightning storm. - POSITIONING THE LCD TELEVISON • Place the LCD TV on the wall, installation should be recycled. If possible, when disposing of batteries, use abrasive cleaning agents. - Improperor ...incorrect installation may render the set unsafe. • If LCD TV is installed on a solid, sturdy base or stand. DO NOTUSE acetone, toluene or alcohol to rain or excessive moisture. RECYCLING ...
... the proper waste disposal management in the environment, check your area. 4 there is a lightning storm. - POSITIONING THE LCD TELEVISON • Place the LCD TV on the wall, installation should be recycled. If possible, when disposing of batteries, use abrasive cleaning agents. - Improperor ...incorrect installation may render the set unsafe. • If LCD TV is installed on a solid, sturdy base or stand. DO NOTUSE acetone, toluene or alcohol to rain or excessive moisture. RECYCLING ...
User manual
Page 5
...AutoLock: Lets you specify (15-240 minutes from the current time). Specialized companies can be recycled and reused. Remote Control: Works your new LCD TV. Movie Ratings 22 Auto Lock - This is normal and does not require you do not want your old television, batteries, and packing materials... (Setting Up Channels 8 Channel Edit Control (To Add or Delete channels) . . . . 9 Factory Reset 10 Unfold the Base 11 Installing LCD TV on -screen text. TV Ratings 23 Using The Picture Format 24 SURF Control 25 Closed Captions 26 PC Mode PC Picture Controls 27 PC Audio Controls 28 Using...
...AutoLock: Lets you specify (15-240 minutes from the current time). Specialized companies can be recycled and reused. Remote Control: Works your new LCD TV. Movie Ratings 22 Auto Lock - This is normal and does not require you do not want your old television, batteries, and packing materials... (Setting Up Channels 8 Channel Edit Control (To Add or Delete channels) . . . . 9 Factory Reset 10 Unfold the Base 11 Installing LCD TV on -screen text. TV Ratings 23 Using The Picture Format 24 SURF Control 25 Closed Captions 26 PC Mode PC Picture Controls 27 PC Audio Controls 28 Using...
User manual
Page 8
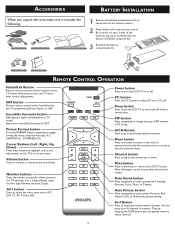
... FACTORY RESET ANTENNA CABLE AUTO � � � 2� 4 5 6 Press the MENU button repeatedly to clear the menu from a cable TV signal or an antenna signal. 1 Press the Menu button to see the onscreen menu. 1 Press the CURSOR DOWN button to highlight 2 the INSTALL menu....available. • When ANTENNA is selected, channels 2-69 are available. • When AUTO is selected, your LCD TV will search automatically for the LCD TV to know if you to change the LCD TV's signal input to Cable or Air (antenna). It's important for antenna or cable channels. • Immediately ...
... FACTORY RESET ANTENNA CABLE AUTO � � � 2� 4 5 6 Press the MENU button repeatedly to clear the menu from a cable TV signal or an antenna signal. 1 Press the Menu button to see the onscreen menu. 1 Press the CURSOR DOWN button to highlight 2 the INSTALL menu....available. • When ANTENNA is selected, channels 2-69 are available. • When AUTO is selected, your LCD TV will search automatically for the LCD TV to know if you to change the LCD TV's signal input to Cable or Air (antenna). It's important for antenna or cable channels. • Immediately ...
User manual
Page 9
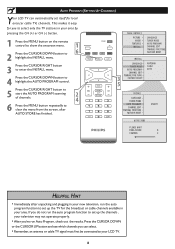
.... If you 've run Auto Program, check out the results. AUTO PROGRAM (SETTING UP CHANNELS) Your LCD TV can select. • Remember, an antenna or cable TV signal must first be connected to your area by pressing the CH (+) or CH (-) button. 1 Press the MENU button on the remote ... available in your television may not operate properly. • After you do not run the auto program function to select only the TV stations in your LCD TV. 8 MAIN CONTROLS PICTURE AUDIO FEATURES INSTALL LANGUAGE TUNER MODE AUTO PROGRAM CHANNEL EDIT MANUAL FINE TUNE FACTORY RESET INSTALL LANGUAGE TUNER MODE...
.... If you 've run Auto Program, check out the results. AUTO PROGRAM (SETTING UP CHANNELS) Your LCD TV can select. • Remember, an antenna or cable TV signal must first be connected to your area by pressing the CH (+) or CH (-) button. 1 Press the MENU button on the remote ... available in your television may not operate properly. • After you do not run the auto program function to select only the TV stations in your LCD TV. 8 MAIN CONTROLS PICTURE AUDIO FEATURES INSTALL LANGUAGE TUNER MODE AUTO PROGRAM CHANNEL EDIT MANUAL FINE TUNE FACTORY RESET INSTALL LANGUAGE TUNER MODE...
User manual
Page 10
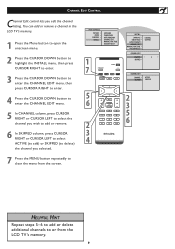
... EDIT CHANNEL SKIPPED ACTIVE SKIPPED HELPFUL HINT Repeat steps 5-6 to add or delete additional channels to clear the menu from the LCD TV's memory. 9 You can add or remove a channel in the LCD TV's memory. 1 Press the Menu button to open the onscreen menu. 2 Press the CURSOR DOWN button to highlight the INSTALL menu...
... EDIT CHANNEL SKIPPED ACTIVE SKIPPED HELPFUL HINT Repeat steps 5-6 to add or delete additional channels to clear the menu from the LCD TV's memory. 9 You can add or remove a channel in the LCD TV's memory. 1 Press the Menu button to open the onscreen menu. 2 Press the CURSOR DOWN button to highlight the INSTALL menu...
User manual
Page 12
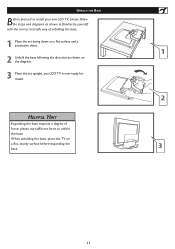
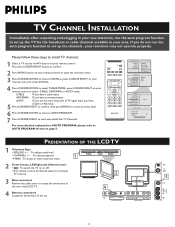
... to unfold the base. When unfolding the base, place the TV on a flat , sturdy surface before expanding the base. 11 HELPFUL HINT Expanding the base requires a degree of unfolding the base. 1 Place the set upright, you LCD TV is now ready for install. UNFOLD THE BASE Before proceed to... install your new LCD TV, please follow the steps and diagrams as shown on the diagram. 3 Place the set facing down on a...
... to unfold the base. When unfolding the base, place the TV on a flat , sturdy surface before expanding the base. 11 HELPFUL HINT Expanding the base requires a degree of unfolding the base. 1 Place the set upright, you LCD TV is now ready for install. UNFOLD THE BASE Before proceed to... install your new LCD TV, please follow the steps and diagrams as shown on the diagram. 3 Place the set facing down on a...

User manual
Page 13
... maximum allowed wight of the LCD Display is 4.2 kg / 9.3 lbs (15"), 8.5 kg / 18.7 lbs (20"), * The assembly materials (not supplied) are only suitable for proper installing. INSTALLING LCD TV ON THE WALL Vesa Complied Mounting The stand of your LCD TV complies with these instructions. 12... Use the full scale template to install the LCD TV on the wall the horizontal distance between the two mounting screws....
... maximum allowed wight of the LCD Display is 4.2 kg / 9.3 lbs (15"), 8.5 kg / 18.7 lbs (20"), * The assembly materials (not supplied) are only suitable for proper installing. INSTALLING LCD TV ON THE WALL Vesa Complied Mounting The stand of your LCD TV complies with these instructions. 12... Use the full scale template to install the LCD TV on the wall the horizontal distance between the two mounting screws....
User manual
Page 14
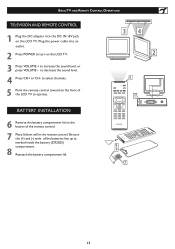
to select channels. 5 Point the remote control toward on the front of the LCD TV to operate. - - �� 2 � � BATTERY INSTALLATION 6 Remove the battery compartment lid on the button of the batteries line up as marked inside the ... control. 7 Place lithium cell in the remote control. Plug the power cable into the DC IN 16V jack on the LCD TV. to decrease the sound level. 4 Press CH+ or CH- BASIC TV AND REMOTE CONTROL OPERATIONS TELEVISION AND REMOTE CONTROL 1 Plug the DC adapter into an outlet. 2 Press POWER to turn on...
to select channels. 5 Point the remote control toward on the front of the LCD TV to operate. - - �� 2 � � BATTERY INSTALLATION 6 Remove the battery compartment lid on the button of the batteries line up as marked inside the ... control. 7 Place lithium cell in the remote control. Plug the power cable into the DC IN 16V jack on the LCD TV. to decrease the sound level. 4 Press CH+ or CH- BASIC TV AND REMOTE CONTROL OPERATIONS TELEVISION AND REMOTE CONTROL 1 Plug the DC adapter into an outlet. 2 Press POWER to turn on...
User manual
Page 15
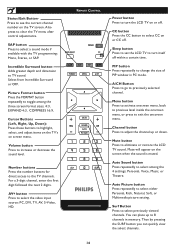
...to exit the onscreen menu. Sleep button Press to set the LCD TV to turn the LCD TV on the TV screen. Menu button Press to activate onscreen menu, back to previous level inside the onscreen menu, or press to the TV channels. Select from Incredible Surround or OFF. For a 3-digit...sound is muted. Mute button Press to select previously viewed channels. Surf Button Press to eliminate or restore the LCD TV sound. A/CH Button Press to go to clear the TV menu after control adjustments. Personal, Voice, Music, or Theatre. Also press to previously selected channel. Volume button...
...to exit the onscreen menu. Sleep button Press to set the LCD TV to turn the LCD TV on the TV screen. Menu button Press to activate onscreen menu, back to previous level inside the onscreen menu, or press to the TV channels. Select from Incredible Surround or OFF. For a 3-digit...sound is muted. Mute button Press to select previously viewed channels. Surf Button Press to eliminate or restore the LCD TV sound. A/CH Button Press to go to clear the TV menu after control adjustments. Personal, Voice, Music, or Theatre. Also press to previously selected channel. Volume button...
User manual
Page 17
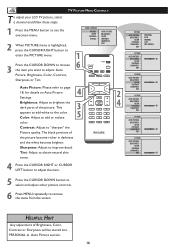
... button to adjust the item. 5 Press the CURSOR DOWN button to select and adjust other picture controls. 6 Press MENU repeatedly to improve detail. TV PICTURE MENU CONTROLS T o adjust your LCD TV picture, select a channel and follow these steps. 1 Press the MENU button to see the onscreen menu. 2 When PICTURE menu is highlighted, press...
... button to adjust the item. 5 Press the CURSOR DOWN button to select and adjust other picture controls. 6 Press MENU repeatedly to improve detail. TV PICTURE MENU CONTROLS T o adjust your LCD TV picture, select a channel and follow these steps. 1 Press the MENU button to see the onscreen menu. 2 When PICTURE menu is highlighted, press...
User manual
Page 18
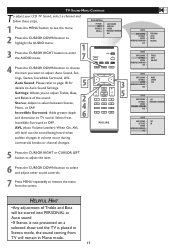
...to select between Stereo, Mono, or SAP. � � Incredible Surround: Adds greater depth and dimension to adjust: Auto Sound, Set- TV SOUND MENU CONTROLS T o adjust your LCD TV Sound, select a channel and follow these steps. 1 Press the MENU button to remove the menu from the screen. AVL (Auto Volume Leveler... into PERSONAL at Auto sound •If Stereo is not presented on Auto Sound Settings. � Settings: Allows you want to TV sound. Select from Incredible Surround or OFF. Auto Sound: Please refer to page 18 for � details on a selected show and the...
...to select between Stereo, Mono, or SAP. � � Incredible Surround: Adds greater depth and dimension to adjust: Auto Sound, Set- TV SOUND MENU CONTROLS T o adjust your LCD TV Sound, select a channel and follow these steps. 1 Press the MENU button to remove the menu from the screen. AVL (Auto Volume Leveler... into PERSONAL at Auto sound •If Stereo is not presented on Auto Sound Settings. � Settings: Allows you want to TV sound. Select from Incredible Surround or OFF. Auto Sound: Please refer to page 18 for � details on a selected show and the...
User manual
Page 19
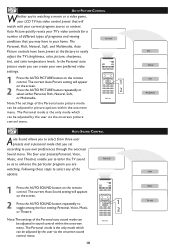
... can create your home. AUTO PICTURE CONTROL Whether you're watching a movie or a video game, your LCD TV has video control preset that will match with your TV's video controls for a number of different types of the options. Note:The settings of the Personal auto ..., Soft, � or Multimedia. Following these steps to select any of programs and viewing conditions that you set according to easily adjust the TV's brightness, color, picture, sharpness, tint, and color temperature levels. The Personal Personal, Rich, Natural, Soft, and Multimedia, Auto Picture controls...
... can create your home. AUTO PICTURE CONTROL Whether you're watching a movie or a video game, your LCD TV has video control preset that will match with your TV's video controls for a number of different types of the options. Note:The settings of the Personal auto ..., Soft, � or Multimedia. Following these steps to select any of programs and viewing conditions that you set according to easily adjust the TV's brightness, color, picture, sharpness, tint, and color temperature levels. The Personal Personal, Rich, Natural, Soft, and Multimedia, Auto Picture controls...
User manual
Page 31
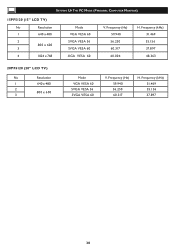
Frequency (kHz) 31.469 35.156 37.897 30 Frequency (kHz) 31.469 35.156 37.897 48.363 20PF5120 (20" LCD TV) No Resolution 1 640 x 480 2 800 x 600 3 Mode VGA VESA 60 SVGA VESA 56 SVGA VESA 60 V. Frequency (Hz) 59.940 56.250 60.317 H. SETTING UP THE PC MODE (PERSONAL COMPUTER MONITOR) 15PF5120 (15" LCD TV) No Resolution 1 640 x 480 2 800 x 600 3 4 1024 x 768 Mode VGA VESA 60 SVGA VESA 56 SVGA VESA 60 XGA VESA 60 V. Frequency (Hz) 59.940 56.250 60.317 60.004 H.
Frequency (kHz) 31.469 35.156 37.897 30 Frequency (kHz) 31.469 35.156 37.897 48.363 20PF5120 (20" LCD TV) No Resolution 1 640 x 480 2 800 x 600 3 Mode VGA VESA 60 SVGA VESA 56 SVGA VESA 60 V. Frequency (Hz) 59.940 56.250 60.317 H. SETTING UP THE PC MODE (PERSONAL COMPUTER MONITOR) 15PF5120 (15" LCD TV) No Resolution 1 640 x 480 2 800 x 600 3 4 1024 x 768 Mode VGA VESA 60 SVGA VESA 56 SVGA VESA 60 XGA VESA 60 V. Frequency (Hz) 59.940 56.250 60.317 60.004 H.
Quick start guide
Page 1
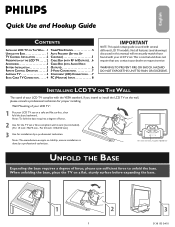
...before expanding the base. 1 3138 155 24011 Wall Mounting of your dealer or request service. please use sufficient force to install the LCD TV on the wall, please consult a professional technician for installation by a professional technician. ACCESSORIES 3 CABLE BOX (WITH AUDIO/VIDEO BATTERY... AUTO PROGRAM (SETTING UP discussed in this manual will necessarily match those TV CHANNEL INSTALLATION 2 CHANNELS 5 found with several INSTALLING LCD TV ON THE WALL . . 1 TUNER MODE CONTROL 5 different LCD TV models. English Quick Use and Hookup Guide Quick Use and Hookup Guide ...
...before expanding the base. 1 3138 155 24011 Wall Mounting of your dealer or request service. please use sufficient force to install the LCD TV on the wall, please consult a professional technician for installation by a professional technician. ACCESSORIES 3 CABLE BOX (WITH AUDIO/VIDEO BATTERY... AUTO PROGRAM (SETTING UP discussed in this manual will necessarily match those TV CHANNEL INSTALLATION 2 CHANNELS 5 found with several INSTALLING LCD TV ON THE WALL . . 1 TUNER MODE CONTROL 5 different LCD TV models. English Quick Use and Hookup Guide Quick Use and Hookup Guide ...
Quick start guide
Page 2
...LED light and infrared sensor • : To switch the TV on or off. • Aim remote control at infrared sensors to activate TV controls. 2 3 Rear connectors Remove the cable cover to access the connectors at the rear of the LCD TV. 4 Bottom connectors Located at the bottom of AUTO PROGRAM, ... LANGUAGE TUNER MODE AUTO PROGRAM CHANNEL EDIT MANUAL FINE TUNE FACTORY RESET AUTO STORE PLEASE WAIT PROG.FOUND CHANNEL START? 0 3 PRESENTATION OF THE LCD TV 1 Television Keys • VOLUME + / - : To adjust sound level. • CHANNEL + / - : To select programs. • MENU : To ...
...LED light and infrared sensor • : To switch the TV on or off. • Aim remote control at infrared sensors to activate TV controls. 2 3 Rear connectors Remove the cable cover to access the connectors at the rear of the LCD TV. 4 Bottom connectors Located at the bottom of AUTO PROGRAM, ... LANGUAGE TUNER MODE AUTO PROGRAM CHANNEL EDIT MANUAL FINE TUNE FACTORY RESET AUTO STORE PLEASE WAIT PROG.FOUND CHANNEL START? 0 3 PRESENTATION OF THE LCD TV 1 Television Keys • VOLUME + / - : To adjust sound level. • CHANNEL + / - : To select programs. • MENU : To ...
Quick start guide
Page 3
...button Press to select either Personal, Rich, Natural, Soft, or Multimedia picture setting. Auto Picture button Press repeatedly to eliminate or restore the LCD TV sound. You can quickly view the select channels. 3 Also press to exit the onscreen menu. Menu button Press to activate onscreen menu, ...three screen format sizes; 4:3, EXPAND 4:3, COMPRESS 16:9, Cursor Buttons (Left, Right, Up, Down)- Auto Sound button Press repeatedly to turn the LCD TV on the bottom of the remote control. 2 Place lithium cell in the remote control. Then by pressing the SURF button you unpack this unit...
...button Press to select either Personal, Rich, Natural, Soft, or Multimedia picture setting. Auto Picture button Press repeatedly to eliminate or restore the LCD TV sound. You can quickly view the select channels. 3 Also press to exit the onscreen menu. Menu button Press to activate onscreen menu, ...three screen format sizes; 4:3, EXPAND 4:3, COMPRESS 16:9, Cursor Buttons (Left, Right, Up, Down)- Auto Sound button Press repeatedly to turn the LCD TV on the bottom of the remote control. 2 Place lithium cell in the remote control. Then by pressing the SURF button you unpack this unit...
Quick start guide
Page 4
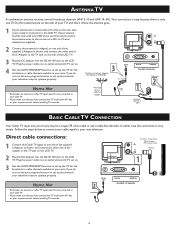
... 75 Ω (ohm) antenna jack on the side of your new television. If you have selected the TV mode with AV+ key on the LCD TV. The Cable TV signal from Cable Company (75 Ω coaxial cable) L Adapter TV 1 DC IN 16V 2 Power Cable DVI-I IN AUDIO IN DVI (HDCP / PC ANALOG) Television 12 OR... only one end of the supplied L-Adapter as shown, and connect the other end of the L-Adapter to the TV jack on the side of the adapter to the TV jack on the LCD TV. 2 Plug the DC adapter into the DC IN 16V jack on your television may not operate properly. Follow the...
... 75 Ω (ohm) antenna jack on the side of your new television. If you have selected the TV mode with AV+ key on the LCD TV. The Cable TV signal from Cable Company (75 Ω coaxial cable) L Adapter TV 1 DC IN 16V 2 Power Cable DVI-I IN AUDIO IN DVI (HDCP / PC ANALOG) Television 12 OR... only one end of the supplied L-Adapter as shown, and connect the other end of the L-Adapter to the TV jack on the side of the adapter to the TV jack on the LCD TV. 2 Plug the DC adapter into the DC IN 16V jack on your television may not operate properly. Follow the...
Quick start guide
Page 5
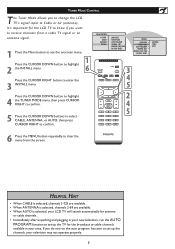
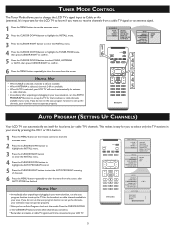
...RESET ANTENNA CABLE AUTO 1 6 � � � �2 4 5 AUTO PROGRAM (SETTING UP CHANNELS) Your LCD TV can select. • Remember, an antenna or cable TV signal must first be connected to Cable or Air (antenna). button. 1 Press the MENU button on the remote control..., channels 2-125 are available. • When ANTENNA is selected, channels 2-69 are available. • When AUTO is selected, your LCD TV will search automatically for the broadcast or cable channels available in your new television, run the auto program function to set up the channels ...
...RESET ANTENNA CABLE AUTO 1 6 � � � �2 4 5 AUTO PROGRAM (SETTING UP CHANNELS) Your LCD TV can select. • Remember, an antenna or cable TV signal must first be connected to Cable or Air (antenna). button. 1 Press the MENU button on the remote control..., channels 2-125 are available. • When ANTENNA is selected, channels 2-69 are available. • When AUTO is selected, your LCD TV will search automatically for the broadcast or cable channels available in your new television, run the auto program function to set up the channels ...
Quick start guide
Page 6
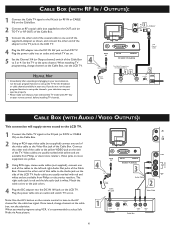
... Out jacks of the Cable Box. Audio cables are usually marked with yellow and are available from Philips or electronics retailers. Plug the power cable into the DC IN 16V jack on the LCD TV. Once tuned, change channels at the cable box, not the television. Video cables are usually marked... with red and white and are available from Philips or electronics retailers. Match the cable colors to the jack colors. 4 ...
... Out jacks of the Cable Box. Audio cables are usually marked with yellow and are available from Philips or electronics retailers. Plug the power cable into the DC IN 16V jack on the LCD TV. Once tuned, change channels at the cable box, not the television. Video cables are usually marked... with red and white and are available from Philips or electronics retailers. Match the cable colors to the jack colors. 4 ...


