
Operation Manual
Page 8
... Operating Parts 14 Getting Started 15 Attaching the Strap 15 Powering the Camera 16 Installing the Battery 16 Removing the Battery 16 Charging the Battery 17 Charging the Battery Abroad 19 Using the AC Adapter (optional 21 Installing the SD Memory Card 23 Image Size and Quality of Still Pictures 26 Size and Quality of Movies 27 Initial Settings (Setting the Display Language and the Date and Time)......... 29 Setting the Display Language 29 Setting the Date and Time 30 Quick Start 33 Taking Still Pictures 33 Playing Back Still Pictures...
... Operating Parts 14 Getting Started 15 Attaching the Strap 15 Powering the Camera 16 Installing the Battery 16 Removing the Battery 16 Charging the Battery 17 Charging the Battery Abroad 19 Using the AC Adapter (optional 21 Installing the SD Memory Card 23 Image Size and Quality of Still Pictures 26 Size and Quality of Movies 27 Initial Settings (Setting the Display Language and the Date and Time)......... 29 Setting the Display Language 29 Setting the Date and Time 30 Quick Start 33 Taking Still Pictures 33 Playing Back Still Pictures...
Operation Manual
Page 9
... Scene Mode 77 Reducing Camera Shake and Blurring in Pictures (Digital SR Mode 78 Taking Movies (Movie Mode 79 Taking Pictures in Frame Composite mode 81 Using the Self-timer 83 Continuous Shooting (Continuous Shooting Mode 84 Shooting in Multi-exposure Mode 85 Using the Remote Control Unit (optional 86 Using Zoom to Change the Subject Size 88 Setting the Shooting Functions 90 Selecting the Focus Mode 90 Selecting the Flash Mode 93 Selecting the Recorded Pixels of Still Pictures 95 Selecting the Quality Level of Still Pictures 97 Adjusting the White Balance...
... Scene Mode 77 Reducing Camera Shake and Blurring in Pictures (Digital SR Mode 78 Taking Movies (Movie Mode 79 Taking Pictures in Frame Composite mode 81 Using the Self-timer 83 Continuous Shooting (Continuous Shooting Mode 84 Shooting in Multi-exposure Mode 85 Using the Remote Control Unit (optional 86 Using Zoom to Change the Subject Size 88 Setting the Shooting Functions 90 Selecting the Focus Mode 90 Selecting the Flash Mode 93 Selecting the Recorded Pixels of Still Pictures 95 Selecting the Quality Level of Still Pictures 97 Adjusting the White Balance...
Operation Manual
Page 10
... Card or the Built-in Memory 174 Changing the Sound Settings 175 Changing the Date and Time 178 Setting the World Time 180 Changing the Display Language 182 Changing the Image Folder Name 183 Changing the USB Connection Mode 184 Changing the Video Output Format 185 Adjusting the Brightness of the LCD Monitor 186 Setting Power Saving 187 Setting Auto Power Off 188 Setting the Guide Display 189 Resetting to Default Settings 189 Appendix 190 List of Cities...190 Default Settings 191 Optional Accessories 196 Messages ...197 Troubleshooting 199 Main Specifications...
... Card or the Built-in Memory 174 Changing the Sound Settings 175 Changing the Date and Time 178 Setting the World Time 180 Changing the Display Language 182 Changing the Image Folder Name 183 Changing the USB Connection Mode 184 Changing the Video Output Format 185 Adjusting the Brightness of the LCD Monitor 186 Setting Power Saving 187 Setting Auto Power Off 188 Setting the Guide Display 189 Resetting to Default Settings 189 Appendix 190 List of Cities...190 Default Settings 191 Optional Accessories 196 Messages ...197 Troubleshooting 199 Main Specifications...
Operation Manual
Page 12
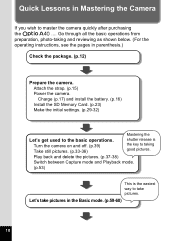
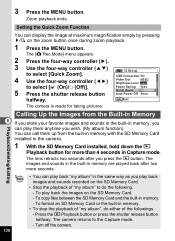
...) Power the camera. Charge (p.17) and install the battery. (p.16) Install the SD Memory Card. (p.23) Make the initial settings. (p.29-32) Mastering the Let's get used to master the camera quickly after purchasing the .... Play back and delete the pictures. (p.37-38) Switch between Capture mode and Playback mode. (p.53) This is the key to take pictures in the Basic mode. (p.59-60) 10 Turn the camera on and off. (p.39) Take still pictures. (p.33-36) shutter...
...) Power the camera. Charge (p.17) and install the battery. (p.16) Install the SD Memory Card. (p.23) Make the initial settings. (p.29-32) Mastering the Let's get used to master the camera quickly after purchasing the .... Play back and delete the pictures. (p.37-38) Switch between Capture mode and Playback mode. (p.53) This is the key to take pictures in the Basic mode. (p.59-60) 10 Turn the camera on and off. (p.39) Take still pictures. (p.33-36) shutter...

Operation Manual
Page 27
.... 25 Write-protect switch Setting the switch to [LOCK] protects the existing data by the user. (2) when the SD Memory Card is exposed to static electricity or electrical interference. (3) when the card has not been used for a long time. (4) when the card is ejected, the AC adapter is disconnected or the battery is removed while the data on the SD Memory Card may be deleted in another camera. Be sure to regularly make a backup...
.... 25 Write-protect switch Setting the switch to [LOCK] protects the existing data by the user. (2) when the SD Memory Card is exposed to static electricity or electrical interference. (3) when the card has not been used for a long time. (4) when the card is ejected, the AC adapter is disconnected or the battery is removed while the data on the SD Memory Card may be deleted in another camera. Be sure to regularly make a backup...

Operation Manual
Page 31
... "Setting the Display Language", "Setting the Date and Time" If the Date Adjust screen appears: 1p.30 - 31 "Setting the Date and Time" If you turn the camera on, follow the procedure below to set the display language and/or current date and time. The Language/ screen appears. 2 Use the four-way controller (2345) to "Changing the Date and Time" (p.178) and "Changing the Display Language" (p.182). Video Out MENU Cancel NTSC OK OK 29 Initial Settings (Setting the Display Language and the Date and Time) Power switch 1 Getting Started...
... "Setting the Display Language", "Setting the Date and Time" If the Date Adjust screen appears: 1p.30 - 31 "Setting the Date and Time" If you turn the camera on, follow the procedure below to set the display language and/or current date and time. The Language/ screen appears. 2 Use the four-way controller (2345) to "Changing the Date and Time" (p.178) and "Changing the Display Language" (p.182). Video Out MENU Cancel NTSC OK OK 29 Initial Settings (Setting the Display Language and the Date and Time) Power switch 1 Getting Started...
Operation Manual
Page 35
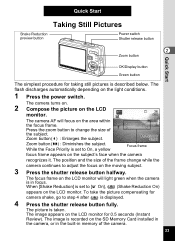
... frame change the size of the camera. 33 Press the zoom button to change while the camera continues to On, a yellow 01/15/2008 12:00 Focus frame focus frame appears on the LCD monitor will focus on the LCD 36 monitor. When [Shake Reduction] is recorded on the LCD monitor. Quick Start Taking Still Pictures Shake Reduction preview button Power switch Shutter release button 2 Zoom button Quick Start OK/Display button Green button The simplest procedure for taking still pictures is taken. The flash...
... frame change the size of the camera. 33 Press the zoom button to change while the camera continues to On, a yellow 01/15/2008 12:00 Focus frame focus frame appears on the LCD monitor will focus on the LCD 36 monitor. When [Shake Reduction] is recorded on the LCD monitor. Quick Start Taking Still Pictures Shake Reduction preview button Power switch Shutter release button 2 Zoom button Quick Start OK/Display button Green button The simplest procedure for taking still pictures is taken. The flash...

Operation Manual
Page 40
... picture taken appears on the LCD monitor when you switch to select [Delete] and press the OK button. The screen for taking pictures. The camera is ready for deleting the image appears. 2 Press the four-way controller (2) 100-0010 2 3 to the Playback mode. • You can enlarge the image displayed on the LCD monitor is no image stored, the message [No image/sound] appears. Quick Start Deleting the Displayed Image 1 Press the Green/i button when File No. playing back an image...
... picture taken appears on the LCD monitor when you switch to select [Delete] and press the OK button. The screen for taking pictures. The camera is ready for deleting the image appears. 2 Press the four-way controller (2) 100-0010 2 3 to the Playback mode. • You can enlarge the image displayed on the LCD monitor is no image stored, the message [No image/sound] appears. Quick Start Deleting the Displayed Image 1 Press the Green/i button when File No. playing back an image...

Operation Manual
Page 41
... the power switch for more than 4 seconds to the "Playback mode" . (The lens is ready for taking pictures by pressing the shutter release button. The lens extends and the camera turns on in green. If you press and hold the Q Playback button for a while, the camera will be turned off with the SD memory card installed. 2 Press the power switch again. Common Operations Common Operations Turning the Camera On and Off Power switch, Power indicator Playback button 3 Turning the Camera On in memory with the lens...
... the power switch for more than 4 seconds to the "Playback mode" . (The lens is ready for taking pictures by pressing the shutter release button. The lens extends and the camera turns on in green. If you press and hold the Q Playback button for a while, the camera will be turned off with the SD memory card installed. 2 Press the power switch again. Common Operations Common Operations Turning the Camera On and Off Power switch, Power indicator Playback button 3 Turning the Camera On in memory with the lens...

Operation Manual
Page 47
... the MENU button to Set the Menus The button operation guide appears at the bottom of the LCD monitor while you are two different menus, [A Rec.Mode] menu and [H Set-up] menu. How to display the menu on the LCD monitor. The setting is taken. 45 There are making settings for the current camera settings. 5 Use the four-way controller (23) to select an item. To Save the Setting and Start Taking Pictures 6 Press the shutter release button...
... the MENU button to Set the Menus The button operation guide appears at the bottom of the LCD monitor while you are two different menus, [A Rec.Mode] menu and [H Set-up] menu. How to display the menu on the LCD monitor. The setting is taken. 45 There are making settings for the current camera settings. 5 Use the four-way controller (23) to select an item. To Save the Setting and Start Taking Pictures 6 Press the shutter release button...

Operation Manual
Page 51
...-way controller, and assignment of start-up ] Menu Item Description Page Format For formatting the SD Memory Card or built-in which menus and messages appear p.182 Folder Name For selecting the way of naming image folders p.183 USB Connection Video Out For changing the USB connection mode For setting the video output format p.184 3 p.185 Brightness Level For changing the brightness of the LCD monitor p.186 Power Saving For setting the Power Saving function p.187 Quick Zoom For displaying the image at...
...-way controller, and assignment of start-up ] Menu Item Description Page Format For formatting the SD Memory Card or built-in which menus and messages appear p.182 Folder Name For selecting the way of naming image folders p.183 USB Connection Video Out For changing the USB connection mode For setting the video output format p.184 3 p.185 Brightness Level For changing the brightness of the LCD monitor p.186 Power Saving For setting the Power Saving function p.187 Quick Zoom For displaying the image at...
Operation Manual
Page 62
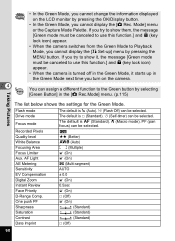
... the Green Mode. Flash mode The default is turned off in the Green Mode next time you try to show them, the message [Green mode must be canceled to use this function.] and - (key lock icon) appear. • When the camera switches from the Green Mode to Playback Mode, you cannot display the [A Rec. Drive mode Focus mode The default is = (Standard). Mode] menu or the Capture Mode Palette. q (Macro mode), PF (pan focus) can be selected. Recorded Pixels Quality level 12M D (Better) White Balance F (Auto) Focusing Area J (Multiple) Focus...
... the Green Mode. Flash mode The default is turned off in the Green Mode next time you try to show them, the message [Green mode must be canceled to use this function.] and - (key lock icon) appear. • When the camera switches from the Green Mode to Playback Mode, you cannot display the [A Rec. Drive mode Focus mode The default is = (Standard). Mode] menu or the Capture Mode Palette. q (Macro mode), PF (pan focus) can be selected. Recorded Pixels Quality level 12M D (Better) White Balance F (Auto) Focusing Area J (Multiple) Focus...

Operation Manual
Page 124
... menu is saved. The file number is saved. The manual focus position is saved. The [White Balance] setting on the [A Rec.Mode] menu is saved. The LCD monitor display mode is saved. The [AE Metering] setting on the [A Rec.Mode] menu is saved. The [EV Compensation] setting on the b button is saved. Select [O On] to save the settings for Memory Item Description Flash Mode Drive Mode Focus Mode Zoom Position MF Position White Balance AE Metering Sensitivity EV Compensation Digital Zoom DISPLAY File # The flash mode setting on the [A Rec.Mode] menu is saved. Taking...
... menu is saved. The file number is saved. The manual focus position is saved. The [White Balance] setting on the [A Rec.Mode] menu is saved. The LCD monitor display mode is saved. The [AE Metering] setting on the [A Rec.Mode] menu is saved. The [EV Compensation] setting on the b button is saved. Select [O On] to save the settings for Memory Item Description Flash Mode Drive Mode Focus Mode Zoom Position MF Position White Balance AE Metering Sensitivity EV Compensation Digital Zoom DISPLAY File # The flash mode setting on the [A Rec.Mode] menu is saved. Taking...
Operation Manual
Page 132
... the Q button. To format an SD Memory Card or the built-in Capture mode. Press the Q Playback button or press the shutter release button halfway. To play back images and sounds recorded on the zoom button once during zoom playback. 1 Press the MENU button. To copy files between the SD Memory Card and the built-in the camera. 1 With the SD Memory Card installed, hold down the Q Playback button for taking pictures. Power Saving 5sec 5 Press the shutter release button Quick Zoom Auto Power Off 3min halfway. The lens retracts...
... the Q button. To format an SD Memory Card or the built-in Capture mode. Press the Q Playback button or press the shutter release button halfway. To play back images and sounds recorded on the zoom button once during zoom playback. 1 Press the MENU button. To copy files between the SD Memory Card and the built-in the camera. 1 With the SD Memory Card installed, hold down the Q Playback button for taking pictures. Power Saving 5sec 5 Press the shutter release button Quick Zoom Auto Power Off 3min halfway. The lens retracts...

Operation Manual
Page 147
... areas when the Video Out setting is recommended. Playing Back an Image Using the Remote Control Unit (optional) When the AV cable is connected to which the camera is available. • You cannot play back movies, images with a voice memo, and sound files recorded in Voice Recording mode, using the remote control unit E or F (optional). 6 1 Press the Q Playback button. 2 Press the shutter release button or the zoom button on . Shutter release button : Displays the next image. Changing the Video Output Format 1p.185 •...
... areas when the Video Out setting is recommended. Playing Back an Image Using the Remote Control Unit (optional) When the AV cable is connected to which the camera is available. • You cannot play back movies, images with a voice memo, and sound files recorded in Voice Recording mode, using the remote control unit E or F (optional). 6 1 Press the Q Playback button. 2 Press the shutter release button or the zoom button on . Shutter release button : Displays the next image. Changing the Video Output Format 1p.185 •...

Operation Manual
Page 179
... sound settings. Set-up OK Format Sound Date Adjust World Time Language/ English Folder Name Standard MENU Exit Changing the Sound (Using a Recorded Sound File) You can use the sound recorded on the camera for taking pictures. MENU Four-way controller (2): Plays back the first two seconds of the selected sound file will be played as the [USER] sound. 5 Set [Shutter sound], [Operation Sound] and [Self-timer Sound] in "Changing the Sound". 2 Press the OK button. Four-way controller (3): Stops playback. 4 Press the OK button. 100-0025 OK OK 7 The selected sound is turned...
... sound settings. Set-up OK Format Sound Date Adjust World Time Language/ English Folder Name Standard MENU Exit Changing the Sound (Using a Recorded Sound File) You can use the sound recorded on the camera for taking pictures. MENU Four-way controller (2): Plays back the first two seconds of the selected sound file will be played as the [USER] sound. 5 Set [Shutter sound], [Operation Sound] and [Self-timer Sound] in "Changing the Sound". 2 Press the OK button. Four-way controller (3): Stops playback. 4 Press the OK button. 100-0025 OK OK 7 The selected sound is turned...

Operation Manual
Page 182
Mode Recorded Pixels Quality Level White Balance AF Setting AE Metering Sensitivity 12M AWB AUTO 800 MENU Exit Setting the World Time Settings The date and time selected in the city selected as the Hometown city. 4 Press the four-way controller (3) to select [X (Destination)]. 5 Press the four-way controller (5). World Time The World Time screen appears. W (Hometown) : Displays the time in "Initial Settings (Setting the Display Language and the Date and Time)" (p.29) serve as the...
Mode Recorded Pixels Quality Level White Balance AF Setting AE Metering Sensitivity 12M AWB AUTO 800 MENU Exit Setting the World Time Settings The date and time selected in the city selected as the Hometown city. 4 Press the four-way controller (3) to select [X (Destination)]. 5 Press the four-way controller (5). World Time The World Time screen appears. W (Hometown) : Displays the time in "Initial Settings (Setting the Display Language and the Date and Time)" (p.29) serve as the...
Operation Manual
Page 199
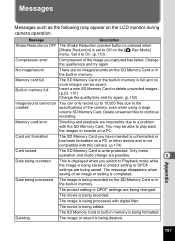
... camera. (p.174) Card locked The SD Memory Card is being saved or protect setting or DPOF settings are possible. 8 Data being recorded This is displayed when you switch to Playback mode while the image is write-protected. Only menu operation and mode change are being recorded. Insert a new SD Memory Card or delete unwanted images. (p.23, 137) Change the quality/size and try again. Card not formatted The SD Memory Card you captured has failed. Appendix 197 The message disappears when saving of an image or setting...
... camera. (p.174) Card locked The SD Memory Card is being saved or protect setting or DPOF settings are possible. 8 Data being recorded This is displayed when you switch to Playback mode while the image is write-protected. Only menu operation and mode change are being recorded. Insert a new SD Memory Card or delete unwanted images. (p.23, 137) Change the quality/size and try again. Card not formatted The SD Memory Card you captured has failed. Appendix 197 The message disappears when saving of an image or setting...

Operation Manual
Page 205
... condition of recordable images is possible untill the file size reaches 2 GB.) Editing Functions Save as Still Image, Divide Movies, Extract Shutter Type Electronic/mechanical shutter Speed Approx. 1/2000 sec. - 4 sec. Time Function World Time setting for 75 cities (28 time zones) Power Supply Rechargeable lithium-ion battery D-LI8, AC adapter (optional) Battery Life Still Images Approx. 180 (at 23°C with LCD monitor on, flash fired for 50% of shots and using a rechargeable lithium...
... condition of recordable images is possible untill the file size reaches 2 GB.) Editing Functions Save as Still Image, Divide Movies, Extract Shutter Type Electronic/mechanical shutter Speed Approx. 1/2000 sec. - 4 sec. Time Function World Time setting for 75 cities (28 time zones) Power Supply Rechargeable lithium-ion battery D-LI8, AC adapter (optional) Battery Life Still Images Approx. 180 (at 23°C with LCD monitor on, flash fired for 50% of shots and using a rechargeable lithium...

Operation Manual
Page 213
...42 Playback Mode 42 Playback Mode Palette 52 Portrait Mode 69 Power indicator 13 Power Saving 187 Power switch 13 Printer 149 Program Mode 63 Protect 142 Q Quick Zoom 130 R Rec. button . . . . . . . . . . . . . . . . . . . .1.4.,. 4. 1. ,. 88 42 Zoom Display 129 8 Appendix 211 Mode Menu 48 Recording Sound 124 , Red-eye Compensation 166 Remote Control 86 145 Reset 189 Resize images 153 Rotate images 156 S SD Memory Card . . . . . . . . . . 23, 25 Self-timer 83 Self-timer lamp 13 Sensitivity 104 Set the Menus 45 Set-up Menu 49...
...42 Playback Mode 42 Playback Mode Palette 52 Portrait Mode 69 Power indicator 13 Power Saving 187 Power switch 13 Printer 149 Program Mode 63 Protect 142 Q Quick Zoom 130 R Rec. button . . . . . . . . . . . . . . . . . . . .1.4.,. 4. 1. ,. 88 42 Zoom Display 129 8 Appendix 211 Mode Menu 48 Recording Sound 124 , Red-eye Compensation 166 Remote Control 86 145 Reset 189 Resize images 153 Rotate images 156 S SD Memory Card . . . . . . . . . . 23, 25 Self-timer 83 Self-timer lamp 13 Sensitivity 104 Set the Menus 45 Set-up Menu 49...


