
Digital Video Camera
Page 7
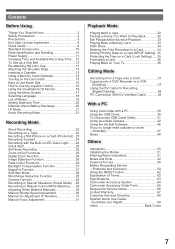
... Power Supply 11 Charging Time and Available Recording Time .... 12 To Use as a Grip Belt 13 Re-attaching the Lens Cap 13 Attaching the Shoulder Strap 13 Inserting a Cassette 13 Using a Memory Card (Optional 14 Turning on the Camcorder 15 Easy to Use Mode Dial 15 How to Use the Joystick Control 15 Using the Viewfinder/LCD Monitor 16 Using the Menu Screen 17 Selecting Language 18 List of Menus 18 Setting Date and Time 20 Internal...
... Power Supply 11 Charging Time and Available Recording Time .... 12 To Use as a Grip Belt 13 Re-attaching the Lens Cap 13 Attaching the Shoulder Strap 13 Inserting a Cassette 13 Using a Memory Card (Optional 14 Turning on the Camcorder 15 Easy to Use Mode Dial 15 How to Use the Joystick Control 15 Using the Viewfinder/LCD Monitor 16 Using the Menu Screen 17 Selecting Language 18 List of Menus 18 Setting Date and Time 20 Internal...

Digital Video Camera
Page 9
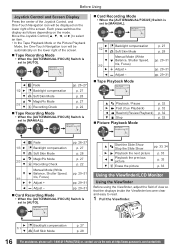
... [PHOTO SHOT] Button. 5 Playing Back a Card 1 Set the Mode Dial to Picture Playback Mode. • The One-Touch Navigation icon is displayed on the lower right of the screen. [One-Touch Navigation icon] 2 Start Playback. Joystick Control [▲] : Starting the Slide Show Stop the Slide Show Joystick Control [▼] : Erase the pictures Joystick Control [◄] : Playing back the previous picture Joystick Control [►] : Playing back the next picture 9 Before Using 2 Set the Mode Dial to Tape Recording Mode. 3 Move...
... [PHOTO SHOT] Button. 5 Playing Back a Card 1 Set the Mode Dial to Picture Playback Mode. • The One-Touch Navigation icon is displayed on the lower right of the screen. [One-Touch Navigation icon] 2 Start Playback. Joystick Control [▲] : Starting the Slide Show Stop the Slide Show Joystick Control [▼] : Erase the pictures Joystick Control [◄] : Playing back the previous picture Joystick Control [►] : Playing back the next picture 9 Before Using 2 Set the Mode Dial to Tape Recording Mode. 3 Move...

Digital Video Camera
Page 10
... plug. We recommend using the accessory power plug adaptor (VJSS0070/KZDB4ZE00001) in an area which has special AC outlets. 2) Battery Pack (p. 12) 3) AV Cable (pp. 36, 37) 4) Shoulder Strap (p. 13) 5) USB Cable and CD-ROM (pp. 39~41, 43) „How to Turn off the Demo Mode To terminate the demonstration mode, insert a cassette or set the [ DEMO MODE] to [OFF] as follows. 1 Set [ SETUP] >> [ DEMO MODE] >> [OFF]. 6 7 89 1 LCD Monitor Open Knob [OPEN...
... plug. We recommend using the accessory power plug adaptor (VJSS0070/KZDB4ZE00001) in an area which has special AC outlets. 2) Battery Pack (p. 12) 3) AV Cable (pp. 36, 37) 4) Shoulder Strap (p. 13) 5) USB Cable and CD-ROM (pp. 39~41, 43) „How to Turn off the Demo Mode To terminate the demonstration mode, insert a cassette or set the [ DEMO MODE] to [OFF] as follows. 1 Set [ SETUP] >> [ DEMO MODE] >> [OFF]. 6 7 89 1 LCD Monitor Open Knob [OPEN...

Digital Video Camera
Page 11
... Mode Selector Switch [AUTO/MANUAL/FOCUS] (pp. 22, 28~31) 25 Cassette Eject Lever [OPEN/EJECT] (p. 13) 26 Power Switch [OFF/ON] (pp. 15, 22) 27 Quick Start Recording Button [QUICK START] (p. 25) Quick Start Recording Lamp (p. 25) 28 Menu Button [MENU] (p. 17) 29 Recording Start/Stop Button (p. 22) 30 Power Lamp [POWER] (p. 15) 31 Light Button [LIGHT] (p. 24) 1 Connect the DC Cable to the Camcorder. 2 Connect the DC Cable to the AC Adaptor. 3 Connect the AC Cable to the Camcorder.) • You cannot open the Card Slot...
... Mode Selector Switch [AUTO/MANUAL/FOCUS] (pp. 22, 28~31) 25 Cassette Eject Lever [OPEN/EJECT] (p. 13) 26 Power Switch [OFF/ON] (pp. 15, 22) 27 Quick Start Recording Button [QUICK START] (p. 25) Quick Start Recording Lamp (p. 25) 28 Menu Button [MENU] (p. 17) 29 Recording Start/Stop Button (p. 22) 30 Power Lamp [POWER] (p. 15) 31 Light Button [LIGHT] (p. 24) 1 Connect the DC Cable to the Camcorder. 2 Connect the DC Cable to the AC Adaptor. 3 Connect the AC Cable to the Camcorder.) • You cannot open the Card Slot...
Digital Video Camera
Page 16
... Skin Mode ▼ 2/2 ► Manual Mode (White Balance, Shutter Speed, Iris, Focus) Adjust + ◄ Adjust - „ Tape Playback Mode One-Touch Navigation icon OFF p. 27 p. 28 pp. 29~31 pp. 29~31 pp. 29~31 ▲ Playback / Pause ► - ◄ Fast (Cue Playback) Rewind (Review Playback) ▼ Stop „ Picture Playback Mode One-Touch Navigation icon OFF p. 32 p. 32 p. 32 p. 32 ◄ 1/3 ► ▼ ▲ 2/3 ▼ Fade Backlight compensation Soft Skin Mode MagicPix Mode Recording Check...
... Skin Mode ▼ 2/2 ► Manual Mode (White Balance, Shutter Speed, Iris, Focus) Adjust + ◄ Adjust - „ Tape Playback Mode One-Touch Navigation icon OFF p. 27 p. 28 pp. 29~31 pp. 29~31 pp. 29~31 ▲ Playback / Pause ► - ◄ Fast (Cue Playback) Rewind (Review Playback) ▼ Stop „ Picture Playback Mode One-Touch Navigation icon OFF p. 32 p. 32 p. 32 p. 32 ◄ 1/3 ► ▼ ▲ 2/3 ▼ Fade Backlight compensation Soft Skin Mode MagicPix Mode Recording Check...
Digital Video Camera
Page 18
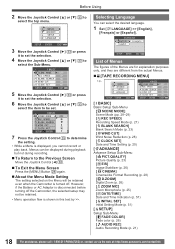
... Setup Sub-Menu [ PICT.QUALITY] Picture Quality (p. 23) [ EIS] Image Stabilizer (p. 26) [ CINEMA] Cinema-like Format Recording (p. 28) [ D.ZOOM] Digital Zoom (p. 26) [ ZOOM MIC] Zoom Microphone (p. 25) [ DATE/TIME] Date and Time Indication (p. 51) [ INITIAL SET] Initial Setting Mode (p. 51) [ SETUP] Setup Sub-Menu [ FADE COLOR] Fade color (p. 26) [ AUDIO REC] Audio Recording Mode (p. 21) 18 For assistance, please call : 1-800-211-PANA(7262) or, contact us via the web at: http://www.panasonic.com/contactinfo Selecting Language You can be displayed during playback...
... Setup Sub-Menu [ PICT.QUALITY] Picture Quality (p. 23) [ EIS] Image Stabilizer (p. 26) [ CINEMA] Cinema-like Format Recording (p. 28) [ D.ZOOM] Digital Zoom (p. 26) [ ZOOM MIC] Zoom Microphone (p. 25) [ DATE/TIME] Date and Time Indication (p. 51) [ INITIAL SET] Initial Setting Mode (p. 51) [ SETUP] Setup Sub-Menu [ FADE COLOR] Fade color (p. 26) [ AUDIO REC] Audio Recording Mode (p. 21) 18 For assistance, please call : 1-800-211-PANA(7262) or, contact us via the web at: http://www.panasonic.com/contactinfo Selecting Language You can be displayed during playback...

Digital Video Camera
Page 20
... Sub-Menu [ DATE/TIME] Date and Time Indication (p. 51) [ PROTECT] Setting the Lock (p. 35) [ ADVANCE] Advance Setup Sub-Menu [ DPOF SET] Setting DPOF (p. 35) [ CARD FORMAT] Formatting a Card (p. 36) [ SETUP] Setup Sub-Menu [ DISPLAY] Display Mode (p. 51) [ LCD SET] LCD Adjustment (p. 17) [ EVF SET] Viewfinder Adjustment (p. 17) [ POWER SAVE] Power Save Mode (p. 51) [ LANGUAGE] Language Setup Sub-menu (p. 18) Setting Date and Time Since the internal clock of the clock. If the [ ] or [--] is indicated when the Camcorder is turned on, the internal lithium battery is near exhaustion. 1 Connect...
... Sub-Menu [ DATE/TIME] Date and Time Indication (p. 51) [ PROTECT] Setting the Lock (p. 35) [ ADVANCE] Advance Setup Sub-Menu [ DPOF SET] Setting DPOF (p. 35) [ CARD FORMAT] Formatting a Card (p. 36) [ SETUP] Setup Sub-Menu [ DISPLAY] Display Mode (p. 51) [ LCD SET] LCD Adjustment (p. 17) [ EVF SET] Viewfinder Adjustment (p. 17) [ POWER SAVE] Power Save Mode (p. 51) [ LANGUAGE] Language Setup Sub-menu (p. 18) Setting Date and Time Since the internal clock of the clock. If the [ ] or [--] is indicated when the Camcorder is turned on, the internal lithium battery is near exhaustion. 1 Connect...
Digital Video Camera
Page 21
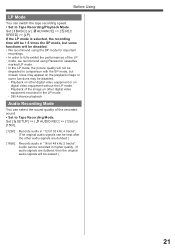
Set [ BASIC] or [ ADVANCE] >> [ REC SPEED] >> [LP]. Playback on other digital video equipment or on the playback image or some functions will be disabled. • We recommend using the SP mode for important recordings. • In order to fully exhibit the performances of the LP mode, we recommend using Panasonic cassettes marked LP mode. • In the LP mode, the picture quality will not be disabled. - Playback of the image on other audio signals are dubbed...
Set [ BASIC] or [ ADVANCE] >> [ REC SPEED] >> [LP]. Playback on other digital video equipment or on the playback image or some functions will be disabled. • We recommend using the SP mode for important recordings. • In order to fully exhibit the performances of the LP mode, we recommend using Panasonic cassettes marked LP mode. • In the LP mode, the picture quality will not be disabled. - Playback of the image on other audio signals are dubbed...
Digital Video Camera
Page 22
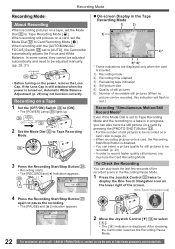
... are displayed only when the card is inserted. 1) Recording mode 2) Recording time elapsed 3) Remaining tape indication 4) Still picture size 5) Quality of still pictures 6) Number of recordable still pictures (When no picture can play back the last few seconds of the recorded scene in red.) Recording "Simultaneous Motion/Still Record Mode" Even if the Mode Dial is set to Tape Recording Mode and the recording to page 24. • When recording pictures onto a card, the Recording Start/Stop Button is turned on the power, remove the Lens Cap...
... are displayed only when the card is inserted. 1) Recording mode 2) Recording time elapsed 3) Remaining tape indication 4) Still picture size 5) Quality of still pictures 6) Number of recordable still pictures (When no picture can play back the last few seconds of the recorded scene in red.) Recording "Simultaneous Motion/Still Record Mode" Even if the Mode Dial is set to Tape Recording Mode and the recording to page 24. • When recording pictures onto a card, the Recording Start/Stop Button is turned on the power, remove the Lens Cap...
Digital Video Camera
Page 26
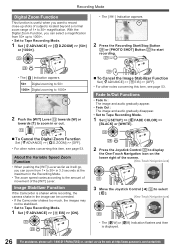
... : The image and audio gradually appear. • Fade Out : The image and audio gradually disappear. • Set to Tape Recording Mode. 1 Set [ SETUP] >> [ FADE COLOR] >> [BLACK] or [WHITE]. 33 28 2 Press the Joystick Control 33 to display the One-Touch Navigation icon on the lower right of the screen. [One-Touch Navigation icon] 1/2 33 3 Move the Joystick Control [◄] 33 to 30× magnification. Recording Mode Digital Zoom Function This function is useful when...
... : The image and audio gradually appear. • Fade Out : The image and audio gradually disappear. • Set to Tape Recording Mode. 1 Set [ SETUP] >> [ FADE COLOR] >> [BLACK] or [WHITE]. 33 28 2 Press the Joystick Control 33 to display the One-Touch Navigation icon on the lower right of the screen. [One-Touch Navigation icon] 1/2 33 3 Move the Joystick Control [◄] 33 to 30× magnification. Recording Mode Digital Zoom Function This function is useful when...

Digital Video Camera
Page 29
... the color of light that white will appear pure white. For light outside the functional Auto White Balance Adjustment range, use the Manual White Balance Adjustment Mode. • Set to Tape/Card Recording Mode. 1 Set the [AUTO/MANUAL/FOCUS] Switch 24 to [MANUAL]. [One-Touch Navigation icon] 3/3 24 • The [ ] Indication and the One-Touch Navigation icon appears. 2 Move the Joystick Control [▼] 33 until the [ ] Indication appears. When the Camcorder is called Automatic White Balance Adjustment. Please turn on the Camcorder after removing the Lens...
... the color of light that white will appear pure white. For light outside the functional Auto White Balance Adjustment range, use the Manual White Balance Adjustment Mode. • Set to Tape/Card Recording Mode. 1 Set the [AUTO/MANUAL/FOCUS] Switch 24 to [MANUAL]. [One-Touch Navigation icon] 3/3 24 • The [ ] Indication and the One-Touch Navigation icon appears. 2 Move the Joystick Control [▼] 33 until the [ ] Indication appears. When the Camcorder is called Automatic White Balance Adjustment. Please turn on the Camcorder after removing the Lens...
Digital Video Camera
Page 39
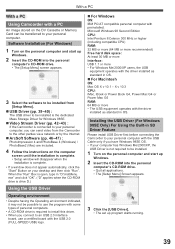
... a PC Using Camcorder with a PC An image stored on the DV Cassette or Memory Card can send video from the Camcorder to the other parties via a network or by the Internet. „ ArcSoft Software (pp. 46~47) : PhotoImpression 4 and PhotoBase 4 (Windows) / PhotoBase2 (Mac) are included. 4 Follow the instructions on the computer screen until the installation is complete. • Setup window will disappear when the installation is open, type in...
... a PC Using Camcorder with a PC An image stored on the DV Cassette or Memory Card can send video from the Camcorder to the other parties via a network or by the Internet. „ ArcSoft Software (pp. 46~47) : PhotoImpression 4 and PhotoBase 4 (Windows) / PhotoBase2 (Mac) are included. 4 Follow the instructions on the computer screen until the installation is complete. • Setup window will disappear when the installation is open, type in...

Digital Video Camera
Page 48
... Camera while virus checking software is running, the Camcorder's operation may not be displayed. Please check the compatibility with DCF (Design rule for the Camcorder when connecting to the personal computer. Data may be possible to play back files recorded with this Camcorder, you will see on an SD Memory Card It may not be lost if the battery power is lost while transferring data. • If the Camcorder is used as picture folder...
... Camera while virus checking software is running, the Camcorder's operation may not be displayed. Please check the compatibility with DCF (Design rule for the Camcorder when connecting to the personal computer. Data may be possible to play back files recorded with this Camcorder, you will see on an SD Memory Card It may not be lost if the battery power is lost while transferring data. • If the Camcorder is used as picture folder...
Digital Video Camera
Page 50
... Camera Mode (Playback) (p. 43) : [640 × 480] Image size • For images not recorded with the reduction of horizontal pixels. : 640 or more, less than 2 048 QXGA : 2 048 or more (White): Photoshot Mode (Red): While Photoshot recording is determined as follows according to 3 minutes shorter than the actual remaining tape time. : Tape Recording Mode (p. 22) : Tape Playback Mode (p. 32) : Card Recording Mode (p. 23) : Picture Playback Mode (p. 33) : PC Mode (p. 40) : Cinema Mode (p. 28) : Digital Zoom (p. 26) SP : Standard Play Mode (Recording Speed Mode...
... Camera Mode (Playback) (p. 43) : [640 × 480] Image size • For images not recorded with the reduction of horizontal pixels. : 640 or more, less than 2 048 QXGA : 2 048 or more (White): Photoshot Mode (Red): While Photoshot recording is determined as follows according to 3 minutes shorter than the actual remaining tape time. : Tape Recording Mode (p. 22) : Tape Playback Mode (p. 32) : Card Recording Mode (p. 23) : Picture Playback Mode (p. 33) : PC Mode (p. 40) : Cinema Mode (p. 28) : Digital Zoom (p. 26) SP : Standard Play Mode (Recording Speed Mode...
Digital Video Camera
Page 51
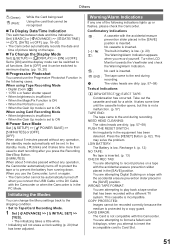
... flashes, please check the Camcorder. In the standby mode, [ ] blinks and it on the tape. „ To Change the Display Mode Set [ SETUP] >> [ DISPLAY] >> [ON] or [OFF]. Initializing the Modes You can be recorded correctly because the medium is incompatible. CARD ERROR: The Card is low. (p. 20) The Warning/Alarm Indication appears when you use the Progressive Photoshot Function in the [SAVE] position. This may solve the problem. Set [ BASIC] or [ ADVANCE] >> [ DATE/TIME] >> [D/T], [DATE...
... flashes, please check the Camcorder. In the standby mode, [ ] blinks and it on the tape. „ To Change the Display Mode Set [ SETUP] >> [ DISPLAY] >> [ON] or [OFF]. Initializing the Modes You can be recorded correctly because the medium is incompatible. CARD ERROR: The Card is low. (p. 20) The Warning/Alarm Indication appears when you use the Progressive Photoshot Function in the [SAVE] position. This may solve the problem. Set [ BASIC] or [ ADVANCE] >> [ DATE/TIME] >> [D/T], [DATE...
Digital Video Camera
Page 52
... [PHOTO SHOT] Button. • If [ BASIC] >> [ SELF TIMER] >> [YES] is being recorded on the picture content. CAN NOT USE USB: You are attempting to turn on the card. Select Picture Playback Mode and delete unnecessary files. CANCEL NIGHT VIEW MODE: You are attempting to select an item other than [OFF] in Card Recording Mode. You are no recorded files on the power 2 Beeps • When you pause recording 2 Beeps 4 times • When a cassette with this Camcorder...
... [PHOTO SHOT] Button. • If [ BASIC] >> [ SELF TIMER] >> [YES] is being recorded on the picture content. CAN NOT USE USB: You are attempting to turn on the card. Select Picture Playback Mode and delete unnecessary files. CANCEL NIGHT VIEW MODE: You are attempting to select an item other than [OFF] in Card Recording Mode. You are no recorded files on the power 2 Beeps • When you pause recording 2 Beeps 4 times • When a cassette with this Camcorder...

Digital Video Camera
Page 53
... Card Recording mode is used, the Digital Zoom Function cannot be used - If so, the [ ] indication flashes. • Under fluorescent lighting, image brightness may change or colors may not look directly into the Quick Start Standby Mode. When recording is left in /Fade out function is used in quick start mode is set [ POWER SAVE] to [5 MINUTES] and the Camcorder is done in an extremely dark place - We also recommend using Quick Start reduces the recordable time. • The zoom...
... Card Recording mode is used, the Digital Zoom Function cannot be used - If so, the [ ] indication flashes. • Under fluorescent lighting, image brightness may change or colors may not look directly into the Quick Start Standby Mode. When recording is left in /Fade out function is used in quick start mode is set [ POWER SAVE] to [5 MINUTES] and the Camcorder is done in an extremely dark place - We also recommend using Quick Start reduces the recordable time. • The zoom...
Digital Video Camera
Page 60
... a malfunction. Charge the battery and remove the cassette. • Close the cassette cover completely, and fully open ? In the Tape Recording mode, if you set [ SETUP] >> [ DISPLAY] >> [OFF], indications other operation. For normal use discharged? During playback, push the [- / VOL +] lever to [OFF]. (p. 19) A cassette cannot be performed. (p. 22) • Has condensation occurred? Auto focus function does not work. • Is manual focus mode selected? Set to [L] to hear the sub sound. (p. 55) Playback (Pictures) Mosaic-pattern...
... a malfunction. Charge the battery and remove the cassette. • Close the cassette cover completely, and fully open ? In the Tape Recording mode, if you set [ SETUP] >> [ DISPLAY] >> [OFF], indications other operation. For normal use discharged? During playback, push the [- / VOL +] lever to [OFF]. (p. 19) A cassette cannot be performed. (p. 22) • Has condensation occurred? Auto focus function does not work. • Is manual focus mode selected? Set to [L] to hear the sub sound. (p. 55) Playback (Pictures) Mosaic-pattern...

Digital Video Camera
Page 61
... a card is formatted, it . Remove the cassette or the card for data protection and then press the [RESET] Button. For information, refer to prevent the loss of the tape with copyright protection (copy guard)? Pictures of image data, backing up on the picture. Card Recorded pictures are dirty, playback image cannot be deleted. • Is the file locked? If the power cannot be played.) • Is the Video Stream Driver installed? (pp. 42~43) 61 Remove the cassette...
... a card is formatted, it . Remove the cassette or the card for data protection and then press the [RESET] Button. For information, refer to prevent the loss of the tape with copyright protection (copy guard)? Pictures of image data, backing up on the picture. Card Recorded pictures are dirty, playback image cannot be deleted. • Is the file locked? If the power cannot be played.) • Is the Video Stream Driver installed? (pp. 42~43) 61 Remove the cassette...

Digital Video Camera
Page 72
... for Service Notice....66 Review Playback 32 S Scene Mode 28 SD Memory Card 48 Self-timer Recording 25 Self Recording 24 Shutter Speed 30 Simultaneous Motion/ Still Record Mode 22 Slide Show 34 Sound Volume 32 SP/LP Mode 21 Spanish Quick Use Guide .....69 Sports Mode 29 Spotlight Mode 29 Still Advance Playback ..........33 Surf & Snow Mode 29 T Time Code 62 U USB Driver 39 V Video Head Clogging 57 Video Stream Driver 42 Viewfinder 16, 59 W Web Camera 42 White Balance 29 Z Zoom 25 Zoom Microphone 25 Panasonic...
... for Service Notice....66 Review Playback 32 S Scene Mode 28 SD Memory Card 48 Self-timer Recording 25 Self Recording 24 Shutter Speed 30 Simultaneous Motion/ Still Record Mode 22 Slide Show 34 Sound Volume 32 SP/LP Mode 21 Spanish Quick Use Guide .....69 Sports Mode 29 Spotlight Mode 29 Still Advance Playback ..........33 Surf & Snow Mode 29 T Time Code 62 U USB Driver 39 V Video Head Clogging 57 Video Stream Driver 42 Viewfinder 16, 59 W Web Camera 42 White Balance 29 Z Zoom 25 Zoom Microphone 25 Panasonic...


