
Lcd Projector
Page 4
... 12 Remote control 14 Getting Started Setting up 15 Screen size and throw distance 15 Projection method 16 Front leg adjusters and throwing angle 16 Connections 17 Before connecting to the projector 17 Connecting example: AV equipment 17 Connecting example: Computers 18 Basic Operation Switching the projector on/off 19 Power cord 19 POWER and POWER LOCK indicators 20 Switching on the projector 21 Switching off the projector 22 Projecting an image 23 Selecting the input signal 23 Positioning the image 23 Remote control operation...
... 12 Remote control 14 Getting Started Setting up 15 Screen size and throw distance 15 Projection method 16 Front leg adjusters and throwing angle 16 Connections 17 Before connecting to the projector 17 Connecting example: AV equipment 17 Connecting example: Computers 18 Basic Operation Switching the projector on/off 19 Power cord 19 POWER and POWER LOCK indicators 20 Switching on the projector 21 Switching off the projector 22 Projecting an image 23 Selecting the input signal 23 Positioning the image 23 Remote control operation...

Lcd Projector
Page 5
... MODE 39 STANDBY MODE 40 LAMP POWER 40 LAMP RUNTIME 40 EMULATE 40 FUNCTION BUTTON 41 AUDIO SETTING 41 TEST PATTERN 42 INITIALIZE ALL 42 SECURITY menu 43 PASSWORD 43 PASSWORD CHANGE 43 TEXT DISPLAY 43 TEXT CHANGE 43 MENU LOCK 44 MENU LOCK PASSWORD 44 CONTROL DEVICE SETUP 44 NETWORK menu (PT-LB90NTU only 45 Maintenance LAMP and TEMP Indicators 46 Managing the indicated problems 46 Care and Replacement 47 Before Care and Replacement 47 Cleaning the projector 47 Replacing the Lamp unit 48 Troubleshooting...
... MODE 39 STANDBY MODE 40 LAMP POWER 40 LAMP RUNTIME 40 EMULATE 40 FUNCTION BUTTON 41 AUDIO SETTING 41 TEST PATTERN 42 INITIALIZE ALL 42 SECURITY menu 43 PASSWORD 43 PASSWORD CHANGE 43 TEXT DISPLAY 43 TEXT CHANGE 43 MENU LOCK 44 MENU LOCK PASSWORD 44 CONTROL DEVICE SETUP 44 NETWORK menu (PT-LB90NTU only 45 Maintenance LAMP and TEMP Indicators 46 Managing the indicated problems 46 Care and Replacement 47 Before Care and Replacement 47 Cleaning the projector 47 Replacing the Lamp unit 48 Troubleshooting...
Lcd Projector
Page 8
... the lamp life or life of the projector in fire. Always disconnect all cables before adjusting the lens focus. 8 - tion and put it is thermally affected by the light from the ceiling, purchase an optional hanging attachment (Model No. See "TEMP indicator" on page 46. Failure to observe this projector at least 30 minutes before moving the projector. Moving the projector with the adjustable feet or lens cover removed. Cautions when installing...
... the lamp life or life of the projector in fire. Always disconnect all cables before adjusting the lens focus. 8 - tion and put it is thermally affected by the light from the ceiling, purchase an optional hanging attachment (Model No. See "TEMP indicator" on page 46. Failure to observe this projector at least 30 minutes before moving the projector. Moving the projector with the adjustable feet or lens cover removed. Cautions when installing...
Lcd Projector
Page 9
... or problems with operation. zzPersonal information being cleaned out, it to vibration or impact. zzThe possibility of disposal. Depending on where the projector is used , air exhaust vents or the warm air from shining onto the screen. Do not project the same image for 10 hours will decrease over windows and turn off any lights near the screen to prevent outside light or light from indoor lamps from air...
... or problems with operation. zzPersonal information being cleaned out, it to vibration or impact. zzThe possibility of disposal. Depending on where the projector is used , air exhaust vents or the warm air from shining onto the screen. Do not project the same image for 10 hours will decrease over windows and turn off any lights near the screen to prevent outside light or light from indoor lamps from air...
Lcd Projector
Page 12
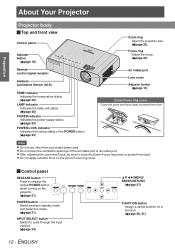
... Projector body JJTop and front view Control panel Adjuster button (Æpage 16) Zoom ring Adjust the projection size. (Æpage 23) Focus ring Adjust the focus. (Æpage 23) Remote control signal receptor Ambient Luminance Sensor (ALS) TEMP indicator Indicates the temperature status. (Æpage 46) LAMP indicator Indicates the lamp unit status. (Æpage 46) POWER indicator Indicates the power supply status. (Æpage 20) POWER LOCK indicator Indicates the locking status of the air intake port or air outlet port. Note zzDo not use other than a provided power cord...
... Projector body JJTop and front view Control panel Adjuster button (Æpage 16) Zoom ring Adjust the projection size. (Æpage 23) Focus ring Adjust the focus. (Æpage 23) Remote control signal receptor Ambient Luminance Sensor (ALS) TEMP indicator Indicates the temperature status. (Æpage 46) LAMP indicator Indicates the lamp unit status. (Æpage 46) POWER indicator Indicates the power supply status. (Æpage 20) POWER LOCK indicator Indicates the locking status of the air intake port or air outlet port. Note zzDo not use other than a provided power cord...

Lcd Projector
Page 14
... 26, 41) Control to change the scale by means of digital zoom. (Æpage 26) Detect the input signal and the setting of different types. zzYou can attach a favourite strap onto the remote control. Preparation JJFront view POWER button Switch between the remote control emitter and the remote control signal receptor, the remote control may malfunction under strong light such as a frozen picture. (Æpage 24) Reset some of the settings to the factory default settings. (Æ...
... 26, 41) Control to change the scale by means of digital zoom. (Æpage 26) Detect the input signal and the setting of different types. zzYou can attach a favourite strap onto the remote control. Preparation JJFront view POWER button Switch between the remote control emitter and the remote control signal receptor, the remote control may malfunction under strong light such as a frozen picture. (Æpage 24) Reset some of the settings to the factory default settings. (Æ...
Lcd Projector
Page 21
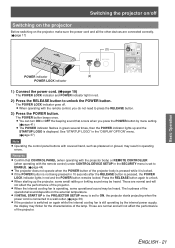
... (3) INPUT SELECT POWER indicator (2) POWER LOCK indicator 1111 Connect the power cord. (Æpage 19) The POWER LOCK indicator and POWER indicator light in the PROJECTOR SETUP menu is set to ENABLE. (Æpage 44) zzThe projector does not operate when the POWER button of the projector body is pressed while it is displayed. zzYou can turn ON or OFF the beeping sound that CONTROL PANEL (when operating with the projector body) or REMOTE CONTROLLER (when operating with the remote control) under CONTROL DEVICE SETUP in the SECURITY menu...
... (3) INPUT SELECT POWER indicator (2) POWER LOCK indicator 1111 Connect the power cord. (Æpage 19) The POWER LOCK indicator and POWER indicator light in the PROJECTOR SETUP menu is set to ENABLE. (Æpage 44) zzThe projector does not operate when the POWER button of the projector body is pressed while it is displayed. zzYou can turn ON or OFF the beeping sound that CONTROL PANEL (when operating with the projector body) or REMOTE CONTROLLER (when operating with the remote control) under CONTROL DEVICE SETUP in the SECURITY menu...

Lcd Projector
Page 22
... installed. Basic Operation 22 - zzIf STANDBY MODE is in operation in AUDIO SETTING. (Æpage 41) 3333 After the POWER LOCK indicator and POWER indicator light in orange. Switching the projector on/off Switching off , the operational sound (beep) sounds, and projection stops. Remarks zzConfirm that CONTROL PANEL (when operating with the projector body) or REMOTE CONTROLLER (when operating with the remote control) under CONTROL DEVICE SETUP in the SECURITY menu is set to ENABLE. (Æpage 44) zzYou can set to NORMAL, the POWER indicator flashes in red...
... installed. Basic Operation 22 - zzIf STANDBY MODE is in operation in AUDIO SETTING. (Æpage 41) 3333 After the POWER LOCK indicator and POWER indicator light in orange. Switching the projector on/off Switching off , the operational sound (beep) sounds, and projection stops. Remarks zzConfirm that CONTROL PANEL (when operating with the projector body) or REMOTE CONTROLLER (when operating with the remote control) under CONTROL DEVICE SETUP in the SECURITY menu is set to ENABLE. (Æpage 44) zzYou can set to NORMAL, the POWER indicator flashes in red...
Lcd Projector
Page 27
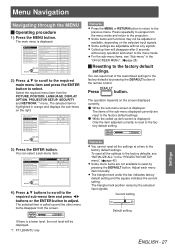
... the MENU button. The main menu is a lower level, the next level will disappear after 5 seconds without any operation and return to reset by the selected input signals. KEYSTONE If there is displayed. The operation depends on the screen displayed currently. PICTURE PICTURE MODE POSITION CONTRAST LANGUAGE BRIGHTNESS DISPLAY OPTION COLOR PROJECTOR SETUP TINT SECURITY SHARPNESS NETWORK COLOR TEMPERATURE DAYLIGHT VIEW SELECT RETURN STILL MODE NOISE REDUCTION ENTER TV-SYSTEM STANDARD DEFAULT AUTO OFF OFF AUTO 2222...
... the MENU button. The main menu is a lower level, the next level will disappear after 5 seconds without any operation and return to reset by the selected input signals. KEYSTONE If there is displayed. The operation depends on the screen displayed currently. PICTURE PICTURE MODE POSITION CONTRAST LANGUAGE BRIGHTNESS DISPLAY OPTION COLOR PROJECTOR SETUP TINT SECURITY SHARPNESS NETWORK COLOR TEMPERATURE DAYLIGHT VIEW SELECT RETURN STILL MODE NOISE REDUCTION ENTER TV-SYSTEM STANDARD DEFAULT AUTO OFF OFF AUTO 2222...

Lcd Projector
Page 28
... WHITE BALANCE BLUE *1 0 30 COLOR TEMPERATURE DEFAULT 30 DAYLIGHT VIEW AUTO 31 RGB/YPBPR *2 AUTO 31 **** Only when RGB signal is input. **** Only when RGB signal (VGA60) is input. Remarks zzThe factory default values vary depending on the remote control. For the menu operation, see "Navigating through the MENU". (Æpage 27) ON-SCREEN MENU Press button. The ON-SCREEN MENU consists of each menu is displayed. JJPICTURE [ ] QQ S-VIDEO/VIDEO/RGB (Moving image)/YPBPR signal is input *1 Sub-menu item Default Page PICTURE MODE...
... WHITE BALANCE BLUE *1 0 30 COLOR TEMPERATURE DEFAULT 30 DAYLIGHT VIEW AUTO 31 RGB/YPBPR *2 AUTO 31 **** Only when RGB signal is input. **** Only when RGB signal (VGA60) is input. Remarks zzThe factory default values vary depending on the remote control. For the menu operation, see "Navigating through the MENU". (Æpage 27) ON-SCREEN MENU Press button. The ON-SCREEN MENU consists of each menu is displayed. JJPICTURE [ ] QQ S-VIDEO/VIDEO/RGB (Moving image)/YPBPR signal is input *1 Sub-menu item Default Page PICTURE MODE...

Lcd Projector
Page 31
... not available when INSTALLATION in PROJECTOR SETUP menu is set to block out sunlight. zzWhen the projector is not working properly in AUTO mode, change the setting according to REAR/DESK or REAR/CEILING. PICTURE menu DAYLIGHT VIEW You can keep the projected image bright and vivid even in well-lit rooms where the ambient light sources cannot be input to match the video data. (Available with signals of S-VIDEO/VIDEO only) Change setting Change setting OFF ON No noise...
... not available when INSTALLATION in PROJECTOR SETUP menu is set to block out sunlight. zzWhen the projector is not working properly in AUTO mode, change the setting according to REAR/DESK or REAR/CEILING. PICTURE menu DAYLIGHT VIEW You can keep the projected image bright and vivid even in well-lit rooms where the ambient light sources cannot be input to match the video data. (Available with signals of S-VIDEO/VIDEO only) Change setting Change setting OFF ON No noise...

Lcd Projector
Page 40
... the projector can be turned ON and the audio output can be set active from controlling the computer connected via a wired LAN or a wireless LAN in a small room. LAMP POWER You can adjust the power of power-on times, etc. ). zzCheck the lamp unit replacement time. (Æpage 48) Remarks zzIf the lamp runtime has reached 2 800 hours, the red (time indicator) and gray marks appear alternately to notify you can change the standby mode setting. Change setting Change setting NORMAL...
... the projector can be turned ON and the audio output can be set active from controlling the computer connected via a wired LAN or a wireless LAN in a small room. LAMP POWER You can adjust the power of power-on times, etc. ). zzCheck the lamp unit replacement time. (Æpage 48) Remarks zzIf the lamp runtime has reached 2 800 hours, the red (time indicator) and gray marks appear alternately to notify you can change the standby mode setting. Change setting Change setting NORMAL...

Lcd Projector
Page 42
... power is connected. (Æpage 11) Remarks zzThe usage time of the projector, lamp runtime and the NETWORK settings are deactivated.) zzThe INITIAL SETTING menu screen will display. Change pattern Change pattern Press the MENU or RETURN button to return to the PROJECTOR SETUP menu, or press repeatedly to enter the correct password when initialised. ENGLISH Select OK and turn off the power according to the factory defaults. PROJECTOR SETUP menu TEST PATTERN You can reset all white...
... power is connected. (Æpage 11) Remarks zzThe usage time of the projector, lamp runtime and the NETWORK settings are deactivated.) zzThe INITIAL SETTING menu screen will display. Change pattern Change pattern Press the MENU or RETURN button to return to the PROJECTOR SETUP menu, or press repeatedly to enter the correct password when initialised. ENGLISH Select OK and turn off the power according to the factory defaults. PROJECTOR SETUP menu TEST PATTERN You can reset all white...
Lcd Projector
Page 44
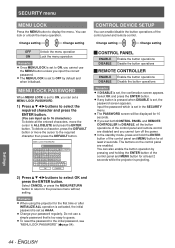
Change setting Change setting OFF ON Unlock the menu operation Lock the menu operation Remarks zzOnce MENU LOCK is projecting. You can enable/disable the button operations of the control panel and MENU button for at least 2 seconds while the projector is set , the confirmation screen appears. Select CANCEL or press the MENU/RETURN button to return to ON, you cannot use a simple password that is set a MENU LOCK PASSWORD. 1111 Press▲▼◄►buttons to select the required...
Change setting Change setting OFF ON Unlock the menu operation Lock the menu operation Remarks zzOnce MENU LOCK is projecting. You can enable/disable the button operations of the control panel and MENU button for at least 2 seconds while the projector is set , the confirmation screen appears. Select CANCEL or press the MENU/RETURN button to return to ON, you cannot use a simple password that is set a MENU LOCK PASSWORD. 1111 Press▲▼◄►buttons to select the required...
Lcd Projector
Page 45
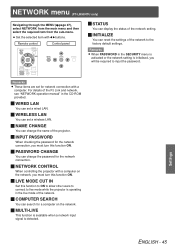
Remote control Control panel JJSTATUS You can set a wired LAN. For details of the network to the factory default settings. JJINPUT PASSWORD When checking the password for the network connection. JJMULTI-LIVE This function is available when a network input signal is operating in the live mode while the projector is detected. Settings ENGLISH - 45 JJWIRED LAN You can display the status of the network setting. JJCOMPUTER SEARCH You can search for network connection with ◄►buttons. JJPASSWORD CHANGE You can set for...
Remote control Control panel JJSTATUS You can set a wired LAN. For details of the network to the factory default settings. JJINPUT PASSWORD When checking the password for the network connection. JJMULTI-LIVE This function is available when a network input signal is operating in the live mode while the projector is detected. Settings ENGLISH - 45 JJWIRED LAN You can display the status of the network setting. JJCOMPUTER SEARCH You can search for network connection with ◄►buttons. JJPASSWORD CHANGE You can set for...

Lcd Projector
Page 46
... power supply status by the POWER indicator. (Æpage 20) LAMP indicator TEMP indicator FOCUS ZOOM POWER STANDBY(RED)/ LOCK ON(GREEN) LAMP TEMP RELEASE INPUT SELECT FUNCTION MENU ENTER RETURN JJLAMP indicator Indicator Problem zzIlluminating red LAMP RUNTIME has reached 2 800 hours. Cause Lamp unit will perform 2 minutes with the projector, the LAMP and/or TEMP indicators will be replaced. See "Replacing the Lamp unit". (Æpage 48) Remarks zzIf the LAMP indicator still lights or flashes after the above remedy, disconnect the power plug, and then supply the power...
... power supply status by the POWER indicator. (Æpage 20) LAMP indicator TEMP indicator FOCUS ZOOM POWER STANDBY(RED)/ LOCK ON(GREEN) LAMP TEMP RELEASE INPUT SELECT FUNCTION MENU ENTER RETURN JJLAMP indicator Indicator Problem zzIlluminating red LAMP RUNTIME has reached 2 800 hours. Cause Lamp unit will perform 2 minutes with the projector, the LAMP and/or TEMP indicators will be replaced. See "Replacing the Lamp unit". (Æpage 48) Remarks zzIf the LAMP indicator still lights or flashes after the above remedy, disconnect the power plug, and then supply the power...

Lcd Projector
Page 47
... "Switching off the projector". (Æpage 22) Cleaning the projector JJCabinet Wipe off dirt and dust gently with water, wring the cloth well and then wipe the projector. Otherwise, it gently on the surface of the projector increases, the TEMP indicator lights, and the power is excessively dirty, the internal temperature of the lens cover glass. Note zzClean the lens cover with a lint-free cloth. Tab Air filter 3 ) Install...
... "Switching off the projector". (Æpage 22) Cleaning the projector JJCabinet Wipe off dirt and dust gently with water, wring the cloth well and then wipe the projector. Otherwise, it gently on the surface of the projector increases, the TEMP indicator lights, and the power is excessively dirty, the internal temperature of the lens cover glass. Note zzClean the lens cover with a lint-free cloth. Tab Air filter 3 ) Install...
Lcd Projector
Page 49
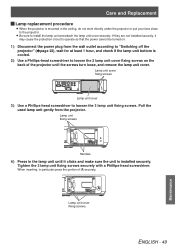
... 1 hour, and check if the lamp unit bottom is installed securely. When inserting, in the ceiling, do not work directly under the projector or put your face close to the projector. Care and Replacement JJLamp replacement procedure zzWhen the projector is mounted in particular press the portion of the projector until it may cause the protection circuit to operate so that the power cannot be turned...
... 1 hour, and check if the lamp unit bottom is installed securely. When inserting, in the ceiling, do not work directly under the projector or put your face close to the projector. Care and Replacement JJLamp replacement procedure zzWhen the projector is mounted in particular press the portion of the projector until it may cause the protection circuit to operate so that the power cannot be turned...
Lcd Projector
Page 51
... the screen. zzThe circuit breakers have a loss of computer; Should any problem persist, contact an Authorized Service Center. zzThe remote control signal receptor on . zzREMOTE CONTROLLER in the PROJECTOR SETUP menu is invalidated. (If you fail to the projector may not be able to the VARIABLE AUDIO OUT terminal. zzThere may be at the minimum setting. zzThe lamp unit cover has not been securely installed. No sound...
... the screen. zzThe circuit breakers have a loss of computer; Should any problem persist, contact an Authorized Service Center. zzThe remote control signal receptor on . zzREMOTE CONTROLLER in the PROJECTOR SETUP menu is invalidated. (If you fail to the projector may not be able to the VARIABLE AUDIO OUT terminal. zzThere may be at the minimum setting. zzThe lamp unit cover has not been securely installed. No sound...

Lcd Projector
Page 59
... P PASSWORD 43 PASSWORD CHANGE 43 PICTURE menu 30 PICTURE MODE 30 Positioning the image 23 POSITION menu 32 Power cord 19 POWER indicator status 20 POWER LOCK indicator status......20 Projection method 16 Projector body 12 PROJECTOR SETUP menu..........39 R Read this first 11 REALTIME KEYSTONE 32 Remote control 14 Replacing the Lamp unit 48 RGB/YPBPR 31 S Screen size and throw distance.....15 Security 9 SECURITY menu 43 Selecting the input signal 23 Serial terminal 53 SHARPNESS 30 SHIFT 32 SHIFT V 32 SIGNAL SEARCH 37 Specifications 55 STANDBY MODE...
... P PASSWORD 43 PASSWORD CHANGE 43 PICTURE menu 30 PICTURE MODE 30 Positioning the image 23 POSITION menu 32 Power cord 19 POWER indicator status 20 POWER LOCK indicator status......20 Projection method 16 Projector body 12 PROJECTOR SETUP menu..........39 R Read this first 11 REALTIME KEYSTONE 32 Remote control 14 Replacing the Lamp unit 48 RGB/YPBPR 31 S Screen size and throw distance.....15 Security 9 SECURITY menu 43 Selecting the input signal 23 Serial terminal 53 SHARPNESS 30 SHIFT 32 SHIFT V 32 SIGNAL SEARCH 37 Specifications 55 STANDBY MODE...


