
PTAE200U User Guide
Page 1
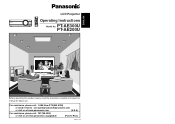
... PT-AE200U Before operating this product, please read the instructions carefully and save this manual for future use. ENGLISH R LCD Projector POWER LIGHT INPUT VIDEO CMPNT PC COMPONENT KEYSTONE MENU ENTER NORMAL FREEZE MODE MEMORY ASPECT PICTURE USER MUTE VOLUME SD SD MENU TIME LCD PROJECTOR Operating Instructions Model No. For assistance, please call : 1-888-View-PTV(843-9788) or send e-mail to : consumerproducts@panasonic.com or visit us at www.panasonic.com (U.S.A) For assistance...
... PT-AE200U Before operating this product, please read the instructions carefully and save this manual for future use. ENGLISH R LCD Projector POWER LIGHT INPUT VIDEO CMPNT PC COMPONENT KEYSTONE MENU ENTER NORMAL FREEZE MODE MEMORY ASPECT PICTURE USER MUTE VOLUME SD SD MENU TIME LCD PROJECTOR Operating Instructions Model No. For assistance, please call : 1-888-View-PTV(843-9788) or send e-mail to : consumerproducts@panasonic.com or visit us at www.panasonic.com (U.S.A) For assistance...
PTAE200U User Guide
Page 2
... triangle, is supplied with the instructions, may cause undesired operation. These limits are unable to insert the plug into an outlet on the power plug. However, there is intended to alert the user to the presence of your Panasonic LCD projector. Connect the equipment into the outlet, contact an electrician. Address: One Panasonic Way Secaucus New Jersey 07094 Telephone number: 1-888-View-PTV(843...
... triangle, is supplied with the instructions, may cause undesired operation. These limits are unable to insert the plug into an outlet on the power plug. However, there is intended to alert the user to the presence of your Panasonic LCD projector. Connect the equipment into the outlet, contact an electrician. Address: One Panasonic Way Secaucus New Jersey 07094 Telephone number: 1-888-View-PTV(843...
PTAE200U User Guide
Page 3
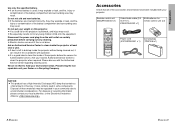
... moving images..........49 Error displays 50 Others Indicators 51 Cleaning and replacing the air filter 53 Replacing the lamp unit 54 Before calling for service 57 Specifications 59 Appendix 61 List of the projector. Contents Preparation IMPORTANT SAFETY NOTICE..........2 Precautions with regard to safety ....5 Accessories 9 Precautions on handling 10 Location and function of each part...12 Using the remote control unit.........17 Inserting the batteries 17 Operating range 17 Connections...
... moving images..........49 Error displays 50 Others Indicators 51 Cleaning and replacing the air filter 53 Replacing the lamp unit 54 Before calling for service 57 Specifications 59 Appendix 61 List of the projector. Contents Preparation IMPORTANT SAFETY NOTICE..........2 Precautions with regard to safety ....5 Accessories 9 Precautions on handling 10 Location and function of each part...12 Using the remote control unit.........17 Inserting the batteries 17 Operating range 17 Connections...
PTAE200U User Guide
Page 5
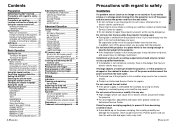
... is used, it can result if this projector. B You could fall or the projector could break, and injury may result. Disconnect the power cord plug from the wall outlet as a safety precaution before the season for m (9´10˝), remote control unit (x2) K2KA2FA00002 x1] POWER LIGHT INPUT VIDEO CMPNT PC COMPONENT KEYSTONE MENU ENTER NORMAL FREEZE MODE MEMORY ASPECT PICTURE USER MUTE VOLUME SD SD MENU TIME LCD PROJECTOR Power cord...
... is used, it can result if this projector. B You could fall or the projector could break, and injury may result. Disconnect the power cord plug from the wall outlet as a safety precaution before the season for m (9´10˝), remote control unit (x2) K2KA2FA00002 x1] POWER LIGHT INPUT VIDEO CMPNT PC COMPONENT KEYSTONE MENU ENTER NORMAL FREEZE MODE MEMORY ASPECT PICTURE USER MUTE VOLUME SD SD MENU TIME LCD PROJECTOR Power cord...

PTAE200U User Guide
Page 6
... places which produces lint. Furthermore, all installation work should only be subjected to vibration or shocks which is set the FAN CONTROL to HIGH. (Refer to page 40.) Failure to observe this does not affect the performance of blue, green or red. Moreover, when not using this will be replaced earlier due to variables such as a fixed point of your bare hands. If...
... places which produces lint. Furthermore, all installation work should only be subjected to vibration or shocks which is set the FAN CONTROL to HIGH. (Refer to page 40.) Failure to observe this does not affect the performance of blue, green or red. Moreover, when not using this will be replaced earlier due to variables such as a fixed point of your bare hands. If...
PTAE200U User Guide
Page 7
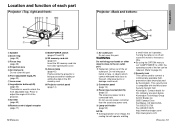
... than the accessory power cord. & Lamp unit holder (page 55) NOTE: B During projection of an image, the cooling fan will cause this port. ( Front adjustable legs(L/R) (page 22) ) Lens cover * Leg adjuster buttons(L/R) (page 22) This button is compatible with the Microsaver Security System from Kensington. Location and function of each part Projector &%$ # 0 /. ' - ' ( , + ) * # Speaker $ Zoom ring (page 23) % Focus ring (page 23) & Projection lens ' Air inlet ports Do not cover this noise to...
... than the accessory power cord. & Lamp unit holder (page 55) NOTE: B During projection of an image, the cooling fan will cause this port. ( Front adjustable legs(L/R) (page 22) ) Lens cover * Leg adjuster buttons(L/R) (page 22) This button is compatible with the Microsaver Security System from Kensington. Location and function of each part Projector &%$ # 0 /. ' - ' ( , + ) * # Speaker $ Zoom ring (page 23) % Focus ring (page 23) & Projection lens ' Air inlet ports Do not cover this noise to...

PTAE200U User Guide
Page 8
...-screen menu screens. ) ENTER button (page 26) This button is used to accept and to activate items selected in speaker. / LIGHT button This button is used for aspect adjustment (vertical and horizontal proportions). . ENGLISH-15 Preparation POWER LIGHT INPUT VIDEO CMPNT PC COMPONENT KEYSTONE MENU ENTER NORMAL FREEZE MODE MEMORY ASPECT PICTURE USER MUTE VOLUME SD SD MENU TIME / * + 0 1 2 3 LCD PROJECTOR + 456 B The remote control unit and the projector itself have the same control buttons available. # TEMP indicator (page 51) This indicator...
...-screen menu screens. ) ENTER button (page 26) This button is used to accept and to activate items selected in speaker. / LIGHT button This button is used for aspect adjustment (vertical and horizontal proportions). . ENGLISH-15 Preparation POWER LIGHT INPUT VIDEO CMPNT PC COMPONENT KEYSTONE MENU ENTER NORMAL FREEZE MODE MEMORY ASPECT PICTURE USER MUTE VOLUME SD SD MENU TIME / * + 0 1 2 3 LCD PROJECTOR + 456 B The remote control unit and the projector itself have the same control buttons available. # TEMP indicator (page 51) This indicator...
PTAE200U User Guide
Page 11
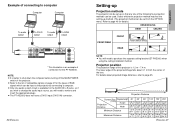
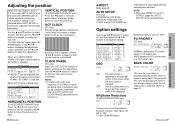
... audio input source, you will need to page 65. Projector position The projection range of the following four projection methods can be set from the center of RGB signals which can be used. Example of connecting to shut down the computer before turning off the MAIN POWER switch of the projector. The lower edge of the projected image falls about projected image distances, refer to remove and insert the appropriate plugs. Projection Distance Screen Size...
... audio input source, you will need to page 65. Projector position The projection range of the following four projection methods can be set from the center of RGB signals which can be used. Example of connecting to shut down the computer before turning off the MAIN POWER switch of the projector. The lower edge of the projected image falls about projected image distances, refer to remove and insert the appropriate plugs. Projection Distance Screen Size...
PTAE200U User Guide
Page 12
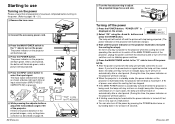
... cut power to adjust the projected image focus and size. The input signal selected will illuminate red. & Press the POWER button. Be careful not to switch off the MAIN POWER switch of the projector, unplug the power cord from the electrical outlet or turn off in standby mode (the power indicator on the projector is illuminated red), the projector will turn on straight away after a short period. (During this time, the power indicator on the projector will flash orange.) B When the projector is turned...
... cut power to adjust the projected image focus and size. The input signal selected will illuminate red. & Press the POWER button. Be careful not to switch off the MAIN POWER switch of the projector, unplug the power cord from the electrical outlet or turn off in standby mode (the power indicator on the projector is illuminated red), the projector will turn on straight away after a short period. (During this time, the power indicator on the projector will flash orange.) B When the projector is turned...

PTAE200U User Guide
Page 14
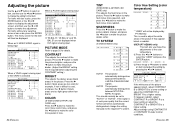
... will be displayed. However, the operation of signal being displayed. B When a menu screen is being displayed PICTURE PICTURE MODE NORMAL CONTRAST 0 BRIGHT 0 COLOR 0 TINT 0 SHARPNESS 0 COLOR TEMP. 0 GAMMA ADJUST MEMORY SAVE MEMORY LOAD TV-SYSTEM AUTO1 SELECT ADJ ESC B When an individual adjustment screen is being input. The MAIN MENU screen will be returned to the factory default settings. Using the freeze function The picture will return to accept the selection. Menu operation guide # Press the MENU button. Selected...
... will be displayed. However, the operation of signal being displayed. B When a menu screen is being displayed PICTURE PICTURE MODE NORMAL CONTRAST 0 BRIGHT 0 COLOR 0 TINT 0 SHARPNESS 0 COLOR TEMP. 0 GAMMA ADJUST MEMORY SAVE MEMORY LOAD TV-SYSTEM AUTO1 SELECT ADJ ESC B When an individual adjustment screen is being input. The MAIN MENU screen will be returned to the factory default settings. Using the freeze function The picture will return to accept the selection. Menu operation guide # Press the MENU button. Selected...
PTAE200U User Guide
Page 15
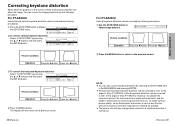
... Picture condition Operation Press the Hbutton. The display will become to obtain image balance. NOTE: B You can be corrected by following procedures. # Press the KEYSTONE button to the previous screen. To obtain the best picture quality, set up the projector and screen in the MAIN MENU and pressing ENTER. ENGLISH-29 Basic Operation B The picture size will affect the image. Press the Ibutton. & Press the MENU button. KEYSTONE 0 Picture condition Operation...
... Picture condition Operation Press the Hbutton. The display will become to obtain image balance. NOTE: B You can be corrected by following procedures. # Press the KEYSTONE button to the previous screen. To obtain the best picture quality, set up the projector and screen in the MAIN MENU and pressing ENTER. ENGLISH-29 Basic Operation B The picture size will affect the image. Press the Ibutton. & Press the MENU button. KEYSTONE 0 Picture condition Operation...

PTAE200U User Guide
Page 17
... the MUTE button once to turn off the picture and sound from the MAIN MENU screen and then press the ENTER button. $ Use the FG buttons to display the PICTURE menu. Selecting the picture mode You can select the appropriate picture mode for the type of time, such as during breaks in meetings or when carrying out preparation. Changing the display language # Select LANGUAGE from the projector when the projector is...
... the MUTE button once to turn off the picture and sound from the MAIN MENU screen and then press the ENTER button. $ Use the FG buttons to display the PICTURE menu. Selecting the picture mode You can select the appropriate picture mode for the type of time, such as during breaks in meetings or when carrying out preparation. Changing the display language # Select LANGUAGE from the projector when the projector is...
PTAE200U User Guide
Page 18
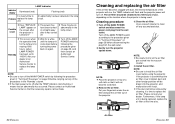
... is being input PICTURE PICTURE MODE NORMAL CONTRAST 0 BRIGHT 0 SHARPNESS 0 COLOR TEMP. 0 W-BAL R 0 W-BAL G 0 W-BAL B 0 GAMMA ADJUST MEMORY SAVE MEMORY LOAD SIGNAL MODE XGA SELECT ADJ ESC B "W-BAL R", "W-BAL G" and "WBAL B" are not displayed when DVI signal is used to adjust the white areas of the picture appears bluish, adjust CONTRAST B or BRIGHT B to a lower setting or adjust the CONTRAST R or BRIGHT R to a higher setting. SHARPNESS Press the H button to make...
... is being input PICTURE PICTURE MODE NORMAL CONTRAST 0 BRIGHT 0 SHARPNESS 0 COLOR TEMP. 0 W-BAL R 0 W-BAL G 0 W-BAL B 0 GAMMA ADJUST MEMORY SAVE MEMORY LOAD SIGNAL MODE XGA SELECT ADJ ESC B "W-BAL R", "W-BAL G" and "WBAL B" are not displayed when DVI signal is used to adjust the white areas of the picture appears bluish, adjust CONTRAST B or BRIGHT B to a lower setting or adjust the CONTRAST R or BRIGHT R to a higher setting. SHARPNESS Press the H button to make...
PTAE200U User Guide
Page 20
... the ENTER button to initiate automatic positioning. When an S-VIDEO/VIDEO/ YPBPR /DVI signal is being input or when "SD CARD" is from the projector because of a poor input signal, set NR to adjust so that any such noise is displayed in the top-right corner of 100 MHz or higher are automatically adjusted. If this happens, use the I N G DESK FAN CONTROL NORMAL LAMP POWER HIGH LAMP RUNTIME 5H...
... the ENTER button to initiate automatic positioning. When an S-VIDEO/VIDEO/ YPBPR /DVI signal is being input or when "SD CARD" is from the projector because of a poor input signal, set NR to adjust so that any such noise is displayed in the top-right corner of 100 MHz or higher are automatically adjusted. If this happens, use the I N G DESK FAN CONTROL NORMAL LAMP POWER HIGH LAMP RUNTIME 5H...

PTAE200U User Guide
Page 22
... button to change the display to the SD menu shown above). Removing the SD memory card # Open the slot cover. $ Check that the access indicator at the side of the projector. NOTE: B If you play back still image data. PICTURE SLIDE SHOW VIDEO PICTURE (page 44) This lets you try to force the SD memory card to check that the access indicator is displayed or -the previous menu screen or image...
... button to change the display to the SD menu shown above). Removing the SD memory card # Open the slot cover. $ Check that the access indicator at the side of the projector. NOTE: B If you play back still image data. PICTURE SLIDE SHOW VIDEO PICTURE (page 44) This lets you try to force the SD memory card to check that the access indicator is displayed or -the previous menu screen or image...

PTAE200U User Guide
Page 26
... an operation. NOTE: B Press the SD MENU button to be played back. Indicators There are two indicators on ) Flashing (red) (Lamp unit off the power and check the table below for the cause of use may be blocked. Flashing (red) (Lamp unit on the control panel of the projector which give information about problems that have occurred inside the projector, so if you notice that can be covered. Advanced Operation Others...
... an operation. NOTE: B Press the SD MENU button to be played back. Indicators There are two indicators on ) Flashing (red) (Lamp unit off the power and check the table below for the cause of use may be blocked. Flashing (red) (Lamp unit on the control panel of the projector which give information about problems that have occurred inside the projector, so if you notice that can be covered. Advanced Operation Others...
PTAE200U User Guide
Page 27
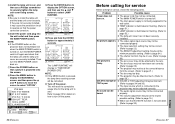
... air filter becomes clogged with dust, the internal temperature of the projector will rise, the TEMP indicator will flash and the projector power will turn off the MAIN POWER switch and disconnect the power cord plug from the wall outlet. $ Gently turn off the MAIN POWER switch by following the nearing 1800 turning the power procedure given hours. (when back on again. dealer or an Authorised Service Center to install the air filter cover before using...
... air filter becomes clogged with dust, the internal temperature of the projector will rise, the TEMP indicator will flash and the projector power will turn off the MAIN POWER switch and disconnect the power cord plug from the wall outlet. $ Gently turn off the MAIN POWER switch by following the nearing 1800 turning the power procedure given hours. (when back on again. dealer or an Authorised Service Center to install the air filter cover before using...

PTAE200U User Guide
Page 28
... the lamp from the projector. On-screen display Lamp indicator warning light More than 1800 hours More than the one hour before handling it to burst. which button is made of time covered by warranty. on replacing the lamp unit B The light generating lamp is pressed. ENGLISH-55 Others Warning When replacing the lamp, allow it out from exploding, the lamp will switch to standby mode after turning on page 23, and then disconnect the power cord...
... the lamp from the projector. On-screen display Lamp indicator warning light More than 1800 hours More than the one hour before handling it to burst. which button is made of time covered by warranty. on replacing the lamp unit B The light generating lamp is pressed. ENGLISH-55 Others Warning When replacing the lamp, allow it out from exploding, the lamp will switch to standby mode after turning on page 23, and then disconnect the power cord...
PTAE200U User Guide
Page 29
... ENTER button to display the OPTION screen, and then use the F and G buttons to select LAMP RUNTIME. If they are securely installed. B The video signal input source may cause the protection circuit to operate so that a picture is illuminated or flashing. (Refer to the wall outlet. ' Install the lamp unit cover, and then use . (Refer to page 33.) B The lens cover may be attached to the lens. This will change to "TIME RESET [POWER OFF...
... ENTER button to display the OPTION screen, and then use the F and G buttons to select LAMP RUNTIME. If they are securely installed. B The video signal input source may cause the protection circuit to operate so that a picture is illuminated or flashing. (Refer to the wall outlet. ' Install the lamp unit cover, and then use . (Refer to page 33.) B The lens cover may be attached to the lens. This will change to "TIME RESET [POWER OFF...
PTAE200U User Guide
Page 30
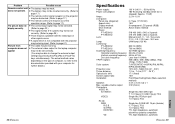
.../SECAM) Projection size: 1016 mm - 5080 mm (40˝ - 200˝) Throw distance: 1.2 m - 7.4 m (3´11˝ - 24´3˝) Optical axis shift: 17:1 (fixed) Screen aspect ratio: 16:9 Installation: Front/Rear/Ceiling/Desk (Menu selection method) Speaker: 4 cm x 3 cm oval x 1 Max. does not operate. display correctly. (Refer to page 35.) B There may be being input. (Refer to change the external output settings by...
.../SECAM) Projection size: 1016 mm - 5080 mm (40˝ - 200˝) Throw distance: 1.2 m - 7.4 m (3´11˝ - 24´3˝) Optical axis shift: 17:1 (fixed) Screen aspect ratio: 16:9 Installation: Front/Rear/Ceiling/Desk (Menu selection method) Speaker: 4 cm x 3 cm oval x 1 Max. does not operate. display correctly. (Refer to page 35.) B There may be being input. (Refer to change the external output settings by...


