PTD6000U User Guide
Page 5
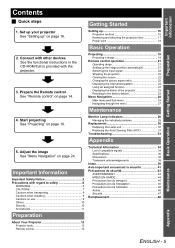
... 9 Cautions when installing 9 Cautions on use 9 Others 10 Security 10 Accessories 11 Preparation Technical Information 34 List of the projector 23 Resetting to the factory default 23 Menu Navigation 24 Main menu and Sub-menu 24 Navigating through the menu 27 Maintenance ...46 Sécurit 47 Remplacement 48 About Your Projector 12 Projector body 12 Remote control 14 Maintenance Appendix ENGLISH - 5 Set up your projector See "Setting up 16 Projection method 16 Removing and attaching the projection lens 17 Power cord 18 Basic Operation 2. Start projecting...
... 9 Cautions when installing 9 Cautions on use 9 Others 10 Security 10 Accessories 11 Preparation Technical Information 34 List of the projector 23 Resetting to the factory default 23 Menu Navigation 24 Main menu and Sub-menu 24 Navigating through the menu 27 Maintenance ...46 Sécurit 47 Remplacement 48 About Your Projector 12 Projector body 12 Remote control 14 Maintenance Appendix ENGLISH - 5 Set up your projector See "Setting up 16 Projection method 16 Removing and attaching the projection lens 17 Power cord 18 Basic Operation 2. Start projecting...
PTD6000U User Guide
Page 7
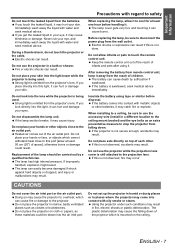
... port. ENGLISH - 7 Fire or electric shocks can result. The battery can hurt or damage your skin into the lens while the projector is not secure enough, accidents may result. If the projector is being used . Doing so may hurt your hands or other . If you place directly into this is emitted ... other objects close to this is swallowed, seek medical advice immediately. The lamp cover gets very hot, and touching it away from the projector's lens. Do not look directly into contact with water and seek medical advice. The lamp can cause fire or damage to the...
... port. ENGLISH - 7 Fire or electric shocks can result. The battery can hurt or damage your skin into the lens while the projector is not secure enough, accidents may result. If the projector is being used . Doing so may hurt your hands or other . If you place directly into this is emitted ... other objects close to this is swallowed, seek medical advice immediately. The lamp cover gets very hot, and touching it away from the projector's lens. Do not look directly into contact with water and seek medical advice. The lamp can cause fire or damage to the...
PTD6000U User Guide
Page 9
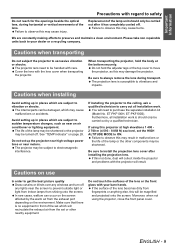
...Important Information Precautions with regard to excessive vibration or shocks. Cautions when transporting Do not subject the projector to safety Do not reach for the openings beside the optical lens, during transport. Do not hold the body at high elevations 1 400 2 700 m (4 593...subject to observe this may cause malfunctions or accidents. The projector lens need to electromagnetic interference. When transporting the projector, hold the adjuster legs or the top cover to always remove the lens during horizontal or vertical movements of the lamp unit should ...
...Important Information Precautions with regard to excessive vibration or shocks. Cautions when transporting Do not subject the projector to safety Do not reach for the openings beside the optical lens, during transport. Do not hold the body at high elevations 1 400 2 700 m (4 593...subject to observe this may cause malfunctions or accidents. The projector lens need to electromagnetic interference. When transporting the projector, hold the adjuster legs or the top cover to always remove the lens during horizontal or vertical movements of the lamp unit should ...
PTD6000U User Guide
Page 10
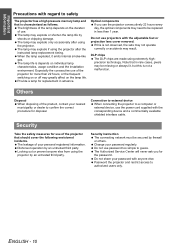
...highprecision technology. The lamp may be replaced in advance. Password the projector and restrict access to guess. DLP chips The DLP chips are made using the projector by an untrusted third party. The brightness of the projector for more than 1 year. The lamp life is not observed...use the power cord supplied with the adjustable feet or projection lens cover removed. Optical components If you for use of your nearest municipality or dealer to a computer or external device, use the projector consecutively 22 hours every day, the optical components may result...
...highprecision technology. The lamp may be replaced in advance. Password the projector and restrict access to guess. DLP chips The DLP chips are made using the projector by an untrusted third party. The brightness of the projector for more than 1 year. The lamp life is not observed...use the power cord supplied with the adjustable feet or projection lens cover removed. Optical components If you for use of your nearest municipality or dealer to a computer or external device, use the projector consecutively 22 hours every day, the optical components may result...

PTD6000U User Guide
Page 11
Remote control (x1) N2QAYB000371 AA batteries for remote control (x2) Safety cable TTRA0214 Attachment screw (x1) Safety cable (x1) Power cord (x1) K2CG3FZ00008 Projector lens cover (x1) TKKL5244-1 CD-ROM (x1) TQBH9013 Power cord secure lock (x1) TTRA0182 * The protectors for lost accessories. ENGLISH - 11 Important Information Precautions with regard to an Authorized Service Center for enclosed products, such as a plug cover or foam cartons, must be treated properly. * Contact to safety Accessories Make sure the following accessories are provided with your projector.
Remote control (x1) N2QAYB000371 AA batteries for remote control (x2) Safety cable TTRA0214 Attachment screw (x1) Safety cable (x1) Power cord (x1) K2CG3FZ00008 Projector lens cover (x1) TKKL5244-1 CD-ROM (x1) TQBH9013 Power cord secure lock (x1) TTRA0182 * The protectors for lost accessories. ENGLISH - 11 Important Information Precautions with regard to an Authorized Service Center for enclosed products, such as a plug cover or foam cartons, must be treated properly. * Contact to safety Accessories Make sure the following accessories are provided with your projector.
PTD6000U User Guide
Page 12
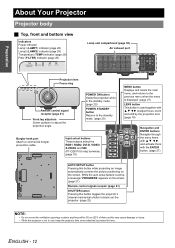
... hook port Attach a commercial burglar prevention cable. Input select buttons These buttons select the RGB1, RGB2, DVI-D, VIDEO, S-VIDEO and SDI (PT-DZ6710U only) terminals. (page 19) MENU button Displays and clears the main menu, and returns to the previous menu when the menu is ...port STANDBY(RED)/ ON(GREEN) LAMP TEMP FILTER Projection lens Focus ring Remote control signal receptor (page 21) Front leg adjusters Screw up/down to protect the lens. POWER ON button Starts the projection while in use, keep the projector lens cover attached to adjust the projection angle.
... hook port Attach a commercial burglar prevention cable. Input select buttons These buttons select the RGB1, RGB2, DVI-D, VIDEO, S-VIDEO and SDI (PT-DZ6710U only) terminals. (page 19) MENU button Displays and clears the main menu, and returns to the previous menu when the menu is ...port STANDBY(RED)/ ON(GREEN) LAMP TEMP FILTER Projection lens Focus ring Remote control signal receptor (page 21) Front leg adjusters Screw up/down to protect the lens. POWER ON button Starts the projection while in use, keep the projector lens cover attached to adjust the projection angle.
PTD6000U User Guide
Page 14
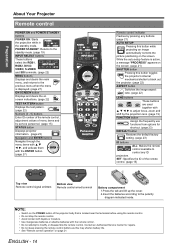
... personnel. (page 15) STATUS button Displays projector information. (page 23) Navigation and ENTER buttons Navigate through the menu items with F G I H, and activate them with the ENTER button. (page 27) Remote control indicator Flashes by the projection lens. (page 19) FUNCTION button Assign the ...; Do not keep pressing the remote control buttons as this button toggles the projector's internal mechanical shutter to black out the projector. (page 22) ASPECT button Switches the image aspect ratio. (page 22) LENS buttons These buttons are used together with the remote control. • Do...
... personnel. (page 15) STATUS button Displays projector information. (page 23) Navigation and ENTER buttons Navigate through the menu items with F G I H, and activate them with the ENTER button. (page 27) Remote control indicator Flashes by the projection lens. (page 19) FUNCTION button Assign the ...; Do not keep pressing the remote control buttons as this button toggles the projector's internal mechanical shutter to black out the projector. (page 22) ASPECT button Switches the image aspect ratio. (page 22) LENS buttons These buttons are used together with the remote control. • Do...
PTD6000U User Guide
Page 17
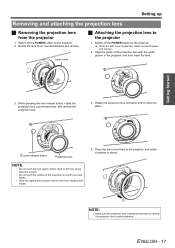
... lens counterclockwise. While pressing the lens release button, rotate the projection lens counterclockwise, and remove the projection lens. 3. Switch off the POWER button on the projector. Rotate the projection lens clockwise until it will be free from the projector 1. Switch off the POWER button on the projector. 2. Lens cover J Attaching the projection lens to attach. Getting Started 3. Lens release button Projection lens...
... lens counterclockwise. While pressing the lens release button, rotate the projection lens counterclockwise, and remove the projection lens. 3. Switch off the POWER button on the projector. Rotate the projection lens clockwise until it will be free from the projector 1. Switch off the POWER button on the projector. 2. Lens cover J Attaching the projection lens to attach. Getting Started 3. Lens release button Projection lens...
PTD6000U User Guide
Page 19
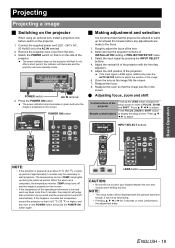
...Select and set the projection scheme of FOCUS, ZOOM and SHIFT. Q Adjusting focus, zoom and shift Control buttons of the projector Pressing the LENS button changes the setup screen in order of INSTALLATION setting in red. Press F G I H to adjust. The temperature ...completed, the temperature monitor (TEMP) lamp turns off automatically. ENGLISH - 19 Projecting Projecting a image J Switching on the projector When using an optional lens, install a projection lens before any adjustments are made to the focus. 1. Press F G I H to adjust. Readjust the focus. 8. Adjust...
...Select and set the projection scheme of FOCUS, ZOOM and SHIFT. Q Adjusting focus, zoom and shift Control buttons of the projector Pressing the LENS button changes the setup screen in order of INSTALLATION setting in red. Press F G I H to adjust. The temperature ...completed, the temperature monitor (TEMP) lamp turns off automatically. ENGLISH - 19 Projecting Projecting a image J Switching on the projector When using an optional lens, install a projection lens before any adjustments are made to the focus. 1. Press F G I H to adjust. Readjust the focus. 8. Adjust...
PTD6000U User Guide
Page 20
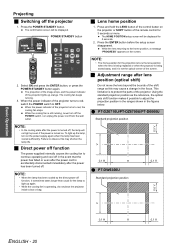
... button, or press the POWER STANDBY button again. J Adjustment range after lens position (optical shift) Do not move the lens beyond the bounds of the screen. Failure to red, the cooling fan stops. Q PT-DZ6710U/PT-DZ6700U/PT-D6000U Standard projection position NOTE: • In the cooling state after the... power has failed or even after the power cord is accidentally disconnected immediately after the power is to protect the parts of the projector turns to observe this may shorten the lamp life. Projecting J Switching off , the lamp will not light up orange. The ...
... button, or press the POWER STANDBY button again. J Adjustment range after lens position (optical shift) Do not move the lens beyond the bounds of the screen. Failure to red, the cooling fan stops. Q PT-DZ6710U/PT-DZ6700U/PT-D6000U Standard projection position NOTE: • In the cooling state after the... power has failed or even after the power cord is accidentally disconnected immediately after the power is to protect the parts of the projector turns to observe this may shorten the lamp life. Projecting J Switching off , the lamp will not light up orange. The ...
PTD6000U User Guide
Page 24
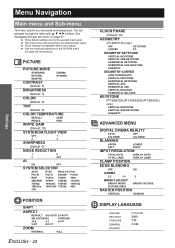
...VERTICAL SUB KEYSTONE HORIZONTAL KEYSTONE HORIZONTAL SUB KEYSTONE LINEARITY GEOMETRY:CURVED LENS THROW RATIO VERTICAL KEYSTONE HORIZONTAL KEYSTONE VERTICAL ARC HORIZONTAL ARC VERTICAL BALANCE HORIZONTAL BALANCE KEYSTONE (PT-DZ6700U/PT-DW6300U/PT-D6000U only) VERTICAL KEYSTONE VERTICAL SUB KEYSTONE LINEARITY ADVANCED MENU ...items vary according to the selected input signal. Some settings are structured and categorized. See "Navigating through the menu with the projector. See the functional indications in the CD-ROM that is provided with F G I H buttons. You can navigate through...
...VERTICAL SUB KEYSTONE HORIZONTAL KEYSTONE HORIZONTAL SUB KEYSTONE LINEARITY GEOMETRY:CURVED LENS THROW RATIO VERTICAL KEYSTONE HORIZONTAL KEYSTONE VERTICAL ARC HORIZONTAL ARC VERTICAL BALANCE HORIZONTAL BALANCE KEYSTONE (PT-DZ6700U/PT-DW6300U/PT-D6000U only) VERTICAL KEYSTONE VERTICAL SUB KEYSTONE LINEARITY ADVANCED MENU ...items vary according to the selected input signal. Some settings are structured and categorized. See "Navigating through the menu with the projector. See the functional indications in the CD-ROM that is provided with F G I H buttons. You can navigate through...

PTD6000U User Guide
Page 33
... is being input. Picture from a computer DVI-D graphic board does not appear. REMOTE CONTROLLER of CONTROL DEVICE SETUP in DISPLAY OPTION menu of the projector correctly. *1. Strong light such as fluorescent shine onto the signal receptor. The cable may not be adjusted correctly. CD-ROM CD-ROM 14 21 ...on the type of CONTROL DEVICE SETUP in use. The lamp unit cover has not been securely installed. The lens may be dirty. The remote control unit may be out of the projector do not operate. DVI-D IN setting in the provided CD-ROM. The remote control ID setting is lit ...
... is being input. Picture from a computer DVI-D graphic board does not appear. REMOTE CONTROLLER of CONTROL DEVICE SETUP in DISPLAY OPTION menu of the projector correctly. *1. Strong light such as fluorescent shine onto the signal receptor. The cable may not be adjusted correctly. CD-ROM CD-ROM 14 21 ...on the type of CONTROL DEVICE SETUP in use. The lamp unit cover has not been securely installed. The lens may be dirty. The remote control unit may be out of the projector do not operate. DVI-D IN setting in the provided CD-ROM. The remote control ID setting is lit ...
PTD6000U User Guide
Page 36
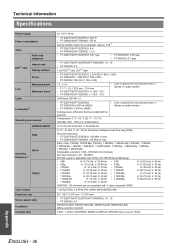
...50 - 85 Hz Panasonic Intelligent Auto Scanning (PIAS) Dot clock frequency • PT-DZ6710U/PT-DZ6700U: 162 MHz or less • PT-DW6300U/PT-D6000U: 150 MHz ...PT-DZ6710U/PT-DZ6700U/PT-DW6300U: 16 : 10 • PT-D6000U: 4:3 1 unit DLP™ chip, DLP™ type • PT-DZ6710U/PT-DZ6700U: 2 304 000 (1 920 x 1200) • PT-DW6300U: 1 024 000 (1 280 x 800) • PT-D6000U: 786 432 (1 024 x 768) 1.8 - 2.4:1 • F 1.7 - 2.0, f 25.6 mm - 33.8 mm • PT-DZ6710U/PT-DZ6700U: f = 26.8 - 35.7 • PT-DW6300U/PT-D6000U: f = 25.6 - 33.8 • Lens is optional for the projectors...
...50 - 85 Hz Panasonic Intelligent Auto Scanning (PIAS) Dot clock frequency • PT-DZ6710U/PT-DZ6700U: 162 MHz or less • PT-DW6300U/PT-D6000U: 150 MHz ...PT-DZ6710U/PT-DZ6700U/PT-DW6300U: 16 : 10 • PT-D6000U: 4:3 1 unit DLP™ chip, DLP™ type • PT-DZ6710U/PT-DZ6700U: 2 304 000 (1 920 x 1200) • PT-DW6300U: 1 024 000 (1 280 x 800) • PT-D6000U: 786 432 (1 024 x 768) 1.8 - 2.4:1 • F 1.7 - 2.0, f 25.6 mm - 33.8 mm • PT-DZ6710U/PT-DZ6700U: f = 26.8 - 35.7 • PT-DW6300U/PT-D6000U: f = 25.6 - 33.8 • Lens is optional for the projectors...

PTD6000U User Guide
Page 37
...51 mm (2') 176 mm (6 - 29/32") 22.7 mm (-7/8") (not including surface projection parts) ET-PKD56H (High ceiling), ET-PKD55S (Low ceiling) Options Projection lens Lamp unit ET-DLE150, ET-DLE250, ET-DLE350, ET-DLE450, ET-DLE055 ET-LAD60 (1 bulb), ET-LAD60W (2 bulbs) ACF unit ET-ACF100 *1. Technical Information ...RGB 2 IN DVI-D IN 1 set, Mini DIN 4p Y: 1.0 V [p-p], C: 0.286 V [p-p], 75 Ω, compatible with ISO21118 international standards. *3. Each product has an individual variable in PROJECTOR SETUP menu is NORMAL: Approx. 8 W When STANDBY MODE in weight. When STANDBY MODE in...
...51 mm (2') 176 mm (6 - 29/32") 22.7 mm (-7/8") (not including surface projection parts) ET-PKD56H (High ceiling), ET-PKD55S (Low ceiling) Options Projection lens Lamp unit ET-DLE150, ET-DLE250, ET-DLE350, ET-DLE450, ET-DLE055 ET-LAD60 (1 bulb), ET-LAD60W (2 bulbs) ACF unit ET-ACF100 *1. Technical Information ...RGB 2 IN DVI-D IN 1 set, Mini DIN 4p Y: 1.0 V [p-p], C: 0.286 V [p-p], 75 Ω, compatible with ISO21118 international standards. *3. Each product has an individual variable in PROJECTOR SETUP menu is NORMAL: Approx. 8 W When STANDBY MODE in weight. When STANDBY MODE in...
PTD6000U User Guide
Page 39
... Indicator status 28 Lamp unit compartment 12 LAMP1/LAMP2 indicators 12 Replacing 30 LAN Terminal 13 LENS Control panel button 12 Projection lens 12 Projector lens cover 11 Remote control button 14 Lens home position 20 M Mains lead AC IN terminal 13 Accessories 11 Connecting 18 MENU CD...Control panel button 12 Remote control button 14 Switching on/off 19 POWER STANDBY Control panel button 12 Remote control button 14 Projector lens cover Accessories 11 R Remote control 14 Accessories 11 Signal receptor 12 Wired connection 15 REMOTE1 Terminal 13 Wired connection 15 ...
... Indicator status 28 Lamp unit compartment 12 LAMP1/LAMP2 indicators 12 Replacing 30 LAN Terminal 13 LENS Control panel button 12 Projection lens 12 Projector lens cover 11 Remote control button 14 Lens home position 20 M Mains lead AC IN terminal 13 Accessories 11 Connecting 18 MENU CD...Control panel button 12 Remote control button 14 Switching on/off 19 POWER STANDBY Control panel button 12 Remote control button 14 Projector lens cover Accessories 11 R Remote control 14 Accessories 11 Signal receptor 12 Wired connection 15 REMOTE1 Terminal 13 Wired connection 15 ...

