Operating Instructions
Page 3
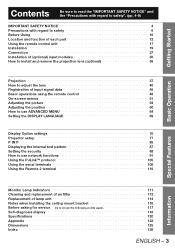
...51 Adjusting the picture 54 Adjusting the position 60 How to use ADVANCED MENU 64 Setting the DISPLAY LANGUAGE 69 Display Option settings 70 Projector setup 77 P IN P 85 Displaying the internal test pattern 87 Setting the security 88 How to use network functions 91 Using the ...8482; protocol 105 Using the serial terminals 106 Using the Remote 2 terminal 110 Special Features Information Monitor Lamp Indicators 111 Cleaning and replacement of air filter 112 Replacement of lamp unit 114 Notes when installing the ceiling mount bracket 116 Before asking for service ʜ try to ...
...51 Adjusting the picture 54 Adjusting the position 60 How to use ADVANCED MENU 64 Setting the DISPLAY LANGUAGE 69 Display Option settings 70 Projector setup 77 P IN P 85 Displaying the internal test pattern 87 Setting the security 88 How to use network functions 91 Using the ...8482; protocol 105 Using the serial terminals 106 Using the Remote 2 terminal 110 Special Features Information Monitor Lamp Indicators 111 Cleaning and replacement of air filter 112 Replacement of lamp unit 114 Notes when installing the ceiling mount bracket 116 Before asking for service ʜ try to ...

Operating Instructions
Page 5
..., may cause undesired operation. Model Number: Trade Name: Responsible Party: Telephone Number: Email: Declaration of Conformity PT-D12000U/PT-DZ12000U Panasonic Panasonic Corporation of the FCC Rules. For disposal or recycling information, please contact your community due to environmental considerations....the equipment into an outlet on , the user is connected. - NOTICE: This product has a High Intensity Discharge (HID) lamp that interference will not occur in a residential installation. Reorient or relocate the receiving antenna. - FCC CAUTION: To assure continued compliance...
..., may cause undesired operation. Model Number: Trade Name: Responsible Party: Telephone Number: Email: Declaration of Conformity PT-D12000U/PT-DZ12000U Panasonic Panasonic Corporation of the FCC Rules. For disposal or recycling information, please contact your community due to environmental considerations....the equipment into an outlet on , the user is connected. - NOTICE: This product has a High Intensity Discharge (HID) lamp that interference will not occur in a residential installation. Reorient or relocate the receiving antenna. - FCC CAUTION: To assure continued compliance...
Operating Instructions
Page 7
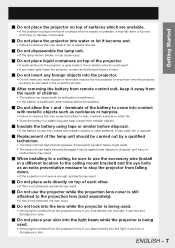
... result in fire or electric shocks. „ Do not disassemble the lamp unit. • If the lamp section breaks, it may cause injury. „ Do not place liquid containers on top of the projector. • If water spills onto the projector or gets inside it, fire or electric shocks could result. •... Do not place sets directly on top of each other batteries, it may catch fire or explode. „ Replacement of the lamp unit should be sure to use the projector while the projection lens cover is still attached to the projection lens (sold separately). • If this is not observed, fire...
... result in fire or electric shocks. „ Do not disassemble the lamp unit. • If the lamp section breaks, it may cause injury. „ Do not place liquid containers on top of the projector. • If water spills onto the projector or gets inside it, fire or electric shocks could result. •... Do not place sets directly on top of each other batteries, it may catch fire or explode. „ Replacement of the lamp unit should be sure to use the projector while the projection lens cover is still attached to the projection lens (sold separately). • If this is not observed, fire...

Operating Instructions
Page 8
... (continued) CAUTION „ Do not set up the projector in humid or dusty places or in places where the projector may come into your eyes or mouth, seek medical advice immediately. • Ask your dealer to replace the lamp unit and check the inside of the air outlet port.... and fire, short-circuits or serious electric shocks may result. „ Always disconnect all cables before moving the projector. • Moving the projector with smoke or steam. • Using the projector under such conditions may result in fire or electric shocks. „ When disconnecting the power cord, hold the ...
... (continued) CAUTION „ Do not set up the projector in humid or dusty places or in places where the projector may come into your eyes or mouth, seek medical advice immediately. • Ask your dealer to replace the lamp unit and check the inside of the air outlet port.... and fire, short-circuits or serious electric shocks may result. „ Always disconnect all cables before moving the projector. • Moving the projector with smoke or steam. • Using the projector under such conditions may result in fire or electric shocks. „ When disconnecting the power cord, hold the ...
Operating Instructions
Page 11
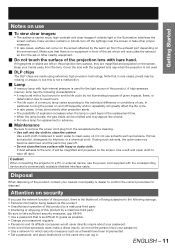
... and clean cloth to confirm the correct procedure for disposal. ENGLISH - 11 Keep your password regularly. • Panasonic and its life cycle by a malicious third party Be sure to clean the cabinet Use a soft cloth moistened in..., pixels may be missing or always lit, but this is not a malfunction. „ Lamp A mercury lamp with the supplied lens cap when the projector is as difficult to a PC or external device, use the network function of this product...depending on the screen. Note that is not used. „ DLP chips The DLP chips are magnified and projected on the environment.
... and clean cloth to confirm the correct procedure for disposal. ENGLISH - 11 Keep your password regularly. • Panasonic and its life cycle by a malicious third party Be sure to clean the cabinet Use a soft cloth moistened in..., pixels may be missing or always lit, but this is not a malfunction. „ Lamp A mercury lamp with the supplied lens cap when the projector is as difficult to a PC or external device, use the network function of this product...depending on the screen. Note that is not used. „ DLP chips The DLP chips are magnified and projected on the environment.
Operating Instructions
Page 12
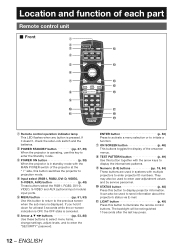
.... If you hold it doesn't, check the side Lock switch and the batteries. 2 POWER STANDBY button pp. 37, 39) When the projector is operating, use this button to return to the previous screen when the sub menu is in standby mode with multiple... are used in systems with the MAIN POWER switch of each part Remote control unit „ Front 1 2 3 l 4 5 m 6 7 n o 8 p 9 j q k r s 1 Remote control operation indicator lamp This LED flashes when any button is canceled. 6 Arrow buttons pp. 53, 88) Use these buttons to select menu items, change settings, adjust levels, and...
.... If you hold it doesn't, check the side Lock switch and the batteries. 2 POWER STANDBY button pp. 37, 39) When the projector is operating, use this button to return to the previous screen when the sub menu is in standby mode with multiple... are used in systems with the MAIN POWER switch of each part Remote control unit „ Front 1 2 3 l 4 5 m 6 7 n o 8 p 9 j q k r s 1 Remote control operation indicator lamp This LED flashes when any button is canceled. 6 Arrow buttons pp. 53, 88) Use these buttons to select menu items, change settings, adjust levels, and...

Operating Instructions
Page 14
... first may ease removal. r Air intake vents During installation, ensure adequate airflow to these vents to " l ". o Lamp unit cover screw p. 115) This is a problem with the air filter. Location and function of each part (continued) Projector Main Unit „ Front „ Rear 1 2 3 45 6 n o 7 89j k l m pq rs 1 Projection lens cover p. 36) 2 Projection lens...
... first may ease removal. r Air intake vents During installation, ensure adequate airflow to these vents to " l ". o Lamp unit cover screw p. 115) This is a problem with the air filter. Location and function of each part (continued) Projector Main Unit „ Front „ Rear 1 2 3 45 6 n o 7 89j k l m pq rs 1 Projection lens cover p. 36) 2 Projection lens...

Operating Instructions
Page 18
...properly if line-of the cable may not be sufficient and the remote control may not function properly in intense ambient light such as fluorescent lamps. Attention • Do not press the ID SET button accidentally or carelessly because the ID number on shipping, and use the wired remote...was pressed. • Your specified ID number is stored in the light path or where devices are left exhausted. Using a wired remote control When multiple projectors are replaced, set the same ID number again. • The ID number can be assigned a unique ID number, and the handheld remote's number ...
...properly if line-of the cable may not be sufficient and the remote control may not function properly in intense ambient light such as fluorescent lamps. Attention • Do not press the ID SET button accidentally or carelessly because the ID number on shipping, and use the wired remote...was pressed. • Your specified ID number is stored in the light path or where devices are left exhausted. Using a wired remote control When multiple projectors are replaced, set the same ID number again. • The ID number can be assigned a unique ID number, and the handheld remote's number ...
Operating Instructions
Page 37
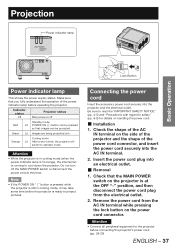
...sure that images can be pressed so that you fully understand the operation of the power indicator lamp before the projector is still in cooling mode (when the power indicator lamp is lit orange), the internal fan is off the MAIN POWER switch or disconnect the power...SAFETY NOTICE" (pp. 4-5) and "Precautions with regard to the projector before connecting the projector's power cord. (pp. 28-29) ENGLISH - 37 Projection Power indicator lamp Basic Operation FILTER CLEANING OPEN CLOSE Lock Button Power indicator lamp This shows the power supply status. Connecting the power cord Insert ...
...sure that images can be pressed so that you fully understand the operation of the power indicator lamp before the projector is still in cooling mode (when the power indicator lamp is lit orange), the internal fan is off the MAIN POWER switch or disconnect the power...SAFETY NOTICE" (pp. 4-5) and "Precautions with regard to the projector before connecting the projector's power cord. (pp. 28-29) ENGLISH - 37 Projection Power indicator lamp Basic Operation FILTER CLEANING OPEN CLOSE Lock Button Power indicator lamp This shows the power supply status. Connecting the power cord Insert ...

Operating Instructions
Page 38
...is projected on the MAIN POWER switch and the POWER ON " | " switch once more than 5 minutes, the projector will flash in red. The temperature monitor (TEMP) lamp lights up during the warm-up period. Making adjustment and selection 4 Roughly adjust the focus of the lens. (p. ...of the operating environment is 0 ˃C or higher, and then turn on the power. • The power indicator lamp on the screen. Projection (continued) 63 5 4, 8-l 3 9 6 12 7 5 4, k 8 j 9 Powering up the projector 1 Connect the supplied power cable. (120 V/240 V, 50 Hz/60 Hz) 2 Press the " | " ...
...is projected on the MAIN POWER switch and the POWER ON " | " switch once more than 5 minutes, the projector will flash in red. The temperature monitor (TEMP) lamp lights up during the warm-up period. Making adjustment and selection 4 Roughly adjust the focus of the lens. (p. ...of the operating environment is 0 ˃C or higher, and then turn on the power. • The power indicator lamp on the screen. Projection (continued) 63 5 4, 8-l 3 9 6 12 7 5 4, k 8 j 9 Powering up the projector 1 Connect the supplied power cable. (120 V/240 V, 50 Hz/60 Hz) 2 Press the " | " ...
Operating Instructions
Page 39
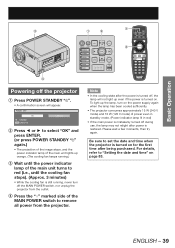
... not relight after being purchased. Please wait a few moments, then try again. ENGLISH - 39 To light up the lamp, turn off the MAIN POWER switch, nor unplug the projector from the outlet. 4 Press the "○" marked side of the MAIN POWER switch to red (i.e., until the cooling fan stops). (...Approx. 3 minutes) • While the cooling fan is still running, never turn on the power supply again when the lamp has been cooled sufficiently. • The projector consumes approximately 15 W (240 V mode) and 10 W (120 V mode) of the main unit turns to remove all power from the...
... not relight after being purchased. Please wait a few moments, then try again. ENGLISH - 39 To light up the lamp, turn off the MAIN POWER switch, nor unplug the projector from the outlet. 4 Press the "○" marked side of the MAIN POWER switch to red (i.e., until the cooling fan stops). (...Approx. 3 minutes) • While the cooling fan is still running, never turn on the power supply again when the lamp has been cooled sufficiently. • The projector consumes approximately 15 W (240 V mode) and 10 W (120 V mode) of the main unit turns to remove all power from the...

Operating Instructions
Page 48
Press ON SCREEN on the remote control or the main unit. • The projected light is blocked by the internal shutter. 2. AROUND LAMP TEMP. Press INPUT SELECT on the remote control or the main unit. • Press RGB1: Switches to RGB1 input. • Press RGB2... / 342h / ON / 97h / ON / 31°C/87°F 27°C/80°F 31°C/87°F DISABLE Note • Refer to "STATUS" of "PROJECTOR SETUP". (p. 81) • Refer to "How to avoid disrupting the program. 1. Press SHUTTER again. • Projection resumes. On-screen display function This button electronically mutes...
Press ON SCREEN on the remote control or the main unit. • The projected light is blocked by the internal shutter. 2. AROUND LAMP TEMP. Press INPUT SELECT on the remote control or the main unit. • Press RGB1: Switches to RGB1 input. • Press RGB2... / 342h / ON / 97h / ON / 31°C/87°F 27°C/80°F 31°C/87°F DISABLE Note • Refer to "STATUS" of "PROJECTOR SETUP". (p. 81) • Refer to "How to avoid disrupting the program. 1. Press SHUTTER again. • Projection resumes. On-screen display function This button electronically mutes...

Operating Instructions
Page 52
...DISPLAY BACK COLOR STARTUP LOGO OFF OFF BLACK LOGO3 MENU SELECT CHANGE 52 - ENGLISH „ PROJECTOR SETUP (pp. 77-84) PROJECTOR SETUP PROJECTOR ID INSTALLATION ALTITUDE MODE DIRECTION LAMP SELECT LAMP RELAY RS-232C REMOTE2 MODE STATUS AIR FILTER CLEANING AUTO POWER OFF FUNC1 MENU SELECT CHANGE ...1/2 ALL FRONT-FLOOR ON HORIZONTAL QUAD OFF DEFAULT DISABLE PROJECTOR SETUP 2/2 DATE AND TIME SAVE ...
...DISPLAY BACK COLOR STARTUP LOGO OFF OFF BLACK LOGO3 MENU SELECT CHANGE 52 - ENGLISH „ PROJECTOR SETUP (pp. 77-84) PROJECTOR SETUP PROJECTOR ID INSTALLATION ALTITUDE MODE DIRECTION LAMP SELECT LAMP RELAY RS-232C REMOTE2 MODE STATUS AIR FILTER CLEANING AUTO POWER OFF FUNC1 MENU SELECT CHANGE ...1/2 ALL FRONT-FLOOR ON HORIZONTAL QUAD OFF DEFAULT DISABLE PROJECTOR SETUP 2/2 DATE AND TIME SAVE ...

Operating Instructions
Page 78
...9658; to "ON". 1. Press ◄► to select "DIRECTION". Altitude Mode When using buttons of the projector. Press ▲▼ to select "INSTALLATION". ALTITUDE MODE DIRECTION LAMP SELECT ON HORIZONTAL QUAD 2. Press MENU twice. • The on the installation of the remote control or ...the control panel on -screen indications using the projector over 1 400 m above sea level, set to switch "...
...9658; to "ON". 1. Press ◄► to select "DIRECTION". Altitude Mode When using buttons of the projector. Press ▲▼ to select "INSTALLATION". ALTITUDE MODE DIRECTION LAMP SELECT ON HORIZONTAL QUAD 2. Press MENU twice. • The on the installation of the remote control or ...the control panel on -screen indications using the projector over 1 400 m above sea level, set to switch "...

Operating Instructions
Page 79
... operating time that exceeds 2 000 hours will switch to standby mode. • Lamp units which have a cumulative operating time of the lamps. In addition, if the cumulative operating times for all lamps exceed 2 000 hours, the projector will be turned off and the other than the specified number of... when they are not turned on should still be installed to the projector. • When it is time to replace the lamp, the number of the lamps that exceeds 2 000 hours will be greater than "QUAD", any lamp which is selected automatically.) 3. Yellow: An error has occurred with ...
... operating time that exceeds 2 000 hours will switch to standby mode. • Lamp units which have a cumulative operating time of the lamps. In addition, if the cumulative operating times for all lamps exceed 2 000 hours, the projector will be turned off and the other than the specified number of... when they are not turned on should still be installed to the projector. • When it is time to replace the lamp, the number of the lamps that exceeds 2 000 hours will be greater than "QUAD", any lamp which is selected automatically.) 3. Yellow: An error has occurred with ...
Operating Instructions
Page 80
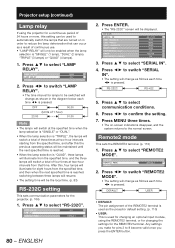
... IN". 4. Any settings you press the ENTER button. After this setting can occur as the projector default setting. (p. 110) • USER: This is "SINGLE" (1 lamp), "DUAL" (2 lamps), "TRIPLE" (3 lamps) or "QUAD" (4 lamps). 1. Press ▲▼ to select communication conditions. 6. Press ENTER. • The "RS...8226; DEFAULT: The pin assignment of the REMOTE2 terminal is used as a result of 24 hours or more, this , four lamps will illuminate for the projector. (p. 106) 1. Press ◄► to switch "REMOTE2 MODE". • The setting will change as follows each time...
... IN". 4. Any settings you press the ENTER button. After this setting can occur as the projector default setting. (p. 110) • USER: This is "SINGLE" (1 lamp), "DUAL" (2 lamps), "TRIPLE" (3 lamps) or "QUAD" (4 lamps). 1. Press ▲▼ to select communication conditions. 6. Press ENTER. • The "RS...8226; DEFAULT: The pin assignment of the REMOTE2 terminal is used as a result of 24 hours or more, this , four lamps will illuminate for the projector. (p. 106) 1. Press ◄► to switch "REMOTE2 MODE". • The setting will change as follows each time...

Operating Instructions
Page 81
... TEMP: Displays the intake air temperature of the projector. • OPTICS MODULE TEMP.: Displays the temperature inside the projector. • AROUND LAMP TEMP.: Displays the temperature around the lamp of the projector. • REMOTE2 STATUS: Displays the control status of REMOTE2. • PROJECTOR MODEL: Displays the type of projector. • SERIAL NUMBER: Displays the serial number of...
... TEMP: Displays the intake air temperature of the projector. • OPTICS MODULE TEMP.: Displays the temperature inside the projector. • AROUND LAMP TEMP.: Displays the temperature around the lamp of the projector. • REMOTE2 STATUS: Displays the control status of REMOTE2. • PROJECTOR MODEL: Displays the type of projector. • SERIAL NUMBER: Displays the serial number of...

Operating Instructions
Page 93
... the E-mail function, communication with E-mail server must be used when connecting through a switch or router. LAN10/100 lamp (yellow) This lights when a 100BASE-TX connection is required to the LAN. Network connections The projector is equipped with network functions, and web browser controls can be 100 m or shorter. „ Name and...
... the E-mail function, communication with E-mail server must be used when connecting through a switch or router. LAN10/100 lamp (yellow) This lights when a 100BASE-TX connection is required to the LAN. Network connections The projector is equipped with network functions, and web browser controls can be 100 m or shorter. „ Name and...

Operating Instructions
Page 96
... type of the control page with the latest information. Displays temperature of the projector main unit. Displays the firmware version of projector exhaust. Displays the lamp lit hours. Displays used hours of the projector. 96 - Menu display „ Projector status page Click [Status], then [Projector status] to display the Detail control page. Displays temperature inside the...
... type of the control page with the latest information. Displays temperature of the projector main unit. Displays the firmware version of projector exhaust. Displays the lamp lit hours. Displays used hours of the projector. 96 - Menu display „ Projector status page Click [Status], then [Projector status] to display the Detail control page. Displays temperature inside the...

Operating Instructions
Page 97
... the temperature is high such as near a heating appliance. LAMP STATUS The lamp has failed to cool off the MAIN POWER switch by following the procedure on the nature of the error, the projector may be placed in the standby mode for an item OK.... Consult your dealer. OUTPUT AIR TEMPERATURE The temperature around the lamp is too high. Wait a short while for the projector's power consumption requirements. Consult your dealer. OUTPUT TEMP. Consult your dealer. LAMP REMAIN TIME The lamp runtime has exceeded the prescribed cumulative time, and it to display...
... the temperature is high such as near a heating appliance. LAMP STATUS The lamp has failed to cool off the MAIN POWER switch by following the procedure on the nature of the error, the projector may be placed in the standby mode for an item OK.... Consult your dealer. OUTPUT AIR TEMPERATURE The temperature around the lamp is too high. Wait a short while for the projector's power consumption requirements. Consult your dealer. OUTPUT TEMP. Consult your dealer. LAMP REMAIN TIME The lamp runtime has exceeded the prescribed cumulative time, and it to display...


