Functional Instructions
Page 17
...or the ENTER button, and press I H to +10 More natural white Whiter NOISE REDUCTION You can select manually. Press I H to adjust the value. M/PAL...projector detects the colour system and selects the matched setting automatically, or you can select the automatic noise reduction system strength. PICTURE menu WHITE GAIN You can adjust the sharpness of the projected image. RGB 1 IN/RGB 2 IN terminal 480i/576i/576p signals RGB... or the ENTER button, and press I H to adjust the value. SDI terminal (PT-DZ6710E only) AUTO H 1080⁄60i H 1035⁄60i H 720⁄60p ...
...or the ENTER button, and press I H to +10 More natural white Whiter NOISE REDUCTION You can select manually. Press I H to adjust the value. M/PAL...projector detects the colour system and selects the matched setting automatically, or you can select the automatic noise reduction system strength. PICTURE menu WHITE GAIN You can adjust the sharpness of the projected image. RGB 1 IN/RGB 2 IN terminal 480i/576i/576p signals RGB... or the ENTER button, and press I H to adjust the value. SDI terminal (PT-DZ6710E only) AUTO H 1080⁄60i H 1035⁄60i H 720⁄60p ...
Functional Instructions
Page 23
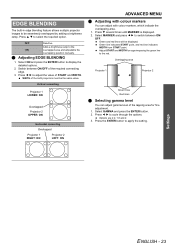
...and adjustable the overlapping position manually. Adjust START and WIDTH for fine adjustment. 1. Press I H to apply the setting. Q Adjusting EDGE BLENDING 1. Vertical connecting Projector 1 LOWER: ON Overlapped Projector 2 UPPER: ON Horizontal connecting Overlapped Projector 1 RIGHT: ON Projector 2 LEFT: ON ADVANCED ... 2. Select ON and press the ENTER button to select the required option. Switch between ON/ OFF. Overlapping area Projector 1 Projector 2 Green lines Red lines Q Selecting gamma level You can adjust with colour markers, which indicate the overlapping area....
...and adjustable the overlapping position manually. Adjust START and WIDTH for fine adjustment. 1. Press I H to apply the setting. Q Adjusting EDGE BLENDING 1. Vertical connecting Projector 1 LOWER: ON Overlapped Projector 2 UPPER: ON Horizontal connecting Overlapped Projector 1 RIGHT: ON Projector 2 LEFT: ON ADVANCED ... 2. Select ON and press the ENTER button to select the required option. Switch between ON/ OFF. Overlapping area Projector 1 Projector 2 Green lines Red lines Q Selecting gamma level You can adjust with colour markers, which indicate the overlapping area....
Functional Instructions
Page 37
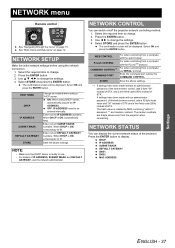
... hash value is ON, automatically filled. See "Main menu and Sub-menu" on /off the projector network controlling method. 1. Use F G I H to be displayed. Select STORE and press the ENTER button. The confirmation screen will be entered manually. If settings have been made with an administrator password, of the web browser control, add...
... hash value is ON, automatically filled. See "Main menu and Sub-menu" on /off the projector network controlling method. 1. Use F G I H to be displayed. Select STORE and press the ENTER button. The confirmation screen will be entered manually. If settings have been made with an administrator password, of the web browser control, add...
Operating Instructions
Page 1
PT-DZ6710U PT-DZ6700U PT-DW6300U PT-D6000U STANDBY(RED)/ ON(GREEN) LAMP TEMP FILTER Before operating this product, please read the instructions carefully and save this manual for future use with multiple models of these instructions are shared use . Operating Instructions DLP™Based Projector Commercial Use Model No. The information of DZ6710 series, DZ6700 series, DW6300 series and D6000 series. TQBJ0295 ENGLISH
PT-DZ6710U PT-DZ6700U PT-DW6300U PT-D6000U STANDBY(RED)/ ON(GREEN) LAMP TEMP FILTER Before operating this product, please read the instructions carefully and save this manual for future use with multiple models of these instructions are shared use . Operating Instructions DLP™Based Projector Commercial Use Model No. The information of DZ6710 series, DZ6700 series, DW6300 series and D6000 series. TQBJ0295 ENGLISH
Operating Instructions
Page 21
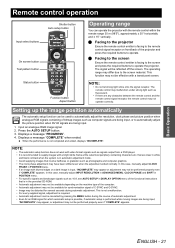
... can be used to automatically adjust the resolution, clock phase and picture position when analogue RGB signals consisting of C-SYNC and G-SYNC. • Image may not be performed properly...is in automatic adjustment mode. • Avoid supplying images that involve halftones or gradation such as 16:9, see AUTO SETUP in white and black contrast when the system is not completed and ended, displays... OPTION menu of the projector and press the required buttons to automatically adjust the picture position when DVI-D signals are being input. 1. In this case, manually adjust CLOCK PHASE in ...
... can be used to automatically adjust the resolution, clock phase and picture position when analogue RGB signals consisting of C-SYNC and G-SYNC. • Image may not be performed properly...is in automatic adjustment mode. • Avoid supplying images that involve halftones or gradation such as 16:9, see AUTO SETUP in white and black contrast when the system is not completed and ended, displays... OPTION menu of the projector and press the required buttons to automatically adjust the picture position when DVI-D signals are being input. 1. In this case, manually adjust CLOCK PHASE in ...


