
Dlp Projector - Multi Language
Page 3
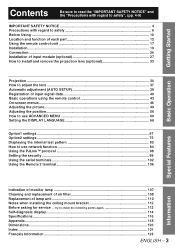
... Setting the security ...99 Using the serial terminals 102 Using the Remote 2 terminal 106 Special Features Information Indication of monitor lamp 107 Cleaning and replacement of air filter 108 Replacement of lamp unit 110 Notes when installing the ceiling mount bracket 112 Before asking for service ... Getting Started Basic Operation Contents Be...
... Setting the security ...99 Using the serial terminals 102 Using the Remote 2 terminal 106 Special Features Information Indication of monitor lamp 107 Cleaning and replacement of air filter 108 Replacement of lamp unit 110 Notes when installing the ceiling mount bracket 112 Before asking for service ... Getting Started Basic Operation Contents Be...

Dlp Projector - Multi Language
Page 5
... Name: Responsible Party: Address: Telephone Number: Email: Declaration of Conformity PT-D10000U / PT-DW10000U Panasonic Panasonic North America One Panasonic Way 4B-9 Secaucus, NJ 07094 1-800-524-1448 or 1-800-526-6610 pjscservice@us.panasonic.com This device complies with Part 15 of mercury. For disposal or...for help. These limits are designed to computer or peripheral devices. NOTICE: This product has a High Intensity Discharge (HID) lamp that interference will not occur in accordance with the instructions, may cause undesired operation. Reorient or relocate the receiving antenna. -...
... Name: Responsible Party: Address: Telephone Number: Email: Declaration of Conformity PT-D10000U / PT-DW10000U Panasonic Panasonic North America One Panasonic Way 4B-9 Secaucus, NJ 07094 1-800-524-1448 or 1-800-526-6610 pjscservice@us.panasonic.com This device complies with Part 15 of mercury. For disposal or...for help. These limits are designed to computer or peripheral devices. NOTICE: This product has a High Intensity Discharge (HID) lamp that interference will not occur in accordance with the instructions, may cause undesired operation. Reorient or relocate the receiving antenna. -...

Dlp Projector - Multi Language
Page 7
...in fire or electric shocks. ■ Do not disassemble the lamp unit. • If the lamp section breaks, it may cause injury. ■ Do not place liquid containers on top of the projector. • If water spills onto the projector or gets inside it, fire or electric shocks could result. &#...8226; If any water gets inside the projector, contact an Authorized Service ...
...in fire or electric shocks. ■ Do not disassemble the lamp unit. • If the lamp section breaks, it may cause injury. ■ Do not place liquid containers on top of the projector. • If water spills onto the projector or gets inside it, fire or electric shocks could result. &#...8226; If any water gets inside the projector, contact an Authorized Service ...

Dlp Projector - Multi Language
Page 8
...cord will become damaged, and fire, short-circuits or serious electric shocks may result. ■ Always disconnect all cables before moving the projector. • Moving the projector with cables still attached can damage the cables, which could cause fire or electric shocks to occur. ■ Do not place any ...may result close to become unbalanced and fall, which cannot withstand heat. ■ Do not use the old lamp unit. • The lamp section may break. ■ Replacement of the lamp unit should only be carried out after it can hurt or damage your skin. ■ Do not bring your...
...cord will become damaged, and fire, short-circuits or serious electric shocks may result. ■ Always disconnect all cables before moving the projector. • Moving the projector with cables still attached can damage the cables, which could cause fire or electric shocks to occur. ■ Do not place any ...may result close to become unbalanced and fall, which cannot withstand heat. ■ Do not use the old lamp unit. • The lamp section may break. ■ Replacement of the lamp unit should only be carried out after it can hurt or damage your skin. ■ Do not bring your...

Dlp Projector - Multi Language
Page 9
... the non repairable unit your Dealer or a Recycling Company. ■ Do not use projectors with the adjustable feet or projection lens cover removed. • If this is not done. ■ If the lamp has broken, ventilate the room immediately. Please discuss with the Authorized Service Center regarding cleaning...your eyes or mouth, seek medical advice immediately. • Ask your dealer to replace the lamp unit and check the inside of the projector. ■ Ask an Authorized Service Center to clean inside the projector at least once a year. • If dust is left to build up inside of the...
... the non repairable unit your Dealer or a Recycling Company. ■ Do not use projectors with the adjustable feet or projection lens cover removed. • If this is not done. ■ If the lamp has broken, ventilate the room immediately. Please discuss with the Authorized Service Center regarding cleaning...your eyes or mouth, seek medical advice immediately. • Ask your dealer to replace the lamp unit and check the inside of the projector. ■ Ask an Authorized Service Center to clean inside the projector at least once a year. • If dust is left to build up inside of the...
Dlp Projector - Multi Language
Page 11
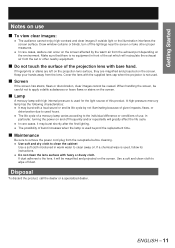
... the projection lens with a loud sound or end its instructions. ● Do not clean the lens surface with the supplied lens cap when the projector is not used. ■ Screen If the screen has stains, flaws or discoloration, clear images cannot be viewed. In particular, turning the power ...surface, they are magnified and projected on the environment. If dust adheres to clean away oil. Getting Started Notes on the screen. ■ Lamp A mercury lamp with high internal pressure is used for the light source of this product. If a chemical wipe is used, follow its life cycle by ...
... the projection lens with a loud sound or end its instructions. ● Do not clean the lens surface with the supplied lens cap when the projector is not used. ■ Screen If the screen has stains, flaws or discoloration, clear images cannot be viewed. In particular, turning the power ...surface, they are magnified and projected on the environment. If dust adheres to clean away oil. Getting Started Notes on the screen. ■ Lamp A mercury lamp with high internal pressure is used for the light source of this product. If a chemical wipe is used, follow its life cycle by ...

Dlp Projector - Multi Language
Page 12
... unit ■ Front # $ % 0 & ( 1 ) * 2 3 + 4 - . 5 / 6 7 # Remote control operation indicator lamp The lamp flashes when any remote control button is pressed. $ POWER STANDBY button pp. 34, 36) When the projector is in projection mode with the MAIN POWER switch of the projector at the " l " side, this button switches the projector to standby mode. % POWER ON button pp. 34...
... unit ■ Front # $ % 0 & ( 1 ) * 2 3 + 4 - . 5 / 6 7 # Remote control operation indicator lamp The lamp flashes when any remote control button is pressed. $ POWER STANDBY button pp. 34, 36) When the projector is in projection mode with the MAIN POWER switch of the projector at the " l " side, this button switches the projector to standby mode. % POWER ON button pp. 34...

Dlp Projector - Multi Language
Page 14
... to green when the POWER ON button of the remote control or the main unit is being cleaned. Location and function of each part (continued) Projector Main Unit ■ Front ■ Rear # $ % &( ) * 2 * + -. / 0 1 34 56 # Projectin lens cover p. 33) $ Projection lens (optional) Lens...this vents. 6 Lamp unit cover p. 111) The lamp unit is time to this lamp indicates an abnormal condition of the internal temperature. ) Power indicator lamp p. 34) The lamp lights in the lamp circuit. ( Temperature monitor (TEMP p. 107) Lighting or blinking of the projector. (Adjustable feet ...
... to green when the POWER ON button of the remote control or the main unit is being cleaned. Location and function of each part (continued) Projector Main Unit ■ Front ■ Rear # $ % &( ) * 2 * + -. / 0 1 34 56 # Projectin lens cover p. 33) $ Projection lens (optional) Lens...this vents. 6 Lamp unit cover p. 111) The lamp unit is time to this lamp indicates an abnormal condition of the internal temperature. ) Power indicator lamp p. 34) The lamp lights in the lamp circuit. ( Temperature monitor (TEMP p. 107) Lighting or blinking of the projector. (Adjustable feet ...

Dlp Projector - Multi Language
Page 18
... in intense ambient light such as part of the system, connect to use the ID ALL button of the remote control are connected as fluorescent lamps. It is effective to units with a M3 stereo mini jack cable (sold separately) Remote Control Attention • Use a two-wire shielded cable with a... function properly if an object is in the light path. • The Remote Control receiver may not work. 18 - Setting projector ID number to remote control Every projector has its Remote Control receiver windows will be directly exposed to the ID number that was set before the ID SET button...
... in intense ambient light such as part of the system, connect to use the ID ALL button of the remote control are connected as fluorescent lamps. It is effective to units with a M3 stereo mini jack cable (sold separately) Remote Control Attention • Use a two-wire shielded cable with a... function properly if an object is in the light path. • The Remote Control receiver may not work. 18 - Setting projector ID number to remote control Every projector has its Remote Control receiver windows will be directly exposed to the ID number that was set before the ID SET button...

Dlp Projector - Multi Language
Page 34
... (pp. 6-9) for details on ) Standby preparation mode After a short while, the projector will still be drawing approximately 25 W of power while the projector is in standby preparation mode (when the power indicator lamp is lit orange), the internal fan is off the MAIN POWER switch or disconnect the power... the power cord plug from the AC IN terminal of the power indicator lamp before connecting the projector's power cord. (pp. 25-26) Attention • While the projector is in standby mode (when the power indicator lamp is at this time. Check the shape of the power cord connector, ...
... (pp. 6-9) for details on ) Standby preparation mode After a short while, the projector will still be drawing approximately 25 W of power while the projector is in standby preparation mode (when the power indicator lamp is lit orange), the internal fan is off the MAIN POWER switch or disconnect the power... the power cord plug from the AC IN terminal of the power indicator lamp before connecting the projector's power cord. (pp. 25-26) Attention • While the projector is in standby mode (when the power indicator lamp is at this time. Check the shape of the power cord connector, ...

Dlp Projector - Multi Language
Page 35
...side of the main unit in red. If this happens, increase the temperature around the projector so that a problem has occurred and the power will enter standby mode. % Press POWER ON " | ". • The power indicator lamp illuminates in green and soon the image is 0 °C or higher, and then ... • If the temperature of approximately 5 minutes may be turned off automatically. The temperature monitor (TEMP) lamp lights up during the warm-up takes more . Note • If the projector is powered up at about 0 °C, a warm-up period of the operating environment is low and warm...
...side of the main unit in red. If this happens, increase the temperature around the projector so that a problem has occurred and the power will enter standby mode. % Press POWER ON " | ". • The power indicator lamp illuminates in green and soon the image is 0 °C or higher, and then ... • If the temperature of approximately 5 minutes may be turned off automatically. The temperature monitor (TEMP) lamp lights up during the warm-up takes more . Note • If the projector is powered up at about 0 °C, a warm-up period of the operating environment is low and warm...

Dlp Projector - Multi Language
Page 36
... on for the first time after shutting off the projector # Press POWER STANDBY " ". • A confirmation screen will not light up orange. (The cooling fan keeps running.) % Wait until the power indicator lamp of power even in standby mode. (Power indicator lamp lit in the process of the MAIN POWER switch ...to set the date and time when the projector is turned on page 81. 36 - To light up the lamp, turn on the power supply again when the lamp has been cooled sufficiently. • The projector consumes approximately 25 W of the main unit turns to select "OK...
... on for the first time after shutting off the projector # Press POWER STANDBY " ". • A confirmation screen will not light up orange. (The cooling fan keeps running.) % Wait until the power indicator lamp of power even in standby mode. (Power indicator lamp lit in the process of the MAIN POWER switch ...to set the date and time when the projector is turned on page 81. 36 - To light up the lamp, turn on the power supply again when the lamp has been cooled sufficiently. • The projector consumes approximately 25 W of the main unit turns to select "OK...

Dlp Projector - Multi Language
Page 47
... COLOR DVI EDID AUX DVI EDID P IN P FUNC1 OSD POSITION OSD MEMORY ■ OPTION2 (pp. 75-82) SUB MENU item PROJECTOR ID INSTALLATION ALTITUDE DIRECTION OUTPUT RESOLUTION (PT-D10000U only) LAMP SELECT LAMP RELAY RS-232C SYSTEM INFORMATION AIR FILTER CLEANING ADJUST DATE STARTUP LOGO PASSWORD ■ TEST PATTERN (p. 83) ■ SIGNAL LIST (pp...
... COLOR DVI EDID AUX DVI EDID P IN P FUNC1 OSD POSITION OSD MEMORY ■ OPTION2 (pp. 75-82) SUB MENU item PROJECTOR ID INSTALLATION ALTITUDE DIRECTION OUTPUT RESOLUTION (PT-D10000U only) LAMP SELECT LAMP RELAY RS-232C SYSTEM INFORMATION AIR FILTER CLEANING ADJUST DATE STARTUP LOGO PASSWORD ■ TEST PATTERN (p. 83) ■ SIGNAL LIST (pp...

Dlp Projector - Multi Language
Page 75
...INSTALLATION ALTITUDE DIRECTION LAMP SELECT LAMP RELAY RS-232C SYSTEM INFORMATION AIR FILTER CLEANING DATE AND TIME STARTUP LOGO PASSWORD MENU SELECT CHANGE 2 FRONT-F LOW H QUAD OFF LOGO1 2. Note • The ID number can be set to "64". • If the projectors are used . 1. MENU Press to select "PROJECTOR ID". Press ... and the on remote control ID setting, see page 18. Option2 settings MENU ENTER DEFAULT This menu can be set when only one projector is used and some of them have their remote controls must be assigned the same ID numbers, respectively. • If the ID ...
...INSTALLATION ALTITUDE DIRECTION LAMP SELECT LAMP RELAY RS-232C SYSTEM INFORMATION AIR FILTER CLEANING DATE AND TIME STARTUP LOGO PASSWORD MENU SELECT CHANGE 2 FRONT-F LOW H QUAD OFF LOGO1 2. Note • The ID number can be set to "64". • If the projectors are used . 1. MENU Press to select "PROJECTOR ID". Press ... and the on remote control ID setting, see page 18. Option2 settings MENU ENTER DEFAULT This menu can be set when only one projector is used and some of them have their remote controls must be assigned the same ID numbers, respectively. • If the ID ...

Dlp Projector - Multi Language
Page 76
... follows each time ◄► is shown upside down or in reverse, change as follows each time ◄► is pressed. OPTION2 PROJECTOR ID INSTALLATION ALTITUDE DIRECTION LAMP SELECT LAMP RELAY RS-232C SYSTEM INFORMATION AIR FILTER CLEANING DATE AND TIME STARTUP LOGO PASSWORD MENU SELECT CHANGE 2 FRONT-F LOW H QUAD OFF LOGO1 2. FRONT...
... follows each time ◄► is shown upside down or in reverse, change as follows each time ◄► is pressed. OPTION2 PROJECTOR ID INSTALLATION ALTITUDE DIRECTION LAMP SELECT LAMP RELAY RS-232C SYSTEM INFORMATION AIR FILTER CLEANING DATE AND TIME STARTUP LOGO PASSWORD MENU SELECT CHANGE 2 FRONT-F LOW H QUAD OFF LOGO1 2. FRONT...
Dlp Projector - Multi Language
Page 77
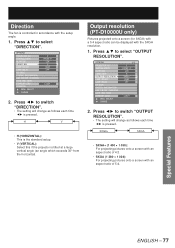
...1 024): For projecting pictures onto a screen with the setup angle. 1. Special Features ENGLISH - 77 OPTION2 PROJECTOR ID INSTALLATION ALTITUDE DIRECTION LAMP SELECT LAMP RELAY RS-232C SYSTEM INFORMATION AIR FILTER CLEANING DATE AND TIME STARTUP LOGO PASSWORD MENU SELECT CHANGE 2 FRONT-F LOW...RESOLUTION". Output resolution (PT-D10000U only) Pictures projected onto a screen (for SXGA) with a 5:4 aspect ratio can be displayed with the SXGA resolution. 1. H V • H (HORIZONTAL): This is the standard setup. • V (VERTICAL): Select this if the projector is pressed. Press ...
...1 024): For projecting pictures onto a screen with the setup angle. 1. Special Features ENGLISH - 77 OPTION2 PROJECTOR ID INSTALLATION ALTITUDE DIRECTION LAMP SELECT LAMP RELAY RS-232C SYSTEM INFORMATION AIR FILTER CLEANING DATE AND TIME STARTUP LOGO PASSWORD MENU SELECT CHANGE 2 FRONT-F LOW...RESOLUTION". Output resolution (PT-D10000U only) Pictures projected onto a screen (for SXGA) with a 5:4 aspect ratio can be displayed with the SXGA resolution. 1. H V • H (HORIZONTAL): This is the standard setup. • V (VERTICAL): Select this if the projector is pressed. Press ...

Dlp Projector - Multi Language
Page 78
... operating time is selected automatically.) • "DUAL" : Two lamps illuminate. (The lamp units with the shortest operating time out of lamp units 1 and 4 or 2 and 3 are not turned on should still be installed to the projector. • If the lamp selection is changed, picture is muted during lamp switching execution. (7-25 sec.) 78 - Press ◄►...
... operating time is selected automatically.) • "DUAL" : Two lamps illuminate. (The lamp units with the shortest operating time out of lamp units 1 and 4 or 2 and 3 are not turned on should still be installed to the projector. • If the lamp selection is changed, picture is muted during lamp switching execution. (7-25 sec.) 78 - Press ◄►...

Dlp Projector - Multi Language
Page 79
...8226; The "RS-232C" screen will be the local time. (p. 81) RS-232C setting This sets communication parameters for the projector. 1. Press ▲▼ to select "LAMP RELAY". Press ▲▼ to confirm the setting. 7. Press ◄► to switch "SERIAL IN". • The setting... Press MENU three times. • The on in accordance with the setting time. If "QUAD" is pressed. OPTION2 PROJECTOR ID INSTALLATION ALTITUDE DIRECTION LAMP SELECT LAMP RELAY RS-232C SYSTEM INFORMATION AIR FILTER CLEANING DATE AND TIME STARTUP LOGO PASSWORD MENU SELECT CHANGE 2 FRONT-F LOW H ...
...8226; The "RS-232C" screen will be the local time. (p. 81) RS-232C setting This sets communication parameters for the projector. 1. Press ▲▼ to select "LAMP RELAY". Press ▲▼ to confirm the setting. 7. Press ◄► to switch "SERIAL IN". • The setting... Press MENU three times. • The on in accordance with the setting time. If "QUAD" is pressed. OPTION2 PROJECTOR ID INSTALLATION ALTITUDE DIRECTION LAMP SELECT LAMP RELAY RS-232C SYSTEM INFORMATION AIR FILTER CLEANING DATE AND TIME STARTUP LOGO PASSWORD MENU SELECT CHANGE 2 FRONT-F LOW H ...
Dlp Projector - Multi Language
Page 80
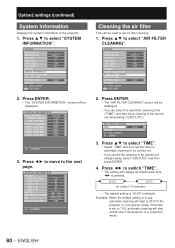
...set to 7:00, automatic cleaning will be displayed. • You can be carried out immediately ("EXECUTE"). OPTION2 PROJECTOR ID INSTALLATION ALTITUDE DIRECTION LAMP SELECT LAMP RELAY RS-232C SYSTEM INFORMATION AIR FILTER CLEANING DATE AND TIME STARTUP LOGO PASSWORD MENU SELECT ENTER SUB MENU 2 ...8226; The "AIR FILTER CLEANING" screen will start at that time if the projector is set air filter cleaning. 1. ENGLISH SYSTEM INFORMATION ON COUNT POWER ON TIMES 100 LAMP 1 ON 50 LAMP 2 ON 50 LAMP 3 ON 50 LAMP 4 ON 50 SHUTTER 9( 0) AIR FILTER CLEANING AUX NUMBER OF ENTRY SIGNAL...
...set to 7:00, automatic cleaning will be displayed. • You can be carried out immediately ("EXECUTE"). OPTION2 PROJECTOR ID INSTALLATION ALTITUDE DIRECTION LAMP SELECT LAMP RELAY RS-232C SYSTEM INFORMATION AIR FILTER CLEANING DATE AND TIME STARTUP LOGO PASSWORD MENU SELECT ENTER SUB MENU 2 ...8226; The "AIR FILTER CLEANING" screen will start at that time if the projector is set air filter cleaning. 1. ENGLISH SYSTEM INFORMATION ON COUNT POWER ON TIMES 100 LAMP 1 ON 50 LAMP 2 ON 50 LAMP 3 ON 50 LAMP 4 ON 50 SHUTTER 9( 0) AIR FILTER CLEANING AUX NUMBER OF ENTRY SIGNAL...

Dlp Projector - Multi Language
Page 81
...will be carried out immediately if more than 24 hours have not yet elapsed since cleaning was last carried out. OPTION2 PROJECTOR ID INSTALLATION ALTITUDE DIRECTION LAMP SELECT LAMP RELAY RS-232C SYSTEM INFORMATION AIR FILTER CLEANING DATE AND TIME STARTUP LOGO PASSWORD MENU SELECT ENTER SUB MENU 2 FRONT-F... will flash blue while cleaning of the time. p. 81 • Automatic cleaning will not be carried out if the projector is in standby mode. • If the projector is not in progress. Press ◄► to select "APPLY", and then press ENTER. • This completes setting...
...will be carried out immediately if more than 24 hours have not yet elapsed since cleaning was last carried out. OPTION2 PROJECTOR ID INSTALLATION ALTITUDE DIRECTION LAMP SELECT LAMP RELAY RS-232C SYSTEM INFORMATION AIR FILTER CLEANING DATE AND TIME STARTUP LOGO PASSWORD MENU SELECT ENTER SUB MENU 2 FRONT-F... will flash blue while cleaning of the time. p. 81 • Automatic cleaning will not be carried out if the projector is in standby mode. • If the projector is not in progress. Press ◄► to select "APPLY", and then press ENTER. • This completes setting...


