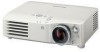

Hd Home Cinema Projector
Page 1
PT-AX100U For assistance, please call : 787 - 750 - 4300 or visit us at http://panasonic.net (Puerto Rico) Before operating this product, please read these instructions carefully and save this manual for future use. mail to: consumerproducts@panasonic.com or visit us at www.panasonic.com (U.S.A) For assistance, please call : 1 - 888 - PTV (843 - 9788) or send e - TQBJ0203 ENGLISH LCD Projector Operating Instructions Model No. View -
PT-AX100U For assistance, please call : 787 - 750 - 4300 or visit us at http://panasonic.net (Puerto Rico) Before operating this product, please read these instructions carefully and save this manual for future use. mail to: consumerproducts@panasonic.com or visit us at www.panasonic.com (U.S.A) For assistance, please call : 1 - 888 - PTV (843 - 9788) or send e - TQBJ0203 ENGLISH LCD Projector Operating Instructions Model No. View -

Hd Home Cinema Projector
Page 2
... product's enclosure that may be of sufficient magnitude to constitute a risk of your Panasonic LCD projector.The serial number of electric shock to persons. Important Safety Notice Dear Panasonic Customer: This instruction booklet provides all the necessary operating information that you use higher voltages... or currents than this booklet in case service is intended to alert the user to the presence of the grounding plug. Model number: Serial number: PT-AX100U ...
... product's enclosure that may be of sufficient magnitude to constitute a risk of your Panasonic LCD projector.The serial number of electric shock to persons. Important Safety Notice Dear Panasonic Customer: This instruction booklet provides all the necessary operating information that you use higher voltages... or currents than this booklet in case service is intended to alert the user to the presence of the grounding plug. Model number: Serial number: PT-AX100U ...
Hd Home Cinema Projector
Page 3
... protection against harmful interference in accordance with the limits for a Class B digital device, pursuant to Part 15 of projector, you must accept any interference received, including interference that interference will void the user's authority to which can radiate radio...to operate. Consult the dealer or an experienced radio/TV technician for the Protection of Conformity Model Number: PT-AX100U Trade Name: Panasonic Responsible party: Panasonic North America Address: One Panasonic Way 4B - 9 Secaucus, New Jersey 07094 Telephone number: 1 - 888 - If this device ...
... protection against harmful interference in accordance with the limits for a Class B digital device, pursuant to Part 15 of projector, you must accept any interference received, including interference that interference will void the user's authority to which can radiate radio...to operate. Consult the dealer or an experienced radio/TV technician for the Protection of Conformity Model Number: PT-AX100U Trade Name: Panasonic Responsible party: Panasonic North America Address: One Panasonic Way 4B - 9 Secaucus, New Jersey 07094 Telephone number: 1 - 888 - If this device ...

Hd Home Cinema Projector
Page 4
... 6 CAUTIONS 8 Before use 9 Accessories 9 Cautions when transporting 9 Cautions when installing 9 Cautions on use 10 About Your Projector 11 Remote control 11 Projector 12 Getting Started Setting up 14 Screen size and throw distance 14 Projection method 15 Front leg adjuster and throwing angle 15 ... Contents J Quick Steps 1. Connect with HDMI/PC 18 Basic Operation Switching the projector on/off 19 Power cord 19 POWER indicator 19 Switching on the projector 20 Switching off the projector 20 Projecting an image 21 Selecting the input signal 21 Positioning the image 21 ...
... 6 CAUTIONS 8 Before use 9 Accessories 9 Cautions when transporting 9 Cautions when installing 9 Cautions on use 10 About Your Projector 11 Remote control 11 Projector 12 Getting Started Setting up 14 Screen size and throw distance 14 Projection method 15 Front leg adjuster and throwing angle 15 ... Contents J Quick Steps 1. Connect with HDMI/PC 18 Basic Operation Switching the projector on/off 19 Power cord 19 POWER indicator 19 Switching on the projector 20 Switching off the projector 20 Projecting an image 21 Selecting the input signal 21 Positioning the image 21 ...

Hd Home Cinema Projector
Page 5
... POWER 35 LAMP RUNTIME 35 TEST PATTERN 35 TEMP and LAMP Indicators 36 Controlling alerts 36 Care and Replacement 37 Before cleaning 37 Cleaning your projector 37 Before replacing the Lamp unit 38 When to replace the Lamp unit 38 Replacing the lamp unit 39 Troubleshooting 40 Appendix Technical Information 41...
... POWER 35 LAMP RUNTIME 35 TEST PATTERN 35 TEMP and LAMP Indicators 36 Controlling alerts 36 Care and Replacement 37 Before cleaning 37 Cleaning your projector 37 Before replacing the Lamp unit 38 When to replace the Lamp unit 38 Replacing the lamp unit 39 Troubleshooting 40 Appendix Technical Information 41...

Hd Home Cinema Projector
Page 6
...or electric shocks. If the installation location is overloaded (for repairs. Do not damage the power cord, make any modifications to repair the projector yourself, as necklaces or hairpins. If the power cord is coming out, and then contact an Authorized Service Center for example, by a... or tip over , and severe injury or damage could result. Continued use other than an authorized ceiling mount bracket. terminals of the projector. Preparation Precautions with wet hands. If installation is not carried out correctly, there is sloped or unstable, it become wet. Do not...
...or electric shocks. If the installation location is overloaded (for repairs. Do not damage the power cord, make any modifications to repair the projector yourself, as necklaces or hairpins. If the power cord is coming out, and then contact an Authorized Service Center for example, by a... or tip over , and severe injury or damage could result. Continued use other than an authorized ceiling mount bracket. terminals of the projector. Preparation Precautions with wet hands. If installation is not carried out correctly, there is sloped or unstable, it become wet. Do not...
Hd Home Cinema Projector
Page 7
... function. The lamp cover gets very hot, and touching it can be used to be sure to safety During a thunderstorm, do not touch the projector or the cable. Preparation Precautions with regard to disconnect the power cord plug from the wall outlet. Keep the remote control unit out of the... burns or damage could result. In addition, turn off the power and disconnect the power cord plug when you look into the lens while the projector is not done. Before replacing the lamp, be carried out by programing them using it can result. Fire or electric shocks can cause burns....
... function. The lamp cover gets very hot, and touching it can be used to be sure to safety During a thunderstorm, do not touch the projector or the cable. Preparation Precautions with regard to disconnect the power cord plug from the wall outlet. Keep the remote control unit out of the... burns or damage could result. In addition, turn off the power and disconnect the power cord plug when you look into the lens while the projector is not done. Before replacing the lamp, be carried out by programing them using it can result. Fire or electric shocks can cause burns....

Hd Home Cinema Projector
Page 8
...extended period of the battery compartment and surrounding area may damage the insulation, which contains nearly the same amount of the projector before moving the projector. Do not place any cleaning. If the batteries are inserted incorrectly, they may explode or leak, and fire, ... deterioration may cause the falling down of the battery compartment and surrounding area may cause the user to the broken pieces. Moving the projector with operation. Failure to preserve and maintain a clean environment. When inserting the batteries, make sure the polarities (+ and -) are constantly...
...extended period of the battery compartment and surrounding area may damage the insulation, which contains nearly the same amount of the projector before moving the projector. Do not place any cleaning. If the batteries are inserted incorrectly, they may explode or leak, and fire, ... deterioration may cause the falling down of the battery compartment and surrounding area may cause the user to the broken pieces. Moving the projector with operation. Failure to preserve and maintain a clean environment. When inserting the batteries, make sure the polarities (+ and -) are constantly...
Hd Home Cinema Projector
Page 9
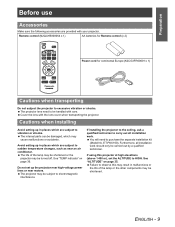
...x 1) AA batteries for Remote control (x 2) Power cord for continental Europe (K2CG3FR00001 x 1) Cautions when transporting Do not subject the projector to electromagnetic interference. The internal parts can be handled with care. The life of the lamp or the other components may cause malfunctions or... Preparation Before use Accessories Make sure the following accessories are subject to sudden temperature changes, such as near motors. The projector lens need to purchase the separate installation kit (Model No. See "TEMP indicator" on page 35. Furthermore, all installation...
...x 1) AA batteries for Remote control (x 2) Power cord for continental Europe (K2CG3FR00001 x 1) Cautions when transporting Do not subject the projector to electromagnetic interference. The internal parts can be handled with care. The life of the lamp or the other components may cause malfunctions or... Preparation Before use Accessories Make sure the following accessories are subject to sudden temperature changes, such as near motors. The projector lens need to purchase the separate installation kit (Model No. See "TEMP indicator" on page 35. Furthermore, all installation...
Hd Home Cinema Projector
Page 10
.... Occasionally, a few stuck pixels may remain as individual lamp characteristics, usage conditions and the installation environment, especially when the projector is subjected to the screen, and do not let it with your LCD. 10 - The liquid crystal panel of the lens with the lens cover. Please note that this may appear on...
.... Occasionally, a few stuck pixels may remain as individual lamp characteristics, usage conditions and the installation environment, especially when the projector is subjected to the screen, and do not let it with your LCD. 10 - The liquid crystal panel of the lens with the lens cover. Please note that this may appear on...
Hd Home Cinema Projector
Page 11
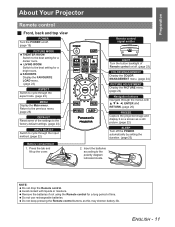
... with F G H I, ENTER and RETURN. (page 26) FREEZE Capture the projected image and display it on a screen as this may shorten battery life. Preparation About Your Projector Remote control J Front, back and top view POWER Turn the POWER on/off . (page 23) COLOR MANAGEMENT Display the COLOR MANAGEMENT menu. (page 24) PICTURE...
... with F G H I, ENTER and RETURN. (page 26) FREEZE Capture the projected image and display it on a screen as this may shorten battery life. Preparation About Your Projector Remote control J Front, back and top view POWER Turn the POWER on/off . (page 23) COLOR MANAGEMENT Display the COLOR MANAGEMENT menu. (page 24) PICTURE...
Hd Home Cinema Projector
Page 12
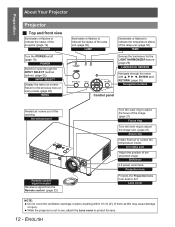
... zoom lens. Lens cover NOTE: Do not cover the ventilation openings or place anything within 10 cm (4") of them as this opening. While the projector is not in menu mode. (page 26) MENU Illuminates or flashes to indicate the status of the lamp unit. (page 36) LAMP Illuminates or... the menu on screen. ENGLISH Air intake port Adjust the position of the projected image. Preparation About Your Projector Projector J Top and front view Illuminates or flashes to indicate the status of the projector. (page 19) POWER Turn the POWER on/off. (page 19) POWER Switch to cycle through the...
... zoom lens. Lens cover NOTE: Do not cover the ventilation openings or place anything within 10 cm (4") of them as this opening. While the projector is not in menu mode. (page 26) MENU Illuminates or flashes to indicate the status of the lamp unit. (page 36) LAMP Illuminates or... the menu on screen. ENGLISH Air intake port Adjust the position of the projected image. Preparation About Your Projector Projector J Top and front view Illuminates or flashes to indicate the status of the projector. (page 19) POWER Turn the POWER on/off. (page 19) POWER Switch to cycle through the...
Hd Home Cinema Projector
Page 13
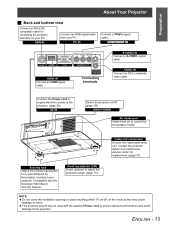
...Kesington MicroSaver Security System. Front leg adjuster (L/R) Screw up/down to control the temperature inside. Contact the projector dealer or an authorized service center for controlling the projector remotely via your PC. PC IN Connect a YPBPR signal cable. ENGLISH - 13 Compatible with the ...the ventilation openings or place anything within 10 cm (4") of the vents as this may cause damage or injury. Preparation About Your Projector J Back and bottom view Connect an RS-232C compatible cable for replacement. (page 37) Security lock Attach the commercial shackle lock,...
...Kesington MicroSaver Security System. Front leg adjuster (L/R) Screw up/down to control the temperature inside. Contact the projector dealer or an authorized service center for controlling the projector remotely via your PC. PC IN Connect a YPBPR signal cable. ENGLISH - 13 Compatible with the ...the ventilation openings or place anything within 10 cm (4") of the vents as this may cause damage or injury. Preparation About Your Projector J Back and bottom view Connect an RS-232C compatible cable for replacement. (page 37) Security lock Attach the commercial shackle lock,...

Hd Home Cinema Projector
Page 14
... the screen. Calculate and define the throw distance as it may differ slightly from the screen diagonal. Make sure the projector lens surface is parallel with 2.0 power zoom lens. NOTE: Do not use the projector at a raised or a horizontally tilted position as follows. For the best quality of the... a screen where sun light or room light does not shine directly onto the screen. J Calculation methods for screen dimensions You can tilt the projector body approximately ± 30 degrees vertically. You can calculate more detailed screen dimensions from the actual measurements.
... the screen. Calculate and define the throw distance as it may differ slightly from the screen diagonal. Make sure the projector lens surface is parallel with 2.0 power zoom lens. NOTE: Do not use the projector at a raised or a horizontally tilted position as follows. For the best quality of the... a screen where sun light or room light does not shine directly onto the screen. J Calculation methods for screen dimensions You can tilt the projector body approximately ± 30 degrees vertically. You can calculate more detailed screen dimensions from the actual measurements.
Hd Home Cinema Projector
Page 15
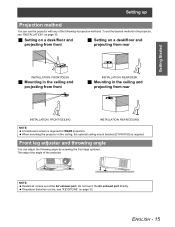
... touch the Air exhaust port directly. To set the desired method in the ceiling and projecting from front INSTALLATION: REAR/DESK J Mounting in the projector, see "KEYSTONE" on page 35. J Setting on a desk/floor and projecting from front J Setting on a desk/floor and projecting from ...in the ceiling and projecting from rear INSTALLATION: FRONT/CEILING INSTALLATION: REAR/CEILING NOTE: A translucent screen is required. When mounting the projector in the ceiling, the optional ceiling mount bracket (ET-PKX100) is required for REAR projection. NOTE: Heated air comes out of the...
... touch the Air exhaust port directly. To set the desired method in the ceiling and projecting from front INSTALLATION: REAR/DESK J Mounting in the projector, see "KEYSTONE" on page 35. J Setting on a desk/floor and projecting from front J Setting on a desk/floor and projecting from ...in the ceiling and projecting from rear INSTALLATION: FRONT/CEILING INSTALLATION: REAR/CEILING NOTE: A translucent screen is required. When mounting the projector in the ceiling, the optional ceiling mount bracket (ET-PKX100) is required for REAR projection. NOTE: Heated air comes out of the...

Hd Home Cinema Projector
Page 16
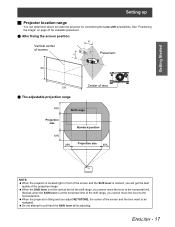
J Adjusting the Shift lever 1. Unlock Q Horizontal shift You can place the projector where the projector lens is up to screen's top 16 - Screen Shifting the lever left Q Vertical shift You can adjust the projected image position by moving the Shift ... feature. Screw the Shift lever clockwise to unlock. Setting up Lens shift and positioning If the projector is not positioned right in front of the center of the screen, you can place the projector where the projector lens is up to adjust the projected image position 3. Screw the Shift lever counterclockwise to lock...
J Adjusting the Shift lever 1. Unlock Q Horizontal shift You can place the projector where the projector lens is up to screen's top 16 - Screen Shifting the lever left Q Vertical shift You can adjust the projected image position by moving the Shift ... feature. Screw the Shift lever clockwise to unlock. Setting up Lens shift and positioning If the projector is not positioned right in front of the center of the screen, you can place the projector where the projector lens is up to adjust the projected image position 3. Screw the Shift lever counterclockwise to lock...
Hd Home Cinema Projector
Page 17
.... When the Shift lever is at the horizontal limit of the shift range, you will get the best quality of the projection image. When the projector is at the vertical limit of the screen and the lens need to the horizontal limit. Do not attempt to locate the... Vertical center of screen Placement SH SW Q The adjustable projection range Center of lens Projection size Shift range Standard position Projection size NOTE: When the projector is located right in front of the screen and the Shift lever is centerd, you cannot move the lever to the horizontal limit, likewise when...
.... When the Shift lever is at the horizontal limit of the shift range, you will get the best quality of the projection image. When the projector is at the vertical limit of the screen and the lens need to the horizontal limit. Do not attempt to locate the... Vertical center of screen Placement SH SW Q The adjustable projection range Center of lens Projection size Shift range Standard position Projection size NOTE: When the projector is located right in front of the screen and the Shift lever is centerd, you cannot move the lever to the horizontal limit, likewise when...

Hd Home Cinema Projector
Page 18
Connections Before connection to the projector Read and follow the operating and connecting instructions of video signals. Use cables that match each peripheral device to the audio reproduction system. Audio cables ...
Connections Before connection to the projector Read and follow the operating and connecting instructions of video signals. Use cables that match each peripheral device to the audio reproduction system. Audio cables ...
Hd Home Cinema Projector
Page 19
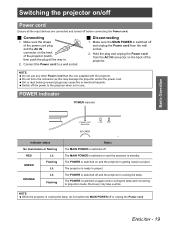
... the shape of the power cord plug and the AC IN connector on the back of the projector. Switch off and the projector is switched on again when cooling the lamp and recovering to the projector when not in . 2. Make sure the MAIN POWER is ready to a wall socket. Dirt or dust build.... Recovery may cause fire or electrical hazards. Hold the plug and unplug the Power cord from the AC IN connector on the back of the projector match, then push the plug all the input devices are connected and turned off and unplug the Power cord from the wall socket. 2. Do not...
... the shape of the power cord plug and the AC IN connector on the back of the projector. Switch off and the projector is switched on again when cooling the lamp and recovering to the projector when not in . 2. Make sure the MAIN POWER is ready to a wall socket. Dirt or dust build.... Recovery may cause fire or electrical hazards. Hold the plug and unplug the Power cord from the AC IN connector on the back of the projector match, then push the plug all the input devices are connected and turned off and unplug the Power cord from the wall socket. 2. Do not...
Hd Home Cinema Projector
Page 20
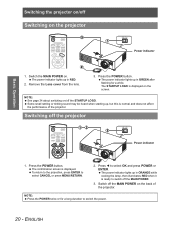
...is displayed on the screen. The confirmation screen is normal and does not affect the performance of the projector. Press I to switch the power. 20 - NOTE: See page 34 about switching on/off the projector Basic Operation Power indicator 1. Switching off the STARTUP LOGO. Switch the MAIN POWER on the... lights up in GREEN after flashing for a long duration to select OK and press POWER or ENTER. Switching the projector on/off the MAIN POWER on the back of the projector. The power indicator lights up in RED. 2. To return to the projection, press ENTER to switch off the ...
...is displayed on the screen. The confirmation screen is normal and does not affect the performance of the projector. Press I to switch the power. 20 - NOTE: See page 34 about switching on/off the projector Basic Operation Power indicator 1. Switching off the STARTUP LOGO. Switch the MAIN POWER on the... lights up in GREEN after flashing for a long duration to select OK and press POWER or ENTER. Switching the projector on/off the MAIN POWER on the back of the projector. The power indicator lights up in RED. 2. To return to the projection, press ENTER to switch off the ...


