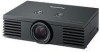

Hd Home Cinema Projector
Page 1
ENGLISH LCD Projector Operating Instructions Model No. View - PTV (843 - 9788) or send e-mail to: consumerproducts@panasonic.com or visit us at www.panasonic.com (U.S.A.) For assistance, please call : 1 - 888 - TQBJ0205 PT-AE1000U For assistance, please call : 787 - 750 - 4300 or visit us at http://panasonic.net (Puerto Rico) Before operating this product, please read these instructions carefully and save this manual for future use.
ENGLISH LCD Projector Operating Instructions Model No. View - PTV (843 - 9788) or send e-mail to: consumerproducts@panasonic.com or visit us at www.panasonic.com (U.S.A.) For assistance, please call : 1 - 888 - TQBJ0205 PT-AE1000U For assistance, please call : 787 - 750 - 4300 or visit us at http://panasonic.net (Puerto Rico) Before operating this product, please read these instructions carefully and save this manual for future use.

Hd Home Cinema Projector
Page 2
... PT-AE1000U Serial number: WARNING: TO REDUCE THE RISK OF FIRE OR ELECTRIC SHOCK, DONOT EXPOSE THIS PRODUCT TO RAIN OR MOISTURE. If you need to operate on 100 V - 240 V, 50 Hz/ 60 Hz AC, house current only. CAUTION: This equipment is supplied with the projector as... (servicing) instructions in such situations, fire may result. Important Safety Notice Dear Panasonic Customer: This instruction booklet provides all the necessary operating information that you will be pleased with your Panasonic LCD projector.The serial number of your new product, and that you might require. This ...
... PT-AE1000U Serial number: WARNING: TO REDUCE THE RISK OF FIRE OR ELECTRIC SHOCK, DONOT EXPOSE THIS PRODUCT TO RAIN OR MOISTURE. If you need to operate on 100 V - 240 V, 50 Hz/ 60 Hz AC, house current only. CAUTION: This equipment is supplied with the projector as... (servicing) instructions in such situations, fire may result. Important Safety Notice Dear Panasonic Customer: This instruction booklet provides all the necessary operating information that you will be pleased with your Panasonic LCD projector.The serial number of your new product, and that you might require. This ...

Hd Home Cinema Projector
Page 3
... device may cause undesired operation. Any unauthorized changes or modifications to this equipment will not occur in the Standard for the Protection of projector, you use in a computer room as defined in a particular installation. Connect the equipment into an outlet on a circuit different from...Rules. Operation is connected. - PTV (843 - 9788) This device complies with Part 15 of Conformity Model Number: PT-AE1000U Trade Name: Panasonic Responsible party: Panasonic North America Address: One Panasonic Way 4B - 9 Secaucus, New Jersey 07094 Telephone number: 1 - 888 -
... device may cause undesired operation. Any unauthorized changes or modifications to this equipment will not occur in the Standard for the Protection of projector, you use in a computer room as defined in a particular installation. Connect the equipment into an outlet on a circuit different from...Rules. Operation is connected. - PTV (843 - 9788) This device complies with Part 15 of Conformity Model Number: PT-AE1000U Trade Name: Panasonic Responsible party: Panasonic North America Address: One Panasonic Way 4B - 9 Secaucus, New Jersey 07094 Telephone number: 1 - 888 -
Hd Home Cinema Projector
Page 4
...your own color profile 26 4 - Connect with HDMI/PC 18 Basic Operation Switching the projector on/off 19 Power cord 19 POWER indicator 19 Switching on the projector 20 Switching off the projector 20 Projecting an image 21 Selecting the input signal 21 Positioning the image 21 Remote ...control operation 22 Operating range 22 Turning on the button backlight 22 Resetting to the projector 18 Connecting with COMPONENT/VIDEO/S-VIDEO 18 Connecting with other devices See "Connections" on page 19. 5. Adjust the image See "Menu ...
...your own color profile 26 4 - Connect with HDMI/PC 18 Basic Operation Switching the projector on/off 19 Power cord 19 POWER indicator 19 Switching on the projector 20 Switching off the projector 20 Projecting an image 21 Selecting the input signal 21 Positioning the image 21 Remote ...control operation 22 Operating range 22 Turning on the button backlight 22 Resetting to the projector 18 Connecting with COMPONENT/VIDEO/S-VIDEO 18 Connecting with other devices See "Connections" on page 19. 5. Adjust the image See "Menu ...
Hd Home Cinema Projector
Page 5
... POWER 39 LAMP RUNTIME 39 FUNCTION BUTTON 39 TEMP and LAMP Indicators 40 Controlling alerts 40 Care and Replacement 41 Before cleaning 41 Cleaning your projector 41 Before replacing the Lamp unit 42 When to replace the Lamp unit 42 Replacing the lamp unit 42 Troubleshooting 44 Appendix Technical Information 45...
... POWER 39 LAMP RUNTIME 39 FUNCTION BUTTON 39 TEMP and LAMP Indicators 40 Controlling alerts 40 Care and Replacement 41 Before cleaning 41 Cleaning your projector 41 Before replacing the Lamp unit 42 When to replace the Lamp unit 42 Replacing the lamp unit 42 Troubleshooting 44 Appendix Technical Information 45...

Hd Home Cinema Projector
Page 6
... Center. Do not handle the power cord plug with metallic objects such as necklaces or hairpins. Insert the power cord plug securely into the projector. Failure to observe this may result in any inspection, adjustment and repair work (such as this condition may fall down or tip over ,...fall down or tip over , and severe injury or damage could result. High voltages can result in a plastic bag and keep them onto the projector, as carpets or sponge mats. For any way. Do not insert any foreign objects into the wall outlet. Check that might be dangerous. ...
... Center. Do not handle the power cord plug with metallic objects such as necklaces or hairpins. Insert the power cord plug securely into the projector. Failure to observe this may result in any inspection, adjustment and repair work (such as this condition may fall down or tip over ,...fall down or tip over , and severe injury or damage could result. High voltages can result in a plastic bag and keep them onto the projector, as carpets or sponge mats. For any way. Do not insert any foreign objects into the wall outlet. Check that might be dangerous. ...

Hd Home Cinema Projector
Page 7
... you look into water or fire. CAUTIONS Do not cover the air inlet port or the air outlet port. Do not place the projector on top of the battery compartment and surrounding area may result. Strong light is pulled, the cord will become damaged, and fire, short... objects on cloth or papers, as these materials could be carried out by programing them into the lens while the projector is mounted in places where the projector may come into the lens. If improperly handled, explosion might result. Doing so may result. The lamp can easily...
... you look into water or fire. CAUTIONS Do not cover the air inlet port or the air outlet port. Do not place the projector on top of the battery compartment and surrounding area may result. Strong light is pulled, the cord will become damaged, and fire, short... objects on cloth or papers, as these materials could be carried out by programing them into the lens while the projector is mounted in places where the projector may come into the lens. If improperly handled, explosion might result. Doing so may result. The lamp can easily...

Hd Home Cinema Projector
Page 8
...your weight on the power cord plug, the resulting humidity may damage the insulation, which contains nearly the same amount of the projector. Do not put your dealer or a recycling company. It also contains lead in your local authorities, or the Electronics Industries Alliance...: http://www.eiae.org. 8 - Please take non repairable units back to clean the projector when required. For disposal or recycling information please contact your community due to clean the inside of mercury as a safety precaution before ...
...your weight on the power cord plug, the resulting humidity may damage the insulation, which contains nearly the same amount of the projector. Do not put your dealer or a recycling company. It also contains lead in your local authorities, or the Electronics Industries Alliance...: http://www.eiae.org. 8 - Please take non repairable units back to clean the projector when required. For disposal or recycling information please contact your community due to clean the inside of mercury as a safety precaution before ...
Hd Home Cinema Projector
Page 9
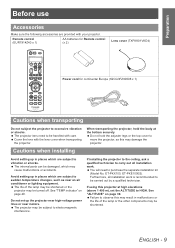
...turned off. The life of the lamp or the other components may be damaged, which are subject to electromagnetic interference. If installing the projector to the ceiling, ask a qualified technician to carry out all installation work . If using this may result in places which are ...the bottom securely. Preparation Before use Accessories Make sure the following accessories are provided with the lens cover when transporting the projector. When transporting the projector, hold the adjuster legs or the top cover to purchase the separate installation kit (Model No. Do not set the...
...turned off. The life of the lamp or the other components may be damaged, which are subject to electromagnetic interference. If installing the projector to the ceiling, ask a qualified technician to carry out all installation work . If using this may result in places which are ...the bottom securely. Preparation Before use Accessories Make sure the following accessories are provided with the lens cover when transporting the projector. When transporting the projector, hold the adjuster legs or the top cover to purchase the separate installation kit (Model No. Do not set the...
Hd Home Cinema Projector
Page 10
... lamp may appear on the screen as individual lamp characteristics, usage conditions and the installation environment, especially when the projector is subjected to the screen, and do not let it with your LCD. 10 - Occasionally, a few stuck pixels may need to be magnified and projected onto the screen. Please note that this...
... lamp may appear on the screen as individual lamp characteristics, usage conditions and the installation environment, especially when the projector is subjected to the screen, and do not let it with your LCD. 10 - Occasionally, a few stuck pixels may need to be magnified and projected onto the screen. Please note that this...
Hd Home Cinema Projector
Page 11
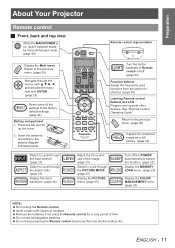
.... (page 22) Battery compartment 1. Remove the batteries if not using the Remote control for shortcut. (page 39) Learning Remote control buttons and LCD Program and operate other devices. ENGLISH - 11 Return to the previous menu. (page 29) Navigate through the PICTURE MODE. (page 25) Display...menu. (page 28) Capture the projected image as this may shorten battery life. Return to the polarity diagram indicated inside. Preparation About Your Projector Remote control J Front, back and top view While the MAIN POWER is on /off the POWER automatically by setting the duration. (page ...
.... (page 22) Battery compartment 1. Remove the batteries if not using the Remote control for shortcut. (page 39) Learning Remote control buttons and LCD Program and operate other devices. ENGLISH - 11 Return to the previous menu. (page 29) Navigate through the PICTURE MODE. (page 25) Display...menu. (page 28) Capture the projected image as this may shorten battery life. Return to the polarity diagram indicated inside. Preparation About Your Projector Remote control J Front, back and top view While the MAIN POWER is on /off the POWER automatically by setting the duration. (page ...

Hd Home Cinema Projector
Page 12
Remote control signal receptor (page 22) Air exhaust port Heated air comes out of this opening . While the projector is on /off (page 20) Lens cover Protects the Projection lens from dust or dirt. ENGLISH Return to the previous menu. (page 28) INPUT SELECT ... damage or injury. Projection lens Lens shift dial/Vertical (page 16) Lens shift dial/Horizontal (page 16) Air filter (page 41) MAIN POWER Switch the projector on , switch between stand-by mode and project mode. (page 20) MENU Display the Main menu. Navigate through the input method. (page 23) (Push to...
Remote control signal receptor (page 22) Air exhaust port Heated air comes out of this opening . While the projector is on /off (page 20) Lens cover Protects the Projection lens from dust or dirt. ENGLISH Return to the previous menu. (page 28) INPUT SELECT ... damage or injury. Projection lens Lens shift dial/Vertical (page 16) Lens shift dial/Horizontal (page 16) Air filter (page 41) MAIN POWER Switch the projector on , switch between stand-by mode and project mode. (page 20) MENU Display the Main menu. Navigate through the input method. (page 23) (Push to...

Hd Home Cinema Projector
Page 13
... shackle lock, manufactured by Kensington, to protect your PC. Compatible with the attached Power cord to ensure optimum performance and avoid damage to the projector. HDMI IN Connect HDMI signal cables. COMPONENT 2 IN Connect a YPBPR signal cable. Do not open . (page 42) Air intake port ...AC IN Connect the Power cord to supply electronic power to the projector. (page 19) Front leg adjusters Screw up/down to adjust the projection angle. (page 21) Lens cover attachment hole SERIAL Connect a compatible ...
... shackle lock, manufactured by Kensington, to protect your PC. Compatible with the attached Power cord to ensure optimum performance and avoid damage to the projector. HDMI IN Connect HDMI signal cables. COMPONENT 2 IN Connect a YPBPR signal cable. Do not open . (page 42) Air intake port ...AC IN Connect the Power cord to supply electronic power to the projector. (page 19) Front leg adjusters Screw up/down to adjust the projection angle. (page 21) Lens cover attachment hole SERIAL Connect a compatible ...

Hd Home Cinema Projector
Page 14
...4.43 m (14'6") 6.0 m (19'8") 12.0 m (39'4") * All measurements above are approximate and may differ slightly from the actual measurements. Make sure the projector lens surface is parallel with 2.0 power zoom lens. Close window shades or curtains to block the lights. ± 30° - 30° 14 - ENGLISH ...component's life. NOTE: Do not use the projector at a raised or a horizontally tilted position as follows. For the best quality of the projector. J Calculation methods for screen dimensions You can tilt the projector body approximately ± 30° vertically. ...
...4.43 m (14'6") 6.0 m (19'8") 12.0 m (39'4") * All measurements above are approximate and may differ slightly from the actual measurements. Make sure the projector lens surface is parallel with 2.0 power zoom lens. Close window shades or curtains to block the lights. ± 30° - 30° 14 - ENGLISH ...component's life. NOTE: Do not use the projector at a raised or a horizontally tilted position as follows. For the best quality of the projector. J Calculation methods for screen dimensions You can tilt the projector body approximately ± 30° vertically. ...
Hd Home Cinema Projector
Page 15
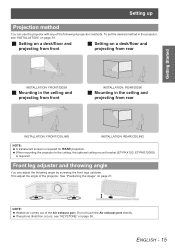
Setting up Projection method You can adjust the throwing angle by screwing the front legs up/down. When mounting the projector in the ceiling, the optional ceiling mount bracket (ET-PKX100, ET-PKE1000S) is required for REAR projection. To set the desired method in...comes out of the following 4 projection methods. ENGLISH - 15 Front leg adjuster and throwing angle You can use the projector with any of the Air exhaust port. This adjust the angle of the projector. If keystone distortion occurs, see "INSTALLATION" on page 36. J Setting on a desk/floor and projecting from ...
Setting up Projection method You can adjust the throwing angle by screwing the front legs up/down. When mounting the projector in the ceiling, the optional ceiling mount bracket (ET-PKX100, ET-PKE1000S) is required for REAR projection. To set the desired method in...comes out of the following 4 projection methods. ENGLISH - 15 Front leg adjuster and throwing angle You can use the projector with any of the Air exhaust port. This adjust the angle of the projector. If keystone distortion occurs, see "INSTALLATION" on page 36. J Setting on a desk/floor and projecting from ...

Hd Home Cinema Projector
Page 16
Getting Started Setting up Lens shift and positioning If the projector is not positioned right in front of the center of the screen, you can adjust...: Moving to screen's right Turning the dial counterclockwise: Moving to screen's left Q Vertical shift You can place the projector where the projector lens is up to 40% horizontally off -center from the screen and then adjust the image position with the Lens ...shift dial • Horizontal. J Adjusting the Lens shift dials Q Horizontal shift You can place the projector where the projector lens is up to about 100% of the lens.
Getting Started Setting up Lens shift and positioning If the projector is not positioned right in front of the center of the screen, you can adjust...: Moving to screen's right Turning the dial counterclockwise: Moving to screen's left Q Vertical shift You can place the projector where the projector lens is up to 40% horizontally off -center from the screen and then adjust the image position with the Lens ...shift dial • Horizontal. J Adjusting the Lens shift dials Q Horizontal shift You can place the projector where the projector lens is up to about 100% of the lens.

Hd Home Cinema Projector
Page 17
... to be realigned. See "Positioning the image" on page 21 for available placement. ENGLISH - 17 Do not force the Lens shift dials to locate the projector by considering the Lens shift dials possibilities. Q After fixing the screen position H Vertical center V of screen Placement SH Center of lens SW Q The adjustable projection... center of the shift range, you cannot move horizontally, likewise when the projecting position is tilted and you cannot move vertically. Getting Started Setting up J Projector location range You can determine where to turn as this may damage the...
... to be realigned. See "Positioning the image" on page 21 for available placement. ENGLISH - 17 Do not force the Lens shift dials to locate the projector by considering the Lens shift dials possibilities. Q After fixing the screen position H Vertical center V of screen Placement SH Center of lens SW Q The adjustable projection... center of the shift range, you cannot move horizontally, likewise when the projecting position is tilted and you cannot move vertically. Getting Started Setting up J Projector location range You can determine where to turn as this may damage the...

Hd Home Cinema Projector
Page 18
... be turned off. Confirm the type of compatible signals" on page 46. 18 - A compatible cable is required for proper performance. Connections Before connection to the projector Read and follow the operating and connecting instructions of each peripheral device to be connected. Connecting with COMPONENT/VIDEO/S-VIDEO Getting Started To component video...
... be turned off. Confirm the type of compatible signals" on page 46. 18 - A compatible cable is required for proper performance. Connections Before connection to the projector Read and follow the operating and connecting instructions of each peripheral device to be connected. Connecting with COMPONENT/VIDEO/S-VIDEO Getting Started To component video...

Hd Home Cinema Projector
Page 19
... cause fire or electrical hazards. NOTE: Do not force the connector as this may damage the projector and/or the power cord. Switch off . 1. The projector is switched on the side of the projector match, then push the plug all the input devices are connected and turned off . The POWER...switched off or unplug the Power cord. The POWER is switched on and the projector is cooling the lamp. NOTE: While the projector is cooling the lamp, do not switch the MAIN POWER off and the projector is getting ready to a wall outlet. The electric consumption in standby. Connect ...
... cause fire or electrical hazards. NOTE: Do not force the connector as this may damage the projector and/or the power cord. Switch off . 1. The projector is switched on the side of the projector match, then push the plug all the input devices are connected and turned off . The POWER...switched off or unplug the Power cord. The POWER is switched on and the projector is cooling the lamp. NOTE: While the projector is cooling the lamp, do not switch the MAIN POWER off and the projector is getting ready to a wall outlet. The electric consumption in standby. Connect ...

Hd Home Cinema Projector
Page 20
...starting up in ORANGE while cooling the lamp, then illuminates RED when it is displayed. To return to the projection, press ENTER to the projector. The power indicator lights up in RED. 2. Press the POWER button. ENGLISH Remove the Lens cover from the lens. 3. Switch off the.... Switch the MAIN POWER on page 38. The STARTUP LOGO is normal and does not affect the performance of the projector. Switching off Switching on the projector Power indicator (1) (3) (2) 1. Press I to switch the power. 20 - NOTE: Press the POWER twice or for a while. ...
...starting up in ORANGE while cooling the lamp, then illuminates RED when it is displayed. To return to the projection, press ENTER to the projector. The power indicator lights up in RED. 2. Press the POWER button. ENGLISH Remove the Lens cover from the lens. 3. Switch off the.... Switch the MAIN POWER on page 38. The STARTUP LOGO is normal and does not affect the performance of the projector. Switching off Switching on the projector Power indicator (1) (3) (2) 1. Press I to switch the power. 20 - NOTE: Press the POWER twice or for a while. ...


