

User Manual
Page 1
ENGLISH TABLE OF CONTENTS Usage Notice Precautions...3 Eye Safety Warnings ...5 Introduction Product Features ...6 Package Overview ...7 Product Overview ...8 Main Unit ...8 Projector Panel ...9 DVD Panel...9 Connection Ports ...10 Remote Control ...11 Installation Setting up the Projector ...12 Connecting the Computer...12 Connecting the Video ...13 Connecting the Audio Input...14 Connecting the Audio Output-(External...
ENGLISH TABLE OF CONTENTS Usage Notice Precautions...3 Eye Safety Warnings ...5 Introduction Product Features ...6 Package Overview ...7 Product Overview ...8 Main Unit ...8 Projector Panel ...9 DVD Panel...9 Connection Ports ...10 Remote Control ...11 Installation Setting up the Projector ...12 Connecting the Computer...12 Connecting the Video ...13 Connecting the Audio Input...14 Connecting the Audio Output-(External...

User Manual
Page 2
......26 Using the DVD Panel ...26 On-screen Display Menus ...27 How to Operate Projector Menu 27 Menu Tree for Projector ...28 Language ...29 Image-I ...30 Image-II...32 Display ...35 System ...37 Lamp setting...38 How to Operate WMA/MP3/JPEG Program 39 How to ... Image Problems ...47 Intermission Problems...49 LED Problems...49 DVD Player Problems ...50 Sound Problems ...51 Remote Control Problems...51 Replacing the Lamp...52 2 * DVD Projector
......26 Using the DVD Panel ...26 On-screen Display Menus ...27 How to Operate Projector Menu 27 Menu Tree for Projector ...28 Language ...29 Image-I ...30 Image-II...32 Display ...35 System ...37 Lamp setting...38 How to Operate WMA/MP3/JPEG Program 39 How to ... Image Problems ...47 Intermission Problems...49 LED Problems...49 DVD Player Problems ...50 Sound Problems ...51 Remote Control Problems...51 Replacing the Lamp...52 2 * DVD Projector

User Manual
Page 3
If this occurs, the projector will display a warning message when the lamp is in this user's guide. ▀■ To reduce the risk of fire or electric shock, do ... product self-detects the life of the lamp and will not turn back on the projector first and then select the signal sources. ▀■ Do not use lens cap when projector is about to expire. DVD Projector * 3 ENGLISH USAGE NOTICE Precautions Please follow all warnings, precautions, and maintenance procedures as recommended...
If this occurs, the projector will display a warning message when the lamp is in this user's guide. ▀■ To reduce the risk of fire or electric shock, do ... product self-detects the life of the lamp and will not turn back on the projector first and then select the signal sources. ▀■ Do not use lens cap when projector is about to expire. DVD Projector * 3 ENGLISH USAGE NOTICE Precautions Please follow all warnings, precautions, and maintenance procedures as recommended...

User Manual
Page 4
In areas susceptible to clean the unit. ▀■ Use under the following conditions: - Near any appliance generating a strong magnetic field. 4 * DVD Projector Do not: ▀■ Block the slots and openings on the unit provided for a long period of time. Extremely heat, cold or humidity. - ENGLISH USAGE ...
In areas susceptible to clean the unit. ▀■ Use under the following conditions: - Near any appliance generating a strong magnetic field. 4 * DVD Projector Do not: ▀■ Block the slots and openings on the unit provided for a long period of time. Extremely heat, cold or humidity. - ENGLISH USAGE ...

User Manual
Page 5
..., they are located out of the sight line from the screen to stare at all times. ▀■ Minimize standing facing into the projector beam at the projector lamp. Keep your back to the beam as much as possible. ▀■ Use of a stick or laser pointer to avoid the ...enter the beam is used in a classroom, adequately supervise students when they do not also have to the audience; DVD Projector * 5 The best way to achieve this ensures that projectors are asked to point out something on the screen. ▀■ In order to minimize the lamp power needed to project...
..., they are located out of the sight line from the screen to stare at all times. ▀■ Minimize standing facing into the projector beam at the projector lamp. Keep your back to the beam as much as possible. ▀■ Use of a stick or laser pointer to avoid the ...enter the beam is used in a classroom, adequately supervise students when they do not also have to the audience; DVD Projector * 5 The best way to achieve this ensures that projectors are asked to point out something on the screen. ▀■ In order to minimize the lamp power needed to project...

User Manual
Page 6
ENGLISH INTRODUCTION Product Features This product is a 480p single chip DLPTM projector with S-video, composite and HDTV (480i/p, 576i/p, 720p, 1080i) ▀■ Computer compatibility- bility with builtin DVD player featuring: ▀■ Single... panel ▀■ Video compatibility- NTSC/PAL/SECAM video capa- SXGA, XGA compression and SVGA, VGA re-sizing ▀■ Pure digital DVD to projector connection ▀■ Built-in 5W x 2 stereo speaker ▀■ Optical digital audio output and stereo output ▀■ DVD player compatibilityMedia Compatibility:...
ENGLISH INTRODUCTION Product Features This product is a 480p single chip DLPTM projector with S-video, composite and HDTV (480i/p, 576i/p, 720p, 1080i) ▀■ Computer compatibility- bility with builtin DVD player featuring: ▀■ Single... panel ▀■ Video compatibility- NTSC/PAL/SECAM video capa- SXGA, XGA compression and SVGA, VGA re-sizing ▀■ Pure digital DVD to projector connection ▀■ Built-in 5W x 2 stereo speaker ▀■ Optical digital audio output and stereo output ▀■ DVD player compatibilityMedia Compatibility:...

User Manual
Page 7
ENGLISH INTRODUCTION Package Overview This projector comes with lens cap Composite Video Cable 1.8m (For USA and ASIA) VGA Cable 1.8m (For European) Power Cord 1.8m D-Sub to RCA Adapter (For USA and ASIA) SCART RGB/S-video Adapter (For European) Due to make sure your unit is complete. Check to the difference in applications for each country, some regions may have different accessories. Projector with all the items shown below. IR Remote Control AA Battery x 2 Documentation: User's manual Warranty Card Carrying Case DVD Projector * 7
ENGLISH INTRODUCTION Package Overview This projector comes with lens cap Composite Video Cable 1.8m (For USA and ASIA) VGA Cable 1.8m (For European) Power Cord 1.8m D-Sub to RCA Adapter (For USA and ASIA) SCART RGB/S-video Adapter (For European) Due to make sure your unit is complete. Check to the difference in applications for each country, some regions may have different accessories. Projector with all the items shown below. IR Remote Control AA Battery x 2 Documentation: User's manual Warranty Card Carrying Case DVD Projector * 7
User Manual
Page 8
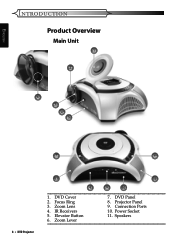
IR Receivers 5. DVD Panel 8. Connection Ports 10. DVD Cover 2. Zoom Lever 11 9 10 7. Projector Panel 9. Zoom Lens 4. Power Socket 11. Speakers Focus Ring 3. ENGLISH INTRODUCTION Product Overview Main Unit 1 2 6 3 4 5 7 8 8 * DVD Projector 11 4 1. Elevator Button 6.
IR Receivers 5. DVD Panel 8. Connection Ports 10. DVD Cover 2. Zoom Lever 11 9 10 7. Projector Panel 9. Zoom Lens 4. Power Socket 11. Speakers Focus Ring 3. ENGLISH INTRODUCTION Product Overview Main Unit 1 2 6 3 4 5 7 8 8 * DVD Projector 11 4 1. Elevator Button 6.

User Manual
Page 9
Menu 3. Lamp LED 7. Backward 4. Power Button/Power LED 2. Play/Pause 3. Volume 7. Source 5. Four Directional Select Keys 8. Forward 5. DVD LED 6. Enter 4. Resync 1. INTRODUCTION Projector Panel 1 23 4 ENGLISH 56 7 8 1. Tempaterture LED 6. Stop 2. Volume + DVD Panel 1 2 3 4 6 7 5 DVD Projector * 9
Menu 3. Lamp LED 7. Backward 4. Power Button/Power LED 2. Play/Pause 3. Volume 7. Source 5. Four Directional Select Keys 8. Forward 5. DVD LED 6. Enter 4. Resync 1. INTRODUCTION Projector Panel 1 23 4 ENGLISH 56 7 8 1. Tempaterture LED 6. Stop 2. Volume + DVD Panel 1 2 3 4 6 7 5 DVD Projector * 9

User Manual
Page 11
... Directional 8 Select Keys 7 7. DVD Enter Key 10 9. Sub Title 15. REW Button 25 26 22. Stop Button DVD Projector * 11 ENGLISH INTRODUCTION Remote Control 1 1. Source 4 5 4. Play Button 27 28 24. Keystone +/- 15 14 13. Volume +/- 16 14. Pause Button 25. PREV Button 20. Audio ...16. DVD Four Directional Select Keys 9 8. Format 3. Slow Button 26. Setup 11 10. Numerical Buttons 17 18 17. DVD Menu 12 13 11. Projector Enter Key 6 5. A-B Repeat 19 20 18.
... Directional 8 Select Keys 7 7. DVD Enter Key 10 9. Sub Title 15. REW Button 25 26 22. Stop Button DVD Projector * 11 ENGLISH INTRODUCTION Remote Control 1 1. Source 4 5 4. Play Button 27 28 24. Keystone +/- 15 14 13. Volume +/- 16 14. Pause Button 25. PREV Button 20. Audio ...16. DVD Four Directional Select Keys 9 8. Format 3. Slow Button 26. Setup 11 10. Numerical Buttons 17 18 17. DVD Menu 12 13 11. Projector Enter Key 6 5. A-B Repeat 19 20 18.

User Manual
Page 12
ENGLISH INSTALLATION Setting up the Projector Connecting the Computer/Notebook 1. VGA cable 2 1 12 * DVD Projector Power cord 2.
ENGLISH INSTALLATION Setting up the Projector Connecting the Computer/Notebook 1. VGA cable 2 1 12 * DVD Projector Power cord 2.

User Manual
Page 13
D-Sub to their environment of audio and video equipments or demand. 32 4 1 DVD Projector * 13 Video cable 3. nent Cable for YPbPr 5 The user can install the connection port according to RCA Adapter 5. S-Video Cable 4. RCA Compo- Power cord 2. ENGLISH INSTALLATION Connecting the Video 1.
D-Sub to their environment of audio and video equipments or demand. 32 4 1 DVD Projector * 13 Video cable 3. nent Cable for YPbPr 5 The user can install the connection port according to RCA Adapter 5. S-Video Cable 4. RCA Compo- Power cord 2. ENGLISH INSTALLATION Connecting the Video 1.

User Manual
Page 14
Audio cable 1 14 * DVD Projector Power cord 2. Audio cable (L/R) 1 2 Connecting the Audio Output(External Subwoofer/Stereo System) 2 1. Power cord 2. ENGLISH INSTALLATION Connecting the Audio Input 1.
Audio cable 1 14 * DVD Projector Power cord 2. Audio cable (L/R) 1 2 Connecting the Audio Output(External Subwoofer/Stereo System) 2 1. Power cord 2. ENGLISH INSTALLATION Connecting the Audio Input 1.

User Manual
Page 15
Optical audio cable Connecting the Audio Output(2.1 Channel/5.1 Channel) 2 Optical Digital Audio Input Jack 1 2.1 Channel 5.1 Channel DVD Projector * 15 Power cord 2. ENGLISH INSTALLATION 1.
Optical audio cable Connecting the Audio Output(2.1 Channel/5.1 Channel) 2 Optical Digital Audio Input Jack 1 2.1 Channel 5.1 Channel DVD Projector * 15 Power cord 2. ENGLISH INSTALLATION 1.

User Manual
Page 16
...Source" button on your source (computer, notebook, video player, etc.), the projector will turn blue. The first time you use the projector, you can select your desired source. 2 Power Button 16 * DVD Projector 1 Lens Cap The Power LED will flash blue. 3. ENGLISH ...INSTALLATION Powering On/Off the Projector Powering On the Projector Turn on the control panel. Ensure that ...
...Source" button on your source (computer, notebook, video player, etc.), the projector will turn blue. The first time you use the projector, you can select your desired source. 2 Power Button 16 * DVD Projector 1 Lens Cap The Power LED will flash blue. 3. ENGLISH ...INSTALLATION Powering On/Off the Projector Powering On the Projector Turn on the control panel. Ensure that ...

User Manual
Page 17
.../Close] on DVD panel or to close disc loading tray. 2 1 3 DVD Projector * 17 If the DVD player does not load the disc, the start-up screen will turn blue. Place the DVD on the projector's screen. 4. Ensure that the power cord and signal cable are securely connected. Remove the lens... cap. 2. Turn on the lamp by pressing [Power] button on the projector's screen. And the Power LED will display on the tray , then press [Open/Close] to open disc loading tray. 5. The Power LED...
.../Close] on DVD panel or to close disc loading tray. 2 1 3 DVD Projector * 17 If the DVD player does not load the disc, the start-up screen will turn blue. Place the DVD on the projector's screen. 4. Ensure that the power cord and signal cable are securely connected. Remove the lens... cap. 2. Turn on the lamp by pressing [Power] button on the projector's screen. And the Power LED will display on the tray , then press [Open/Close] to open disc loading tray. 5. The Power LED...

User Manual
Page 18
..., simply press [Power] button to turn blue. Press the [Power] button to confirm, otherwise the message will turn the projector back on the projector's screen. Picture Mute" displayed on , you will be displayed. Press the [Power] button again to turn off the lamp? Please ...To exit the "Picture Mute" mode, press the [Power] button again. 2. If you wish to restart the projector. When the Power LED begins flashing, the projector has entered standby mode. INSTALLATION ENGLISH DVD compatibility type Type of disc Diameter DVD 12cm/8cm SVCD 12cm VCD 12cm/...
..., simply press [Power] button to turn blue. Press the [Power] button to confirm, otherwise the message will turn the projector back on the projector's screen. Picture Mute" displayed on , you will be displayed. Press the [Power] button again to turn off the lamp? Please ...To exit the "Picture Mute" mode, press the [Power] button again. 2. If you wish to restart the projector. When the Power LED begins flashing, the projector has entered standby mode. INSTALLATION ENGLISH DVD compatibility type Type of disc Diameter DVD 12cm/8cm SVCD 12cm VCD 12cm/...

User Manual
Page 19
... be switched on immediately following a power off soon." Lamp will automatically shut itself down. DVD Projector * 19 on the on -screen display. on the on -screen display. Please contact your local reseller or service center. ▀■ When the "TEMP" indicator ... service center. Lamp will see a message "Fan fail. You will automatically turn off procedure. If the problem persists, you will automatically shut itself down . The projector will automatically turn off soon." Disconnect the power cord from the electrical outlet and the...
... be switched on immediately following a power off soon." Lamp will automatically shut itself down. DVD Projector * 19 on the on -screen display. on the on -screen display. Please contact your local reseller or service center. ▀■ When the "TEMP" indicator ... service center. Lamp will see a message "Fan fail. You will automatically turn off procedure. If the problem persists, you will automatically shut itself down . The projector will automatically turn off soon." Disconnect the power cord from the electrical outlet and the...

User Manual
Page 20
.... 3. Use to modify the height of the projector. To raise or lower the image : 1. Lower the projector so it may be adjusted. 2. Elevator Button 2 2. Tilt-adjustment 3 3 Foot 20 * DVD Projector adjust as needed. 1 1. ENGLISH INSTALLATION Adjusting the Projected Image Adjusting the Projector's Height The projector is equipped with three adjustable feet to fine...
.... 3. Use to modify the height of the projector. To raise or lower the image : 1. Lower the projector so it may be adjusted. 2. Elevator Button 2 2. Tilt-adjustment 3 3 Foot 20 * DVD Projector adjust as needed. 1 1. ENGLISH INSTALLATION Adjusting the Projected Image Adjusting the Projector's Height The projector is equipped with three adjustable feet to fine...

User Manual
Page 21
... focus at distances from 3.28 to 32.80 feet (1.0 to zoom in ) 78.16 63.86 DVD Projector * 21 Focus Ring Zoom Lever Adjusting Projection Image Size Side View Front View W(640X480) H' (854X480) H B(854X480) LA D(854X480) W(854X480) Throw Ratio (TR) = 1.26 as Wide ...) 198.53 162.21 D (in or zoom out. To focus the image, turn the focus ring until you see a clear image. ENGLISH INSTALLATION Adjusting the Projector's Zoom/Focus Turn the Zoom Lever to 10.0 meters).
... focus at distances from 3.28 to 32.80 feet (1.0 to zoom in ) 78.16 63.86 DVD Projector * 21 Focus Ring Zoom Lever Adjusting Projection Image Size Side View Front View W(640X480) H' (854X480) H B(854X480) LA D(854X480) W(854X480) Throw Ratio (TR) = 1.26 as Wide ...) 198.53 162.21 D (in or zoom out. To focus the image, turn the focus ring until you see a clear image. ENGLISH INSTALLATION Adjusting the Projector's Zoom/Focus Turn the Zoom Lever to 10.0 meters).


