Optoma HD180 Support Question
Optoma HD180 Support Question
Find answers below for this question about Optoma HD180.Need a Optoma HD180 manual? We have 3 online manuals for this item!
Question posted by coreymoz on June 19th, 2012
Ceiling Mounted Projector
We have a ceiling mounted projector. It had to be raised in the back to get it on the screen. The projection is in a trapezoid shape. It looks like the image may be shooting through the top of the lens. I followed the directions in the online manual and it corrected some of it. Are there any other ways to make the image square?
Current Answers
Answer #1: Posted by OptomaUSA on June 20th, 2012 9:33 AM
OptomaUSA

Member since:
June 20th, 2012 Points: 26,690

Member since:
June 20th, 2012 Points: 26,690
Since you've followed the user manual, you've probably already adjusted as much as possible with the keystone feature. If not, please try that first.
If you have adjusted the keystoning as much as possible, you will have to move the projector. The projector shoots at an upward angle, meaning that it needs to be leveled with the screen. If you'd like to tell us the diagonal measurements of the screen, we can help you determine how many inches the projector will need to be from the top of the screen's viewing area.
Please feel free to contact our customer service team at 888-289-6786 and we can walk you through the steps to get your image nice and square.
Best,
Optoma
Related Optoma HD180 Manual Pages
User's Manual - Page 1
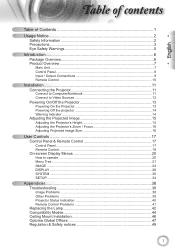
... ...17 Remote Control...18 On-screen Display Menus 20 How to operate ...20 Menu Tree...21 IMAGE ...24 DISPLAY ...26 SYSTEM ...30 SETUP ...34
Appendices 38 Troubleshooting 38
Image Problems 38 Other Problems 39 Projector Status Indication 40 Remote Control Problems 41 Replacing the Lamp 42 Compatibility Modes 44 Ceiling Mount Installation 46 Optoma Global Of...
User's Manual - Page 2

... the presence of fire and/or electric shock, do not place the projector on to the projector. Projector has been exposed to rain or moisture. Something has fallen in a...ficient magnitude to persons. As an example, do not expose the projector to install the projector in the projector or something is recommended to rain or moisture.
3. The unit should only...
User's Manual - Page 3
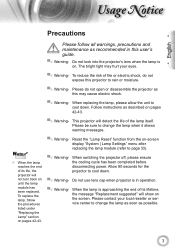
... seconds for the projector to cool down .
▀■ Warning- Do not look into the projector's lens when the lamp ...Follow instructions as recommended in operation.
▀■ Warning- Reset the "Lamp Reset" function from the on . When the lamp is on -screen...projector will show on the screen. Please be sure to page 33).
▀■ Warning-
Do not use lens cap when projector...
User's Manual - Page 5
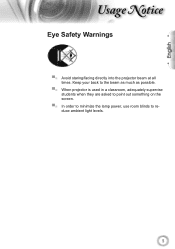
... Safety Warnings
▀■ Avoid staring/facing directly into the projector beam at all times. Keep your back to the beam as much as possible.
▀■ When projector is used in a classroom, adequately supervise students when they are asked to point out something on the screen.
▀■ In order to minimize the...
User's Manual - Page 6
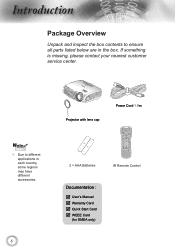
... nearest customer service center. POWER
SOURCE
Noottee
Due to ensure all parts listed below are in each country, some regions may have different accessories.
6
Projector with lens cap
Power Cord 1.8m
Lamp
2 × AAA Batteries
IR Remote Control
Documentation :
User's Manual Warranty Card Quick Start Card WEEE...
User's Manual - Page 9
...
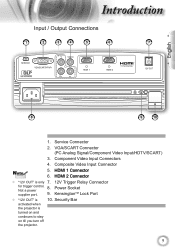
1. HDMI 2 Connector
"12V OUT" is
turned on and
continues to stay
on till you turn off
the projector.
9
Component Video Input Connectors
4. Composite Video Input Connector
Noottee
5. Security Bar
activated when
the projector is only 7. 12V Trigger Relay Connector
for trigger control. VGA/SCART Connector (PC Analog Signal/Component Video Input...
User's Manual - Page 11
... accessory
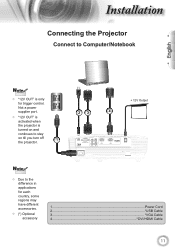
1...Power Cord 2...*USB Cable 3 VGA Cable 4 DVI/HDMI Cable
11 nstallation
Connecting the Projector
Connect to Computer/Notebook
English
Noottee
"12V OUT" is
turned on and
continues to stay
on till you turn off the projector.
1
MOLEX
+ 12V Output
23
4
SERVICE
VGA/SCART/YPbPr
Y
VIDEO
Pb
Pr
HDMI 1
HDMI 2
12V...
User's Manual - Page 12
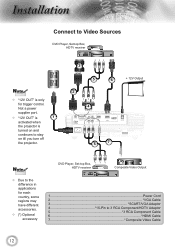
... Box, HDTV receiver
Noottee
"12V OUT" is
turned on and
continues to stay
on till you turn off
the projector. Not a power
supplier port.
"12V OUT" is
1
activated when
the projector is only
for each country, some regions may have different accessories.
(*) Optional accessory
DVD Player, Set-top Box...
User's Manual - Page 13
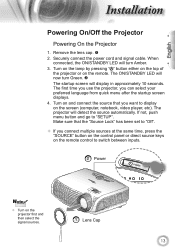
..." button on the control panel or direct source keys on the screen (computer, notebook, video player, etc). When connected, the ON/STANDBY LED will turn Green.
The startup screen will detect the source automatically. Remove the lens cap.
2. The first time you use the projector, you can select your preferred language from...
User's Manual - Page 14
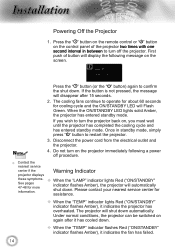
... be switched on again after 15 seconds.
2. Do not turn on the projector immediately following message on , you wish to turn the projector back on the screen. Once in between to turn off procedure.
Contact the
nearest service
center if the projector displays
Warning Indicator
these symptoms. See pages 47-48 for assistance.
...
User's Manual - Page 15
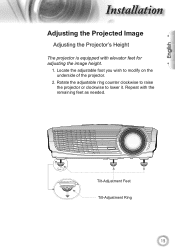
Rotate the adjustable ring counter clockwise to raise the projector or clockwise to modify on the underside of the projector.
2. English
nstallation
Adjusting the Projected Image
Adjusting the Projector's Height
The projector is equipped with the remaining feet as needed. Tilt-Adjustment Feet Tilt-Adjustment Ring
15 Locate the adjustable foot you wish to lower it. Repeat ...
User's Manual - Page 16
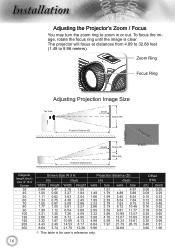
... from 4.89 to 32.68 feet (1.49 to zoom in or out. POWER
nstallation
Adjusting the Projector's Zoom / Focus
You may turn the zoom ring to 9.96 meters).
Zoom Ring
Focus Ring
Adjusting Projection Image Size
Top View
Screen
Screen (W)
SOURCE
Projection Distance (D)
Projection Distance (D)
Screen Screen (H) Offset (Hd)
Height
Diagonal Width
Diagonal
length (inch)
size of 16...
User's Manual - Page 17
...
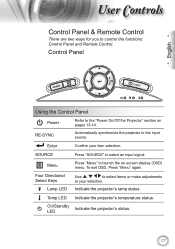
Press "SOURCE" to the "Power On/Off the Projector" section on -screen display (OSD) menu. Four Directional Select Keys
Lamp LED
Use
to select items or make adjustments
to control the functions: Control Panel and Remote Control.
Indicate the projector's lamp status. Temp LED Indicate the projector's temperature status. Control Panel
English
SOURCE
POWER
Using...
User's Manual - Page 18
... ontrols
Lamp
18
Remote Control
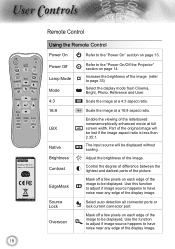
Using the Remote Control
Power On
Refer to the "Power On/Off the Projector" section on page 14. Scale the image at a 4:3 aspect ratio.
16:9
Scale the image at full screen width. The input source will be displayed without scaling. Mask off a few pixels on page 13. Source Lock...
User's Manual - Page 19

... choose Composite video source.
Re-sync Menu HDMI 1 HDMI 2 D-Sub YPbPr Video
Automatically synchronizes the projector to choose source from HDMI 1 connector. Press "D-Sub" to the input source. Press "YPbPr" to your item selection.
Four Directional Select Keys
Use
to select items or
make adjustments to choose Component video source. Display or...
User's Manual - Page 20

... page, press
or "Enter" key to the main menu.
6. Use using
keys to make image adjustments and change a variety of
settings. Main Menu
Settings
Sub Menu
20 ser ontrols
On-screen Display Menus
The Projector has multilingual On-screen Display menus that allow you to select the desired item and adjust the settings key...
User's Manual - Page 30
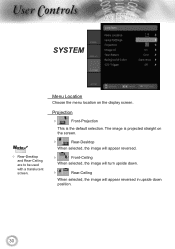
...-Ceiling
When selected, the image will turn upside down.
Rear-Ceiling
When selected, the image will appear reversed in upside down position.
30
The image is the default selection. ser ontrols
SYSTEM
Noottee
Rear-Desktop and Rear-Ceiling are to be used with a translucent screen. Projection
Front-Projection
This is projected straight on the display screen...
User's Manual - Page 42
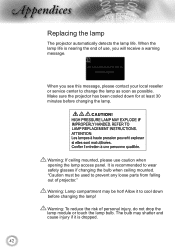
... change the lamp as soon as possible. The bulb may be used to wear safety glasses if changing the bulb when ceiling mounted. Warning: To reduce the risk of projector." Warning: If ceiling mounted, please use , you see this message, please contact your local reseller or service center to cool down for at least 30...
User's Manual - Page 46

....00 55.00
137.20
233.30
93.60
59.01 131.40
Lens
323.60
Unit: mm
46 If you wish to use a third party ceiling mount kit, please ensure the screws used to attach a mount to the projector meet the following specifications:
Screw type: M3*3 Maximum screw length: 10mm Minimum screw...
Datasheet - Page 1

.../p)
Projection Lens F= 2.55-2.87, f= 22.4-26.8mm, 1.2x Manual Zoom and Focus
Horizontal Scan Rate 15.3 to 91.1 KHz
Vertical Refresh Rate 24 to 85 Hz
I/O Connectors Two HDMI, VGA-In, Component Video, Composite Video and +12V Trigger
Security Kensington® Lock Port, Security Bar and Keypad Lock
Projection Method Front, Rear, Ceiling Mount, Table...
Similar Questions


