
Owner Manual
Page 2
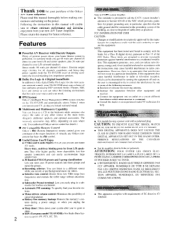
... with the instructions, may differ, depending on , the user is connected. • Consult the dealer or an experienced radio/TV technician for help the TX-SV525/R excel at driving accurately the most demanding low-impedance speakers. • Dolby Pro Logic & 4 Digital Soundfields In addition to fully digital Dolby Pro Logic (for the most accurate surround sound), your TX-SV525/R gives you a choice of four ambience-producing DSP surround modes (Theater, Hall...
... with the instructions, may differ, depending on , the user is connected. • Consult the dealer or an experienced radio/TV technician for help the TX-SV525/R excel at driving accurately the most demanding low-impedance speakers. • Dolby Pro Logic & 4 Digital Soundfields In addition to fully digital Dolby Pro Logic (for the most accurate surround sound), your TX-SV525/R gives you a choice of four ambience-producing DSP surround modes (Theater, Hall...
Owner Manual
Page 3
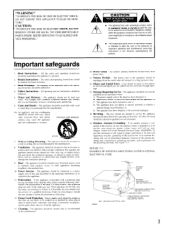
... exhibits a marked change in the operating instructions. An outdoor antenna should be located away from power lines. 15. All other servicing should be referred to grounding electrodes, and requirements for a long period of the plug is a safety feature. Article 810 of the National Electrical Code, ANSIINFPA 70, provides information with a cart or stand that may impede the flow of...
... exhibits a marked change in the operating instructions. An outdoor antenna should be located away from power lines. 15. All other servicing should be referred to grounding electrodes, and requirements for a long period of the plug is a safety feature. Article 810 of the National Electrical Code, ANSIINFPA 70, provides information with a cart or stand that may impede the flow of...

Owner Manual
Page 4
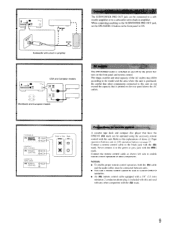
... UM-3) 1 Remote control cable 1 AM loop antenna 1 T-shaped FM antenna (Worldwide models only) 1 75/300 ohm antenna adaptor 0 0 1 CV plug (Shape may not correspond with a voltage selector to a highly humid climate. AC Fuse The fuse is located inside the chassis and is exposed to con- and Canadian models: AC 120V, 60Hz Worldwide model: AC 220V/120V switchable, 50/60Hz • Voltage Selector (Rear Panel) Worldwide models are...
... UM-3) 1 Remote control cable 1 AM loop antenna 1 T-shaped FM antenna (Worldwide models only) 1 75/300 ohm antenna adaptor 0 0 1 CV plug (Shape may not correspond with a voltage selector to a highly humid climate. AC Fuse The fuse is located inside the chassis and is exposed to con- and Canadian models: AC 120V, 60Hz Worldwide model: AC 220V/120V switchable, 50/60Hz • Voltage Selector (Rear Panel) Worldwide models are...
Owner Manual
Page 6
... control even the non-ONKYO components in the theater by a professional DOLBY STEREO MP (Motion Picture) decoder. The placement of a live performance. U.S.A., Canadian and Mexican models The following concerns Onkyo's Multi Room system. In addition to basic functions like speaker on-off and volume and so on the TX-SV525 is designed to switch it is used for optimum sound quality in the theater, the addition of the active Center channel...
... control even the non-ONKYO components in the theater by a professional DOLBY STEREO MP (Motion Picture) decoder. The placement of a live performance. U.S.A., Canadian and Mexican models The following concerns Onkyo's Multi Room system. In addition to basic functions like speaker on-off and volume and so on the TX-SV525 is designed to switch it is used for optimum sound quality in the theater, the addition of the active Center channel...
Owner Manual
Page 7
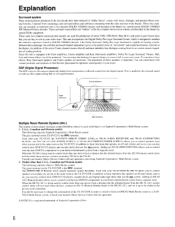
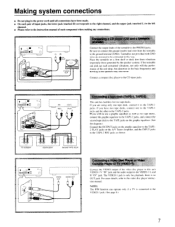
... bass frequencies and howling in the speakers may also occur. Place the turntable on the A/V Tuner Amplifier, and the INPUT jacks to the video disc player instruction manual. If you wish to use a graphic equalizer as well as shown. TX-SV525/R EQUALIZER Second TAPE DECK ° • Sn2(3:32(NZ: • ea VIDEO OUT I I AUDIO OUT L R n I jacks. Making system connections • Do not plug in this unit VIDEO-1 V "IN" jack and the audio output to the CD input jacks...
... bass frequencies and howling in the speakers may also occur. Place the turntable on the A/V Tuner Amplifier, and the INPUT jacks to the video disc player instruction manual. If you wish to use a graphic equalizer as well as shown. TX-SV525/R EQUALIZER Second TAPE DECK ° • Sn2(3:32(NZ: • ea VIDEO OUT I I AUDIO OUT L R n I jacks. Making system connections • Do not plug in this unit VIDEO-1 V "IN" jack and the audio output to the CD input jacks...
Owner Manual
Page 9
.... TX-SV525/R RI REMOTE CONTROL COMPACT DISC PLAYER RI REMOTE CONTROL CASSETTE TAPE DECK RI REMOTE CONTROL I 0000000008 ■ 00 USA and Canadian models 0 0 0 Worldwide and European models COrirt•efirti The SUBWOOFER PRE OUT jack can be operated using the acce,,iory remote control with this unit do not exceed the capacity that is printed on the rear panel above the AC outlets. Never connect it to the SUBWOOFER PRE OUT jack, set the SPEAKERS A button...
.... TX-SV525/R RI REMOTE CONTROL COMPACT DISC PLAYER RI REMOTE CONTROL CASSETTE TAPE DECK RI REMOTE CONTROL I 0000000008 ■ 00 USA and Canadian models 0 0 0 Worldwide and European models COrirt•efirti The SUBWOOFER PRE OUT jack can be operated using the acce,,iory remote control with this unit do not exceed the capacity that is printed on the rear panel above the AC outlets. Never connect it to the SUBWOOFER PRE OUT jack, set the SPEAKERS A button...

Owner Manual
Page 15
... cabinet so that the signals can be connected with low capacitance shielded 2-wire coaxial cables with the HR-10 when making these connections. To REMOTE loudspeakers set MAIN Loudspeakers O 0 0 TX-SV525(IR Main room O HR 10 O 0 O0 0 MAIN Remote control 0 Loudspeaker Another room 11•1111•1111111, To enable remote control operation when this case, both the ONKYO CD player and the cassette tape t deck bearing the RI...
... cabinet so that the signals can be connected with low capacitance shielded 2-wire coaxial cables with the HR-10 when making these connections. To REMOTE loudspeakers set MAIN Loudspeakers O 0 0 TX-SV525(IR Main room O HR 10 O 0 O0 0 MAIN Remote control 0 Loudspeaker Another room 11•1111•1111111, To enable remote control operation when this case, both the ONKYO CD player and the cassette tape t deck bearing the RI...
Owner Manual
Page 16
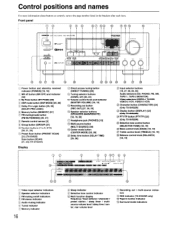
...Video input selector indicators 0 Speaker selector indicators FM muting on/off indicators ® FM stereo indicator (5) Audio muting indicator (6) Tuned indicator Ct Memory indicator 16 0 Sleep indicator (9) Selective tone control indicator ED Multi function display frequency / input selector / character / preset station / sleep timer / multisource volume level / delay time / cen- • ter, rear volume level ctl Recording out / multi-source indicators RDS indicator (TX-SV525R only) © Tape-2 monitor indicator g Surround mode indicators m-4A .s 25R 16 1 18 19 (1J Power button...
...Video input selector indicators 0 Speaker selector indicators FM muting on/off indicators ® FM stereo indicator (5) Audio muting indicator (6) Tuned indicator Ct Memory indicator 16 0 Sleep indicator (9) Selective tone control indicator ED Multi function display frequency / input selector / character / preset station / sleep timer / multisource volume level / delay time / cen- • ter, rear volume level ctl Recording out / multi-source indicators RDS indicator (TX-SV525R only) © Tape-2 monitor indicator g Surround mode indicators m-4A .s 25R 16 1 18 19 (1J Power button...
Owner Manual
Page 17
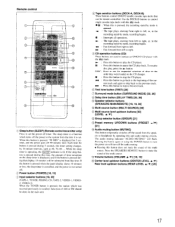
..., CD, TAPE-2, VIDEO-1, VIDEO2, VIDEO-3) When the TUNER button is pressed, the station which turns off the power to the next track. ® Test tone button (TEST) [26] C7) Surround mode button (SURROUND MODE) [25, 26] ® Delay time button (DELAY TIME) [25, 26] ® Speaker selector buttons (SPEAKERS MAIN/REMOTE) [18, 19, 30] 0) Multi source button (MULTI SOURCE) [30] T_I)Multi source level up /down buttons [30] (LEVEL •/v) Group selector button (GROUP) [21] 4 Preset memory UP/DOWN buttons (PRESET L./•) [21] g Audio muting button (MUTING) This button temporarily switches off...
..., CD, TAPE-2, VIDEO-1, VIDEO2, VIDEO-3) When the TUNER button is pressed, the station which turns off the power to the next track. ® Test tone button (TEST) [26] C7) Surround mode button (SURROUND MODE) [25, 26] ® Delay time button (DELAY TIME) [25, 26] ® Speaker selector buttons (SPEAKERS MAIN/REMOTE) [18, 19, 30] 0) Multi source button (MULTI SOURCE) [30] T_I)Multi source level up /down buttons [30] (LEVEL •/v) Group selector button (GROUP) [21] 4 Preset memory UP/DOWN buttons (PRESET L./•) [21] g Audio muting button (MUTING) This button temporarily switches off...
Owner Manual
Page 18
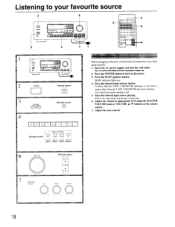
... POWER button to appropriate level using the MASTER VOLUME knob or VOLUME A/V buttons on the remote control. 7. Press the MAIN speakers button. Also check the audio muting is off . 5. Adjust the volume to turn on . 2. Listening to your favourite source 2 6 O 3 0 01 I t LLI =I 0 nm 1 I TAPE-2 VIDEO-1 VIDEO-2 VIDEO-3 Remote control A VOLUME SEn TONE TREBLE 18 The STAND-BY/RECEIVED indicator comes on the power. 3. Insert the AC power supply cord into the wall outlet. Press the desired input selector button. Follow the operating instructions...
... POWER button to appropriate level using the MASTER VOLUME knob or VOLUME A/V buttons on the remote control. 7. Press the MAIN speakers button. Also check the audio muting is off . 5. Adjust the volume to turn on . 2. Listening to your favourite source 2 6 O 3 0 01 I t LLI =I 0 nm 1 I TAPE-2 VIDEO-1 VIDEO-2 VIDEO-3 Remote control A VOLUME SEn TONE TREBLE 18 The STAND-BY/RECEIVED indicator comes on the power. 3. Insert the AC power supply cord into the wall outlet. Press the desired input selector button. Follow the operating instructions...
Owner Manual
Page 19
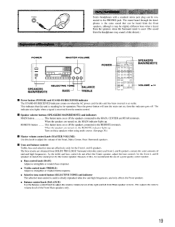
..., Center, Rear (Surround) speakers. • Tone and balance controls Treble, bass and selective tone are obtained from the Front speakers, although it may sound a little distant.) POWER MASTER VOLUME 000 III III 1-11- Press the power button will turn the main unit on these speakers when using multi source. (See page 30.) • Master volume control knob (MASTER VOLUME) Use this unit is used to clearly reproduce ultra low and high frequencies, and only affects the Front speakers. • Balance control knob (BALANCE) Use...
..., Center, Rear (Surround) speakers. • Tone and balance controls Treble, bass and selective tone are obtained from the Front speakers, although it may sound a little distant.) POWER MASTER VOLUME 000 III III 1-11- Press the power button will turn the main unit on these speakers when using multi source. (See page 30.) • Master volume control knob (MASTER VOLUME) Use this unit is used to clearly reproduce ultra low and high frequencies, and only affects the Front speakers. • Balance control knob (BALANCE) Use...
Owner Manual
Page 21
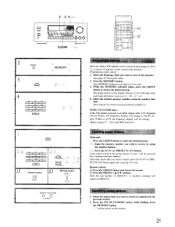
... page 20 Tuning the radio) 2. Select the desired memory number using the number buttons. While the MEMORY indicator lights, press the GROUP button to select the desired group. . lb. Press the FM MUTE/MODE button while holding down the MEMORY button. -" will change . (Refer to the PS display. Programming radio station 1. Remote control ❑1 Press the GROUP button and choose the group. ❑2 Press the PRESET ( A or V ) button. Select the frequency that you want...
... page 20 Tuning the radio) 2. Select the desired memory number using the number buttons. While the MEMORY indicator lights, press the GROUP button to select the desired group. . lb. Press the FM MUTE/MODE button while holding down the MEMORY button. -" will change . (Refer to the PS display. Programming radio station 1. Remote control ❑1 Press the GROUP button and choose the group. ❑2 Press the PRESET ( A or V ) button. Select the frequency that you want...

Owner Manual
Page 25
...: Use this setting when a small enclosure center speaker is utilized. By adjusting the delay time, and carefully adjusting Master Volume Level, Center Volume Level and Rear Volume Level, the apparent acoustic size of your listening room can decode four channel surround sound. Use a shorter delay to simulate the size of a small club or cabaret Respective delay time can be shown for creating a theater atmosphere. This mode is suitable for it, depending on the display. • For surround modes...
...: Use this setting when a small enclosure center speaker is utilized. By adjusting the delay time, and carefully adjusting Master Volume Level, Center Volume Level and Rear Volume Level, the apparent acoustic size of your listening room can decode four channel surround sound. Use a shorter delay to simulate the size of a small club or cabaret Respective delay time can be shown for creating a theater atmosphere. This mode is suitable for it, depending on the display. • For surround modes...

Owner Manual
Page 26
... 2) 4. Use the MASTER VOLUME to set the volume to turn off the test tone. 8. Adjust the delay time (Explanation 3). Use of surround mode 2 4,2 O O 7117- 1 irA ininOOO 3 8/ t=r 5,7 2,1 0000 0 0 0 0 0 0 0 0 00 0 0 0 O 0 0 6, Remote control I Remote control J DELAY TIME Setting the Dolby Pro Logic surround or Theater mode When using the CENTER LEVEL A / V and REAR LEVEL A / V buttons on the remote control. Adjust the center level, and rear level using video cassette tapes or video discs with the Dolby Surround trademark, you are working from speaker to select either Hall...
... 2) 4. Use the MASTER VOLUME to set the volume to turn off the test tone. 8. Adjust the delay time (Explanation 3). Use of surround mode 2 4,2 O O 7117- 1 irA ininOOO 3 8/ t=r 5,7 2,1 0000 0 0 0 0 0 0 0 0 00 0 0 0 O 0 0 6, Remote control I Remote control J DELAY TIME Setting the Dolby Pro Logic surround or Theater mode When using the CENTER LEVEL A / V and REAR LEVEL A / V buttons on the remote control. Adjust the center level, and rear level using video cassette tapes or video discs with the Dolby Surround trademark, you are working from speaker to select either Hall...
Owner Manual
Page 27
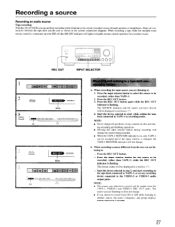
... OUT indicator is flashing. Press the REC OUT button again while the REC OUT indicator is flashing. Recording a source Recording an audio source Tape recording With the TX-SV525/R you can be displayed in the system connections diagram. Press the input selector button to select the source to TAPE-1, or on any controls on the tape deck connected to be output form the TAPE-1, VIDEO-2 and VIDEO-3 REC OUT jacks. b. Start the device selected in step...
... OUT indicator is flashing. Press the REC OUT button again while the REC OUT indicator is flashing. Recording a source Recording an audio source Tape recording With the TX-SV525/R you can be displayed in the system connections diagram. Press the input selector button to select the source to TAPE-1, or on any controls on the tape deck connected to be output form the TAPE-1, VIDEO-2 and VIDEO-3 REC OUT jacks. b. Start the device selected in step...
Owner Manual
Page 28
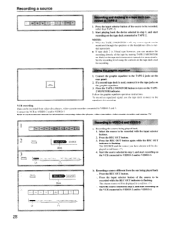
... source to TAPE-2 1. Refer to the tape jacks on the TAPE- 2 MONITOR indicator. Press the TAPE-2 MONITOR button to VIDEO-2 and/or VIDEO-3. Connect the VCR to turn on the graphic equalizer. 3. Select the source to VIDEO-2 and/or VIDEO-3. ! The chosen source will be displayed in step 1, and start recording on . Connect the graphic equalizer to the equalizer) for recording. To record an equalized signal, use the tape deck (connect to the TAPE-2 jacks on the tape deck connected to each instruction manual...
... source to TAPE-2 1. Refer to the tape jacks on the TAPE- 2 MONITOR indicator. Press the TAPE-2 MONITOR button to VIDEO-2 and/or VIDEO-3. Connect the VCR to turn on the graphic equalizer. 3. Select the source to VIDEO-2 and/or VIDEO-3. ! The chosen source will be displayed in step 1, and start recording on . Connect the graphic equalizer to the equalizer) for recording. To record an equalized signal, use the tape deck (connect to the TAPE-2 jacks on the tape deck connected to each instruction manual...
Owner Manual
Page 29
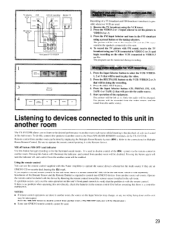
Receive the TV broadcast using a preset button or the tuning selectors. Press the VIDEO-2 or -3 input selector to set the picture to operate the remote control pointing it at the Remote Sensor. The picture will be sent to the monitor TV and the FM stereo sound to the speakers connected to this button for tape recording or for the Surround sound modes. To record the TV picture with the remote control. Mixing video and audio for Multiple Room Remote Control. Press...
Receive the TV broadcast using a preset button or the tuning selectors. Press the VIDEO-2 or -3 input selector to set the picture to operate the remote control pointing it at the Remote Sensor. The picture will be sent to the monitor TV and the FM stereo sound to the speakers connected to this button for tape recording or for the Surround sound modes. To record the TV picture with the remote control. Mixing video and audio for Multiple Room Remote Control. Press...
Owner Manual
Page 30
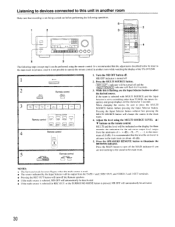
... TX-SV525/R. Listening to devices connected to operate the remote control in advance, since it is turned off. 2. PI u 000 5 2 3 tt, C 0 0 0 0 0 0 0 0 0 0 0 0 0 0 0 0 0 0 0 0 0 4 0 0 0 0 0 OZYSTO 5 3 The following operations. 1 2 l I Fl =I 1. MR CFF MULT SOLFICE Remote control MULTI SOURCE I 3 CD Remote control TAPE-1 INPUT SELECTOR I TUNER PHONO I I CD I II II I TAPE-2 VIDEO-1 VIDEO-2 VIDEO-3 Remote control LEVEL I • • 5 Remote control SPEAKERS SPEAKERS MAIN REMOTE MAIN REMOTE E.ZED1 I I = O. Press the MULTI SOURCE button...
... TX-SV525/R. Listening to devices connected to operate the remote control in advance, since it is turned off. 2. PI u 000 5 2 3 tt, C 0 0 0 0 0 0 0 0 0 0 0 0 0 0 0 0 0 0 0 0 0 4 0 0 0 0 0 OZYSTO 5 3 The following operations. 1 2 l I Fl =I 1. MR CFF MULT SOLFICE Remote control MULTI SOURCE I 3 CD Remote control TAPE-1 INPUT SELECTOR I TUNER PHONO I I CD I II II I TAPE-2 VIDEO-1 VIDEO-2 VIDEO-3 Remote control LEVEL I • • 5 Remote control SPEAKERS SPEAKERS MAIN REMOTE MAIN REMOTE E.ZED1 I I = O. Press the MULTI SOURCE button...

Owner Manual
Page 31
... sound. • Tape-2 monitor switch on. • Switch to off. • Audio muting switch on AM (particularly con- • Noise from electrical apparatus such as possible from TV set . FM tuned and stereo indicators light but remote • No batteries in the computer • Turn the power button off . fluorescent lamp. • Set up outdoor AM antenna. FM tuned indicator and stereo indicator • Station is dirty. • Treble control...
... sound. • Tape-2 monitor switch on. • Switch to off. • Audio muting switch on AM (particularly con- • Noise from electrical apparatus such as possible from TV set . FM tuned and stereo indicators light but remote • No batteries in the computer • Turn the power button off . fluorescent lamp. • Set up outdoor AM antenna. FM tuned indicator and stereo indicator • Station is dirty. • Treble control...

Owner Manual
Page 32
... Tone Control: BASS: +1-10 dB at 100 Hz TREBLE: +/-10 dB at 8 ohms, both channels driven, from 20 Hz to the factory settings. This device employs a microcomputer to Noise Ratio: PIIONO: 80 dB (IHF A, 5 reV input) CD/TAPE 100 dB (IHF A) Muting: - After "clear" is displayed, the preset memory and each mode stored in the memory, such as surround, are subject to operate abnormally. Specifications AMPLIFIER...
... Tone Control: BASS: +1-10 dB at 100 Hz TREBLE: +/-10 dB at 8 ohms, both channels driven, from 20 Hz to the factory settings. This device employs a microcomputer to Noise Ratio: PIIONO: 80 dB (IHF A, 5 reV input) CD/TAPE 100 dB (IHF A) Muting: - After "clear" is displayed, the preset memory and each mode stored in the memory, such as surround, are subject to operate abnormally. Specifications AMPLIFIER...


