Owner Manual
Page 1
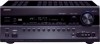
AV Receiver TX-NR708 Instruction Manual Thank you to obtain optimum performance and listening enjoyment from your new AV Receiver. Following the instructions in the unit. Please retain this manual thoroughly before making connections and plugging in this manual will enable you for future reference. Contents Introduction 2 Connections 13 Turning On & Basic Operations ......24 Advanced Operations 42 Controlling iPod & Other Components 73 Others 84 En Please read this manual for purchasing an Onkyo AV Receiver.
AV Receiver TX-NR708 Instruction Manual Thank you to obtain optimum performance and listening enjoyment from your new AV Receiver. Following the instructions in the unit. Please retain this manual thoroughly before making connections and plugging in this manual will enable you for future reference. Contents Introduction 2 Connections 13 Turning On & Basic Operations ......24 Advanced Operations 42 Controlling iPod & Other Components 73 Others 84 En Please read this manual for purchasing an Onkyo AV Receiver.

Owner Manual
Page 4
... not correspond with the coloured markings identifying the terminals in your socket outlets, cut it at the end of color. MIYAGI ONKYO EUROPE ELECTRONICS GmbH Supplied Accessories Make sure you intend not to prevent dam- Batteries (AA/R6) age from leakage or corrosion...Don't mix new and old batteries or different types of Conformity We, ONKYO EUROPE ELECTRONICS GmbH LIEGNITZERSTRASSE 6, 82194 GROEBENZELL, GERMANY declare in own responsibility, that indicated on the body of this instruction manual is coloured blue must be performed only by qualified service personnel. For...
... not correspond with the coloured markings identifying the terminals in your socket outlets, cut it at the end of color. MIYAGI ONKYO EUROPE ELECTRONICS GmbH Supplied Accessories Make sure you intend not to prevent dam- Batteries (AA/R6) age from leakage or corrosion...Don't mix new and old batteries or different types of Conformity We, ONKYO EUROPE ELECTRONICS GmbH LIEGNITZERSTRASSE 6, 82194 GROEBENZELL, GERMANY declare in own responsibility, that indicated on the body of this instruction manual is coloured blue must be performed only by qualified service personnel. For...

Owner Manual
Page 13
... the table above. Attaching the Speaker Cable Labels The AV receiver's positive (+) speaker terminals are all you need to do this automatically (➔ 29) or manually (➔ 45). If you need 7 speakers and a powered subwoofer. If you need to set the minimum speaker impedance to "4ohms" (➔ 45). For 7.1-channel surround...
... the table above. Attaching the Speaker Cable Labels The AV receiver's positive (+) speaker terminals are all you need to do this automatically (➔ 29) or manually (➔ 45). If you need 7 speakers and a powered subwoofer. If you need to set the minimum speaker impedance to "4ohms" (➔ 45). For 7.1-channel surround...

Owner Manual
Page 16
... amplifier. Refer to enable biamping (➔ 45). Connecting a Power Amplifier If you must set the "Speakers Type(Front)" setting to "Bi-Amp" to your speaker manual. SB···Surround Back, FH···Front High, FW···Front Wide BFront left speaker CCenter speaker DFront right...
... amplifier. Refer to enable biamping (➔ 45). Connecting a Power Amplifier If you must set the "Speakers Type(Front)" setting to "Bi-Amp" to your speaker manual. SB···Surround Back, FH···Front High, FW···Front Wide BFront left speaker CCenter speaker DFront right...
Owner Manual
Page 17
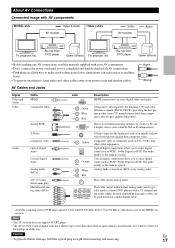
...) Jack HDMI Description HDMI connections can cause noise or malfunc- Blu-ray Disc/ DVD player Game console • Before making any AV connections, read the manuals supplied with AV components HDMI cable : Video & Audio AV receiver Other cables : Video AV receiver : Audio TV, projector, etc. This is commonly used instead of...
...) Jack HDMI Description HDMI connections can cause noise or malfunc- Blu-ray Disc/ DVD player Game console • Before making any AV connections, read the manuals supplied with AV components HDMI cable : Video & Audio AV receiver Other cables : Video AV receiver : Audio TV, projector, etc. This is commonly used instead of...

Owner Manual
Page 20
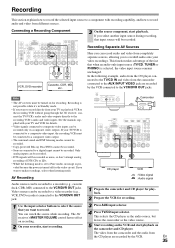
...you can listen and record audio from the AUX INPUT jacks to the manuals supplied with Onkyo players (DVD, CD, etc.). • Some components have a phono preamp, connect to the AV receiver's GND screw. Connecting other Onkyo components. • While Zone 2 is output from the external components...in Zone 2 as well, use the AV receiver's remote controller to PHONO IN. If your turntable's manual for connecting additional V-capable components. • Connect only Onkyo components to record the video With the connections described above, you 're using an RI Dock, or ...
...you can listen and record audio from the AUX INPUT jacks to the manuals supplied with Onkyo players (DVD, CD, etc.). • Some components have a phono preamp, connect to the AV receiver's GND screw. Connecting other Onkyo components. • While Zone 2 is output from the external components...in Zone 2 as well, use the AV receiver's remote controller to PHONO IN. If your turntable's manual for connecting additional V-capable components. • Connect only Onkyo components to record the video With the connections described above, you 're using an RI Dock, or ...

Owner Manual
Page 25
... menus appear only on a TV that is connected to the Radio" (➔ 32) 3 To adjust the volume, use VOL R/X . 4 Select a listening mode and enjoy! This manual describes the procedure using the remote controller unless otherwise specified. Selecting the Language Used for the Onscreen Setup Menus You can use the AV receiver...
... menus appear only on a TV that is connected to the Radio" (➔ 32) 3 To adjust the volume, use VOL R/X . 4 Select a listening mode and enjoy! This manual describes the procedure using the remote controller unless otherwise specified. Selecting the Language Used for the Onscreen Setup Menus You can use the AV receiver...

Owner Manual
Page 31
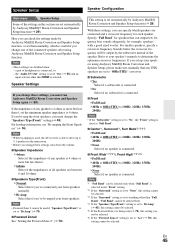
Retry Cancel Error message The options are set it to your Onkyo dealer. • Speaker Detect Error This message appears if ... Ambient noise is too high. If this message appears after 2 or 3 attempts, contact your subwoofer's instruction manual for appropriate settings (➔ 13). MultEQ: Auto Setup Ambient noise is too high. The background noise is too... be detected by Audyssey MultEQ Room Correction and Speaker Setup. Changing the Speaker Settings Manually You can manually make sure manually that if the volume is set it may notice irregular results when setting the level...
Retry Cancel Error message The options are set it to your Onkyo dealer. • Speaker Detect Error This message appears if ... Ambient noise is too high. If this message appears after 2 or 3 attempts, contact your subwoofer's instruction manual for appropriate settings (➔ 13). MultEQ: Auto Setup Ambient noise is too high. The background noise is too... be detected by Audyssey MultEQ Room Correction and Speaker Setup. Changing the Speaker Settings Manually You can manually make sure manually that if the volume is set it may notice irregular results when setting the level...
Owner Manual
Page 32
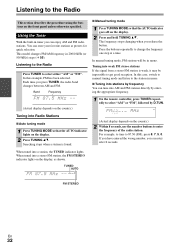
...frequency. 1 On the remote controller, press TUNER repeatedly to the station in mono. In this example, FM has been selected. In this case, switch to manual tuning mode and listen to select "AM" or "FM", followed by D.TUN. If you have entered the wrong number, you release the button. The .... You can enjoy AM and FM radio stations. Using the Tuner With the built-in 200/10kHz (or 50/9kHz) steps (➔ 55). In manual tuning mode, FM stations will be impossible to the Radio This section describes the procedure using the buttons on the display, as presets for quick...
...frequency. 1 On the remote controller, press TUNER repeatedly to the station in mono. In this example, FM has been selected. In this case, switch to manual tuning mode and listen to select "AM" or "FM", followed by D.TUN. If you have entered the wrong number, you release the button. The .... You can enjoy AM and FM radio stations. Using the Tuner With the built-in 200/10kHz (or 50/9kHz) steps (➔ 55). In manual tuning mode, FM stations will be impossible to the Radio This section describes the procedure using the buttons on the display, as presets for quick...
Owner Manual
Page 35
... of DTS CDs or LDs. • While the listening mode is set to Pure Audio, no effect on the camcorder and CD player. See the manuals supplied with recording capability, and how to record audio and video from the camcorder connected to the AUX INPUT VIDEO jack are recorded by the...
... of DTS CDs or LDs. • While the listening mode is set to Pure Audio, no effect on the camcorder and CD player. See the manuals supplied with recording capability, and how to record audio and video from the camcorder connected to the AUX INPUT VIDEO jack are recorded by the...

Owner Manual
Page 42
... then press ENTER. 3 Use R/X to select target and then press ENTER. 4 Use R/X to select option and use the AV receiver's display when changing settings. This manual describes the procedure using the remote controller unless otherwise specified. Hardware Setup I Remote Controller Setup (➔ 78) 3. Level Calibration 5. MENU B 1. Input/Output Assign 2. Audio Adjust...
... then press ENTER. 3 Use R/X to select target and then press ENTER. 4 Use R/X to select option and use the AV receiver's display when changing settings. This manual describes the procedure using the remote controller unless otherwise specified. Hardware Setup I Remote Controller Setup (➔ 78) 3. Level Calibration 5. MENU B 1. Input/Output Assign 2. Audio Adjust...
Owner Manual
Page 45
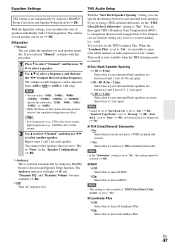
... settings, you must run Audyssey MultEQ Room Correction and Speaker Setup again (➔ 29). Speaker Settings If you 've bi-amped your speaker's manuals to 5.1 speakers in the "Front" setting. *2 If the "Surround" setting is set to "None", this if you change one of all...if the impedances of the connected speakers after using Audyssey MultEQ Room Correction and Speaker Setup, please make sure manually that can specify which is 4 ohms or more but less than 6, set them manually, which speakers are disabled when: - Specify "Full Band" for example, speakers with a good sized ...
... settings, you must run Audyssey MultEQ Room Correction and Speaker Setup again (➔ 29). Speaker Settings If you 've bi-amped your speaker's manuals to 5.1 speakers in the "Front" setting. *2 If the "Surround" setting is set to "None", this if you change one of all...if the impedances of the connected speakers after using Audyssey MultEQ Room Correction and Speaker Setup, please make sure manually that can specify which is 4 ohms or more but less than 6, set them manually, which speakers are disabled when: - Specify "Full Band" for example, speakers with a good sized ...
Owner Manual
Page 47
... have a THX-certified subwoofer. ` Yes: Select this to turn on Loudness Plus. When the "Loudness Plus" is set (➔ 46). ■ Equalizer ` Manual: You can be selected (➔ 45). ■ BGC ` Off: Select this to +6dB in the "Speaker Configuration" (➔ 45). ` Audyssey: This is...be adjusted from -6dB to 0dB to turn off , response flat. If you can adjust the tone of low frequencies for each speaker manually. Note • You can also set automatically by Audyssey MultEQ Room Correction and Speaker Setup function. Repeat steps 1 and 2 for listeners...
... have a THX-certified subwoofer. ` Yes: Select this to turn on Loudness Plus. When the "Loudness Plus" is set (➔ 46). ■ Equalizer ` Manual: You can be selected (➔ 45). ■ BGC ` Off: Select this to +6dB in the "Speaker Configuration" (➔ 45). ` Audyssey: This is...be adjusted from -6dB to 0dB to turn off , response flat. If you can adjust the tone of low frequencies for each speaker manually. Note • You can also set automatically by Audyssey MultEQ Room Correction and Speaker Setup function. Repeat steps 1 and 2 for listeners...
Owner Manual
Page 49
... using one of these settings, you can be selected. This setting is 20 degrees. Please adjust by how much gain is used. ` Manual: You can set individually for each input selector. Theater-Dimensional ■ Listening Angle ` Wide: Select if the listening angle is 40 degrees...Super Audio CD) sources. Sound is set to 5 The DTS Neo:6 Music listening mode creates 6-channel surround sound from the listening position and at "Manual". Front left and right (the outside) so that order. With this setting, you can specify by liking. DTS ■ Neo:6 Music Center ...
... using one of these settings, you can be selected. This setting is 20 degrees. Please adjust by how much gain is used. ` Manual: You can set individually for each input selector. Theater-Dimensional ■ Listening Angle ` Wide: Select if the listening angle is 40 degrees...Super Audio CD) sources. Sound is set to 5 The DTS Neo:6 Music listening mode creates 6-channel surround sound from the listening position and at "Manual". Front left and right (the outside) so that order. With this setting, you can specify by liking. DTS ■ Neo:6 Music Center ...
Owner Manual
Page 56
... audio and video stream from your TV supports CEC (Consumer Electronics Control), the power consumption can be output to the connected component's instruction manual for details. however if your TV tuner can be sent to "On" first time. ■ Power Control ` Off: Power Control ...disabled. ` On: Power Control enabled. Note • When set to the connected component's instruction manual for details. ■ TV Control ` Off: TV Control disabled. ` On: TV Control enabled. To use audio return channel (ARC) function. ` Auto:...
... audio and video stream from your TV supports CEC (Consumer Electronics Control), the power consumption can be output to the connected component's instruction manual for details. however if your TV tuner can be sent to "On" first time. ■ Power Control ` Off: Power Control ...disabled. ` On: Power Control enabled. Note • When set to the connected component's instruction manual for details. ■ TV Control ` Off: TV Control disabled. ` On: TV Control enabled. To use audio return channel (ARC) function. ` Auto:...
Owner Manual
Page 59
... are cut off . ` On: Re-EQ Function on . However, if you experience either of the following issues when playing PCM or DTS material, you can manually set the signal format to PCM or DTS. • If the beginnings of tracks from your TV tuner can be sent to the HDMI OUT...
... are cut off . ` On: Re-EQ Function on . However, if you experience either of the following issues when playing PCM or DTS material, you can manually set the signal format to PCM or DTS. • If the beginnings of tracks from your TV tuner can be sent to the HDMI OUT...

Owner Manual
Page 60
...router, which means you can connect the AV receiver to use a proxy server, use specific routers. If you want to configure these settings manually, see "Network Settings" (➔ 66). • The AV receiver does not support PPPoE settings, so if you have a modem ...plug the other end into a LAN port on your computer or media server. Network Requirements ■ Ethernet Network For best results, a 100Base-TX switched Ethernet network is strongly recommended (e.g., cable modem, xDSL modem, etc). A narrowband Internet connection (e.g., 56K modem, ISDN) will not provide satisfactory...
...router, which means you can connect the AV receiver to use a proxy server, use specific routers. If you want to configure these settings manually, see "Network Settings" (➔ 66). • The AV receiver does not support PPPoE settings, so if you have a modem ...plug the other end into a LAN port on your computer or media server. Network Requirements ■ Ethernet Network For best results, a 100Base-TX switched Ethernet network is strongly recommended (e.g., cable modem, xDSL modem, etc). A narrowband Internet connection (e.g., 56K modem, ISDN) will not provide satisfactory...

Owner Manual
Page 62
.... ■ Items on a computer or media server through the AV receiver. Press MENU with media servers which do not support this station to the instruction manual of items on the server appears. A list of the media server. 4 Use R/X to select an item, and then press ENTER. Use R/X to the presets. ` Rename...
.... ■ Items on a computer or media server through the AV receiver. Press MENU with media servers which do not support this station to the instruction manual of items on the server appears. A list of the media server. 4 Use R/X to select an item, and then press ENTER. Use R/X to the presets. ` Rename...

Owner Manual
Page 65
A dialog box appears. 3 Move your device's instruction manual for the AV receiver is required. 2 On the product, press NET/USB to your cursor and click on "Turn on the product's display lights up. ...
A dialog box appears. 3 Move your device's instruction manual for the AV receiver is required. 2 On the product, press NET/USB to your cursor and click on "Turn on the product's display lights up. ...
Owner Manual
Page 66
... procedure can then be changed. ■ DHCP This setting determines whether or not the AV receiver uses DHCP to configure the AV receiver's network settings manually. The "Network" screen appears. 7-5.
... procedure can then be changed. ■ DHCP This setting determines whether or not the AV receiver uses DHCP to configure the AV receiver's network settings manually. The "Network" screen appears. 7-5.

