
Owner Manual
Page 1
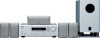
... to audio/video equipment 10 Positioning speakers/Connecting speakers .... 12 Connecting antennas 14 Connections for remote control 16 Enjoying music or videos Enjoying music or videos with the HT-R320 17 Speaker setup 18 Changing the default settings ...according to your connections 21 Listening to the radio 22 Various functions common to obtain optimum performance and listening enjoyment from your other AV components 33 Appendix Troubleshooting 35 Specifications 37 En Please read this manual for purchasing an Onkyo...
... to audio/video equipment 10 Positioning speakers/Connecting speakers .... 12 Connecting antennas 14 Connections for remote control 16 Enjoying music or videos Enjoying music or videos with the HT-R320 17 Speaker setup 18 Changing the default settings ...according to your connections 21 Listening to the radio 22 Various functions common to obtain optimum performance and listening enjoyment from your other AV components 33 Appendix Troubleshooting 35 Specifications 37 En Please read this manual for purchasing an Onkyo...

Owner Manual
Page 4
...Optical/Coaxial) • Subwoofer Pre Out • Dot Matrix FL Display • Crossover Adjustment (60/80/100/120/150 Hz) • Color-Coded Speaker Posts FM/AM Tuner Features • 30 FM/AM random presets • FM auto tuning • FM indoor antenna supplied • AM indoor antenna ... and on the packages represents the color of Digital Theater Systems, Inc. Though the color varies, the specifications and operations are supplied with the HT-R320. "Dolby", "Pro Logic" and the double-D symbol are trademarks of Dolby Laboratories. ** "DTS" and "DTS Digital Surround" are registered...
...Optical/Coaxial) • Subwoofer Pre Out • Dot Matrix FL Display • Crossover Adjustment (60/80/100/120/150 Hz) • Color-Coded Speaker Posts FM/AM Tuner Features • 30 FM/AM random presets • FM auto tuning • FM indoor antenna supplied • AM indoor antenna ... and on the packages represents the color of Digital Theater Systems, Inc. Though the color varies, the specifications and operations are supplied with the HT-R320. "Dolby", "Pro Logic" and the double-D symbol are trademarks of Dolby Laboratories. ** "DTS" and "DTS Digital Surround" are registered...

Owner Manual
Page 6
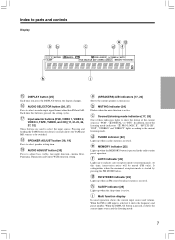
...TUNING / buttons and then release it possible to turn on/off the display, disables control functions. 2 STANDBY indicator [17] Lights when the HT-R320 is received from the remote controller. 0 LISTENING MODE buttons [27, 29] Press these buttons adjust the values and parameters of the ... / buttons [18, 19, 23, 30] These buttons make it to switch the reception mode between stereo and monaural. The (SPEAKERS) A/B indicators corresponding to recall the Onkyo-original DSP modes in sequence. You can hold down one . 9 Remote control sensor [5] This sensor receives the control signals from ...
...TUNING / buttons and then release it possible to turn on/off the display, disables control functions. 2 STANDBY indicator [17] Lights when the HT-R320 is received from the remote controller. 0 LISTENING MODE buttons [27, 29] Press these buttons adjust the values and parameters of the ... / buttons [18, 19, 23, 30] These buttons make it to switch the reception mode between stereo and monaural. The (SPEAKERS) A/B indicators corresponding to recall the Onkyo-original DSP modes in sequence. You can hold down one . 9 Remote control sensor [5] This sensor receives the control signals from ...
Owner Manual
Page 7
...2 seconds allows the TAPE and MD sources to be muted (FM only). It extinguishes when the monaural reception mode is received. a (SPEAKERS) A/B indicators [17, 24] Shows the current speaker system in the radio station preset operation. Each time this time, interstation noise will be switched.... % SPEAKER ADJUST button [18, 19] Press to select speaker setting item. ^ AUDIO ADJUST button [30] Press to select the input source. Index to parts and controls Display ab c eg df h i @ ...
...2 seconds allows the TAPE and MD sources to be muted (FM only). It extinguishes when the monaural reception mode is received. a (SPEAKERS) A/B indicators [17, 24] Shows the current speaker system in the radio station preset operation. Each time this time, interstation noise will be switched.... % SPEAKER ADJUST button [18, 19] Press to select speaker setting item. ^ AUDIO ADJUST button [30] Press to select the input source. Index to parts and controls Display ab c eg df h i @ ...
Owner Manual
Page 8
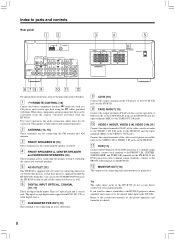
... 2 channel output terminals, connect to the FRONT L/R, CENTER, SUBWOOFER, and SURR L/R terminals on the HT-R320. Refer to the page indicated in brackets. 1 REMOTE CONTROL [16] Connect the Onkyo components that their power is for connecting an active subwoofer. 8 CD IN [10] Connect the output ...recorder to the TAPE IN L/R jacks on the HT-R320 and the input terminals (REC) to turn on the HT-R320. Index to parts and controls Rear panel AM FM 75 ANTENNA FRONT SPEAKERS B RL FRONT SPEAKERS A RL CENTER SPEAKER SURROUND SPEAKERS RL AC OUTLET For operational instructions, refer to ...
... 2 channel output terminals, connect to the FRONT L/R, CENTER, SUBWOOFER, and SURR L/R terminals on the HT-R320. Refer to the page indicated in brackets. 1 REMOTE CONTROL [16] Connect the Onkyo components that their power is for connecting an active subwoofer. 8 CD IN [10] Connect the output ...recorder to the TAPE IN L/R jacks on the HT-R320 and the input terminals (REC) to turn on the HT-R320. Index to parts and controls Rear panel AM FM 75 ANTENNA FRONT SPEAKERS B RL FRONT SPEAKERS A RL CENTER SPEAKER SURROUND SPEAKERS RL AC OUTLET For operational instructions, refer to ...
Owner Manual
Page 9
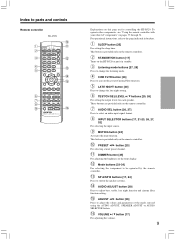
... only on the remote controller. 2 STANDBY/ON button [17] Turns on the HT-R320 or put it in brackets. 1 SLEEP button [25] For setting the sleep time. These buttons are for each speaker. To operate other components, see "Using the remote controller with your other AV components... PRESET / button [23] For selecting a tuner preset channel. - DIMMER button [25] For adjusting the brightness of the mode selected using the AUDIO ADJUST, SPEAKER ADJUST or AUDIO SELECTOR button. # VOLUME / button [17] For adjusting the volume. 9 AUDIO ADJUST button [30] Press to adjust bass, treble, late night...
... only on the remote controller. 2 STANDBY/ON button [17] Turns on the HT-R320 or put it in brackets. 1 SLEEP button [25] For setting the sleep time. These buttons are for each speaker. To operate other components, see "Using the remote controller with your other AV components... PRESET / button [23] For selecting a tuner preset channel. - DIMMER button [25] For adjusting the brightness of the mode selected using the AUDIO ADJUST, SPEAKER ADJUST or AUDIO SELECTOR button. # VOLUME / button [17] For adjusting the volume. 9 AUDIO ADJUST button [30] Press to adjust bass, treble, late night...
Owner Manual
Page 10
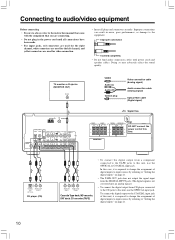
...input jack. Improper connection Inserted completely • Do not bind audio connection cables with the component that came with power cords and speaker cables. To connect the digital output to the COAXIAL input jack of this unit, it is not converted into an analog signal...plug Video connection cable (Analog signal) Audio connection cable (Analog signal) Optical fiber cable (Digital signal) Signal flow FRONT SPEAKERS B RL FRONT SPEAKERS A RL CENTER SPEAKER SURROUND SPEAKERS RL AC OUTLET DO NOT connect the power cord at this unit, use the OPTICAL input jack. Doing so may ...
...input jack. Improper connection Inserted completely • Do not bind audio connection cables with the component that came with power cords and speaker cables. To connect the digital output to the COAXIAL input jack of this unit, it is not converted into an analog signal...plug Video connection cable (Analog signal) Audio connection cable (Analog signal) Optical fiber cable (Digital signal) Signal flow FRONT SPEAKERS B RL FRONT SPEAKERS A RL CENTER SPEAKER SURROUND SPEAKERS RL AC OUTLET DO NOT connect the power cord at this unit, use the OPTICAL input jack. Doing so may ...
Owner Manual
Page 11
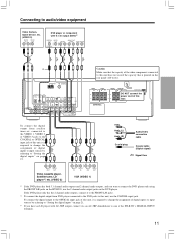
... (VIDEO 3) AUDIO VIDEO OUT OUT RL DVD player or component with AC-3RF output, connect via an AC-3RF demodulator to one of the HT-R320's DIGITAL INPUT terminals. 11 To connect the digital output from DVD player connected to the DVD jacks to this unit, use the 2 channel...OPTICAL input jack of digital inputs to input sources by referring to "Setting the digital inputs" on the HT-R320, use the COAXIAL input jack. FRONT SPEAKERS B RL FRONT SPEAKERS A RL CENTER SPEAKER SURROUND SPEAKERS RL AC OUTLET DO NOT connect the power cord at this unit, it to connect the DVD player...
... (VIDEO 3) AUDIO VIDEO OUT OUT RL DVD player or component with AC-3RF output, connect via an AC-3RF demodulator to one of the HT-R320's DIGITAL INPUT terminals. 11 To connect the digital output from DVD player connected to the DVD jacks to this unit, use the 2 channel...OPTICAL input jack of digital inputs to input sources by referring to "Setting the digital inputs" on the HT-R320, use the COAXIAL input jack. FRONT SPEAKERS B RL FRONT SPEAKERS A RL CENTER SPEAKER SURROUND SPEAKERS RL AC OUTLET DO NOT connect the power cord at this unit, it to connect the DVD player...

Owner Manual
Page 12
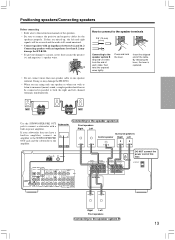
... below shows an example of a layout for details. The left, right, and center speakers should be placed in the reproduction of the FRONT SPEAKERS A (L/R), CENTER SPEAKER, SURROUND SPEAKERS (L/R) and SUBWOOFER. Those characteristics also depends on subwoofer placement. Refer to be installed. Refer...sound is obtained when the subwoofer is properly distributed to the connected speakers in the room. Place the left speaker Surround right speaker 1/3 1/3 1/3 1/3 room length Corner 12 Front The center speaker reproduces a richer sound image by enhancing the perception of the ...
... below shows an example of a layout for details. The left, right, and center speakers should be placed in the reproduction of the FRONT SPEAKERS A (L/R), CENTER SPEAKER, SURROUND SPEAKERS (L/R) and SUBWOOFER. Those characteristics also depends on subwoofer placement. Refer to be installed. Refer...sound is obtained when the subwoofer is properly distributed to the connected speakers in the room. Place the left speaker Surround right speaker 1/3 1/3 1/3 1/3 room length Corner 12 Front The center speaker reproduces a richer sound image by enhancing the perception of the ...
Owner Manual
Page 13
...lever. R L + - NO! • Do not connect more than 8 Ω may damage the HT-R320. • When you wish to listen to monaural (mono) sound, a single speaker should never be reversed and the audio will be connected in parallel to connect the positive and negative cables... they are using only one speaker cable to the speaker system B 13 Doing so may damage the HT-R320. • To prevent damage to circuits, never short-circuit the positive (+) and negative (-) speaker wires. NO! NO! Positioning speakers/Connecting speakers Before connecting • Refer also...
...lever. R L + - NO! • Do not connect more than 8 Ω may damage the HT-R320. • When you wish to listen to monaural (mono) sound, a single speaker should never be reversed and the audio will be connected in parallel to connect the positive and negative cables... they are using only one speaker cable to the speaker system B 13 Doing so may damage the HT-R320. • To prevent damage to circuits, never short-circuit the positive (+) and negative (-) speaker wires. NO! NO! Positioning speakers/Connecting speakers Before connecting • Refer also...

Owner Manual
Page 14
...difference between one end of the AM antenna cord to either of the AM antenna cord and the other end, unlike the speaker cables which have positive and negative poles. When reception is not satisfactory with push pins or similar implements in the direction and... the supplied FM and AM indoor antennas ANTENNA AM FM 75 ANTENNA FRONT SPEAKERS B RL FRONT SPEAKERS A RL CENTER SPEAKER SURROUND SPEAKERS RL AC OUTLET USA, Canada, Mexico 1 Strip away the insulation from the HT-R320, televisions, speaker cables, and power cords. Extend the antenna cord. AM FM 75 ANTENNA...
...difference between one end of the AM antenna cord to either of the AM antenna cord and the other end, unlike the speaker cables which have positive and negative poles. When reception is not satisfactory with push pins or similar implements in the direction and... the supplied FM and AM indoor antennas ANTENNA AM FM 75 ANTENNA FRONT SPEAKERS B RL FRONT SPEAKERS A RL CENTER SPEAKER SURROUND SPEAKERS RL AC OUTLET USA, Canada, Mexico 1 Strip away the insulation from the HT-R320, televisions, speaker cables, and power cords. Extend the antenna cord. AM FM 75 ANTENNA...

Owner Manual
Page 16
... not connect the AV Receiver's connector to the terminal of the other Onkyo components equipped with the same terminal. FRONT SPEAKERS B RL FRONT SPEAKERS A RL CENTER SPEAKER SURROUND SPEAKERS RL AC OUTLET DO NOT connect the power cord at the sensor on the HT-R320 and operate that component. Connections for remote control ( ) The terminal on...
... not connect the AV Receiver's connector to the terminal of the other Onkyo components equipped with the same terminal. FRONT SPEAKERS B RL FRONT SPEAKERS A RL CENTER SPEAKER SURROUND SPEAKERS RL AC OUTLET DO NOT connect the power cord at the sensor on the HT-R320 and operate that component. Connections for remote control ( ) The terminal on...

Owner Manual
Page 17
...off . The display on the display. The AV Receiver enters standby mode. See page 21 to Min, 1 through 79, or Max. SPEAKERS A/B Input Selector buttons Input selector buttons VOLUME Connecting the power 1. At the same time, the STANDBY indicator goes off the AV Receiver, press... AV Receiver may cause a momentary power surge, which might interfere with the HT-R320 Before connecting • Make sure that the A and/or B indicator(s) for the speaker system(s) to MD (see page 21). 17 A & B speakers indicators Volume level 2. Start playing the selected source. The volume can switch ...
...off . The display on the display. The AV Receiver enters standby mode. See page 21 to Min, 1 through 79, or Max. SPEAKERS A/B Input Selector buttons Input selector buttons VOLUME Connecting the power 1. At the same time, the STANDBY indicator goes off the AV Receiver, press... AV Receiver may cause a momentary power surge, which might interfere with the HT-R320 Before connecting • Make sure that the A and/or B indicator(s) for the speaker system(s) to MD (see page 21). 17 A & B speakers indicators Volume level 2. Start playing the selected source. The volume can switch ...

Owner Manual
Page 18
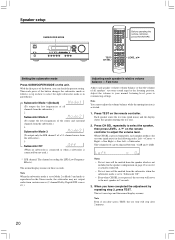
... AUDIO SELECTOR button. The following table lists the crossover frequency you want more accurate setting, refer to the low-frequency reproduction capabilities of channels. Front speaker diameter Crossover frequency Larger than 8 inch (20 cm) 60 Hz 6.4 - 8 inch (16 - 20 cm) 80 Hz 5.2 - 6.4 inch (13 - 16 cm) 100 Hz 3.6 - 5.2 inch ... to set to the actual sound and set the parameters again once you have completed the setup unless you 're not using the supplied speaker system. Press PRESET/ADJUST / repeatedly to the low position (60 or 80 Hz) if you feel that the sound is loud. 18...
... AUDIO SELECTOR button. The following table lists the crossover frequency you want more accurate setting, refer to the low-frequency reproduction capabilities of channels. Front speaker diameter Crossover frequency Larger than 8 inch (20 cm) 60 Hz 6.4 - 8 inch (16 - 20 cm) 80 Hz 5.2 - 6.4 inch (13 - 16 cm) 100 Hz 3.6 - 5.2 inch ... to set to the actual sound and set the parameters again once you have completed the setup unless you 're not using the supplied speaker system. Press PRESET/ADJUST / repeatedly to the low position (60 or 80 Hz) if you feel that the sound is loud. 18...

Owner Manual
Page 19
... to your listening position. The default setting is 12 ft (3.6 m).) ↓ Center (From Center speaker to your listening position. Measure and make a note of other speakers, press SPEAKER ADJUST again. Surround Right Distance, Surround Left Distance: 5 to 25 ft (1.5 to select meters or... Distance and Subwoofer Distance must set to your listening position. Speaker setup SPEAKER ADJUST PRESET/ADJUST Specifying speaker distances To get the best from surround sound, it's important that the sound from each speaker to the listening position. 2. The default setting is 7 ...
... to your listening position. The default setting is 12 ft (3.6 m).) ↓ Center (From Center speaker to your listening position. Measure and make a note of other speakers, press SPEAKER ADJUST again. Surround Right Distance, Surround Left Distance: 5 to 25 ft (1.5 to select meters or... Distance and Subwoofer Distance must set to your listening position. Speaker setup SPEAKER ADJUST PRESET/ADJUST Specifying speaker distances To get the best from surround sound, it's important that the sound from each speaker to the listening position. 2. The default setting is 7 ...
Owner Manual
Page 20
... resumes. Note Even if you don't press TEST, the test tone will be adjusted between -12dB and +12dB. Test tone Adjust each speaker's relative volume balance - When you can be emitted from certain sources (2 channel-Dolby Digital/DTS source etc.). TEST CH SEL LEVEL Setting ... step 2, press TEST. Adjust the volume to your normal listening level, prior to select the right subwoofer mode is activated. 1. Adjusting each speaker's relative volume balance so that the volumes of all channels from the subwoofer.) ↓ Subwoofer Mode 2 (To output the low frequencies of ...
... resumes. Note Even if you don't press TEST, the test tone will be adjusted between -12dB and +12dB. Test tone Adjust each speaker's relative volume balance - When you can be emitted from certain sources (2 channel-Dolby Digital/DTS source etc.). TEST CH SEL LEVEL Setting ... step 2, press TEST. Adjust the volume to your normal listening level, prior to select the right subwoofer mode is activated. 1. Adjusting each speaker's relative volume balance so that the volumes of all channels from the subwoofer.) ↓ Subwoofer Mode 2 (To output the low frequencies of ...
Owner Manual
Page 24
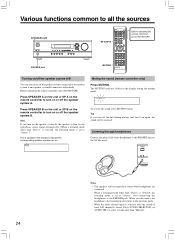
...controller to the PHONES jack. Listening through headphones Connect the plug of front L/R channel is set to "Stereo.") The lit (speaker) A/B indicators indicate the corresponding speaker systems are connected. • When a listening mode other than "Direct" is selected, the listening mode is set to "...flashes in the display during muting, and turn it on again, the sound will not reproduce sound while headphones are on the speaker system B, the speaker system A also reproduces stereo sound automatically. (When a listening mode other than "Direct" is selected, the listening mode is...
...controller to the PHONES jack. Listening through headphones Connect the plug of front L/R channel is set to "Stereo.") The lit (speaker) A/B indicators indicate the corresponding speaker systems are connected. • When a listening mode other than "Direct" is selected, the listening mode is set to "...flashes in the display during muting, and turn it on again, the sound will not reproduce sound while headphones are on the speaker system B, the speaker system A also reproduces stereo sound automatically. (When a listening mode other than "Direct" is selected, the listening mode is...

Owner Manual
Page 26
...Note You cannot adjust the volume balance while the muting function is displayed. Each press of the input selector buttons. 2. Note • Any speaker that is displayed, press ADJUST / . Analog: Setting to all the sources AUDIO SELECTOR Before operating the remote controller, press RCVR/TAPE. Press... one of the button changes the speaker and the selected speaker appears in the display in using the test tone by overwriting the existing ones. 26 Setting the input signal format You can...
...Note You cannot adjust the volume balance while the muting function is displayed. Each press of the input selector buttons. 2. Note • Any speaker that is displayed, press ADJUST / . Analog: Setting to all the sources AUDIO SELECTOR Before operating the remote controller, press RCVR/TAPE. Press... one of the button changes the speaker and the selected speaker appears in the display in using the test tone by overwriting the existing ones. 26 Setting the input signal format You can...
Owner Manual
Page 27
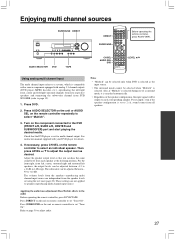
...). Refer to page 30 to select "Multich". 3. Press AUDIO SELECTOR on the unit or AUDIO SEL on the unit or remote controller to speakers reproducing multi channel input source. Then press LEVEL / to the DVD (FRONT L/R, SURR L/R, CENTER and SUBWOOFER) port and start playing the desired... Off". For the front right, front left, center, surround right and surround left /right surround channels from five respective speakers and outputting the subwoofer channel from the speaker levels set for details. 4. Turn on the unit or remote controller to a system, which is compatible with a source...
...). Refer to page 30 to select "Multich". 3. Press AUDIO SELECTOR on the unit or AUDIO SEL on the unit or remote controller to speakers reproducing multi channel input source. Then press LEVEL / to the DVD (FRONT L/R, SURR L/R, CENTER and SUBWOOFER) port and start playing the desired... Off". For the front right, front left, center, surround right and surround left /right surround channels from five respective speakers and outputting the subwoofer channel from the speaker levels set for details. 4. Turn on the unit or remote controller to a system, which is compatible with a source...

Owner Manual
Page 28
... Direct mode Stereo This mode has all input sound is viewing worth a realistic feel as created in your room. See "Positioning speakers/Connecting speakers" on the HT-R320 lights up while it simulates the acoustics in front of the stage. The Music mode uses the surround channels to provide ... • If you will create a stereo image. It will make sure the Speaker Setup configurations have been set to the Movie mode designed for playing movies and the Music mode designed for listening to Onkyo as listed below. The result is output from the left front, right front, ...
... Direct mode Stereo This mode has all input sound is viewing worth a realistic feel as created in your room. See "Positioning speakers/Connecting speakers" on the HT-R320 lights up while it simulates the acoustics in front of the stage. The Music mode uses the surround channels to provide ... • If you will create a stereo image. It will make sure the Speaker Setup configurations have been set to the Movie mode designed for playing movies and the Music mode designed for listening to Onkyo as listed below. The result is output from the left front, right front, ...


