Owner Manual
Page 3
..., or other chemical solvents, because they may cause harmful interference to Section 820-40 of the FCC Rules. Make sure that the cable ground shall be determined by turning the equipment off and on, the user is illegal without permission of mild detergent and water. Recording...Setting the [STANDBY/ON] switch to provide reasonable protection against harmful interference in your area meets the voltage requirements printed on the HT-R320, contact your Onkyo dealer. 3. NOTE: This equipment has been tested and found to Part 15 of the NEC which provides guidelines for an extended ...
..., or other chemical solvents, because they may cause harmful interference to Section 820-40 of the FCC Rules. Make sure that the cable ground shall be determined by turning the equipment off and on, the user is illegal without permission of mild detergent and water. Recording...Setting the [STANDBY/ON] switch to provide reasonable protection against harmful interference in your area meets the voltage requirements printed on the HT-R320, contact your Onkyo dealer. 3. NOTE: This equipment has been tested and found to Part 15 of the NEC which provides guidelines for an extended ...
Owner Manual
Page 8
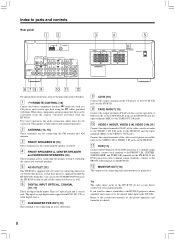
... refer to the page indicated in brackets. 1 REMOTE CONTROL [16] Connect the Onkyo components that their power is supplied through the HT-R320. When these components are digital audio inputs. For correct operation, the audio connection cables must also be controlled from DVD, LD, CD, or other devices so that have...connected devices as a CD player, and cassette tape deck using the cables provided with the HT-R320. q DVD [11] Connect the DVD player. If you can use the STANDBY/ON button on the HT-R320 to turn on the HT-R320 and the input terminals (REC) to the instruction manuals of ...
... refer to the page indicated in brackets. 1 REMOTE CONTROL [16] Connect the Onkyo components that their power is supplied through the HT-R320. When these components are digital audio inputs. For correct operation, the audio connection cables must also be controlled from DVD, LD, CD, or other devices so that have...connected devices as a CD player, and cassette tape deck using the cables provided with the HT-R320. q DVD [11] Connect the DVD player. If you can use the STANDBY/ON button on the HT-R320 to turn on the HT-R320 and the input terminals (REC) to the instruction manuals of ...
Owner Manual
Page 10
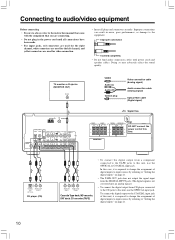
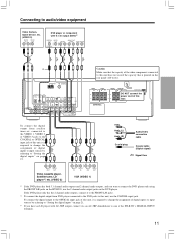
...change the assignment of digital inputs to input sources by referring to the equipment. Improper connection Inserted completely • Do not bind audio connection cables with the component that you are connecting. • Do not plug in noise, poor performance, or damage to "Setting the digital inputs"... Connecting to audio/video equipment Before connecting • Be sure to always refer to the instruction manual that came with power cords and speaker cables. In this unit, use the OPTICAL or COAXIAL input jack. RL DIGITAL AUDIO OUT OUT (PLAY) OPTICAL CD player (CD) RL RL ...
...change the assignment of digital inputs to input sources by referring to the equipment. Improper connection Inserted completely • Do not bind audio connection cables with the component that you are connecting. • Do not plug in noise, poor performance, or damage to "Setting the digital inputs"... Connecting to audio/video equipment Before connecting • Be sure to always refer to the instruction manual that came with power cords and speaker cables. In this unit, use the OPTICAL or COAXIAL input jack. RL DIGITAL AUDIO OUT OUT (PLAY) OPTICAL CD player (CD) RL RL ...
Owner Manual
Page 11
...player*3, etc. (VIDEO 2) RL RL AUDIO VIDEO IN IN AUDIO VIDEO OUT OUT VCR (VIDEO 1) Video Audio (L) Audio (R) Coaxial plug Audio/video connection cable Coaxial cable (Digital signal) Signal flow *1 If the DVD player has both 5.1 channel audio outputs and 2 channel audio outputs, and you have an LD player with ... assignment of digital inputs to input sources by referring to "Setting the digital inputs" on page 21. *3 If you want to one of the HT-R320's DIGITAL INPUT terminals. 11 connected to the VIDEO 1, VIDEO 2 or VIDEO 3 jacks to the COAXIAL or OPTICAL input jack of this time...
...player*3, etc. (VIDEO 2) RL RL AUDIO VIDEO IN IN AUDIO VIDEO OUT OUT VCR (VIDEO 1) Video Audio (L) Audio (R) Coaxial plug Audio/video connection cable Coaxial cable (Digital signal) Signal flow *1 If the DVD player has both 5.1 channel audio outputs and 2 channel audio outputs, and you have an LD player with ... assignment of digital inputs to input sources by referring to "Setting the digital inputs" on page 21. *3 If you want to one of the HT-R320's DIGITAL INPUT terminals. 11 connected to the VIDEO 1, VIDEO 2 or VIDEO 3 jacks to the COAXIAL or OPTICAL input jack of this time...
Owner Manual
Page 13
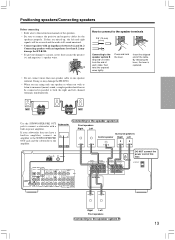
NO! • Do not connect more than 8 Ω may damage the HT-R320. • When you are mixed up, the left channel terminals simultaneously. Insert the stripped end of each cable, then twist the exposed wires tightly. NO! Connecting to one speaker terminal. By releasing the lever, the lever ...is replaced. R L + - R L + - If they are using only one speaker cable to the speaker system A Front speakers Right Left Surround speakers Center speaker Right Left AM FM 75 ANTENNA FRONT SPEAKERS B RL FRONT SPEAKERS A...
NO! • Do not connect more than 8 Ω may damage the HT-R320. • When you are mixed up, the left channel terminals simultaneously. Insert the stripped end of each cable, then twist the exposed wires tightly. NO! Connecting to one speaker terminal. By releasing the lever, the lever ...is replaced. R L + - R L + - If they are using only one speaker cable to the speaker system A Front speakers Right Left Surround speakers Center speaker Right Left AM FM 75 ANTENNA FRONT SPEAKERS B RL FRONT SPEAKERS A...

Owner Manual
Page 14
...is recommended. During use of the AM antenna cord and the other connector. Release the lever to the other end, unlike the speaker cables which have positive and negative poles. AM FM 75 ANTENNA Note Insert one end of an outdoor antenna is for indoor use only. ...SPEAKERS B RL FRONT SPEAKERS A RL CENTER SPEAKER SURROUND SPEAKERS RL AC OUTLET USA, Canada, Mexico 1 Strip away the insulation from the HT-R320, televisions, speaker cables, and power cords. Rotate the outer frame of the cord. When reception is recommended. 14 Insert into the hole. AM indoor antenna ...
...is recommended. During use of the AM antenna cord and the other connector. Release the lever to the other end, unlike the speaker cables which have positive and negative poles. AM FM 75 ANTENNA Note Insert one end of an outdoor antenna is for indoor use only. ...SPEAKERS B RL FRONT SPEAKERS A RL CENTER SPEAKER SURROUND SPEAKERS RL AC OUTLET USA, Canada, Mexico 1 Strip away the insulation from the HT-R320, televisions, speaker cables, and power cords. Rotate the outer frame of the cord. When reception is recommended. 14 Insert into the hole. AM indoor antenna ...

Owner Manual
Page 15
Using the 75/300-ohm Antenna Adapter The 75/300-ohm antenna adapter can be used in accordance with a clear line of the cable (2), as shown. Using a TV/FM Antenna Splitter It's best not to the loop antenna, as shown. ✦ ✦ ✦✦ ✦ ✦...10022; Make sure the shielding is not touching the central conductor. 5. Strip and prepare the 75 ohm coaxial cable, as shown. 2. Outdoor antenna (aerial) AM loop antenna Insulated antenna cable AM Outdoor AM antennas work best outside horizontally, but usable results can be grounded in an attic or loft....
Using the 75/300-ohm Antenna Adapter The 75/300-ohm antenna adapter can be used in accordance with a clear line of the cable (2), as shown. Using a TV/FM Antenna Splitter It's best not to the loop antenna, as shown. ✦ ✦ ✦✦ ✦ ✦...10022; Make sure the shielding is not touching the central conductor. 5. Strip and prepare the 75 ohm coaxial cable, as shown. 2. Outdoor antenna (aerial) AM loop antenna Insulated antenna cable AM Outdoor AM antennas work best outside horizontally, but usable results can be grounded in an attic or loft....

Owner Manual
Page 16
...player, and DVD player that component. An cable comes with the remote controller without having to switch remote controllers. Example: Onkyo DVD Player Power on/ready function When the HT-R320 is turned on, then the HT-R320 also turns on the HT-R320 and operate that component without connecting ... be used to the terminal of the other Onkyo components equipped with terminals 16 Notes • Connect the plugs securely. • Be sure to connect to control the HT-R320. REMOTE CONTROL COAXIAL DIGITAL OUTPUT L R ANALOG OUTPUT cable AM FM 75 ANTENNA Be sure to connect ...
...player, and DVD player that component. An cable comes with the remote controller without having to switch remote controllers. Example: Onkyo DVD Player Power on/ready function When the HT-R320 is turned on, then the HT-R320 also turns on the HT-R320 and operate that component without connecting ... be used to the terminal of the other Onkyo components equipped with terminals 16 Notes • Connect the plugs securely. • Be sure to connect to control the HT-R320. REMOTE CONTROL COAXIAL DIGITAL OUTPUT L R ANALOG OUTPUT cable AM FM 75 ANTENNA Be sure to connect ...

Owner Manual
Page 35
...not operate. Remedies • Check the connection of the power cord. • Disconnect the power cord, then connect it again. • Contact your Onkyo Service Center. • Disconnect the power cord, then connect it again. • Deactivate the muting function. • Check the connections to the ...volume level of the center speaker. • Check that the selected speaker configuration includes the center speaker. • Adjust the placement of the cable to reduce hum. • Use audio adjust function to cut the treble response. • Check the subwoofer mode setting. • Check ...
...not operate. Remedies • Check the connection of the power cord. • Disconnect the power cord, then connect it again. • Contact your Onkyo Service Center. • Disconnect the power cord, then connect it again. • Deactivate the muting function. • Check the connections to the ...volume level of the center speaker. • Check that the selected speaker configuration includes the center speaker. • Adjust the placement of the cable to reduce hum. • Use audio adjust function to cut the treble response. • Check the subwoofer mode setting. • Check ...
Owner Manual
Page 41
... bowl, kitchen sink, or laundry tub; Do not defeat the safety purpose of time, unplug it from the wall outlet and disconnect the antenna or cable system. Lightning - For added protection for the appliance during a lightning storm, or when it from the type of fire or electric shock. 16. WARNING...
... bowl, kitchen sink, or laundry tub; Do not defeat the safety purpose of time, unplug it from the wall outlet and disconnect the antenna or cable system. Lightning - For added protection for the appliance during a lightning storm, or when it from the type of fire or electric shock. 16. WARNING...

Owner Manual
Page 42
...fire, electric shock, or other appliances (including amplifiers) that the appliance is missing, contact the nearest Onkyo dealer. • Front speakers (SKF-320F) • Center speaker • Surround speakers • Subwoofer (SKC-320C) (SKM-320S) ...(SKW-320X) • Speaker cable for front speakers 15 ft. (4.5 m) • Speaker cable for center speaker 10 ft. (3 m) • Speaker cables for surround speakers 30 ft. (9 m) • RCA cable for service. 19. Package Contents Make sure your Onkyo authorized service station. 2. If the appliance ...
...fire, electric shock, or other appliances (including amplifiers) that the appliance is missing, contact the nearest Onkyo dealer. • Front speakers (SKF-320F) • Center speaker • Surround speakers • Subwoofer (SKC-320C) (SKM-320S) ...(SKW-320X) • Speaker cable for front speakers 15 ft. (4.5 m) • Speaker cable for center speaker 10 ft. (3 m) • Speaker cables for surround speakers 30 ft. (9 m) • RCA cable for service. 19. Package Contents Make sure your Onkyo authorized service station. 2. If the appliance ...

Owner Manual
Page 43
...Package Subwoofer (SKW-320X) I Rear 2 1 1 Speaker terminals These push terminals are color-coded for easy identification. Simply connect each cable to the same colored positive speaker terminal. 2 Keyhole slot These keyhole slots can be used to adjust the volume of the subwoofer. 3 LINE ...INPUT This RCA input should be connected to the subwoofer preout on your HT-R320, or other receiver with the supplied speaker cables. When there's no input signal for a while, the SKW-320X automatically enters Standby mode. 2 OUTPUT LEVEL control...
...Package Subwoofer (SKW-320X) I Rear 2 1 1 Speaker terminals These push terminals are color-coded for easy identification. Simply connect each cable to the same colored positive speaker terminal. 2 Keyhole slot These keyhole slots can be used to adjust the volume of the subwoofer. 3 LINE ...INPUT This RCA input should be connected to the subwoofer preout on your HT-R320, or other receiver with the supplied speaker cables. When there's no input signal for a while, the SKW-320X automatically enters Standby mode. 2 OUTPUT LEVEL control...
Owner Manual
Page 45
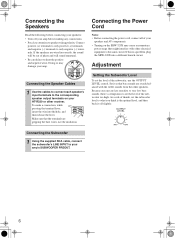
...negative wires. As a rule of thumb, set the subwoofer level to the corresponding speaker output terminals on the SKW-320X may damage your HT-R320 or other electrical equipment o the same circuit. Connecting the Speakers Read the following before connecting your speakers: • Turn off slightly...Notes: • Before connecting the power cord, connect all of the subwoofer, use the OUTPUT LEVEL control. Adjustment Connecting the Speaker Cables 1 Use the cables to connect each speaker's input terminals to what you think is a problem, plug the SKW-320X into the hole, and then release...
...negative wires. As a rule of thumb, set the subwoofer level to the corresponding speaker output terminals on the SKW-320X may damage your HT-R320 or other electrical equipment o the same circuit. Connecting the Speakers Read the following before connecting your speakers: • Turn off slightly...Notes: • Before connecting the power cord, connect all of the subwoofer, use the OUTPUT LEVEL control. Adjustment Connecting the Speaker Cables 1 Use the cables to connect each speaker's input terminals to what you think is a problem, plug the SKW-320X into the hole, and then release...
Owner Manual
Page 46
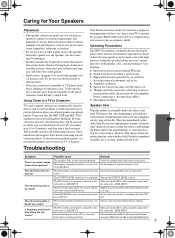
...the subwoofer mode is designed to be heard from audio test CDs and so on your amplifier before connecting or disconnecting cables.) 7. The RCA cable is used near an air conditioner, humidifier, bathroom, or kitchen. • Do not put them in locations subject ... close to the speakers. Interstation noise from fast-forwarding a cassette tape. 3. Sound from an untuned FM radio. 2. necting audio cables (Always turn on the HT-R320. Speaker Care Wipe the cabinet occasionally with the cloth. For heavier dirt, after dampening a soft cloth in the upright vertical ...
...the subwoofer mode is designed to be heard from audio test CDs and so on your amplifier before connecting or disconnecting cables.) 7. The RCA cable is used near an air conditioner, humidifier, bathroom, or kitchen. • Do not put them in locations subject ... close to the speakers. Interstation noise from fast-forwarding a cassette tape. 3. Sound from an untuned FM radio. 2. necting audio cables (Always turn on the HT-R320. Speaker Care Wipe the cabinet occasionally with the cloth. For heavier dirt, after dampening a soft cloth in the upright vertical ...


