
VR-330 Instruction Manual (English)
Page 12
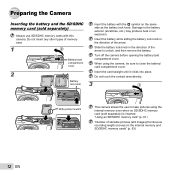
... other types of the arrow to take pictures using the camera, be sure to the battery exterior (scratches, etc.) may produce heat or an explosion. Turn off the camera before opening the battery/card compartment cover. Preparing the Camera Inserting the battery and the SD/SDHC memory card (sold separately) is...
... other types of the arrow to take pictures using the camera, be sure to the battery exterior (scratches, etc.) may produce heat or an explosion. Turn off the camera before opening the battery/card compartment cover. Preparing the Camera Inserting the battery and the SD/SDHC memory card (sold separately) is...

VR-330 Instruction Manual (English)
Page 13
...XP) or "Computer" (Windows Vista/Windows 7) from the start menu. The camera battery can be functioning as expected. Double-click the CD-ROM (OLYMPUS Setup) icon to display the "Setup" dialog. Windows 1 Insert the supplied CD in until it clicks and comes out slightly, then grab the ... adapter" (p. 16) if you are using a different computer or wish to a computer. ● The indicator lamp lights during charging and turns off when charging is connected to charge the battery without using a computer. Windows Vista/Windows 7 ● An Autorun dialog will be displayed.
...XP) or "Computer" (Windows Vista/Windows 7) from the start menu. The camera battery can be functioning as expected. Double-click the CD-ROM (OLYMPUS Setup) icon to display the "Setup" dialog. Windows 1 Insert the supplied CD in until it clicks and comes out slightly, then grab the ... adapter" (p. 16) if you are using a different computer or wish to a computer. ● The indicator lamp lights during charging and turns off when charging is connected to charge the battery without using a computer. Windows Vista/Windows 7 ● An Autorun dialog will be displayed.

VR-330 Instruction Manual (English)
Page 16
... outlet 0:34 VGA 4 14M Monitor top left Battery Empty Error message 16 EN Before use, be sure to charge the battery until the indicator lamp turns off (up to the USB-AC adapter. 1 USB cable USB cable (supplied) (supplied) USB connector USB connector 2 Indicator lamp On: Charging Off: Charged The battery...
... outlet 0:34 VGA 4 14M Monitor top left Battery Empty Error message 16 EN Before use, be sure to charge the battery until the indicator lamp turns off (up to the USB-AC adapter. 1 USB cable USB cable (supplied) (supplied) USB connector USB connector 2 Indicator lamp On: Charging Off: Charged The battery...

VR-330 Instruction Manual (English)
Page 17
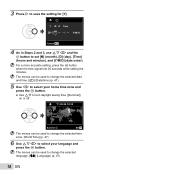
Image Set OK Operation guide OK Erase/Cancel MENU Date, time, time zone, and language The date and time set here are saved to turn on the camera. ● The date and time setting screen is displayed when the date and time are not set. X Y M D Time Y/M/D Cancel MENU Date and ...
Image Set OK Operation guide OK Erase/Cancel MENU Date, time, time zone, and language The date and time set here are saved to turn on the camera. ● The date and time setting screen is displayed when the date and time are not set. X Y M D Time Y/M/D Cancel MENU Date and ...
VR-330 Instruction Manual (English)
Page 18
... to change the selected time zone. [World Time] (p. 47) 6 Use FGHI to select your home time zone and press the Q button. ● Use FG to turn daylight saving time ([Summer]) on or off. '11.02.26.12:30 Seoul Tokyo Summer Set OK The menus can be used to select your...
... to change the selected time zone. [World Time] (p. 47) 6 Use FGHI to select your home time zone and press the Q button. ● Use FG to turn daylight saving time ([Summer]) on or off. '11.02.26.12:30 Seoul Tokyo Summer Set OK The menus can be used to select your...
VR-330 Instruction Manual (English)
Page 19
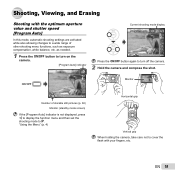
...shooting settings are activated while also allowing changes to a wide range of other shooting menu functions, such as needed. 1 Press the n button to turn on the camera. [Program Auto] indicator P Current shooting mode display Program Auto P 0.0 WB AUTO ISO AUTO 4 14M NORM Press the n button again to... turn off the camera. 2 Hold the camera and compose the shot. 0:34 VGA 4 14M 0.0 WB AUTO ISO AUTO # Monitor Horizontal grip Number of storable ...
...shooting settings are activated while also allowing changes to a wide range of other shooting menu functions, such as needed. 1 Press the n button to turn on the camera. [Program Auto] indicator P Current shooting mode display Program Auto P 0.0 WB AUTO ISO AUTO 4 14M NORM Press the n button again to... turn off the camera. 2 Hold the camera and compose the shot. 0:34 VGA 4 14M 0.0 WB AUTO ISO AUTO # Monitor Horizontal grip Number of storable ...
VR-330 Instruction Manual (English)
Page 21
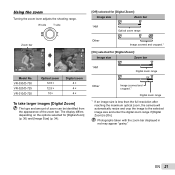
...Turning the zoom lever adjusts the shooting range. The display differs depending on the options selected for [Digital Zoom]: Image size Zoom bar 14M Optical zoom range Zoom bar P P 0:34 VGA 4 14M Model No. EN 21 W side T side [Off] selected for [Digital Zoom] (p. 36) and [Image Size] (p. 34). VR-330/D-730 VR...-320/D-725 VR-310/D-720 0.0 WB AUTO ISO AUTO # 0:34 VGA 4 14M 0.0 WB AUTO ISO AUTO # Optical zoom 12.5 × 12.5 × 10 × ...
...Turning the zoom lever adjusts the shooting range. The display differs depending on the options selected for [Digital Zoom]: Image size Zoom bar 14M Optical zoom range Zoom bar P P 0:34 VGA 4 14M Model No. EN 21 W side T side [Off] selected for [Digital Zoom] (p. 36) and [Image Size] (p. 34). VR-330/D-730 VR...-320/D-725 VR-310/D-720 0.0 WB AUTO ISO AUTO # 0:34 VGA 4 14M 0.0 WB AUTO ISO AUTO # Optical zoom 12.5 × 12.5 × 10 × ...

VR-330 Instruction Manual (English)
Page 24
... NORM 14M FILE 100 0004 '11/02/26 12:30 24 EN Close-up view (up view Index view enables quick selection of image details. 1 Turn the zoom lever.
... NORM 14M FILE 100 0004 '11/02/26 12:30 24 EN Close-up view (up view Index view enables quick selection of image details. 1 Turn the zoom lever.
VR-330 Instruction Manual (English)
Page 31
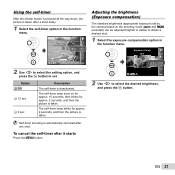
... the function menu. EN 31 Adjusting the brightness (Exposure compensation) The standard brightness (appropriate exposure) set . Self-timer shooting is taken. The self-timer lamp turns on the shooting mode (M and s excluded) can be adjusted brighter or darker to select the desired brightness, and press the Q button. Using the self-timer...
... the function menu. EN 31 Adjusting the brightness (Exposure compensation) The standard brightness (appropriate exposure) set . Self-timer shooting is taken. The self-timer lamp turns on the shooting mode (M and s excluded) can be adjusted brighter or darker to select the desired brightness, and press the Q button. Using the self-timer...
VR-330 Instruction Manual (English)
Page 37
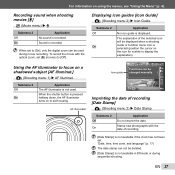
.... AF illuminator Displaying icon guides [Icon Guide] q (Shooting menu 2) X Icon Guide Submenu 2 Off On Application No icon guide is pressed halfway down, the AF illuminator turns on the icon for a while to display the explanation). When the shutter button is displayed. Sound is not used during sequential shooting. When set to...
.... AF illuminator Displaying icon guides [Icon Guide] q (Shooting menu 2) X Icon Guide Submenu 2 Off On Application No icon guide is pressed halfway down, the AF illuminator turns on the icon for a while to display the explanation). When the shutter button is displayed. Sound is not used during sequential shooting. When set to...
VR-330 Instruction Manual (English)
Page 39
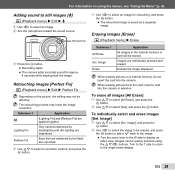
... to select [Yes], and press the Q button. The retouching process may not be erased, and press the Q button to add a R mark to the image. ● Turn the zoom lever to the W side to select an image for approx. 4 seconds while playing back the image. Erasing images [Erase] q (Playback menu) X Erase Submenu... on the picture, the editing may lower the image resolution. Image Erase Application All images in advance. Image] 1 Use FG to the single frame display. Turn to the T side to return to select [Sel.
... to select [Yes], and press the Q button. The retouching process may not be erased, and press the Q button to add a R mark to the image. ● Turn the zoom lever to the W side to select an image for approx. 4 seconds while playing back the image. Erasing images [Erase] q (Playback menu) X Erase Submenu... on the picture, the editing may lower the image resolution. Image Erase Application All images in advance. Image] 1 Use FG to the single frame display. Turn to the T side to return to select [Sel.

VR-330 Instruction Manual (English)
Page 40
... recorded to the image data [Print Order] q (Playback menu) X Print Order "Print Reservations (DPOF)" (p. 52) Print reservation can be saved even after the power is turned off. 40 EN For information on using the menus, see "Using the Menu" (p. 4). Sel.
... recorded to the image data [Print Order] q (Playback menu) X Print Order "Print Reservations (DPOF)" (p. 52) Print reservation can be saved even after the power is turned off. 40 EN For information on using the menus, see "Using the Menu" (p. 4). Sel.

VR-330 Instruction Manual (English)
Page 42
...computer has USB ports, proper operation is not guaranteed in playback mode. The shooting mode is displayed. The opening screen is set to turn on . Adjusts the image playback volume. Adjusting the CCD and the image processing function [Pixel Mapping] s (Settings 2) X Pixel ...] r (Settings 1) X Keep K Settings Submenu 2 Yes No Application The shooting mode is saved when the camera is turned off and is reactivated the next time the camera is not turned on . To turn the camera on in the following cases. ● computers with the q button [q Power On] r (Settings 1) ...
...computer has USB ports, proper operation is not guaranteed in playback mode. The shooting mode is displayed. The opening screen is set to turn on . Adjusts the image playback volume. Adjusting the CCD and the image processing function [Pixel Mapping] s (Settings 2) X Pixel ...] r (Settings 1) X Keep K Settings Submenu 2 Yes No Application The shooting mode is saved when the camera is turned off and is reactivated the next time the camera is not turned on . To turn the camera on in the following cases. ● computers with the q button [q Power On] r (Settings 1) ...

VR-330 Instruction Manual (English)
Page 43
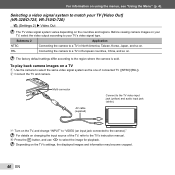
... results, wait at the same time. Adjusting the brightness of sale. Viewing images on the surrounding brightness. For information on a TV [TV Out] (VR-330/D-730) s (Settings 2) X TV Out Different countries and regions use different video signal standards. EN 43 Submenu 2 Video Out Submenu 3 NTSC ... it again. On Playback operations are performed using camera controls. Viewing images on using the TV remote control. If the camera is turned off during pixel mapping, be sure to TVs in countries or regions where NTSC is displayed. ● The camera checks and adjusts...
... results, wait at the same time. Adjusting the brightness of sale. Viewing images on the surrounding brightness. For information on a TV [TV Out] (VR-330/D-730) s (Settings 2) X TV Out Different countries and regions use different video signal standards. EN 43 Submenu 2 Video Out Submenu 3 NTSC ... it again. On Playback operations are performed using camera controls. Viewing images on using the TV remote control. If the camera is turned off during pixel mapping, be sure to TVs in countries or regions where NTSC is displayed. ● The camera checks and adjusts...

VR-330 Instruction Manual (English)
Page 45
... on the camera and the HDMI connector on and select the HDMI input to the TV using the menus, see "Using the Menu" (p. 4). Type C Type D 3 Turn the TV on the TV. See the instruction manual provided with the TV remote control even though the operation guide is connected. For information on... using an HDMI cable. Images and other information may be cropped for [HDMI Control] and turn on the camera. ● Follow the on-screen guide displayed by both an AV cable and an HDMI cable, the HDMI cable will take priority...
... on the camera and the HDMI connector on and select the HDMI input to the TV using the menus, see "Using the Menu" (p. 4). Type C Type D 3 Turn the TV on the TV. See the instruction manual provided with the TV remote control even though the operation guide is connected. For information on... using an HDMI cable. Images and other information may be cropped for [HDMI Control] and turn on the camera. ● Follow the on-screen guide displayed by both an AV cable and an HDMI cable, the HDMI cable will take priority...
VR-330 Instruction Manual (English)
Page 46
... the camera to the camera)." Multi-connector AV cable (supplied) Connect to the TV video input jack (yellow) and audio input jack (white). 3 Turn on the TV, and change "INPUT" to "VIDEO (an input jack connected to a TV in European countries, China, and so on the countries ... on the TV's settings, the displayed images and information may become cropped. 46 EN Selecting a video signal system to your TV [Video Out] (VR-320/D-725, VR-310/D-720) s (Settings 2) X Video Out The TV video signal system varies depending on . PAL Connecting the camera to the region where the camera...
... the camera to the camera)." Multi-connector AV cable (supplied) Connect to the TV video input jack (yellow) and audio input jack (white). 3 Turn on the TV, and change "INPUT" to "VIDEO (an input jack connected to a TV in European countries, China, and so on the countries ... on the TV's settings, the displayed images and information may become cropped. 46 EN Selecting a video signal system to your TV [Video Out] (VR-320/D-725, VR-310/D-720) s (Settings 2) X Video Out The TV video signal system varies depending on . PAL Connecting the camera to the region where the camera...
VR-330 Instruction Manual (English)
Page 47
...to display the time in the travel destination time zone (z). *1 In areas where daylight saving time is in effect, use FG to turn daylight saving time ([Summer]) on. *2 When you select a time zone, the camera automatically calculates the time difference between the selected ...Submenu 2 Submenu 3 Application x Home/ Alternate z The time in the home time zone (the time zone selected for approx. 10 seconds, the monitor automatically turns off to complete the operation. Select the home time zone (x). z*1, 2 - Select the travel destination time zone (z). "Date, time, time zone, and language...
...to display the time in the travel destination time zone (z). *1 In areas where daylight saving time is in effect, use FG to turn daylight saving time ([Summer]) on. *2 When you select a time zone, the camera automatically calculates the time difference between the selected ...Submenu 2 Submenu 3 Application x Home/ Alternate z The time in the home time zone (the time zone selected for approx. 10 seconds, the monitor automatically turns off to complete the operation. Select the home time zone (x). z*1, 2 - Select the travel destination time zone (z). "Date, time, time zone, and language...
VR-330 Instruction Manual (English)
Page 48
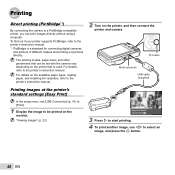
For details, refer to the printer's instruction manual. 2 Turn on the available paper types, loading paper, and installing ink cassettes, refer to the printer's instruction manual. For details on the printer, and then connect ...
For details, refer to the printer's instruction manual. 2 Turn on the available paper types, loading paper, and installing ink cassettes, refer to the printer's instruction manual. For details on the printer, and then connect ...

VR-330 Instruction Manual (English)
Page 55
... by putting them in the correct direction. The lines do , refer to the information below to see". ● Condensation*1 may occur when the camera is turned on the screen". ● This condition may have occurred. To save battery power, the camera automatically goes into a warm, humid room. Press the n button ... up using the supplied CD" (p. 13), "Charging the battery with many flash reflections on . ● Press the q button to switch to turn the camera on dust in the final image. No picture is taken even if the shutter button is fully pressed in the camera when...
... by putting them in the correct direction. The lines do , refer to the information below to see". ● Condensation*1 may occur when the camera is turned on the screen". ● This condition may have occurred. To save battery power, the camera automatically goes into a warm, humid room. Press the n button ... up using the supplied CD" (p. 13), "Charging the battery with many flash reflections on . ● Press the q button to switch to turn the camera on dust in the final image. No picture is taken even if the shutter button is fully pressed in the camera when...

VR-330 Instruction Manual (English)
Page 56
... Format], and press the Q button. No Ink Printer problem Refill the ink in the printer. Printer problem Turn off the camera and printer, check the printer for any problems, and then turn the power on a computer. Release the switch. Next, use FG to select [Yes], and press the Set OK...
... Format], and press the Q button. No Ink Printer problem Refill the ink in the printer. Printer problem Turn off the camera and printer, check the printer for any problems, and then turn the power on a computer. Release the switch. Next, use FG to select [Yes], and press the Set OK...


