

VR-330 Instruction Manual (English)
Page 10
... 20 19 0:34 VGA 18 4 14M NORM ON z DATE P 3 4 5 P0.0 6 WB AUTO ISO AUTO 7 8 9 # 10 17 16 15 14 13 12 11 1/100 F3.0 25 24 1 Battery check p. 16 2 Shooting mode ....... p. 19, 26 3 Flash p. 30 Flash standby/flash charge p. 55 4 Macro p. 30 5 Self-timer p. 31 6 Exposure compensation p. 31 7 White balance p. 32 8 ISO p. 32 9 Drive p. 33 10 Setup menu p. 5 11 Recording with sound (movies p. 37 12 Date stamp p. 37 13 World time p. 47 14 Image stabilization........
... 20 19 0:34 VGA 18 4 14M NORM ON z DATE P 3 4 5 P0.0 6 WB AUTO ISO AUTO 7 8 9 # 10 17 16 15 14 13 12 11 1/100 F3.0 25 24 1 Battery check p. 16 2 Shooting mode ....... p. 19, 26 3 Flash p. 30 Flash standby/flash charge p. 55 4 Macro p. 30 5 Self-timer p. 31 6 Exposure compensation p. 31 7 White balance p. 32 8 ISO p. 32 9 Drive p. 33 10 Setup menu p. 5 11 Recording with sound (movies p. 37 12 Date stamp p. 37 13 World time p. 47 14 Image stabilization........
VR-330 Instruction Manual (English)
Page 12
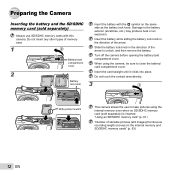
... camera before opening the battery/card compartment cover. When using the camera, be sure to take pictures using the internal memory even when no SD/SDHC memory card (sold separately) Always use SD/SDHC memory cards with the B symbol on the same side as the battery lock knob. Do not touch the contact area directly. 3 1 2 Write-protect switch This camera allows the user to close the battery/ card compartment cover. Damage to unlock, and then remove the battery...
... camera before opening the battery/card compartment cover. When using the camera, be sure to take pictures using the internal memory even when no SD/SDHC memory card (sold separately) Always use SD/SDHC memory cards with the B symbol on the same side as the battery lock knob. Do not touch the contact area directly. 3 1 2 Write-protect switch This camera allows the user to close the battery/ card compartment cover. Damage to unlock, and then remove the battery...

VR-330 Instruction Manual (English)
Page 13
... software is available on Windows computers only. Windows Vista/Windows 7 ● An Autorun dialog will be functioning as expected. Charging the battery and setting up to a computer. ● The indicator lamp lights during charging and turns off when charging is not correctly connected or the battery, camera, computer, or USB cable may not be displayed. If a "User Account Control" dialog is not displayed, select "My Computer" (Windows XP) or "Computer" (Windows Vista/Windows 7) from the start menu. Windows...
... software is available on Windows computers only. Windows Vista/Windows 7 ● An Autorun dialog will be functioning as expected. Charging the battery and setting up to a computer. ● The indicator lamp lights during charging and turns off when charging is not correctly connected or the battery, camera, computer, or USB cable may not be displayed. If a "User Account Control" dialog is not displayed, select "My Computer" (Windows XP) or "Computer" (Windows Vista/Windows 7) from the start menu. Windows...

VR-330 Instruction Manual (English)
Page 14
... 1024 × 768 pixels or more Minimum 65,536 colors (16,770,000 colors recommended) A minimum of 64 MB video RAM with DirectX 9 or later. * See online help for information on using the software. 5 Install the camera manual. ● Click the "Camera Instruction Manual" button and follow the on the camera screen even after connecting the camera to the computer until the battery has charged, then disconnect and reconnect the...
... 1024 × 768 pixels or more Minimum 65,536 colors (16,770,000 colors recommended) A minimum of 64 MB video RAM with DirectX 9 or later. * See online help for information on using the software. 5 Install the camera manual. ● Click the "Camera Instruction Manual" button and follow the on the camera screen even after connecting the camera to the computer until the battery has charged, then disconnect and reconnect the...
VR-330 Instruction Manual (English)
Page 15
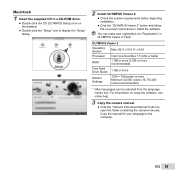
... the "Setup" icon to display the "Setup" dialog. 2 Install OLYMPUS Viewer 2. ● Check the system requirements before beginning installation. ● Click the "OLYMPUS Viewer 2" button and follow the on using the software, see online help. 3 Copy the camera manual. ● Click the "Camera Instruction Manual" button to open the folder containing the camera manuals. You can be selected from the language combo box. Macintosh 1 Insert the supplied CD in OLYMPUS Viewer 2 "Help". For information on -screen instructions to the...
... the "Setup" icon to display the "Setup" dialog. 2 Install OLYMPUS Viewer 2. ● Check the system requirements before beginning installation. ● Click the "OLYMPUS Viewer 2" button and follow the on using the software, see online help. 3 Copy the camera manual. ● Click the "Camera Instruction Manual" button to open the folder containing the camera manuals. You can be selected from the language combo box. Macintosh 1 Insert the supplied CD in OLYMPUS Viewer 2 "Help". For information on -screen instructions to the...

VR-330 Instruction Manual (English)
Page 16
... playback only. The camera cannot playback without the battery even when connected to the USB-AC adapter. 1 USB cable USB cable (supplied) (supplied) USB connector USB connector 2 Indicator lamp On: Charging Off: Charged The battery is connected to the camera. If the indicator lamp does not light, the camera is not correctly connected or the battery, camera, or USBAC adapter may be functioning as USB-AC adapter) differs depending on the battery and the USB-AC adapter, see "The battery and USB-AC adapter" (p. 60). Flashes...
... playback only. The camera cannot playback without the battery even when connected to the USB-AC adapter. 1 USB cable USB cable (supplied) (supplied) USB connector USB connector 2 Indicator lamp On: Charging Off: Charged The battery is connected to the camera. If the indicator lamp does not light, the camera is not correctly connected or the battery, camera, or USBAC adapter may be functioning as USB-AC adapter) differs depending on the battery and the USB-AC adapter, see "The battery and USB-AC adapter" (p. 60). Flashes...

VR-330 Instruction Manual (English)
Page 17
... [Y]. Operation guide Operation guides displayed at the bottom of the screen indicate that the m button, Q button, or zoom lever should be used. 1 Reset 2 Image Size Compression AF Mode 1 Digital Zoom 2 Image Stabilizer AF Illuminat. X Y M D Time 2011 Y/M/D Cancel MENU EN 17 X Y M D Time Y/M/D Cancel MENU Date and time setting screen 2 Use FG to select the year for the menus and messages displayed in the monitor. 1 Press the n button to turn on the camera. ● The date and time setting screen is displayed when the date and time are not set here are saved...
... [Y]. Operation guide Operation guides displayed at the bottom of the screen indicate that the m button, Q button, or zoom lever should be used. 1 Reset 2 Image Size Compression AF Mode 1 Digital Zoom 2 Image Stabilizer AF Illuminat. X Y M D Time 2011 Y/M/D Cancel MENU EN 17 X Y M D Time Y/M/D Cancel MENU Date and time setting screen 2 Use FG to select the year for the menus and messages displayed in the monitor. 1 Press the n button to turn on the camera. ● The date and time setting screen is displayed when the date and time are not set here are saved...
VR-330 Instruction Manual (English)
Page 19
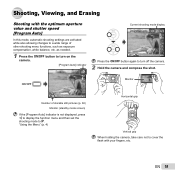
... exposure compensation, white balance, etc. "Using the Menu" (p. 4) Vertical grip When holding the camera, take care not to P. EN 19 Shooting, Viewing, and Erasing Shooting with the optimum aperture value and shutter speed [Program Auto] In this mode, automatic shooting settings are activated while also allowing changes to a wide range of other shooting menu functions, such as needed. 1 Press the n button to turn on the camera. [Program Auto] indicator P Current shooting mode display Program Auto P 0.0 WB AUTO ISO AUTO 4 14M NORM Press the n button again to turn...
... exposure compensation, white balance, etc. "Using the Menu" (p. 4) Vertical grip When holding the camera, take care not to P. EN 19 Shooting, Viewing, and Erasing Shooting with the optimum aperture value and shutter speed [Program Auto] In this mode, automatic shooting settings are activated while also allowing changes to a wide range of other shooting menu functions, such as needed. 1 Press the n button to turn on the camera. [Program Auto] indicator P Current shooting mode display Program Auto P 0.0 WB AUTO ISO AUTO 4 14M NORM Press the n button again to turn...
VR-330 Instruction Manual (English)
Page 25
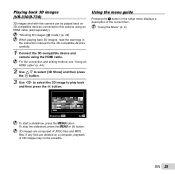
... stop the slideshow, press the m or Q button. 3D images are deleted on a computer, playback of 3D images may not be played back on 3D-compatible devices connected to play back and then press the Q button. Playing back 3D images (VR-330/D-730) 3D images shot with this camera using the HDMI cable. "Shooting 3D images (D mode)" (p. 29) When playing back 3D images, read the warnings in the setup menu displays a description of JPEG files and...
... stop the slideshow, press the m or Q button. 3D images are deleted on a computer, playback of 3D images may not be played back on 3D-compatible devices connected to play back and then press the Q button. Playing back 3D images (VR-330/D-730) 3D images shot with this camera using the HDMI cable. "Shooting 3D images (D mode)" (p. 29) When playing back 3D images, read the warnings in the setup menu displays a description of JPEG files and...

VR-330 Instruction Manual (English)
Page 28
... ~. Panorama 0.0 WB AUTO 4 14M NORM 2 Use FGHI to select the pan direction. 3 Press the shutter button to which the effect has been applied. Creating panoramic images (~ mode) Take pictures that they overlap with the image on the monitor. 4 Repeat Step 3 until the number of the display opposite the pan direction. The flash (p. 30) is fixed to $ (Flash Off) mode. 1 Set the shooting mode to 10 frames. The focus, exposure, zoom position...
... ~. Panorama 0.0 WB AUTO 4 14M NORM 2 Use FGHI to select the pan direction. 3 Press the shutter button to which the effect has been applied. Creating panoramic images (~ mode) Take pictures that they overlap with the image on the monitor. 4 Repeat Step 3 until the number of the display opposite the pan direction. The flash (p. 30) is fixed to $ (Flash Off) mode. 1 Set the shooting mode to 10 frames. The focus, exposure, zoom position...

VR-330 Instruction Manual (English)
Page 41
... displayed. Select when transferring images to a computer. Select when transferring images to a computer running Windows Vista or Windows 7 without using the supplied software with other devices [USB Connection] r (Settings 1) X USB Connection Submenu 2 Auto Storage MTP Print Application When the camera is connected to remove the card before starting the backup. Select when connecting to back up image data in the internal memory or card. Cancels the backup. No Cancels formatting. *1 Be sure to another device, the settings selection screen is compatible...
... displayed. Select when transferring images to a computer. Select when transferring images to a computer running Windows Vista or Windows 7 without using the supplied software with other devices [USB Connection] r (Settings 1) X USB Connection Submenu 2 Auto Storage MTP Print Application When the camera is connected to remove the card before starting the backup. Select when connecting to back up image data in the internal memory or card. Cancels the backup. No Cancels formatting. *1 Be sure to another device, the settings selection screen is compatible...

VR-330 Instruction Manual (English)
Page 42
... q button to P mode when the camera is turned on in the following cases. ● computers with the q button [q Power On] r (Settings 1) X q Power On Submenu 2 No Yes Application The camera is not guaranteed in playback mode. Adjusts the image playback volume. For information on using an expansion card, etc. ● computers without a factory-installed OS and home-built computers Turning on the camera with USB ports installed using the menus, see "Using the Menu" (p. 4). The shooting mode is displayed. The opening screen...
... q button to P mode when the camera is turned on in the following cases. ● computers with the q button [q Power On] r (Settings 1) X q Power On Submenu 2 No Yes Application The camera is not guaranteed in playback mode. Adjusts the image playback volume. For information on using an expansion card, etc. ● computers without a factory-installed OS and home-built computers Turning on the camera with USB ports installed using the menus, see "Using the Menu" (p. 4). The shooting mode is displayed. The opening screen...

VR-330 Instruction Manual (English)
Page 44
... not connect the HDMI cable when the camera is not supported then to 480p and finally to the instruction manual provided with the TV. For information on using the USB cable. AV cable (supplied) Using an HDMI cable 1 Match the camera digital signal format ([480p/576p]/[720p]/[1080i]) to that used by the TV. 2 Connect the camera to the HDMI connector on changing TV HDMI input settings, see "Using the Menu...
... not connect the HDMI cable when the camera is not supported then to 480p and finally to the instruction manual provided with the TV. For information on using the USB cable. AV cable (supplied) Using an HDMI cable 1 Match the camera digital signal format ([480p/576p]/[720p]/[1080i]) to that used by the TV. 2 Connect the camera to the HDMI connector on changing TV HDMI input settings, see "Using the Menu...
VR-330 Instruction Manual (English)
Page 48
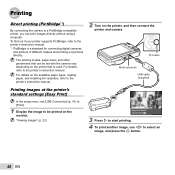
"Viewing images" (p. 22) Easy Print Start Custom Print OK 3 Press I to start printing. 4 To print another image, use HI to the printer's instruction manual. For details, refer to select an image, and press the Q button. 48 EN Y button Multi-connector USB cable (supplied) Printing images at the printer's standard settings [Easy Print] In the setup menu, set [USB Connection] (p. 41) to [Print]. 1 Display the image to be set with the camera vary depending on the printer that can print images directly without using a computer. The printing modes, paper sizes, and other ...
"Viewing images" (p. 22) Easy Print Start Custom Print OK 3 Press I to start printing. 4 To print another image, use HI to the printer's instruction manual. For details, refer to select an image, and press the Q button. 48 EN Y button Multi-connector USB cable (supplied) Printing images at the printer's standard settings [Easy Print] In the setup menu, set [USB Connection] (p. 41) to [Print]. 1 Display the image to be set with the camera vary depending on the printer that can print images directly without using a computer. The printing modes, paper sizes, and other ...

VR-330 Instruction Manual (English)
Page 55
... shooting mode. ● Wait until #(flash charge) stops blinking before taking pictures. *1 Dew drops can form in the camera when it automatically turns off. Take the batteries out of what to do not appear, however, in this mode. "The light is suddenly taken from sleep mode before taking pictures. Troubleshooting Battery "The camera does not work as intended, or if an error message is fully pressed in the final image. Card/Internal memory...
... shooting mode. ● Wait until #(flash charge) stops blinking before taking pictures. *1 Dew drops can form in the camera when it automatically turns off. Take the batteries out of what to do not appear, however, in this mode. "The light is suddenly taken from sleep mode before taking pictures. Troubleshooting Battery "The camera does not work as intended, or if an error message is fully pressed in the final image. Card/Internal memory...

VR-330 Instruction Manual (English)
Page 56
... software, etc. Card problem The card write-protect switch is displayed on a computer. Internal memory problem • Insert a card. • Erase unwanted images.*1 Card problem • Replace the card. • Erase unwanted images.*1 Card Setup Power Off Format Card problem Use FG to select [Memory Format], and press the Q button. No Paper Printer problem Load paper into the printer. Printer problem Turn off the camera and printer, check the printer for any problems, and then turn the power on a computer. Jammed Settings Changed*3 Print Error Printer problem Remove...
... software, etc. Card problem The card write-protect switch is displayed on a computer. Internal memory problem • Insert a card. • Erase unwanted images.*1 Card problem • Replace the card. • Erase unwanted images.*1 Card Setup Power Off Format Card problem Use FG to select [Memory Format], and press the Q button. No Paper Printer problem Load paper into the printer. Printer problem Turn off the camera and printer, check the printer for any problems, and then turn the power on a computer. Jammed Settings Changed*3 Print Error Printer problem Remove...

VR-330 Instruction Manual (English)
Page 59
...; Connect the camera to the TV using an HDMI cable (sold separately) "Using an HDMI cable" (p. 44) Editing "Erasing the sound recorded to a still image" ● Record over the sound with silence when playing back the image "Adding sound to still images [R]" (p. 39) Batteries "Making batteries last longer" ● Avoid any of the following operations when not actually taking pictures because they deplete the battery power ● Repeatedly pressing the shutter button halfway ● Repeatedly using digital zoom (p. 21...
...; Connect the camera to the TV using an HDMI cable (sold separately) "Using an HDMI cable" (p. 44) Editing "Erasing the sound recorded to a still image" ● Record over the sound with silence when playing back the image "Adding sound to still images [R]" (p. 39) Batteries "Making batteries last longer" ● Avoid any of the following operations when not actually taking pictures because they deplete the battery power ● Repeatedly pressing the shutter button halfway ● Repeatedly using digital zoom (p. 21...
VR-330 Instruction Manual (English)
Page 62
... AUTO ISO AUTO # Lights in red while the camera is writing data. Image], or [All Erase] is performed, the data in the card is not completely erased. Never open the battery/card compartment cover or unplug the USB cable. When disposing of the card, damage the card to prevent the disclosure of the card During shooting, the current memory indicator lights in red 0.0 WB AUTO ISO AUTO 4 14M NORM # Shooting mode 4/30 '11/02/26 12:30 Playback mode Even if [Memory Format]/[Format], [Erase], [Sel. Using a new card Cards...
... AUTO ISO AUTO # Lights in red while the camera is writing data. Image], or [All Erase] is performed, the data in the card is not completely erased. Never open the battery/card compartment cover or unplug the USB cable. When disposing of the card, damage the card to prevent the disclosure of the card During shooting, the current memory indicator lights in red 0.0 WB AUTO ISO AUTO 4 14M NORM # Shooting mode 4/30 '11/02/26 12:30 Playback mode Even if [Memory Format]/[Format], [Erase], [Sel. Using a new card Cards...
VR-330 Instruction Manual (English)
Page 67
... camera, remove a tripod and all rights to this manual. otherwise the image may become vague, resulting in a warm place. Battery Handling Precautions • This camera uses a lithium ion battery specified by erasing picture data. it in a playback mode failure or damage to the monitor. • A strip of liability for storage to its color may malfunction if it is used for a long period, remove the batteries...
... camera, remove a tripod and all rights to this manual. otherwise the image may become vague, resulting in a warm place. Battery Handling Precautions • This camera uses a lithium ion battery specified by erasing picture data. it in a playback mode failure or damage to the monitor. • A strip of liability for storage to its color may malfunction if it is used for a long period, remove the batteries...

VR-330 Instruction Manual (English)
Page 70
... from the Product prior to sending the Product to Olympus for the disposal of waste batteries in the EU countries. INTERNATIONAL WARRANTY SERVICE International warranty service is completed, the Product will be repaired, or at Olympus's option replaced, free of charge. Please use the return and collection systems available in your country for service. Provisions of warranty 1 If this product complies with it...
... from the Product prior to sending the Product to Olympus for the disposal of waste batteries in the EU countries. INTERNATIONAL WARRANTY SERVICE International warranty service is completed, the Product will be repaired, or at Olympus's option replaced, free of charge. Please use the return and collection systems available in your country for service. Provisions of warranty 1 If this product complies with it...


