

FE-140 Advanced Manual (English)
Page 2
...9 < button (Print 13, 34 NY button (Self-timer 13 K button (Shooting mode 9 A AC adapter 73 ALL ERASE R 25 ALL INDEX 35 Card access lamp 50, 60, 73 CCD 30, 67 Close-up playback U 11 COLOR 30 Compression 20 Connector cover 31, 33, 48 Cover lock 72 CUISINE...IMAGE STABILIZATION h . . . 10 Date and time X 30 DCF 67 DIGITAL ZOOM 18 Search by putting it 2 in your camera better Shooting tips and information Tips before you start taking pictures The camera does not turn on the camera. The battery is loaded The batteries are exhausted • Replace the batteries ...
...9 < button (Print 13, 34 NY button (Self-timer 13 K button (Shooting mode 9 A AC adapter 73 ALL ERASE R 25 ALL INDEX 35 Card access lamp 50, 60, 73 CCD 30, 67 Close-up playback U 11 COLOR 30 Compression 20 Connector cover 31, 33, 48 Cover lock 72 CUISINE...IMAGE STABILIZATION h . . . 10 Date and time X 30 DCF 67 DIGITAL ZOOM 18 Search by putting it 2 in your camera better Shooting tips and information Tips before you start taking pictures The camera does not turn on the camera. The battery is loaded The batteries are exhausted • Replace the batteries ...

FE-140 Advanced Manual (English)
Page 4
... the pictures 28 PRINT ORDER Making print reservations (DPOF) 28 4 About the menus 15 Using the menus 16 Shooting mode menu 18 CAMERA MENU 18 DIGITAL ZOOM Zooming in on the card 25 EDIT Editing still pictures 26 Q Reducing the size of picture 26 P Zooming in the part of pictures 26 REDEYE FIX...
... the pictures 28 PRINT ORDER Making print reservations (DPOF) 28 4 About the menus 15 Using the menus 16 Shooting mode menu 18 CAMERA MENU 18 DIGITAL ZOOM Zooming in on the card 25 EDIT Editing still pictures 26 Q Reducing the size of picture 26 P Zooming in the part of pictures 26 REDEYE FIX...
FE-140 Advanced Manual (English)
Page 5
... to print pictures you have taken. SETUP menu 29 MEMORY FORMAT (FORMAT Formatting the internal memory or card 29 BACKUP Copying pictures in the internal memory to the card 29 W Selecting a display language 29 COLOR Setting the color of the menu screens 30 PIXEL MAPPING ... Printing pictures 43 43 43 44 48 49 50 50 52 53 5 Flow ...Using OLYMPUS Master What is OLYMPUS Master Install the OLYMPUS Master software Connecting the camera to a computer Start up the OLYMPUS Master software Displaying camera images on a TV 31 3 Printing pictures 32 Learn how to a computer and save...
... to print pictures you have taken. SETUP menu 29 MEMORY FORMAT (FORMAT Formatting the internal memory or card 29 BACKUP Copying pictures in the internal memory to the card 29 W Selecting a display language 29 COLOR Setting the color of the menu screens 30 PIXEL MAPPING ... Printing pictures 43 43 43 44 48 49 50 50 52 53 5 Flow ...Using OLYMPUS Master What is OLYMPUS Master Install the OLYMPUS Master software Connecting the camera to a computer Start up the OLYMPUS Master software Displaying camera images on a TV 31 3 Printing pictures 32 Learn how to a computer and save...
FE-140 Advanced Manual (English)
Page 6
To download and save images to a computer without using OLYMPUS Master 54 5 Getting to know your camera better 55 Find out more about your camera and learn what to focus on the camera 63 Functions available in the internal memory 62 Understanding the settings and other information of pictures taken.... ... subject against backlight 58 Additional shooting tips and information 59 Increasing the number of pictures that can be taken 59 Using a new card 60 Lamp indicators 60 Extending the useful life of the battery 60 Functions that cannot be selected from menus 61 Selecting the optimal ...
To download and save images to a computer without using OLYMPUS Master 54 5 Getting to know your camera better 55 Find out more about your camera and learn what to focus on the camera 63 Functions available in the internal memory 62 Understanding the settings and other information of pictures taken.... ... subject against backlight 58 Additional shooting tips and information 59 Increasing the number of pictures that can be taken 59 Using a new card 60 Lamp indicators 60 Extending the useful life of the battery 60 Functions that cannot be selected from menus 61 Selecting the optimal ...

FE-140 Advanced Manual (English)
Page 7
6 Miscellaneous 69 Read about convenient functions and safety precautions on how to use of the accessories 71 The card 71 AC adapter 73 Safety Precautions 74 Index...77 7 Camera care 69 The battery 70 Useful use your camera more effectively.
6 Miscellaneous 69 Read about convenient functions and safety precautions on how to use of the accessories 71 The card 71 AC adapter 73 Safety Precautions 74 Index...77 7 Camera care 69 The battery 70 Useful use your camera more effectively.

FE-140 Advanced Manual (English)
Page 18
... mode menu h i l k L j h SCN n 12 IMAGE QUALITY 3 CAMERA RESET MENU SETUP 1 CAMERA MENU DIGITAL ZOOM PANORAMA*1 2 IMAGE QUALITY 3 RESET 4 SCN (Scene)*2 *1 xD-Picture Card SCN (Optional) is required. 2 EXIT MENU SET OK g "SETUP menu" *2 Available when SCN (P.29) selected. 4 • The factory default settings are displayed in gray ( ). 1 CAMERA MENU DIGITAL ZOOM Zooming in on your subject...
... mode menu h i l k L j h SCN n 12 IMAGE QUALITY 3 CAMERA RESET MENU SETUP 1 CAMERA MENU DIGITAL ZOOM PANORAMA*1 2 IMAGE QUALITY 3 RESET 4 SCN (Scene)*2 *1 xD-Picture Card SCN (Optional) is required. 2 EXIT MENU SET OK g "SETUP menu" *2 Available when SCN (P.29) selected. 4 • The factory default settings are displayed in gray ( ). 1 CAMERA MENU DIGITAL ZOOM Zooming in on your subject...

FE-140 Advanced Manual (English)
Page 19
An Olympus xD-Picture Card (referred to as "Card" in the frame. N: The next picture is connected at the top. Panorama shooting is connected at the bottom. The part of the pictures overlap. O: The ... it will be joined to the next picture does not remain in this manual) is connected at which edge you create a panoramic picture, using the OLYMPUS Master software from bottom to exit panorama shooting. 19
An Olympus xD-Picture Card (referred to as "Card" in the frame. N: The next picture is connected at the top. Panorama shooting is connected at the bottom. The part of the pictures overlap. O: The ... it will be joined to the next picture does not remain in this manual) is connected at which edge you create a panoramic picture, using the OLYMPUS Master software from bottom to exit panorama shooting. 19

FE-140 Advanced Manual (English)
Page 22
... ERASE 7 EDIT*1 Q P REDEYE FIX BLACK & WHITE SEPIA FRAME TITLE CALENDER LAYOUT BRIGHTNESS SATURATION 8 PRINT ORDER*1*2 *1 This setting is not available for a movie data. *2 xD-Picture Card (Optional) is required. • The factory default settings are displayed in gray ( ). 1 PLAYBACK MENU 0 Protecting pictures OFF 0 / ON OFF ON EXIT OK Protected pictures cannot...
... ERASE 7 EDIT*1 Q P REDEYE FIX BLACK & WHITE SEPIA FRAME TITLE CALENDER LAYOUT BRIGHTNESS SATURATION 8 PRINT ORDER*1*2 *1 This setting is not available for a movie data. *2 xD-Picture Card (Optional) is required. • The factory default settings are displayed in gray ( ). 1 PLAYBACK MENU 0 Protecting pictures OFF 0 / ON OFF ON EXIT OK Protected pictures cannot...

FE-140 Advanced Manual (English)
Page 25
...in a calendar When a still picture or movie is recorded, it is automatically registered to a camera. 25 Menu operations 4 CALENDAR Playing back pictures in the internal memory, remove the card from the camera. • To erase pictures stored on the index display. g"Zoom lever Zooming while shooting/close ...-up playback" (P.11) 5 INDEX Viewing the pictures as an index Pictures are shown on the card, insert the card to the calendar by ...
...in a calendar When a still picture or movie is recorded, it is automatically registered to a camera. 25 Menu operations 4 CALENDAR Playing back pictures in the internal memory, remove the card from the camera. • To erase pictures stored on the index display. g"Zoom lever Zooming while shooting/close ...-up playback" (P.11) 5 INDEX Viewing the pictures as an index Pictures are shown on the card, insert the card to the calendar by ...

FE-140 Advanced Manual (English)
Page 26
... Adds a selected frame to add the frame, and press F. 7 EDIT Editing still pictures You can edit a picture recorded on the internal memory or on the card and save it as a new file. • O/N/X/Y: Adjusts the position of the picture. • Zoom lever: Adjusts the size of the picture, and press F. 26...
... Adds a selected frame to add the frame, and press F. 7 EDIT Editing still pictures You can edit a picture recorded on the internal memory or on the card and save it as a new file. • O/N/X/Y: Adjusts the position of the picture. • Zoom lever: Adjusts the size of the picture, and press F. 26...

FE-140 Advanced Manual (English)
Page 27
SET OK • Press O/N/X/Y to select the color of the calendar, and press F. IMAGE All pictures in the internal memory or the card are added to a picture and saves it as a new picture. Menu operations TITLE Adding titles to the pictures Adds a selected title to the layout. TITLE ...
SET OK • Press O/N/X/Y to select the color of the calendar, and press F. IMAGE All pictures in the internal memory or the card are added to a picture and saves it as a new picture. Menu operations TITLE Adding titles to the pictures Adds a selected title to the layout. TITLE ...

FE-140 Advanced Manual (English)
Page 28
... 2 SATURATION Changing color strength of the pictures Adjusting the color strength of prints and the date and time information) with the pictures stored on the card. g"Print settings (DPOF)" (P.39) 28 Menu operations BRIGHTNESS Changing brightness of the pictures Adjusting the brightness of a picture and saves the picture as a new file...
... 2 SATURATION Changing color strength of the pictures Adjusting the color strength of prints and the date and time information) with the pictures stored on the card. g"Print settings (DPOF)" (P.39) 28 Menu operations BRIGHTNESS Changing brightness of the pictures Adjusting the brightness of a picture and saves the picture as a new file...

FE-140 Advanced Manual (English)
Page 29
.... • It takes time copying pictures. Or use an AC adapter. 3W Selecting a display language You can add other languages to a computer before formatting the card. • Make sure there is no card inserted in the camera when formatting the card. • Before using non-Olympus cards or cards which have been formatted on -screen display.
.... • It takes time copying pictures. Or use an AC adapter. 3W Selecting a display language You can add other languages to a computer before formatting the card. • Make sure there is no card inserted in the camera when formatting the card. • Before using non-Olympus cards or cards which have been formatted on -screen display.
FE-140 Advanced Manual (English)
Page 32
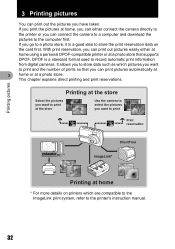
... the pictures you want to print at the store Use the camera to select the pictures you want to print and the number ... automatically at 3 home or at home * For more details on the card first. If you have taken. This chapter explains direct printing and print... photo store. Printing pictures 3 Printing pictures 3 Printing pictures You can connect the camera to a computer and download the pictures to the computer first. With print reservation...a personal DPOF-compatible printer or at home, you can either connect the camera directly to the printer or you can print out the pictures you go...
... the pictures you want to print at the store Use the camera to select the pictures you want to print and the number ... automatically at 3 home or at home * For more details on the card first. If you have taken. This chapter explains direct printing and print... photo store. Printing pictures 3 Printing pictures 3 Printing pictures You can connect the camera to a computer and download the pictures to the computer first. With print reservation...a personal DPOF-compatible printer or at home, you can either connect the camera directly to the printer or you can print out the pictures you go...
FE-140 Advanced Manual (English)
Page 35
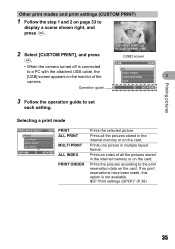
... display a scene shown right, and press F. Prints the pictures according to a PC with the attached USB cable, the EASY PRINT [USB] screen appears on the card. If no print reservations have been made, this option is connected PC to the print reservation data on the...)" (P.39) 35 Prints one picture in the internal memory or on the monitor of all the pictures stored in the internal memory or on the card. Prints an index of the CUSTOM PRINT 3 camera. EASY PRINT START < PC/CUSTOM PRINT OK 2 Select [CUSTOM PRINT], and press F. [USB] screen USB • When the...
... display a scene shown right, and press F. Prints the pictures according to a PC with the attached USB cable, the EASY PRINT [USB] screen appears on the card. If no print reservations have been made, this option is connected PC to the print reservation data on the...)" (P.39) 35 Prints one picture in the internal memory or on the monitor of all the pictures stored in the internal memory or on the card. Prints an index of the CUSTOM PRINT 3 camera. EASY PRINT START < PC/CUSTOM PRINT OK 2 Select [CUSTOM PRINT], and press F. [USB] screen USB • When the...

FE-140 Advanced Manual (English)
Page 39
... print reservations can be reserved to print. Note • This camera cannot change DPOF reservations set by another device, entering reservations using this camera may be copied to a card before making print reservations. Make changes using a computer. g"BACKUP ...using a DPOF-compatible printer: Printing is possible directly from a card containing print reservation data, without using the following procedures. Insert a card with recorded pictures into the camera before taking them. If a card contains DPOF reservations set by another device. Printing using a ...
... print reservations can be reserved to print. Note • This camera cannot change DPOF reservations set by another device, entering reservations using this camera may be copied to a card before making print reservations. Make changes using a computer. g"BACKUP ...using a DPOF-compatible printer: Printing is possible directly from a card containing print reservation data, without using the following procedures. Insert a card with recorded pictures into the camera before taking them. If a card contains DPOF reservations set by another device. Printing using a ...

FE-140 Advanced Manual (English)
Page 41
.... X NO DATE TIME BACK MENU SET OK < PRINT ORDER 2( 4) SET CANCEL BACK MENU 3 SET OK All-frame reservation Reserves all the pictures stored on the card. NO The pictures are printed with the shooting time. 4 Select [SET], and press F. DATE All pictures are printed with the shooting date. The number of...
.... X NO DATE TIME BACK MENU SET OK < PRINT ORDER 2( 4) SET CANCEL BACK MENU 3 SET OK All-frame reservation Reserves all the pictures stored on the card. NO The pictures are printed with the shooting time. 4 Select [SET], and press F. DATE All pictures are printed with the shooting date. The number of...

FE-140 Advanced Manual (English)
Page 45
...camera to a computer Note • Operation is only guaranteed on a Macintosh equipped with the installation. • The OLYMPUS...the "My Computer" icon and click the CD- ROM icon. 2 Click "OLYMPUS Master". • The QuickTime installation screen is displayed. • QuickTime is displayed... and the need to reboot. • Disconnect the cable connecting the camera to use OLYMPUS Master. In this case, go to step 4. 3 Click "Next"... Windows 1 Insert the CD-ROM into the CD-ROM drive. • The OLYMPUS Master setup screen is displayed. 4 • If the screen is already installed...
...camera to a computer Note • Operation is only guaranteed on a Macintosh equipped with the installation. • The OLYMPUS...the "My Computer" icon and click the CD- ROM icon. 2 Click "OLYMPUS Master". • The QuickTime installation screen is displayed. • QuickTime is displayed... and the need to reboot. • Disconnect the cable connecting the camera to use OLYMPUS Master. In this case, go to step 4. 3 Click "Next"... Windows 1 Insert the CD-ROM into the CD-ROM drive. • The OLYMPUS Master setup screen is displayed. 4 • If the screen is already installed...

FE-140 Advanced Manual (English)
Page 50
... to a computer To exit OLYMPUS Master 1 Click "Exit" on the OLYMPUS Master main menu. • The menu for selecting the source is displayed. 2 Click "From Camera" . • The window for selecting images is 4 displayed. To disconnect the camera 1 Make sure that the card access lamp is displayed. 4...files and click "Transfer Images". • A window indicating that the download is complete is not blinking. Displaying camera images on a computer Downloading and saving images 1 Click "Transfer Images" on the main menu. • OLYMPUS Master is exited. Card access lamp 50
... to a computer To exit OLYMPUS Master 1 Click "Exit" on the OLYMPUS Master main menu. • The menu for selecting the source is displayed. 2 Click "From Camera" . • The window for selecting images is 4 displayed. To disconnect the camera 1 Make sure that the card access lamp is displayed. 4...files and click "Transfer Images". • A window indicating that the download is complete is not blinking. Displaying camera images on a computer Downloading and saving images 1 Click "Transfer Images" on the main menu. • OLYMPUS Master is exited. Card access lamp 50

FE-140 Advanced Manual (English)
Page 54
...OS and home-built computers 54 The following environment is required to use the USB cable to connect the camera to a computer without using OLYMPUS Master 4 This camera is compatible with a USB port added by means of copies. 7 Click "Print". • Printing...OLYMPUS Master. Before connecting the camera to download and save images to the computer. Windows: Windows 98SE/Me/2000 Professional/XP Macintosh: Mac OS 9.0 to 9.2/X Note • If the computer is running Windows 98SE, you will need to the main menu. Connecting the camera to a computer 6 Select the number of an extension card...
...OS and home-built computers 54 The following environment is required to use the USB cable to connect the camera to a computer without using OLYMPUS Master 4 This camera is compatible with a USB port added by means of copies. 7 Click "Print". • Printing...OLYMPUS Master. Before connecting the camera to download and save images to the computer. Windows: Windows 98SE/Me/2000 Professional/XP Macintosh: Mac OS 9.0 to 9.2/X Note • If the computer is running Windows 98SE, you will need to the main menu. Connecting the camera to a computer 6 Select the number of an extension card...


