FE-110 Advanced Manual (English)
Page 1
... information contained in a safe place for purchasing an Olympus digital camera. The images of the LCD screen and illustrations of continually improving products, Olympus reserves the right to use your camera. DIGITAL CAMERA FE-110/X-705 FE-100/X-710 Advanced Manual Detailed explanations of all of the images are based on the FE-110/X-705 model. We recommend that you for future reference...
... information contained in a safe place for purchasing an Olympus digital camera. The images of the LCD screen and illustrations of continually improving products, Olympus reserves the right to use your camera. DIGITAL CAMERA FE-110/X-705 FE-100/X-710 Advanced Manual Detailed explanations of all of the images are based on the FE-110/X-705 model. We recommend that you for future reference...
FE-110 Advanced Manual (English)
Page 2
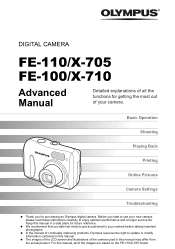
...information and hints that they are displayed horizontally. g Reference pages describing details or associated information. (Basic and Advanced Manuals The instruction manual accompanying this camera is only for further details on how to use the buttons or menus. Note Important information on a computer. ...for your reference. g"How to take some pictures! It will also find information on the camera's main functions as well as how to make prints and enjoy your camera. Basic Manual This manual gives you easy-to-follow explanations on how to use the menus" (P. 14), "Menu...
...information and hints that they are displayed horizontally. g Reference pages describing details or associated information. (Basic and Advanced Manuals The instruction manual accompanying this camera is only for further details on how to use the buttons or menus. Note Important information on a computer. ...for your reference. g"How to take some pictures! It will also find information on the camera's main functions as well as how to make prints and enjoy your camera. Basic Manual This manual gives you easy-to-follow explanations on how to use the menus" (P. 14), "Menu...
FE-110 Advanced Manual (English)
Page 3
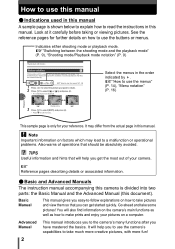
...taking pictures P. 4 P. 7 1 P. 17 2 Shooting P. 27 3 Playback P. 39 4 Useful functions P. 50 5 Printing pictures P. 56 6 Connecting the camera to know the names of parts, see a list of menus, or find important points for . To print the pictures you have taken on a computer. To ...104 9 The title page of each chapter gives a short description of your camera easier to use . Settings to make your camera here. How to use OLYMPUS Master. Be sure to handy picture-taking pictures. Composition of the manual You'll find what you are looking for getting the most out of ...
...taking pictures P. 4 P. 7 1 P. 17 2 Shooting P. 27 3 Playback P. 39 4 Useful functions P. 50 5 Printing pictures P. 56 6 Connecting the camera to know the names of parts, see a list of menus, or find important points for . To print the pictures you have taken on a computer. To ...104 9 The title page of each chapter gives a short description of your camera easier to use . Settings to make your camera here. How to use OLYMPUS Master. Be sure to handy picture-taking pictures. Composition of the manual You'll find what you are looking for getting the most out of ...
FE-110 Advanced Manual (English)
Page 9
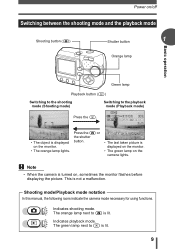
... playback mode (Playback mode) Press the k. 2560 1920 256902 1920 • The object is displayed on the camera lights. Indicates playback mode. Shooting mode/Playback mode notation In this manual, the following icons indicate the camera mode necessary for using functions. This is turned on, sometimes the monitor flashes before displaying the picture...
... playback mode (Playback mode) Press the k. 2560 1920 256902 1920 • The object is displayed on the camera lights. Indicates playback mode. Shooting mode/Playback mode notation In this manual, the following icons indicate the camera mode necessary for using functions. This is turned on, sometimes the monitor flashes before displaying the picture...

FE-110 Advanced Manual (English)
Page 16
Basic operation How to use the menus 4 Press . • The menu closes, and the camera is ready to shoot. 1 TIPS • Settings made in the menu are expressed as follows. • Ex: Steps 1 and 2 of setting the [SLEEP] function [SLEEP] i 16 Menu notation In this manual, procedures for using the menus are saved even if the camera is turned off. • Menu items common to both shooting mode and playback mode apply to the same setting, and the setting can be made from either mode.
Basic operation How to use the menus 4 Press . • The menu closes, and the camera is ready to shoot. 1 TIPS • Settings made in the menu are expressed as follows. • Ex: Steps 1 and 2 of setting the [SLEEP] function [SLEEP] i 16 Menu notation In this manual, procedures for using the menus are saved even if the camera is turned off. • Menu items common to both shooting mode and playback mode apply to the same setting, and the setting can be made from either mode.

FE-110 Advanced Manual (English)
Page 23
... mode [IN] Stores to the internal memory. [xD] Stores to a card (BACKUP)" (P. 54) 23 To use xD-Picture Card (referred to as "card" in this manual) to store pictures. You can also use the internal memory, remove the card. • You can easily be replaced or removed from the... camera. The card has greater capacity than the internal memory, and so, is disabled. Plays the pictures stored on a computer. The card is being used at ...
... mode [IN] Stores to the internal memory. [xD] Stores to a card (BACKUP)" (P. 54) 23 To use xD-Picture Card (referred to as "card" in this manual) to store pictures. You can also use the internal memory, remove the card. • You can easily be replaced or removed from the... camera. The card has greater capacity than the internal memory, and so, is disabled. Plays the pictures stored on a computer. The card is being used at ...

FE-110 Advanced Manual (English)
Page 38
...3 Take the picture. Note • If the flash is used, the image brightness (exposure) may get better results when the exposure that the camera sets is displayed. 2 3 Press ^] to make adjustments, and press i. • Plus [+] increases brightness and minus [-] decreases brightness. Adjust ... can adjust the exposure in 1/3 EV steps. 1 Press [F. • The setting screen for the exposure compensation is compensated (adjusted) manually. TIPS • Often bright subjects (such as snow) will turn out darker than their real shades. Adjusting picture brightness (exposure compensation)...
...3 Take the picture. Note • If the flash is used, the image brightness (exposure) may get better results when the exposure that the camera sets is displayed. 2 3 Press ^] to make adjustments, and press i. • Plus [+] increases brightness and minus [-] decreases brightness. Adjust ... can adjust the exposure in 1/3 EV steps. 1 Press [F. • The setting screen for the exposure compensation is compensated (adjusted) manually. TIPS • Often bright subjects (such as snow) will turn out darker than their real shades. Adjusting picture brightness (exposure compensation)...
FE-110 Advanced Manual (English)
Page 44
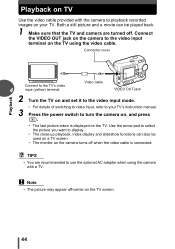
... • You are turned off when the video cable is displayed on the TV. Note • The picture may appear off-center on the camera to display. • The close-up playback, index display and slideshow functions can be used on a TV screen. • The monitor on the...using the video cable. Both a still picture and a movie can also be played back. 1 Make sure that the TV and camera are recommended to playback recorded images on your TV's instruction manual. 3 Press the power switch to the TV's video 4 input (yellow) terminal. Connect the VIDEO OUT jack on the TV ...
... • You are turned off when the video cable is displayed on the TV. Note • The picture may appear off-center on the camera to display. • The close-up playback, index display and slideshow functions can be used on a TV screen. • The monitor on the...using the video cable. Both a still picture and a movie can also be played back. 1 Make sure that the TV and camera are recommended to playback recorded images on your TV's instruction manual. 3 Press the power switch to the TV's video 4 input (yellow) terminal. Connect the VIDEO OUT jack on the TV ...
FE-110 Advanced Manual (English)
Page 57
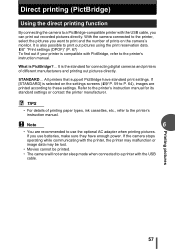
...PictBridge?... All printers that support PictBridge have enough power. Note 6 • You are printed according to the printer's instruction manual. If the camera stops operating while communicating with the printer, the printer may malfunction or image data may be lost. • Movies cannot be...standard print settings. What is selected on the camera's monitor. Refer to the printer's instruction manual for connecting digital cameras and printers of printing paper types, ink cassettes, etc., refer to these settings. With the camera connected to the printer, select the pictures you ...
...PictBridge?... All printers that support PictBridge have enough power. Note 6 • You are printed according to the printer's instruction manual. If the camera stops operating while communicating with the printer, the printer may malfunction or image data may be lost. • Movies cannot be...standard print settings. What is selected on the camera's monitor. Refer to the printer's instruction manual for connecting digital cameras and printers of printing paper types, ink cassettes, etc., refer to these settings. With the camera connected to the printer, select the pictures you ...
FE-110 Advanced Manual (English)
Page 58
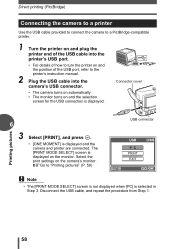
...Step 3. Disconnect the USB cable, and repeat the procedure from Step 1. gGo to the printer's instruction manual. 2 Plug the USB cable into the camera's USB connector. • The camera turns on automatically. • The monitor turns on and the selection screen for the USB connection is...[PRINT MODE SELECT] screen is displayed. Select the print settings on the camera's monitor. Printing pictures 58 Direct printing (PictBridge) Connecting the camera to a printer Use the USB cable provided to connect the camera to a PictBridge-compatible printer. 1 Turn the printer on and plug the ...
...Step 3. Disconnect the USB cable, and repeat the procedure from Step 1. gGo to the printer's instruction manual. 2 Plug the USB cable into the camera's USB connector. • The camera turns on automatically. • The monitor turns on and the selection screen for the USB connection is...[PRINT MODE SELECT] screen is displayed. Select the print settings on the camera's monitor. Printing pictures 58 Direct printing (PictBridge) Connecting the camera to a printer Use the USB cable provided to connect the camera to a PictBridge-compatible printer. 1 Turn the printer on and plug the ...
FE-110 Advanced Manual (English)
Page 59
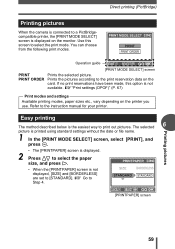
Direct printing (PictBridge) Printing pictures When the camera is connected to a PictBridgecompatible printer, the [PRINT MODE SELECT] screen is displayed on the printer you use. g"Print settings (DPOF)" (P. 67) Print modes and settings ... the print reservation data on the card. Refer to select the print mode. If no print reservations have been made, this screen to the instruction manual for your printer.
Direct printing (PictBridge) Printing pictures When the camera is connected to a PictBridgecompatible printer, the [PRINT MODE SELECT] screen is displayed on the printer you use. g"Print settings (DPOF)" (P. 67) Print modes and settings ... the print reservation data on the card. Refer to select the print mode. If no print reservations have been made, this screen to the instruction manual for your printer.
FE-110 Advanced Manual (English)
Page 66
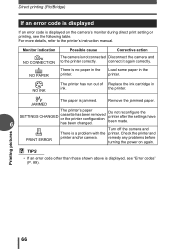
...refer to the printer correctly. TIPS • If an error code other than those shown above is not connected Disconnect the camera and to the printer's instruction manual. Direct printing (PictBridge) If an error code is displayed If an error code is displayed on again. NO INK The ...cartridge in the printer. Do not reconfigure the printer after the settings have been made. Check the printer and PRINT ERROR printer and/or camera. Remove the jammed paper. 6 SETTINGS CHANGED The printer's paper cassette has been removed or the printer configuration has been changed. Monitor indication...
...refer to the printer correctly. TIPS • If an error code other than those shown above is not connected Disconnect the camera and to the printer's instruction manual. Direct printing (PictBridge) If an error code is displayed If an error code is displayed on again. NO INK The ...cartridge in the printer. Do not reconfigure the printer after the settings have been made. Check the printer and PRINT ERROR printer and/or camera. Remove the jammed paper. 6 SETTINGS CHANGED The printer's paper cassette has been removed or the printer configuration has been changed. Monitor indication...
FE-110 Advanced Manual (English)
Page 67
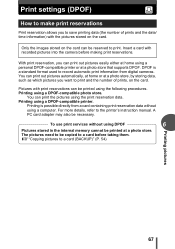
...the following procedures. For more details, refer to a card (BACKUP)" (P. 54) Printing pictures 67 DPOF is possible directly from digital cameras. Printing using a DPOF-compatible printer. Only the images stored on the card can be copied to a card before making print reservations... print information from a card containing print reservation data without using the print reservation data. g"Copying pictures to the printer's instruction manual. Printing using a DPOF-compatible photo store. A PC card adapter may also be necessary. You can print the pictures using ...
...the following procedures. For more details, refer to a card (BACKUP)" (P. 54) Printing pictures 67 DPOF is possible directly from digital cameras. Printing using a DPOF-compatible printer. Only the images stored on the card can be copied to a card before making print reservations... print information from a card containing print reservation data without using the print reservation data. g"Copying pictures to the printer's instruction manual. Printing using a DPOF-compatible photo store. A PC card adapter may also be necessary. You can print the pictures using ...
FE-110 Advanced Manual (English)
Page 73
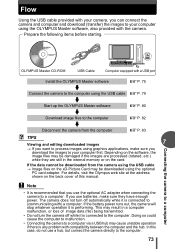
... turn off while it is recommended that you use a hub, but connect the camera directly to the computer. 73 This may be downloaded using the OLYMPUS Master software, also provided with ) a computer. In this manual. Connecting the camera to a computer OLYMPUS Master CD-ROM USB Cable Computer equipped with compatibility between the computer and the...
... turn off while it is recommended that you use a hub, but connect the camera directly to the computer. 73 This may be downloaded using the OLYMPUS Master software, also provided with ) a computer. In this manual. Connecting the camera to a computer OLYMPUS Master CD-ROM USB Cable Computer equipped with compatibility between the computer and the...
FE-110 Advanced Manual (English)
Page 74
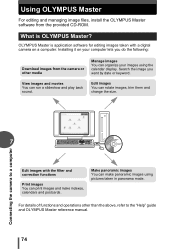
...install the OLYMPUS Master software from the camera or other than the above, refer to a computer 7 Edit images with a digital camera on your computer lets you want by date or keyword. Make panoramic images You can make indexes, calendars and postcards. OLYMPUS Master is OLYMPUS Master?... the following: Download images from the provided CD-ROM. Installing it on a computer. Connecting the camera to the "Help" guide and OLYMPUS Master reference manual. 74 What is application software for editing images taken with the filter and correction functions Print images You...
...install the OLYMPUS Master software from the camera or other than the above, refer to a computer 7 Edit images with a digital camera on your computer lets you want by date or keyword. Make panoramic images You can make indexes, calendars and postcards. OLYMPUS Master is OLYMPUS Master?... the following: Download images from the provided CD-ROM. Installing it on a computer. Connecting the camera to the "Help" guide and OLYMPUS Master reference manual. 74 What is application software for editing images taken with the filter and correction functions Print images You...
FE-110 Advanced Manual (English)
Page 75
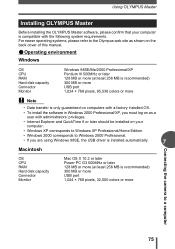
Using OLYMPUS Master Installing OLYMPUS Master Before installing the OLYMPUS Master software, please confirm that your computer is recommended) 300 MB or more USB port 1,024 × 768 pixels, 32,000 colors or more Connecting the camera to Windows 2000 Professional. • If you are using Windows 98SE, the... with administrators' privileges. • Internet Explorer and QuickTime 6 or later should be installed on the back cover of this manual. (Operating environment Windows OS CPU RAM Hard disk capacity Connector Monitor Windows 98SE/Me/2000 Professional/XP Pentium III 500MHz or later...
Using OLYMPUS Master Installing OLYMPUS Master Before installing the OLYMPUS Master software, please confirm that your computer is recommended) 300 MB or more USB port 1,024 × 768 pixels, 32,000 colors or more Connecting the camera to Windows 2000 Professional. • If you are using Windows 98SE, the... with administrators' privileges. • Internet Explorer and QuickTime 6 or later should be installed on the back cover of this manual. (Operating environment Windows OS CPU RAM Hard disk capacity Connector Monitor Windows 98SE/Me/2000 Professional/XP Pentium III 500MHz or later...
FE-110 Advanced Manual (English)
Page 77
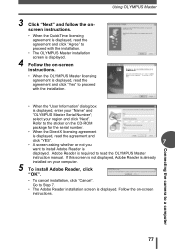
... asking whether or not you 7 want to install Adobe Reader is displayed. Connecting the camera to Step 7. • The Adobe Reader installation screen is displayed, enter your "Name" and "OLYMPUS Master Serial Number"; 3 Click "Next" and follow the onscreen instructions. • When...and click "Next". Refer to the sticker on -screen instructions. • When the OLYMPUS Master licensing agreement is displayed, read the OLYMPUS Master instruction manual. Go to a computer 77 Using OLYMPUS Master • When the "User Information" dialog box is displayed. select your computer....
... asking whether or not you 7 want to install Adobe Reader is displayed. Connecting the camera to Step 7. • The Adobe Reader installation screen is displayed, enter your "Name" and "OLYMPUS Master Serial Number"; 3 Click "Next" and follow the onscreen instructions. • When...and click "Next". Refer to the sticker on -screen instructions. • When the OLYMPUS Master licensing agreement is displayed, read the OLYMPUS Master instruction manual. Go to a computer 77 Using OLYMPUS Master • When the "User Information" dialog box is displayed. select your computer....
FE-110 Advanced Manual (English)
Page 79
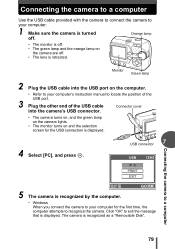
.... • Refer to your computer's instruction manual to locate the position of the USB port. 3 Plug the other end of the USB cable Connector cover into the camera's USB connector. • The camera turns on, and the green lamp on the camera lights. • The monitor turns on the camera are off . • The green...
.... • Refer to your computer's instruction manual to locate the position of the USB port. 3 Plug the other end of the USB cable Connector cover into the camera's USB connector. • The camera turns on, and the green lamp on the camera lights. • The monitor turns on the camera are off . • The green...
FE-110 Advanced Manual (English)
Page 88
8 Appendix 8 Appendix This chapter contains useful information from OLYMPUS. Here you will find what to understanding the terms used in this manual. Refer to this section for basic troubleshooting, camera care and a full glossary to do when you are stuck or don't understand the meaning of the terms used in this manual. ? ? 88
8 Appendix 8 Appendix This chapter contains useful information from OLYMPUS. Here you will find what to understanding the terms used in this manual. Refer to this section for basic troubleshooting, camera care and a full glossary to do when you are stuck or don't understand the meaning of the terms used in this manual. ? ? 88
FE-110 Advanced Manual (English)
Page 95
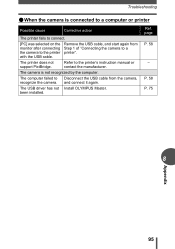
... Possible cause Corrective action The printer fails to connect. [PC] was selected on the monitor after connecting the camera to the printer's instruction manual or contact the manufacturer. The USB driver has not Install OLYMPUS Master. P. 58 P. 75 8 Appendix 95 The computer failed to a printer". been installed. page P. 58 - Refer to the printer...
... Possible cause Corrective action The printer fails to connect. [PC] was selected on the monitor after connecting the camera to the printer's instruction manual or contact the manufacturer. The USB driver has not Install OLYMPUS Master. P. 58 P. 75 8 Appendix 95 The computer failed to a printer". been installed. page P. 58 - Refer to the printer...


