
DS-2400 Instructions (English)
Page 1
EN To ensure successful recordings, we recommend that you for purchasing an Olympus Digital Voice Recorder. Please read these instructions for future reference. Keep the instructions handy for information about using the product correctly and safely. DIGITAL VOICE RECORDER DS-2400 INSTRUCTIONS EN INSTRUCTIONS Thank you test the record function and volume before use.
EN To ensure successful recordings, we recommend that you for purchasing an Olympus Digital Voice Recorder. Please read these instructions for future reference. Keep the instructions handy for information about using the product correctly and safely. DIGITAL VOICE RECORDER DS-2400 INSTRUCTIONS EN INSTRUCTIONS Thank you test the record function and volume before use.
DS-2400 Instructions (English)
Page 4
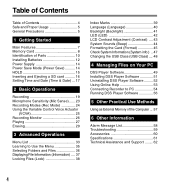
............. 16 Setting Time and Date (Time & Date) ... 17 2 Basic Operations Recording 19 Microphone Sensitivity (Mic Sense) ...... 23 Recording Modes (Rec Mode 24 Using the Variable Control Voice Actuator (VCVA 25 Recording Monitor 26 Playing 27 Erasing 29 3 Advanced Operations Menu List 33 Learning to Use... on Your PC DSS Player Software 49 Installing DSS Player Software 51 Uninstalling DSS Player Software ......... 52 Using Online Help 53 Connecting Recorder to PC 54 Running DSS Player Software 56 5 Other Practical Use Methods Using as External Memory of the Computer ... 57 6 Other...
............. 16 Setting Time and Date (Time & Date) ... 17 2 Basic Operations Recording 19 Microphone Sensitivity (Mic Sense) ...... 23 Recording Modes (Rec Mode 24 Using the Variable Control Voice Actuator (VCVA 25 Recording Monitor 26 Playing 27 Erasing 29 3 Advanced Operations Menu List 33 Learning to Use... on Your PC DSS Player Software 49 Installing DSS Player Software 51 Uninstalling DSS Player Software ......... 52 Using Online Help 53 Connecting Recorder to PC 54 Running DSS Player Software 56 5 Other Practical Use Methods Using as External Memory of the Computer ... 57 6 Other...
DS-2400 Instructions (English)
Page 5
... warnings and information provided. Convention Used In this manual in memory may cause interference and noise. General Precautions ● Do not leave the recorder in hot, humid locations such as inside a closed automobile under direct sunlight or on the beach in the summer. ● Do not store ...8226; Words in Apple Macintosh environment. • The Notes at the bottom of or near electric appliances such as TVs or refrigerators. ● Avoid recording or playing back near cellular phones or other wireless equipment, as PLAY or REC are used to refer to the SD card. • The word...
... warnings and information provided. Convention Used In this manual in memory may cause interference and noise. General Precautions ● Do not leave the recorder in hot, humid locations such as inside a closed automobile under direct sunlight or on the beach in the summer. ● Do not store ...8226; Words in Apple Macintosh environment. • The Notes at the bottom of or near electric appliances such as TVs or refrigerators. ● Avoid recording or playing back near cellular phones or other wireless equipment, as PLAY or REC are used to refer to the SD card. • The word...
DS-2400 Instructions (English)
Page 7
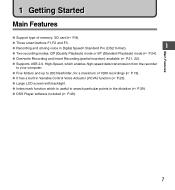
... P.25). ● Large LCD screen with backlight. ● Index mark function which enables high-speed data transmission from the recorder to your computer. ● Five folders and up to search particular points in Digital Speech Standard Pro (DS2 format). 1 Main Features... ● Two recording modes, QP (Quality Playback) mode or SP (Standard Playback) mode (☞ P.24). ● Overwrite Recording and Insert Recording (partial insertion) available (☞ P.21, 22). ● Supports USB 2.0. High-Speed...
... P.25). ● Large LCD screen with backlight. ● Index mark function which enables high-speed data transmission from the recorder to your computer. ● Five folders and up to search particular points in Digital Speech Standard Pro (DS2 format). 1 Main Features... ● Two recording modes, QP (Quality Playback) mode or SP (Standard Playback) mode (☞ P.24). ● Overwrite Recording and Insert Recording (partial insertion) available (☞ P.21, 22). ● Supports USB 2.0. High-Speed...
DS-2400 Instructions (English)
Page 8
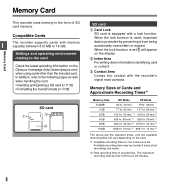
...Card (Format) (☞ P.45) SD card 1 3 2 SD card 1 Card Lock SD card is set will vary depending on the Olympus homepage (http://www.olympus.com) when using cards other than the included card. Settings and operating environment relating to 16 GB. When the lock function is equipped with... memory capacity between 512 MB to the card Memory Card Check the latest operating information on the card. *1: Available recording time...
...Card (Format) (☞ P.45) SD card 1 3 2 SD card 1 Card Lock SD card is set will vary depending on the Olympus homepage (http://www.olympus.com) when using cards other than the included card. Settings and operating environment relating to 16 GB. When the lock function is equipped with... memory capacity between 512 MB to the card Memory Card Check the latest operating information on the card. *1: Available recording time...
DS-2400 Instructions (English)
Page 9
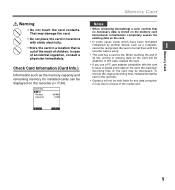
... the memory capacity and remaining memory for any data corruption or loss due to format them with static electricity. • Store the card in the recorder. • Olympus will be displayed on the memory card beforehand. BACK EXIT 9 Warning • Do not touch the card contacts. SD Remain Capacity 540MB 1.0GB Memory...
... the memory capacity and remaining memory for any data corruption or loss due to format them with static electricity. • Store the card in the recorder. • Olympus will be displayed on the memory card beforehand. BACK EXIT 9 Warning • Do not touch the card contacts. SD Remain Capacity 540MB 1.0GB Memory...

DS-2400 Instructions (English)
Page 10
Identification of Parts Identification of Parts 1 & * ( 0 ! @ # $ % ^ ) 1 2 3 4 5 w 6 - 7 8 q= 9 1 SD card slot 2 Built-in speaker - MIC (Microphone) @ Record indicator light # Display (LCD panel) 10 $ + (Volume) button % Fast Forward (9) button ^ PLAY/OK button & Smart button (F1,F2,F3) * Rewind (0) button ( - (Volume) button ) Built-in microphone 3 NEW button 4 REC button 5 REW button 6 FF button 7 STOP button 8 POWER/HOLD switch 9 ERASE button 0 EAR (Earphone) ! Battery cover = PC (USB) terminal q Cradle connector w Battery cover release button
Identification of Parts Identification of Parts 1 & * ( 0 ! @ # $ % ^ ) 1 2 3 4 5 w 6 - 7 8 q= 9 1 SD card slot 2 Built-in speaker - MIC (Microphone) @ Record indicator light # Display (LCD panel) 10 $ + (Volume) button % Fast Forward (9) button ^ PLAY/OK button & Smart button (F1,F2,F3) * Rewind (0) button ( - (Volume) button ) Built-in microphone 3 NEW button 4 REC button 5 REW button 6 FF button 7 STOP button 8 POWER/HOLD switch 9 ERASE button 0 EAR (Earphone) ! Battery cover = PC (USB) terminal q Cradle connector w Battery cover release button
DS-2400 Instructions (English)
Page 11
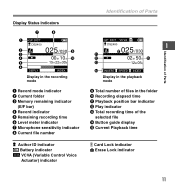
... E 4 5 6 DISPLY 025 /030 9 F 00M 10S 0 15H 22M30S INDEX Display in the recording mode 1 Record mode indicator 2 Current folder 3 Memory remaining indicator (E/F bar) 4 Record indicator 5 Remaining recording time 6 Level meter indicator 7 Microphone sensitivity indicator 8 Current file number Author ID indicator Battery indicator VCVA ... 02 M 50 S % # 12M 05S $ INSERT SPEED INDEX Display in the folder 0 Recording elapsed time ! Playback position bar indicator @ Play indicator # Total recording time of files in the playback mode 9 Total number of the selected file $ Button guide ...
... E 4 5 6 DISPLY 025 /030 9 F 00M 10S 0 15H 22M30S INDEX Display in the recording mode 1 Record mode indicator 2 Current folder 3 Memory remaining indicator (E/F bar) 4 Record indicator 5 Remaining recording time 6 Level meter indicator 7 Microphone sensitivity indicator 8 Current file number Author ID indicator Battery indicator VCVA ... 02 M 50 S % # 12M 05S $ INSERT SPEED INDEX Display in the folder 0 Recording elapsed time ! Playback position bar indicator @ Play indicator # Total recording time of files in the playback mode 9 Total number of the selected file $ Button guide ...
DS-2400 Instructions (English)
Page 12
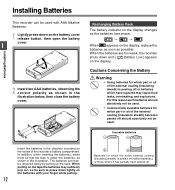
When the batteries are too weak, the recorder shuts down on the battery cover release button, then open the battery 1 cover. The batteries can be used with your finger while pulling. 12 Batteries ... available batteries for which part or all of the external coating (insulation sheath) has been peeled off or batteries which part or all of the recorder's battery compartment. Unusable batteries Insert the batteries in the illustration below, then close the battery cover. Installing Batteries This...
When the batteries are too weak, the recorder shuts down on the battery cover release button, then open the battery 1 cover. The batteries can be used with your finger while pulling. 12 Batteries ... available batteries for which part or all of the external coating (insulation sheath) has been peeled off or batteries which part or all of the recorder's battery compartment. Unusable batteries Insert the batteries in the illustration below, then close the battery cover. Installing Batteries This...
DS-2400 Instructions (English)
Page 13
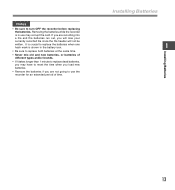
... reset the time when you load new batteries. • Remove the batteries if you are recording into a file and the batteries run out, you are not going to use may corrupt the card.... If you will lose your currently recorded file since the file header will not be written. It is crucial to replace the batteries... when one hash mark is in the battery icon. • Be sure to turn OFF the recorder before replacing the batteries. Installing Batteries 1 Installing Batteries 13 Notes • Be sure to replace both ...
... reset the time when you load new batteries. • Remove the batteries if you are recording into a file and the batteries run out, you are not going to use may corrupt the card.... If you will lose your currently recorded file since the file header will not be written. It is crucial to replace the batteries... when one hash mark is in the battery icon. • Be sure to turn OFF the recorder before replacing the batteries. Installing Batteries 1 Installing Batteries 13 Notes • Be sure to replace both ...

DS-2400 Instructions (English)
Page 14
..., turn on . Turning Off the Power Slide the POWER/HOLD switch in use for 0.5 seconds or longer. Power Save Mode (Power Save) When the recorder is turned off, existing data, mode settings, and clock settings will be changed from among [5 minutes.], [10 minutes.], [30 minutes.], [1 hour], and... minutes 1 hour Off BACK EXIT 14 The resume function remembers the stop position in the direction indicated by default, it will bring the recorder back to power save , press any button or the slide switch. To exit power save mode automatically. The display shuts off . Power...
..., turn on . Turning Off the Power Slide the POWER/HOLD switch in use for 0.5 seconds or longer. Power Save Mode (Power Save) When the recorder is turned off, existing data, mode settings, and clock settings will be changed from among [5 minutes.], [10 minutes.], [30 minutes.], [1 hour], and... minutes 1 hour Off BACK EXIT 14 The resume function remembers the stop position in the direction indicated by default, it will bring the recorder back to power save , press any button or the slide switch. To exit power save mode automatically. The display shuts off . Power...

DS-2400 Instructions (English)
Page 15
Set the recorder to HOLD mode 1 HOLD Slide the POWER/HOLD switch to be disabled.This feature is set to the A position. 15 HOLD If you bring the POWER/HOLD switch to the HOLD position, the current conditions will be preserved, and all buttons and switches will be carried in a bag or pocket. Exit HOLD mode Slide the POWER/HOLD switch to HOLD mode. After [Hold] appears on the display, the recorder is useful when the recorder has to the HOLD position.
Set the recorder to HOLD mode 1 HOLD Slide the POWER/HOLD switch to be disabled.This feature is set to the A position. 15 HOLD If you bring the POWER/HOLD switch to the HOLD position, the current conditions will be preserved, and all buttons and switches will be carried in a bag or pocket. Exit HOLD mode Slide the POWER/HOLD switch to HOLD mode. After [Hold] appears on the display, the recorder is useful when the recorder has to the HOLD position.
DS-2400 Instructions (English)
Page 16
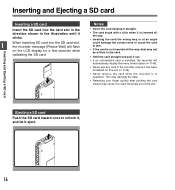
... card. • Hold the card straight and pull it out. • If an unformatted card is installed, the recorder will flash on this unit (☞ P.45). • Never remove the card while the recorder is not inserted all the way, data may cause it to unlock it, and let it eject. 16... the wrong way or at an angle could damage the contact area or cause the card to jam. • If the card is in the recorder unless it has been formatted on the LCD display for a few seconds while validating the SD card. Inserting and Ejecting a SD card Inserting a SD card...
... card. • Hold the card straight and pull it out. • If an unformatted card is installed, the recorder will flash on this unit (☞ P.45). • Never remove the card while the recorder is not inserted all the way, data may cause it to unlock it, and let it eject. 16... the wrong way or at an angle could damage the contact area or cause the card to jam. • If the card is in the recorder unless it has been formatted on the LCD display for a few seconds while validating the SD card. Inserting and Ejecting a SD card Inserting a SD card...
DS-2400 Instructions (English)
Page 17
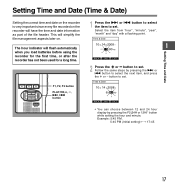
... Setting Time and Date BACK 24H EXIT 2 + - Setting Time and Date (Time & Date) Setting the correct time and date on the recorder is very important since every file recorded on the recorder will simplify the file management aspects later on. Select the item from "hour", "minute", "year", "month" and "day" with a flashing point... have the time and date information as part of the file header. The hour indicator will flash automatically when you load batteries before using the recorder for the first time, or after the recorder has not been used for a long time.
... Setting Time and Date BACK 24H EXIT 2 + - Setting Time and Date (Time & Date) Setting the correct time and date on the recorder is very important since every file recorded on the recorder will simplify the file management aspects later on. Select the item from "hour", "minute", "year", "month" and "day" with a flashing point... have the time and date information as part of the file header. The hour indicator will flash automatically when you load batteries before using the recorder for the first time, or after the recorder has not been used for a long time.
DS-2400 Instructions (English)
Page 18
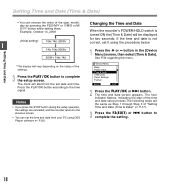
... Step 3 of the year, month, day by pressing the F2(D/M/Y or Y/M/D or M/ D/Y)* button while setting them. Changing the Time and Date When the recorder's POWER/HOLD switch is not correct, set date and time. The hour indicator flashes, indicating the start from your PC using the procedure below. 1 Press... 2008Y 10M 14D Setting Time and Date *The display will start of the time and date setup process.The following steps are cancelled, and the recorder returns to the previous screen. • You can choose the order of "Setting Time and Date (Time & Date)" (☞ P.17). 3 Press the...
... Step 3 of the year, month, day by pressing the F2(D/M/Y or Y/M/D or M/ D/Y)* button while setting them. Changing the Time and Date When the recorder's POWER/HOLD switch is not correct, set date and time. The hour indicator flashes, indicating the start from your PC using the procedure below. 1 Press... 2008Y 10M 14D Setting Time and Date *The display will start of the time and date setup process.The following steps are cancelled, and the recorder returns to the previous screen. • You can choose the order of "Setting Time and Date (Time & Date)" (☞ P.17). 3 Press the...
DS-2400 Instructions (English)
Page 19
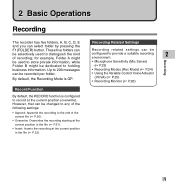
.... • Using the Variable Control Voice Actuator By default, the Recording Mode is QP. (VCVA) (☞ P.25) • Recording Monitor (☞ P.26) Record Function By default, the RECORD function is configured to provide a suitable recording 2 of the current file (☞ P.20). • Overwrite: Overwrites the recording starting at the current position in the file (☞ P.21...
.... • Using the Variable Control Voice Actuator By default, the Recording Mode is QP. (VCVA) (☞ P.25) • Recording Monitor (☞ P.26) Record Function By default, the RECORD function is configured to provide a suitable recording 2 of the current file (☞ P.20). • Overwrite: Overwrites the recording starting at the current position in the file (☞ P.21...
DS-2400 Instructions (English)
Page 20
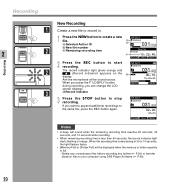
...FOLDER INFO MENU Notes • A beep will be displayed when the memory or folder capacity is less than 60 seconds, the record indicator light starts flashing in . Aim the microphone at the sound source. Press the NEW button to create a new QP DICT ... a DS2400 b / 030 bNew file number E F 2 2 cRemaining recording time New File Remain c 15 H 22 M 40 s FOLDER INFO MENU Recording 2 Press the REC button to record in orange. Recording New Recording 1 Create a new file to start recording. If you can change the LCD DISPLY INDEX screen displays. 3 dRecord indicator...
...FOLDER INFO MENU Notes • A beep will be displayed when the memory or folder capacity is less than 60 seconds, the record indicator light starts flashing in . Aim the microphone at the sound source. Press the NEW button to create a new QP DICT ... a DS2400 b / 030 bNew file number E F 2 2 cRemaining recording time New File Remain c 15 H 22 M 40 s FOLDER INFO MENU Recording 2 Press the REC button to record in orange. Recording New Recording 1 Create a new file to start recording. If you can change the LCD DISPLY INDEX screen displays. 3 dRecord indicator...

DS-2400 Instructions (English)
Page 21
... overwriting. E a b 101 /133 F 10 M 25 s 00H 14M 00s aRecording elapsed time bTotal recording time of overwrite. 2 Recording 2 Press the REC button to overwrite. Note that of the original file before overwrite recording. 21 QP DICT DS2400 3 The record indicator light glows orange and (Record indicator) appears on the display. Note • You cannot select a different...
... overwriting. E a b 101 /133 F 10 M 25 s 00H 14M 00s aRecording elapsed time bTotal recording time of overwrite. 2 Recording 2 Press the REC button to overwrite. Note that of the original file before overwrite recording. 21 QP DICT DS2400 3 The record indicator light glows orange and (Record indicator) appears on the display. Note • You cannot select a different...
DS-2400 Instructions (English)
Page 22
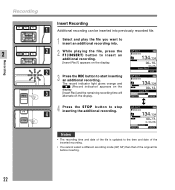
...25s Insert Rec? 2 EXIT 3 Press the REC button to stop inserting the additional recording. Recording Insert Recording 1 Additional recording can be inserted into . 2 2 2 While playing the file, press the F1(INSERT) button to insert an additional recording. E F 00 M 12s Insert Rec DISPLY INDEX 4 Press the STOP button ...to start inserting an additional recording. PLAY/OK 1 Select and play the file you want to the time and date of the inserted recording. • You cannot select a different recording mode (QP, SP) than that of the original file...
...25s Insert Rec? 2 EXIT 3 Press the REC button to stop inserting the additional recording. Recording Insert Recording 1 Additional recording can be inserted into . 2 2 2 While playing the file, press the F1(INSERT) button to insert an additional recording. E F 00 M 12s Insert Rec DISPLY INDEX 4 Press the STOP button ...to start inserting an additional recording. PLAY/OK 1 Select and play the file you want to the time and date of the inserted recording. • You cannot select a different recording mode (QP, SP) than that of the original file...
DS-2400 Instructions (English)
Page 23
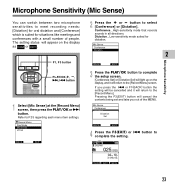
... screen. [Conference Set] or [Dictation Set] will light up on the display as CONF or DICT . button to the [Record Menu] screen. Conference...High-sensitivity mode that records sounds in all directions. Mic Sense Conference Dictation Dictation Set BACK EXIT 4 Press the F3(EXIT) or 0 button to meet... oral dictation and [Conference] which is suited for dictation. PLAY/OK F1, F3 button PLAY/OK,+, -, 9, 0 button 1 Select [Mic Sense] at the [Record Menu] screen, then press the PLAY/OK or 9 button. Pressing the F3(EXIT) button will appear on the display, and it will return to select [...
... screen. [Conference Set] or [Dictation Set] will light up on the display as CONF or DICT . button to the [Record Menu] screen. Conference...High-sensitivity mode that records sounds in all directions. Mic Sense Conference Dictation Dictation Set BACK EXIT 4 Press the F3(EXIT) or 0 button to meet... oral dictation and [Conference] which is suited for dictation. PLAY/OK F1, F3 button PLAY/OK,+, -, 9, 0 button 1 Select [Mic Sense] at the [Record Menu] screen, then press the PLAY/OK or 9 button. Pressing the F3(EXIT) button will appear on the display, and it will return to select [...


