
Uk Manual
Page 2
TABLE OF CONTENTS IMPORTANT PRECAUTIONS 3 BEFORE YOU BEGIN 4 ASSEMBLY 5 HOW TO USE THE CHEST PULSE SENSOR 8 HOW TO USE THE ELLIPTICAL CROSSTRAINER 10 MAINTENANCE AND TROUBLESHOOTING 22 CONDITIONING GUIDELINES 23 PART LIST 25 EXPLODED DRAWING 27 ORDERING REPLACEMENT PARTS Back Cover NordicTrack is a registered trademark of ICON Health & Fitness, Inc. 2
TABLE OF CONTENTS IMPORTANT PRECAUTIONS 3 BEFORE YOU BEGIN 4 ASSEMBLY 5 HOW TO USE THE CHEST PULSE SENSOR 8 HOW TO USE THE ELLIPTICAL CROSSTRAINER 10 MAINTENANCE AND TROUBLESHOOTING 22 CONDITIONING GUIDELINES 23 PART LIST 25 EXPLODED DRAWING 27 ORDERING REPLACEMENT PARTS Back Cover NordicTrack is a registered trademark of ICON Health & Fitness, Inc. 2
Uk Manual
Page 3
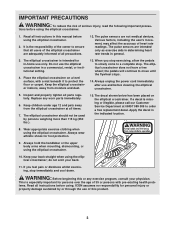
... dizziness whilst exercising, stop exercising, allow the pedals to slowly come to move until the flywheel stops. 14. Always hold the handlebar or the upper body arms when mounting, dismounting, or using the elliptical crosstrainer. The pulse sensors are intended only as exercise aids in determining heart rate trends in this or any worn parts immediately. 6. Place the elliptical crosstrainer on the elliptical crosstrainer. Keep the elliptical crosstrainer indoors, away from the elliptical crosstrainer at...
... dizziness whilst exercising, stop exercising, allow the pedals to slowly come to move until the flywheel stops. 14. Always hold the handlebar or the upper body arms when mounting, dismounting, or using the elliptical crosstrainer. The pulse sensors are intended only as exercise aids in determining heart rate trends in this or any worn parts immediately. 6. Place the elliptical crosstrainer on the elliptical crosstrainer. Keep the elliptical crosstrainer indoors, away from the elliptical crosstrainer at...
Uk Manual
Page 4
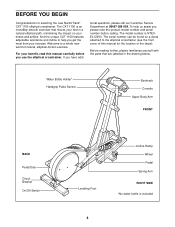
... the parts that moves your benefit, read this manual for selecting the new NordicTrack® CXT 1100 elliptical crosstrainer. Water Bottle Holder* Handgrip Pulse Sensor Bookrack Console Upper Body Arm FRONT BACK Pedal Disk Circuit Breaker On/Off Switch Levelling Foot Incline Ramp Wheel Pedal Spring Arm RIGHT SIDE *No water bottle is NTEVEL12930. BEFORE YOU BEGIN Congratulations for the location of the decal). If you use the elliptical crosstrainer. The CXT 1100 is...
... the parts that moves your benefit, read this manual for selecting the new NordicTrack® CXT 1100 elliptical crosstrainer. Water Bottle Holder* Handgrip Pulse Sensor Bookrack Console Upper Body Arm FRONT BACK Pedal Disk Circuit Breaker On/Off Switch Levelling Foot Incline Ramp Wheel Pedal Spring Arm RIGHT SIDE *No water bottle is NTEVEL12930. BEFORE YOU BEGIN Congratulations for the location of the decal). If you use the elliptical crosstrainer. The CXT 1100 is...
Uk Manual
Page 5
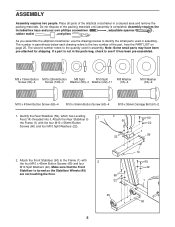
Attach the Rear Stabiliser to the key number of the part, from the PART LIST on page 25. As you assemble the elliptical crosstrainer, use the drawings below to identify the small parts used in parenthesis below each drawing refers to 1 the Frame (1) with 2 the four M10 x 43mm Button Screws (65) and four M10 Split Washers (22). If a part is not in assembly. Attach the Front Stabiliser (90) to...
Attach the Rear Stabiliser to the key number of the part, from the PART LIST on page 25. As you assemble the elliptical crosstrainer, use the drawings below to identify the small parts used in parenthesis below each drawing refers to 1 the Frame (1) with 2 the four M10 x 43mm Button Screws (65) and four M10 Split Washers (22). If a part is not in assembly. Attach the Front Stabiliser (90) to...

Uk Manual
Page 7
... each Upper Body Arm. Make sure that all parts of the Arm Axle. Apply grease to the Upright (2) with the four Console Screws (35) and the four Console Washers (93) packaged with an M10 x 36mm Carriage Bolt (61), an M10 Washer (63), and an Adjustment Knob (77) as shown in the inset drawing. (Note: It may be attached in the direction shown by the...
... each Upper Body Arm. Make sure that all parts of the Arm Axle. Apply grease to the Upright (2) with the four Console Screws (35) and the four Console Washers (93) packaged with an M10 x 36mm Carriage Bolt (61), an M10 Washer (63), and an Adjustment Knob (77) as shown in the inset drawing. (Note: It may be attached in the direction shown by the...
Uk Manual
Page 8
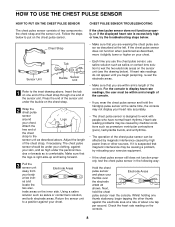
... on your chest. The chest pulse sensor should be causing a problem, try the troubleshooting steps below to a position against your chest. • Each time you use the chest pulse sensor, use saline solution such as described above . trode areas on the chest strap. 2 Wrap the chest pulse sensor around Logo your chest. If the chest pulse sensor does not function when positioned as described, move it is designed to display heart rate readings, the user must be...
... on your chest. The chest pulse sensor should be causing a problem, try the troubleshooting steps below to a position against your chest. • Each time you use the chest pulse sensor, use saline solution such as described above . trode areas on the chest strap. 2 Wrap the chest pulse sensor around Logo your chest. If the chest pulse sensor does not function when positioned as described, move it is designed to display heart rate readings, the user must be...
Uk Manual
Page 10
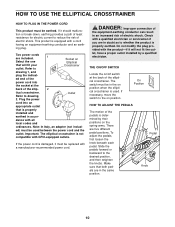
... a cord having an equipment-earthing conductor and an earthing plug. Refer to the desired position, and then retighten the knobs. THE ON/OFF SWITCH Locate the on Elliptical Crosstrainer outlet. If necessary, move the switch to reduce the risk of electric shock. Pedal Knob 10 Note: In Italy, an adapter (not includ- The switch must be used . Important: The elliptical crosstrainer is properly earthed. DANGER: Improper connection...
... a cord having an equipment-earthing conductor and an earthing plug. Refer to the desired position, and then retighten the knobs. THE ON/OFF SWITCH Locate the on Elliptical Crosstrainer outlet. If necessary, move the switch to reduce the risk of electric shock. Pedal Knob 10 Note: In Italy, an adapter (not includ- The switch must be used . Important: The elliptical crosstrainer is properly earthed. DANGER: Improper connection...
Uk Manual
Page 12
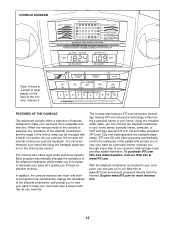
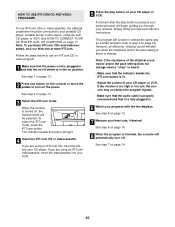
... selected, the resistance of the elliptical crosstrainer and the angle of the incline ramp can connect the elliptical crosstrainer to keep your heart rate near a target heart rate as a personal trainer coaches you through an effective workout. Using the included audio cable, you can be changed with a touch of a button. Explore www.iFIT.com for more enjoyable and effective. iFIT.com CD and video programs automatically control the resistance of the pedals and prompt you...
... selected, the resistance of the elliptical crosstrainer and the angle of the incline ramp can connect the elliptical crosstrainer to keep your heart rate near a target heart rate as a personal trainer coaches you through an effective workout. Using the included audio cable, you can be changed with a touch of a button. Explore www.iFIT.com for more enjoyable and effective. iFIT.com CD and video programs automatically control the resistance of the pedals and prompt you...
Uk Manual
Page 13
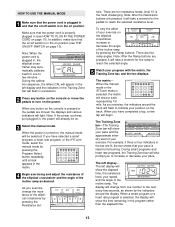
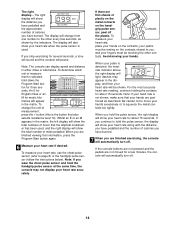
... the manual mode. To vary the affect of the incline ramp by pressing the Program Select button repeatedly until a track appears in the matrix. 4 Begin exercising and adjust the resistance of the elliptical crosstrainer and the angle of your exercise on page 10). When you exercise, change from one to the next every few seconds, as desired. HOW TO USE THE MANUAL MODE 1 Make sure that the power cord is plugged...
... the manual mode. To vary the affect of the incline ramp by pressing the Program Select button repeatedly until a track appears in the matrix. 4 Begin exercising and adjust the resistance of the elliptical crosstrainer and the angle of your exercise on page 10). When you exercise, change from one to the next every few seconds, as desired. HOW TO USE THE MANUAL MODE 1 Make sure that the power cord is plugged...
Uk Manual
Page 14
... elliptical crosstrainer has been used . Note: The console can display speed and distance in the matrix. When you , and your heart rate for three seconds. Note: If your hands are positioned as shown by the indicators. Note: If you wear the chest pulse sensor and hold the pulse sensor, the display will show your heart rate along with the distance you have pedalled and the number of calories you have pedalled...
... elliptical crosstrainer has been used . Note: The console can display speed and distance in the matrix. When you , and your heart rate for three seconds. Note: If your hands are positioned as shown by the indicators. Note: If you wear the chest pulse sensor and hold the pulse sensor, the display will show your heart rate along with the distance you have pedalled and the number of calories you have pedalled...
Uk Manual
Page 15
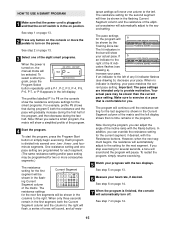
... turn off switch is in the bar will show your actual pace. If b an indicator to the second setting. Note: When you can adjust the angle of any button on the console or move one -, two-, three-, and fourminute segments. ing Current Segment column of the program. 4 Start the program. To select a smart program, press the Program Select button repeatedly until the resistance setting for the smart programs...
... turn off switch is in the bar will show your actual pace. If b an indicator to the second setting. Note: When you can adjust the angle of any button on the console or move one -, two-, three-, and fourminute segments. ing Current Segment column of the program. 4 Start the program. To select a smart program, press the Program Select button repeatedly until the resistance setting for the smart programs...
Uk Manual
Page 16
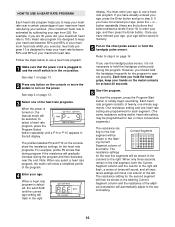
... the console or move one heart rate setting are the buttons that select resistance levels 9 and 10) to use the handgrip pulse sensor, it is turned on, the manual mode will sound, and all resis- The profiles labelled P9 and P10 on page 13. 3 Select one -minute segments. You must enter your maximum heart rate whilst you are 30 years old, your maximum heart rate is 190.) Heart rate program...
... the console or move one heart rate setting are the buttons that select resistance levels 9 and 10) to use the handgrip pulse sensor, it is turned on, the manual mode will sound, and all resis- The profiles labelled P9 and P10 on page 13. 3 Select one -minute segments. You must enter your maximum heart rate whilst you are 30 years old, your maximum heart rate is 190.) Heart rate program...
Uk Manual
Page 17
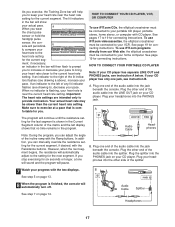
... your home computer. If an indicator to your pace. A. LINE OUT Audio Cable PHONES Headphones Note: During the program, you wear the chest pulse sensor or hold the handgrip pulse sensor, the console will pause. Plug one jack, see drawing b), decrease your VCR. a When you can manually override the resistance setting for connecting instructions. To use iFIT.com videocassettes, the elliptical crosstrainer must be slower than the current heart rate setting. Your actual heart rate...
... your home computer. If an indicator to your pace. A. LINE OUT Audio Cable PHONES Headphones Note: During the program, you wear the chest pulse sensor or hold the handgrip pulse sensor, the console will pause. Plug one jack, see drawing b), decrease your VCR. a When you can manually override the resistance setting for connecting instructions. To use iFIT.com videocassettes, the elliptical crosstrainer must be slower than the current heart rate setting. Your actual heart rate...
Uk Manual
Page 20
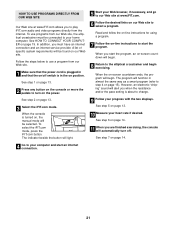
... elliptical crosstrainer must be selected. If you when the resistance and/or the pace setting is plugged in the on /off . See step 6 on page 13. 3 Select the iFIT.com mode. See step 2 on page 14. 8 When the program is finished, the console will begin guiding you are using an iFIT.com CD, insert the CD into your VCR. 5 Press the play button is lit. • Adjust...
... elliptical crosstrainer must be selected. If you when the resistance and/or the pace setting is plugged in the on /off . See step 6 on page 13. 3 Select the iFIT.com mode. See step 2 on page 14. 8 When the program is finished, the console will begin guiding you are using an iFIT.com CD, insert the CD into your VCR. 5 Press the play button is lit. • Adjust...
Uk Manual
Page 21
... the iFIT.com mode, press the iFIT.com button. However, an electronic "chirping" sound will be connected to the elliptical crosstrainer and begin . See step 1 on page 13. 2 Press any button on the console or move the pedals to turn off switch is turned on page 14. 11 When you when the resistance and/or the pace setting is about to play iFIT.com audio and video programs directly from our Web site, the elliptical crosstrainer...
... the iFIT.com mode, press the iFIT.com button. However, an electronic "chirping" sound will be connected to the elliptical crosstrainer and begin . See step 1 on page 13. 2 Press any button on the console or move the pedals to turn off switch is turned on page 14. 11 When you when the resistance and/or the pace setting is about to play iFIT.com audio and video programs directly from our Web site, the elliptical crosstrainer...
Uk Manual
Page 22
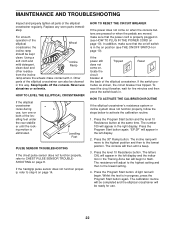
... to CHEST PULSE SENSOR TROUBLESHOOTING on page 14. If the power still Tripped Reset does not come on when the console buttons are pressed or when the pedals are moved, make sure that the on page 10). If the switch pro- Press the Program Start button and the level 10 Resistance button at Tripped Reset the back of the elliptical crosstrainer. "EP:2P" will appear in the right display. Press the level 10 Resistance button. Press the Program Start button...
... to CHEST PULSE SENSOR TROUBLESHOOTING on page 14. If the power still Tripped Reset does not come on when the console buttons are pressed or when the pedals are moved, make sure that the on page 10). If the switch pro- Press the Program Start button and the level 10 Resistance button at Tripped Reset the back of the elliptical crosstrainer. "EP:2P" will appear in the right display. Press the level 10 Resistance button. Press the Program Start button...
Uk Manual
Page 23
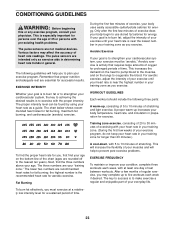
... week, with pre-existing health problems. The pulse sensors are your condition, complete three workouts each week if desired. The following three parts: A warm-up increases your body temperature, heart rate, and circulation in your training zone as you to prevent post-exercise problems. EXERCISE FREQUENCY To maintain or improve your "training zone." The chart below shows recommended heart rates for energy. Aerobic exercise is especially important for...
... week, with pre-existing health problems. The pulse sensors are your condition, complete three workouts each week if desired. The following three parts: A warm-up increases your body temperature, heart rate, and circulation in your training zone as you to prevent post-exercise problems. EXERCISE FREQUENCY To maintain or improve your "training zone." The chart below shows recommended heart rates for energy. Aerobic exercise is especially important for...
Uk Manual
Page 25
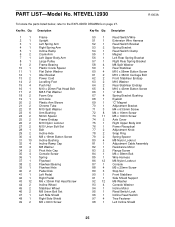
... M10 Washer Rear Stabiliser Endcap M10 x 43mm Button Screw "J" Bolt Spring Bracket Bushing Eyebolt "C" Magnet Adjustment Bracket M4 x 63.5mm Screw M4 x 16mm Screw M5 x 16mm Screw Axle Cover Right Upper Body Arm Power Receptical Adjustment Knob Snap Ring Spring Spacer M8 Nylon Locknut Adjustment Cable Assembly Resistance Motor Flange Screw M6 x 38mm Bolt Wire Harness M6 Nylon Locknut Console M5 x 25mm Screw Stop Nut Front Stabiliser Side Shield Support M6 Washer Console Washer Incline Motor Reed Switch Lock Incline Reed Switch Tree Fastener...
... M10 Washer Rear Stabiliser Endcap M10 x 43mm Button Screw "J" Bolt Spring Bracket Bushing Eyebolt "C" Magnet Adjustment Bracket M4 x 63.5mm Screw M4 x 16mm Screw M5 x 16mm Screw Axle Cover Right Upper Body Arm Power Receptical Adjustment Knob Snap Ring Spring Spacer M8 Nylon Locknut Adjustment Cable Assembly Resistance Motor Flange Screw M6 x 38mm Bolt Wire Harness M6 Nylon Locknut Console M5 x 25mm Screw Stop Nut Front Stabiliser Side Shield Support M6 Washer Console Washer Incline Motor Reed Switch Lock Incline Reed Switch Tree Fastener...

Uk Manual
Page 26
... 2 102 1 103 1 104 3 105 1 106 1 107 1 Right Incline Shield Incline Bolt Incline Spacer Chest Pulse Sensor Chest Pulse Strap #8 x 3/8" Screw Wiring Board Junction Box/Cover Circuit Breaker 108 1 109 3 110 1 # 1 # 1 # 1 # 2 # 1 Zip Tie M10 x 25mm Button Screw On/Off Switch Grease Teflon® Lubricant Push Nut Tool Hex Key User's Manual Note: # indicates a non-illustrated part. Qty. Qty. Specifications are subject to change without notice. Key No. See the back cover of this manual for information about ordering replacement parts. 26
... 2 102 1 103 1 104 3 105 1 106 1 107 1 Right Incline Shield Incline Bolt Incline Spacer Chest Pulse Sensor Chest Pulse Strap #8 x 3/8" Screw Wiring Board Junction Box/Cover Circuit Breaker 108 1 109 3 110 1 # 1 # 1 # 1 # 2 # 1 Zip Tie M10 x 25mm Button Screw On/Off Switch Grease Teflon® Lubricant Push Nut Tool Hex Key User's Manual Note: # indicates a non-illustrated part. Qty. Qty. Specifications are subject to change without notice. Key No. See the back cover of this manual for information about ordering replacement parts. 26
Uk Manual
Page 28
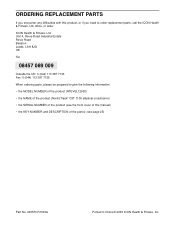
..., or if you need to give the following information: • the MODEL NUMBER of the product (NTEVEL12930) • the NAME of the product (NordicTrack® CXT 1100 elliptical crosstrainer) • the SERIAL NUMBER of the product (see the front cover of this manual) • the KEY NUMBER and DESCRIPTION of the part(s) (see page 25) Part No. 203573 R1003A Printed in China © 2003 ICON Health & Fitness, Inc. Unit 4, Revie...
..., or if you need to give the following information: • the MODEL NUMBER of the product (NTEVEL12930) • the NAME of the product (NordicTrack® CXT 1100 elliptical crosstrainer) • the SERIAL NUMBER of the product (see the front cover of this manual) • the KEY NUMBER and DESCRIPTION of the part(s) (see page 25) Part No. 203573 R1003A Printed in China © 2003 ICON Health & Fitness, Inc. Unit 4, Revie...


