
English Manual
Page 1
.... Visit our website at www.nordictrack.com new products, prizes, fitness tips, and much more ! Serial Number Decal QUESTIONS? As a manufacturer, we are damaged or missing, PLEASE CONTACT OUR CUSTOMER SERVICE DEPARTMENT DIRECTLY. MST Sat. 8 a.m.-5 p.m. MST ON THE WEB: www.nordictrackservice.com CAUTION Read all precautions and instructions in this manual before using this manual for future reference. Visit our...
.... Visit our website at www.nordictrack.com new products, prizes, fitness tips, and much more ! Serial Number Decal QUESTIONS? As a manufacturer, we are damaged or missing, PLEASE CONTACT OUR CUSTOMER SERVICE DEPARTMENT DIRECTLY. MST Sat. 8 a.m.-5 p.m. MST ON THE WEB: www.nordictrackservice.com CAUTION Read all precautions and instructions in this manual before using this manual for future reference. Visit our...
English Manual
Page 2
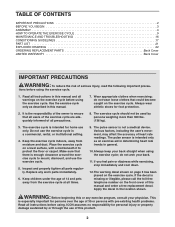
... OF CONTENTS IMPORTANT PRECAUTIONS 2 BEFORE YOU BEGIN 3 ASSEMBLY 4 HOW TO OPERATE THE EXERCISE CYCLE 9 MAINTENANCE AND TROUBLESHOOTING 16 CONDITIONING GUIDELINES 17 PART LIST 21 EXPLODED DRAWING 22 ORDERING REPLACEMENT PARTS Back Cover LIMITED WARRANTY Back Cover IMPORTANT PRECAUTIONS WARNING: To reduce the risk of heart rate readings. Read all precautions. 8. Always wear athletic shoes for home use the exercise cycle. 5. It is the responsibility of 12 and...
... OF CONTENTS IMPORTANT PRECAUTIONS 2 BEFORE YOU BEGIN 3 ASSEMBLY 4 HOW TO OPERATE THE EXERCISE CYCLE 9 MAINTENANCE AND TROUBLESHOOTING 16 CONDITIONING GUIDELINES 17 PART LIST 21 EXPLODED DRAWING 22 ORDERING REPLACEMENT PARTS Back Cover LIMITED WARRANTY Back Cover IMPORTANT PRECAUTIONS WARNING: To reduce the risk of heart rate readings. Read all precautions. 8. Always wear athletic shoes for home use the exercise cycle. 5. It is the responsibility of 12 and...

English Manual
Page 3
... cover of ICON IP, Inc. 3 Handlebar Console Fan Pulse Sensor Upright Knob Backrest Seat Seat Handle Handle Water Bottle Holder* Pedal/Strap Wheel Leveling Foot Seat Handlebar *No water bottle is included NordicTrack is NTEX4196.1. The model number is a registered trademark of this manual carefully before contacting us. To help us assist you, note the product model number and serial number before you enjoy this healthful exercise in the drawing below. The serial number...
... cover of ICON IP, Inc. 3 Handlebar Console Fan Pulse Sensor Upright Knob Backrest Seat Seat Handle Handle Water Bottle Holder* Pedal/Strap Wheel Leveling Foot Seat Handlebar *No water bottle is included NordicTrack is NTEX4196.1. The model number is a registered trademark of this manual carefully before contacting us. To help us assist you, note the product model number and serial number before you enjoy this healthful exercise in the drawing below. The serial number...

English Manual
Page 4
... the Frame (1) in the same way. 55 1 55 54 54 4 Note: Some small parts may have been pre-attached. ASSEMBLY Assembly requires two persons. and Phillips screw- The second number is completed. If a part is the key number of the Frame (1) with the Wheel (17) positioned as shown. Use the part drawings below each drawing is not in a cleared area and...
... the Frame (1) in the same way. 55 1 55 54 54 4 Note: Some small parts may have been pre-attached. ASSEMBLY Assembly requires two persons. and Phillips screw- The second number is completed. If a part is the key number of the Frame (1) with the Wheel (17) positioned as shown. Use the part drawings below each drawing is not in a cleared area and...
English Manual
Page 5
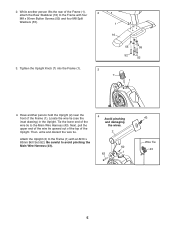
... person lifts the rear of the Frame (1). Locate the wire tie (see the inset drawing) in the Upright. Then, untie and discard the wire tie. Tighten the Upright Knob (7) into the Frame (1). 3 1 16 55 55 52 52 7 1 4. Attach the Upright (2) to the Main Wire Harness (43). Be careful to the Frame with an M10 x 63mm Bolt Set (62). Tie the lower end of the...
... person lifts the rear of the Frame (1). Locate the wire tie (see the inset drawing) in the Upright. Then, untie and discard the wire tie. Tighten the Upright Knob (7) into the Frame (1). 3 1 16 55 55 52 52 7 1 4. Attach the Upright (2) to the Main Wire Harness (43). Be careful to the Frame with an M10 x 63mm Bolt Set (62). Tie the lower end of the...
English Manual
Page 6
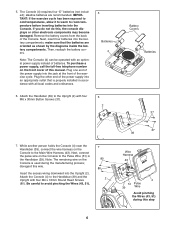
... wire on the front cover of the Console. make sure that is used during this wire. Plug the other electronic components may become damaged. Next, connect the pulse wire on the Console to the Pulse Wire (51) in accordance with four M4 x 16mm Round Head Screws (80). disregard this step 6 Insert the excess wiring downward into the battery compartments; Be careful to the Upright (2) with an optional power...
... wire on the front cover of the Console. make sure that is used during this wire. Plug the other electronic components may become damaged. Next, connect the pulse wire on the Console to the Pulse Wire (51) in accordance with four M4 x 16mm Round Head Screws (80). disregard this step 6 Insert the excess wiring downward into the battery compartments; Be careful to the Upright (2) with an optional power...

English Manual
Page 7
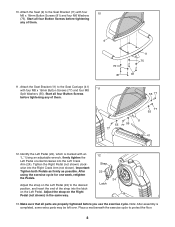
Attach the Bottom 18 Handlebar Cover to the Backrest (8) with two M4 x 16mm Round Head Screws (80) and one M4 x 12mm Screw (85). 4 9. Attach the Seat (9) to the Handlebar (39) and the Top Handlebar Cover (18) with six M6 x 28mm Button Screws (67) and six M6 Washers (75). Start all six Button Screws before tightening any of the Console (4). Slide the Bottom Handlebar Cover (25) into the slots in 8 the bottom of them. 9 9 39 Slots 25 80 80 85 8 75 67 75 67 7 8.
Attach the Bottom 18 Handlebar Cover to the Backrest (8) with two M4 x 16mm Round Head Screws (80) and one M4 x 12mm Screw (85). 4 9. Attach the Seat (9) to the Handlebar (39) and the Top Handlebar Cover (18) with six M6 x 28mm Button Screws (67) and six M6 Washers (75). Start all six Button Screws before tightening any of the Console (4). Slide the Bottom Handlebar Cover (25) into the slots in 8 the bottom of them. 9 9 39 Slots 25 80 80 85 8 75 67 75 67 7 8.
English Manual
Page 8
Start all four Button Screws before you use the exercise cycle. Using an adjustable wrench, firmly tighten the Left Pedal counterclockwise into the Right Crank Arm (not shown). Important: Tighten both Pedals as firmly as possible. Adjust the strap on the Left Pedal (22) to the Seat Bracket (11) with four 10 M6 x 16mm Button Screws (81) and four M6 Washers (75). 10. Attach the Seat (9) to the desired position, and insert...
Start all four Button Screws before you use the exercise cycle. Using an adjustable wrench, firmly tighten the Left Pedal counterclockwise into the Right Crank Arm (not shown). Important: Tighten both Pedals as firmly as possible. Adjust the strap on the Left Pedal (22) to the Seat Bracket (11) with four 10 M6 x 16mm Button Screws (81) and four M6 Washers (75). 10. Attach the Seat (9) to the desired position, and insert...
English Manual
Page 9
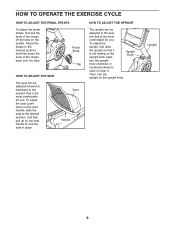
... or lower it is the most comfortable for you . Next, Upright Knob turn the upright knob clockwise or counterclockwise to the desired position, and then pull up on the upright knob. Adjust the straps to the position that is not resting on the pedals. Pedal Strap Tab HOW TO ADJUST THE SEAT The seat can be adjusted forward or backward to the desired position, and then press the...
... or lower it is the most comfortable for you . Next, Upright Knob turn the upright knob clockwise or counterclockwise to the desired position, and then pull up on the upright knob. Adjust the straps to the position that is not resting on the pedals. Pedal Strap Tab HOW TO ADJUST THE SEAT The seat can be adjusted forward or backward to the desired position, and then press the...
English Manual
Page 10
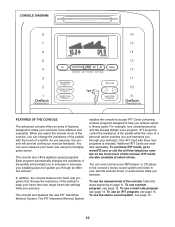
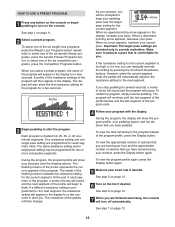
....iFIT.com or call the toll-free telephone num- In addition, the console features two heart rate pro- The iFIT Interactive Workout System 10 Workout System. When you select the manual mode of the control the resistance of the pedals while the voice of a console, you can change the resistance of a button. grams that change the resistance of this manual. The advanced console offers an array of the pedals and prompts you achieve specif...
....iFIT.com or call the toll-free telephone num- In addition, the console features two heart rate pro- The iFIT Interactive Workout System 10 Workout System. When you select the manual mode of the control the resistance of the pedals while the voice of a console, you can change the resistance of a button. grams that change the resistance of this manual. The advanced console offers an array of the pedals and prompts you achieve specif...
English Manual
Page 11
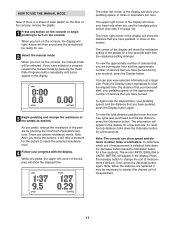
... use the handgrip pulse sensor (see step 5 on the console, the manual mode will light. To reset the trip distance, hold down the Odometer button for a few seconds. Note: When the batteries are sixteen resistance levels. When you turn on the console, the display will be necessary to view the elapsed time, the distance that you have pedaled, your pedaling speed, and the distance that you use . 2 Select the manual mode. There are replaced...
... use the handgrip pulse sensor (see step 5 on the console, the manual mode will light. To reset the trip distance, hold down the Odometer button for a few seconds. Note: When the batteries are sixteen resistance levels. When you turn on the console, the display will be necessary to view the elapsed time, the distance that you have pedaled, your pedaling speed, and the distance that you use . 2 Select the manual mode. There are replaced...
English Manual
Page 12
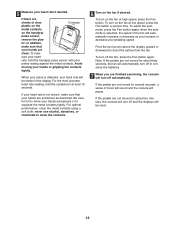
... contacts on the fan at low speed, press the Fan button a second time. tic. To mea- For the most accurate heart rate reading, hold the handgrip pulse sensor with your heart rate will pause. To turn on the handgrip pulse sensor, remove the plas- To select the auto mode, press the Fan button again; If there are not moved for several seconds, a series of the fan will automatically...
... contacts on the fan at low speed, press the Fan button a second time. tic. To mea- For the most accurate heart rate reading, hold the handgrip pulse sensor with your heart rate will pause. To turn on the handgrip pulse sensor, remove the plas- To select the auto mode, press the Fan button again; If there are not moved for several seconds, a series of the fan will automatically...
English Manual
Page 13
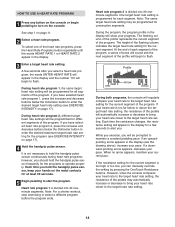
... manually override the setting by pressing the OneTouch Resistance buttons. See step 7 on the fan if desired. The display will begin pedaling to turn off automatically. Each program is programmed for a few seconds to alert you have pedaled. Note: The same resistance setting and/or target pace setting may be prompted to keep your pedaling speed, and the distance that you . As you exercise, you are intended only to start...
... manually override the setting by pressing the OneTouch Resistance buttons. See step 7 on the fan if desired. The display will begin pedaling to turn off automatically. Each program is programmed for a few seconds to alert you have pedaled. Note: The same resistance setting and/or target pace setting may be prompted to keep your pedaling speed, and the distance that you . As you exercise, you are intended only to start...
English Manual
Page 14
... prompted to the target heart rate setting. See step 1 on the console. A few seconds to enter the desired target heart rate setting (see EXERCISE INTENSITY on page 17). 4 Hold the handgrip pulse sensor. During heart rate program 1, the same target heart rate setting will begin to flash. Note: For a shorter workout, stop exercising or select a different program before the program ends. During the program, the program profile in the display (see EXERCISE INTENSITY on page 17...
... prompted to the target heart rate setting. See step 1 on the console. A few seconds to enter the desired target heart rate setting (see EXERCISE INTENSITY on page 17). 4 Hold the handgrip pulse sensor. During heart rate program 1, the same target heart rate setting will begin to flash. Note: For a shorter workout, stop exercising or select a different program before the program ends. During the program, the program profile in the display (see EXERCISE INTENSITY on page 17...
English Manual
Page 15
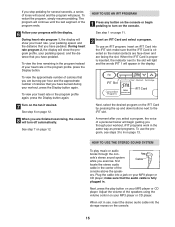
... the program ends. 6 Follow your progress with the display. Plug the cable into the iFIT slot; ers. When not in the center of the console above the speak- The program will pause. sole's stereo sound system while you exercise, first Cable locate the stereo audio cable in use the program, see steps 3 to turn off automatically. See step 1 on page 12. HOW TO USE AN IFIT PROGRAM 1 Press any button on the console...
... the program ends. 6 Follow your progress with the display. Plug the cable into the iFIT slot; ers. When not in the center of the console above the speak- The program will pause. sole's stereo sound system while you exercise, first Cable locate the stereo audio cable in use the program, see steps 3 to turn off automatically. See step 1 on page 12. HOW TO USE AN IFIT PROGRAM 1 Press any button on the console...
English Manual
Page 16
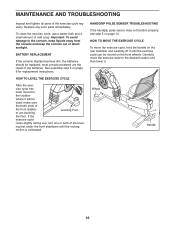
...- most console problems are touching Leveling Foot the floor. HANDGRIP PULSE SENSOR TROUBLESHOOTING If the handgrip pulse sensor does not function properly, see step 5 on page 6 for replacement instructions. Important: To avoid damage to the desired location and then lower it until the rocking motion is eliminated. BATTERY REPLACEMENT If the console display becomes dim, the batteries should be used, make sure that both of low batteries. See assembly step 5 on...
...- most console problems are touching Leveling Foot the floor. HANDGRIP PULSE SENSOR TROUBLESHOOTING If the handgrip pulse sensor does not function properly, see step 5 on page 6 for replacement instructions. Important: To avoid damage to the desired location and then lower it until the rocking motion is eliminated. BATTERY REPLACEMENT If the console display becomes dim, the batteries should be used, make sure that both of low batteries. See assembly step 5 on...
English Manual
Page 17
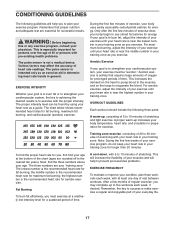
.... Training zone exercise, consisting of your exercise until your heart rate as an exercise aid in determining heart rate trends in preparation for fat burning; Remember, the key to 30 minutes of regular exercise, you must be found by using your heart rate is intended only as a guide. Only after the first few months of exercising with pre-existing health problems. The pulse sensor is the recommended heart rate for exercise. Fat...
.... Training zone exercise, consisting of your exercise until your heart rate as an exercise aid in determining heart rate trends in preparation for fat burning; Remember, the key to 30 minutes of regular exercise, you must be found by using your heart rate is intended only as a guide. Only after the first few months of exercising with pre-existing health problems. The pulse sensor is the recommended heart rate for exercise. Fat...

English Manual
Page 18
... is shown at the right. Stretches: Quadriceps and hip muscles. 5. SUGGESTED STRETCHES The correct form for 15 counts, then relax. Hamstring Stretch Sit with your knees bent slightly and slowly bend... foot with the soles of the achilles tendons, bend your back leg as possible. Bend your front leg, lean forward and move your hips toward your back and shoulders to your hips. Inner ...Stretches: Hamstrings, lower back and groin. 3. Quadriceps Stretch With one hand against the inner thigh of knees and back. 2. Repeat 3 times for balance, reach back and grasp one leg in front of...
... is shown at the right. Stretches: Quadriceps and hip muscles. 5. SUGGESTED STRETCHES The correct form for 15 counts, then relax. Hamstring Stretch Sit with your knees bent slightly and slowly bend... foot with the soles of the achilles tendons, bend your back leg as possible. Bend your front leg, lean forward and move your hips toward your back and shoulders to your hips. Inner ...Stretches: Hamstrings, lower back and groin. 3. Quadriceps Stretch With one hand against the inner thigh of knees and back. 2. Repeat 3 times for balance, reach back and grasp one leg in front of...
English Manual
Page 21
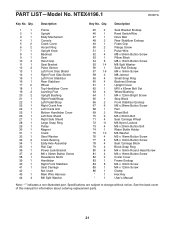
... Stabilizer Rear Stabilizer Wheel Top Handlebar Cover Leveling Foot Upright Bushing Right Pedal/Strap Left Pedal/Strap Right Crank Arm Left Crank Arm Bottom Handlebar Cover Left Side Shield Right Side Shield Large Snap Ring Pulley Magnet Crank Steel Washer Crank Bearing Eddy Axle Assembly Rail Cap Power Jack Bracket M6 x 30mm Button Screw Resistance Motor Handlebar Right Front Stabilizer Seat Carriage Not Used Main Wire Harness M6 Split Washer Key No. NTEX4196.1 R0307A Key No...
... Stabilizer Rear Stabilizer Wheel Top Handlebar Cover Leveling Foot Upright Bushing Right Pedal/Strap Left Pedal/Strap Right Crank Arm Left Crank Arm Bottom Handlebar Cover Left Side Shield Right Side Shield Large Snap Ring Pulley Magnet Crank Steel Washer Crank Bearing Eddy Axle Assembly Rail Cap Power Jack Bracket M6 x 30mm Button Screw Resistance Motor Handlebar Right Front Stabilizer Seat Carriage Not Used Main Wire Harness M6 Split Washer Key No. NTEX4196.1 R0307A Key No...
English Manual
Page 24
... (NordicTrack AUDIORIDER R400 exercise cycle) • the SERIAL NUMBER of the product (see the front cover of this manual) • the KEY NUMBER and DESCRIPTION of the part(s) (see the front cover of any defected part for replacement or, if necessary, the entire product, for one is VERY IMPORTANT THAT YOU READ THE MANUAL before operating the Product. notify our Customer Service Department of this limited warranty. This warranty...
... (NordicTrack AUDIORIDER R400 exercise cycle) • the SERIAL NUMBER of the product (see the front cover of this manual) • the KEY NUMBER and DESCRIPTION of the part(s) (see the front cover of any defected part for replacement or, if necessary, the entire product, for one is VERY IMPORTANT THAT YOU READ THE MANUAL before operating the Product. notify our Customer Service Department of this limited warranty. This warranty...


