

English Manual
Page 3
... cover of the most effective exercises for selecting the new NordicTrack® AUDIORIDER R400 exercise cycle. If you use the exercise cycle. The AUDIORIDER R400 exercise cycle offers an impressive array of features to the exercise cycle (see the front cover of your benefit, read this manual. Handlebar Console Fan Pulse Sensor Upright Knob Backrest Seat Seat Handle Handle Water Bottle Holder...
... cover of the most effective exercises for selecting the new NordicTrack® AUDIORIDER R400 exercise cycle. If you use the exercise cycle. The AUDIORIDER R400 exercise cycle offers an impressive array of features to the exercise cycle (see the front cover of your benefit, read this manual. Handlebar Console Fan Pulse Sensor Upright Knob Backrest Seat Seat Handle Handle Water Bottle Holder...

English Manual
Page 7
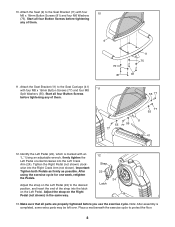
Attach the Bottom 18 Handlebar Cover to the Backrest (8) with two M4 x 16mm Round Head Screws (80) and one M4 x 12mm Screw (85). 4 9. Start all six Button Screws before tightening any of the Console (4). 8. Attach the Seat (9) to the Handlebar (39) and the Top Handlebar Cover (18) with six M6 x 28mm Button Screws (67) and six M6 Washers (75). Slide the Bottom Handlebar Cover (25) into the slots in 8 the bottom of them. 9 9 39 Slots 25 80 80 85 8 75 67 75 67 7
Attach the Bottom 18 Handlebar Cover to the Backrest (8) with two M4 x 16mm Round Head Screws (80) and one M4 x 12mm Screw (85). 4 9. Start all six Button Screws before tightening any of the Console (4). 8. Attach the Seat (9) to the Handlebar (39) and the Top Handlebar Cover (18) with six M6 x 28mm Button Screws (67) and six M6 Washers (75). Slide the Bottom Handlebar Cover (25) into the slots in 8 the bottom of them. 9 9 39 Slots 25 80 80 85 8 75 67 75 67 7
English Manual
Page 8
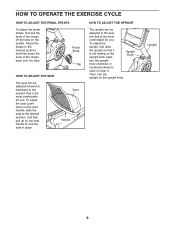
...with four 10 M6 x 16mm Button Screws (81) and four M6 Washers (75). Start all parts are properly tightened before you use the exercise cycle. Attach the Seat Bracket (11) to the desired position, and insert the end of them . 55 77 55 77 55 77 77 55 11 41 12....Screws (77) and four M8 Split Washers (55). Important: Tighten both Pedals as firmly as possible. Place a mat beneath the exercise cycle to the Seat Bracket (11) with an "L." Attach the Seat (9) to protect the floor. 8 Identify the Left Pedal (22), which is completed, some extra parts may be left over. ...
...with four 10 M6 x 16mm Button Screws (81) and four M6 Washers (75). Start all parts are properly tightened before you use the exercise cycle. Attach the Seat Bracket (11) to the desired position, and insert the end of them . 55 77 55 77 55 77 77 55 11 41 12....Screws (77) and four M8 Split Washers (55). Important: Tighten both Pedals as firmly as possible. Place a mat beneath the exercise cycle to the Seat Bracket (11) with an "L." Attach the Seat (9) to protect the floor. 8 Identify the Left Pedal (22), which is completed, some extra parts may be left over. ...
English Manual
Page 9
... knob. HOW TO OPERATE THE EXERCISE CYCLE HOW TO ADJUST THE PEDAL STRAPS To adjust the pedal straps, first pull the ends of the straps back onto the tabs. Upright 9 tion that it . Next, Upright Knob turn the upright knob clockwise or counterclockwise to the posi- Seat Handle HOW TO ADJUST THE...
... knob. HOW TO OPERATE THE EXERCISE CYCLE HOW TO ADJUST THE PEDAL STRAPS To adjust the pedal straps, first pull the ends of the straps back onto the tabs. Upright 9 tion that it . Next, Upright Knob turn the upright knob clockwise or counterclockwise to the posi- Seat Handle HOW TO ADJUST THE...
English Manual
Page 21
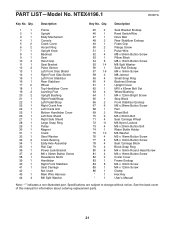
... 40 1 41 1 42 - 43 1 44 4 Description Frame Upright Eddy Mechanism Console Crank Cover Accent Ring Upright Knob Backrest Seat Hand Grip Seat Bracket Pulse Sensor Left Front Side Shield Right Front Side Shield Left Front Stabilizer Rear Stabilizer Wheel Top Handlebar Cover Leveling Foot Upright ...71 4 72 11 73 4 74 1 75 10 76 4 77 4 78 4 79 4 80 6 81 4 82 2 83 1 84 8 85 1 86 1 * 1 * 1 Description Seat Bracket Endcap Reed Switch/Wire Drive Belt Rear Stabilizer Endcap Foam Grip Flange Screw Pulse Wire M8 x 50mm Button Screw Pillow Block M8 x 16mm Button...
... 40 1 41 1 42 - 43 1 44 4 Description Frame Upright Eddy Mechanism Console Crank Cover Accent Ring Upright Knob Backrest Seat Hand Grip Seat Bracket Pulse Sensor Left Front Side Shield Right Front Side Shield Left Front Stabilizer Rear Stabilizer Wheel Top Handlebar Cover Leveling Foot Upright ...71 4 72 11 73 4 74 1 75 10 76 4 77 4 78 4 79 4 80 6 81 4 82 2 83 1 84 8 85 1 86 1 * 1 * 1 Description Seat Bracket Endcap Reed Switch/Wire Drive Belt Rear Stabilizer Endcap Foam Grip Flange Screw Pulse Wire M8 x 50mm Button Screw Pillow Block M8 x 16mm Button...


