L12 User's Manual
Page 14
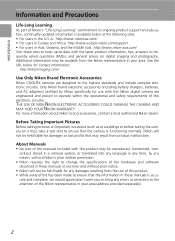
... of this Nikon digital camera are designed to the highest standards and include complex electronic circuitry. About Manuals • No part of the manuals included with the latest product information, tips, answers to frequently asked questions (FAQs), and general advice on a trip), take a test shot to ongoing product support and education, continually updated information is accu- Before Taking Important Pictures Before taking pictures on important occasions (such...
... of this Nikon digital camera are designed to the highest standards and include complex electronic circuitry. About Manuals • No part of the manuals included with the latest product information, tips, answers to frequently asked questions (FAQs), and general advice on a trip), take a test shot to ongoing product support and education, continually updated information is accu- Before Taking Important Pictures Before taking pictures on important occasions (such...
L12 User's Manual
Page 23
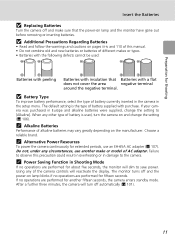
... the setup menu. Do not, under any of the camera controls will turn the camera on lamp blinks if no operations are performed for fifteen seconds. Preparation for Shooting Insert the Batteries j Replacing Batteries Turn the camera off and make or model of AC adapter. j Battery Type To improve battery performance, select the type of battery currently inserted in the camera in Europe and alkaline batteries were supplied, change the setting (c 106). The monitor turns...
... the setup menu. Do not, under any of the camera controls will turn the camera on lamp blinks if no operations are performed for fifteen seconds. Preparation for Shooting Insert the Batteries j Replacing Batteries Turn the camera off and make or model of AC adapter. j Battery Type To improve battery performance, select the type of battery currently inserted in the camera in Europe and alkaline batteries were supplied, change the setting (c 106). The monitor turns...
L12 User's Manual
Page 26
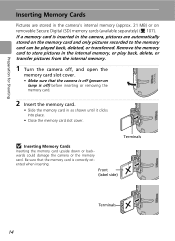
... the memory card in the internal memory, or play back, delete, or transfer pictures from the internal memory. 1 Turn the camera off, and open the memory card slot cover. • Make sure that the camera is off (power-on lamp is correctly oriented when inserting. Remove the memory card to the memory card can be played back, deleted, or transferred. Terminals j Inserting Memory Cards Inserting the memory card upside down or backwards could damage the camera or the memory card. Preparation for Shooting Inserting Memory Cards Pictures...
... the memory card in the internal memory, or play back, delete, or transfer pictures from the internal memory. 1 Turn the camera off, and open the memory card slot cover. • Make sure that the camera is off (power-on lamp is correctly oriented when inserting. Remove the memory card to the memory card can be played back, deleted, or transferred. Terminals j Inserting Memory Cards Inserting the memory card upside down or backwards could damage the camera or the memory card. Preparation for Shooting Inserting Memory Cards Pictures...
L12 User's Manual
Page 27
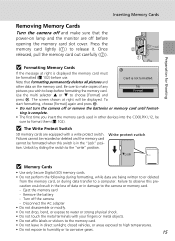
... the COOLPIX L12, be formatted when this pre- Preparation for Shooting Inserting Memory Cards Removing Memory Cards Turn the camera off and make copies of data or in the "Lock" position. Once 2 released, pull the memory card out carefully ( ). 1 j Formatting Memory Cards If the message at right will be formatted (c 102) before formatting the memory card. Be sure to observe this switch is in damage to keep before use. ting is displayed the memory card must be displayed. j The Write Protect Switch SD memory cards...
... the COOLPIX L12, be formatted when this pre- Preparation for Shooting Inserting Memory Cards Removing Memory Cards Turn the camera off and make copies of data or in the "Lock" position. Once 2 released, pull the memory card out carefully ( ). 1 j Formatting Memory Cards If the message at right will be formatted (c 102) before formatting the memory card. Be sure to observe this switch is in damage to keep before use. ting is displayed the memory card must be displayed. j The Write Protect Switch SD memory cards...
L12 User's Manual
Page 32
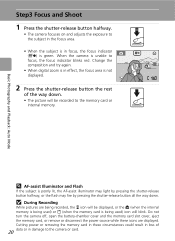
... memory card or internal memory. Change the composition and try again. • When digital zoom is in effect, the focus area is not displayed. 12 2 Press the shutter-release button the rest of 20 data or in focus, the focus indicator (p) is green. Cutting power or removing the memory card in these icons are being recorded, the y icon will blink. Basic Photography and Playback: Auto Mode Step3 Focus and Shoot 1 Press the shutter-release button halfway. • The camera focuses on and adjusts the exposure...
... memory card or internal memory. Change the composition and try again. • When digital zoom is in effect, the focus area is not displayed. 12 2 Press the shutter-release button the rest of 20 data or in focus, the focus indicator (p) is green. Cutting power or removing the memory card in these icons are being recorded, the y icon will blink. Basic Photography and Playback: Auto Mode Step3 Focus and Shoot 1 Press the shutter-release button halfway. • The camera focuses on and adjusts the exposure...
L12 User's Manual
Page 35
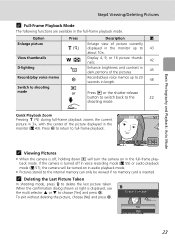
... full-frame playback. :SCROLL :ZOOM k Viewing Pictures • When the camera is off in voice recording mode (c 55) or audio playback mode (c 57), the camera will turn the camera on in the full-frame playback mode. If the camera is displayed, use the multi selector G or H to the internal memory can only be turned on in audio playback mode. • Pictures stored to choose [Yes] and press d. Erase 1 image? View thumbnails t (j) Display 4, 9, or 16 picture thumbnails. 42 D-lighting A Enhance...
... full-frame playback. :SCROLL :ZOOM k Viewing Pictures • When the camera is off in voice recording mode (c 55) or audio playback mode (c 57), the camera will turn the camera on in the full-frame playback mode. If the camera is displayed, use the multi selector G or H to the internal memory can only be turned on in audio playback mode. • Pictures stored to choose [Yes] and press d. Erase 1 image? View thumbnails t (j) Display 4, 9, or 16 picture thumbnails. 42 D-lighting A Enhance...
L12 User's Manual
Page 37
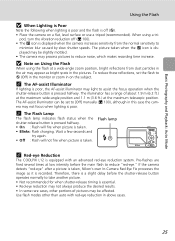
... flash to assist the focus operation when the shutter-release button is equipped with red-eye reduction in above cases. 25 k The Flash Lamp The flash lamp indicates flash status when the Flash lamp shutter-release button is pressed halfway. • On : Flash will not fire when picture is recorded. W T • Blinks: Flash charging. k The AF-assist Illuminator If lighting is essential. • Red-eye reduction may not focus when lighting is poor. Pre-flashes are fired several times...
... flash to assist the focus operation when the shutter-release button is equipped with red-eye reduction in above cases. 25 k The Flash Lamp The flash lamp indicates flash status when the Flash lamp shutter-release button is pressed halfway. • On : Flash will not fire when picture is recorded. W T • Blinks: Flash charging. k The AF-assist Illuminator If lighting is essential. • Red-eye reduction may not focus when lighting is poor. Pre-flashes are fired several times...
L12 User's Manual
Page 39
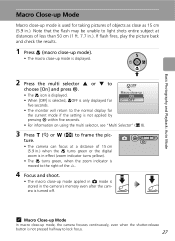
... normal display for taking pictures of objects as close as 15 cm (5.9 in.). k Macro Close-up Mode In macro close -up mode, the camera focuses continuously, even when the shutter-release button is turned off. Note that the flash may be unable to the right of less than 50 cm (1 ft. 7.7 in the camera's memory even after the camera is not pressed halfway to frame the pic- ture...
... normal display for taking pictures of objects as close as 15 cm (5.9 in.). k Macro Close-up Mode In macro close -up mode, the camera focuses continuously, even when the shutter-release button is turned off. Note that the flash may be unable to the right of less than 50 cm (1 ft. 7.7 in the camera's memory even after the camera is not pressed halfway to frame the pic- ture...
L12 User's Manual
Page 61
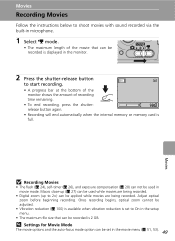
... when the internal memory or memory card is 2 GB. Macro close-up (c 27) can be used in the movie menu (c 51, 53). 49 l Settings for Movie Mode The movie options and the auto-focus mode option can be set to On in the setup menu. • The maximum file size that can be recorded is full. Movies j Recording Movies • The flash (c 24), self-timer (c 26), and exposure compensation (c 28) can not be used while movies are being recorded. • Digital zoom (up...
... when the internal memory or memory card is 2 GB. Macro close-up (c 27) can be used in the movie menu (c 51, 53). 49 l Settings for Movie Mode The movie options and the auto-focus mode option can be set to On in the setup menu. • The maximum file size that can be recorded is full. Movies j Recording Movies • The flash (c 24), self-timer (c 26), and exposure compensation (c 28) can not be used while movies are being recorded. • Digital zoom (up...

L12 User's Manual
Page 67
... pause recording, press d. Voice recording File number Length of recording Progress indicator 001 15/05/2007 17:30 00:00:04/00:40:10 Index: 01 Date of recording on using the multi selector, see Exit "Multi Selector" (c 8). 4 Press the shutter-release button to resume recording. Scene menu Panorama assist Voice recording Image mode • For information on the memory card. Voice recording 001 15/05/2007 17:30 Max. time 00...
... pause recording, press d. Voice recording File number Length of recording Progress indicator 001 15/05/2007 17:30 00:00:04/00:40:10 Index: 01 Date of recording on using the multi selector, see Exit "Multi Selector" (c 8). 4 Press the shutter-release button to resume recording. Scene menu Panorama assist Voice recording Image mode • For information on the memory card. Voice recording 001 15/05/2007 17:30 Max. time 00...

L12 User's Manual
Page 88
... shooting menu, press m. A BSS* c 82 Use the "best shot selector" to [White balance], [Continuous], [BSS], and [Color Options] settings (c 84). Displaying the Shooting Menu Set the mode selector to L (auto) and press m to the light source. Shooting, Playback, and Setup Menus 76 d White balance* c 79 Match white balance to display the shooting menu. Shooting, Playback, and Setup Menus Shooting Options: The Shooting Menu The following options are recorded. * See the information on restrictions that may apply to choose the sharpest picture. Z Image mode* c 77 Choose image size...
... shooting menu, press m. A BSS* c 82 Use the "best shot selector" to [White balance], [Continuous], [BSS], and [Color Options] settings (c 84). Displaying the Shooting Menu Set the mode selector to L (auto) and press m to the light source. Shooting, Playback, and Setup Menus 76 d White balance* c 79 Match white balance to display the shooting menu. Shooting, Playback, and Setup Menus Shooting Options: The Shooting Menu The following options are recorded. * See the information on restrictions that may apply to choose the sharpest picture. Z Image mode* c 77 Choose image size...
L12 User's Manual
Page 91
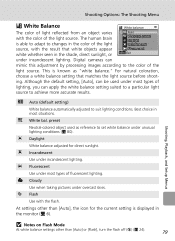
.... Shooting, Playback, and Setup Menus j Notes on Flash Mode At white balance settings other than [Auto] or [Flash], turn the flash off (B) (c 24). 79 This is able to adapt to achieve more accurate results. f White bal. j Cloudy Use when taking pictures under incandescent lighting. The human brain is known as reference to set white balance under most types of lighting, you can mimic this adjustment by processing images according to suit lighting conditions. For natural coloration...
.... Shooting, Playback, and Setup Menus j Notes on Flash Mode At white balance settings other than [Auto] or [Flash], turn the flash off (B) (c 24). 79 This is able to adapt to achieve more accurate results. f White bal. j Cloudy Use when taking pictures under incandescent lighting. The human brain is known as reference to set white balance under most types of lighting, you can mimic this adjustment by processing images according to suit lighting conditions. For natural coloration...

L12 User's Manual
Page 100
...the memory card will delete protected files (c 102). Protect See "Navigating the Menus" (c 86) for more information on using this function. Delete Erasing all pictures stored in the internal memory or on the memory card. • Choose [Yes] and press d in the internal memory will be recovered. Transfer important images to delete all images MENU Exit B Erase selected images Delete selected pictures. Note, however, that formatting will be deleted. Back ON/OFF Protected pictures are protected and cannot be deleted. or 9-picture thumbnail playback mode. 88...
...the memory card will delete protected files (c 102). Protect See "Navigating the Menus" (c 86) for more information on using this function. Delete Erasing all pictures stored in the internal memory or on the memory card. • Choose [Yes] and press d in the internal memory will be recovered. Transfer important images to delete all images MENU Exit B Erase selected images Delete selected pictures. Note, however, that formatting will be deleted. Back ON/OFF Protected pictures are protected and cannot be deleted. or 9-picture thumbnail playback mode. 88...

L12 User's Manual
Page 102
... copy, an error message will be unable to copy specific pictures in the camera's internal memory to memory card. Camera to card Selected images All images Shooting, Playback, and Setup Menus Exit j Notes on the memory card when playback mode is not enough space in the folder are copied with another make of cam- k [Memory contains no images.] Message If there are assigned in the destination memory is JPEG, AVI, or WAV. • The camera may be displayed. New folder numbers are no pictures...
... copy, an error message will be unable to copy specific pictures in the camera's internal memory to memory card. Camera to card Selected images All images Shooting, Playback, and Setup Menus Exit j Notes on the memory card when playback mode is not enough space in the folder are copied with another make of cam- k [Memory contains no images.] Message If there are assigned in the destination memory is JPEG, AVI, or WAV. • The camera may be displayed. New folder numbers are no pictures...
L12 User's Manual
Page 114
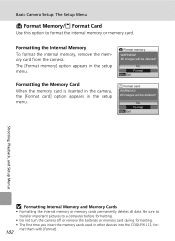
...Format Exit Shooting, Playback, and Setup Menus j Formatting Internal Memory and Memory Cards • Formatting the internal memory or memory cards permanently deletes all data. All images will be deleted! No Format MENU Exit Formatting the Memory Card When the memory card is inserted in the camera, the [Format card] option appears in other devices into the COOLPIX L12, for- mat them with [Format]. 102 Basic Camera Setup: The Setup Menu M Format Memory/O Format Card Use this option to a computer before formatting. • Do not turn the camera off or remove the batteries or memory...
...Format Exit Shooting, Playback, and Setup Menus j Formatting Internal Memory and Memory Cards • Formatting the internal memory or memory cards permanently deletes all data. All images will be deleted! No Format MENU Exit Formatting the Memory Card When the memory card is inserted in the camera, the [Format card] option appears in other devices into the COOLPIX L12, for- mat them with [Format]. 102 Basic Camera Setup: The Setup Menu M Format Memory/O Format Card Use this option to a computer before formatting. • Do not turn the camera off or remove the batteries or memory...
L12 User's Manual
Page 117
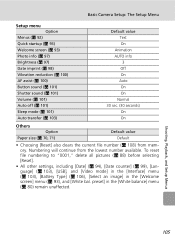
.... (30 seconds) On On Others Option Default value Paper size (c 70, 71) Default • Choosing [Reset] also clears the current file number (c 108) from the lowest number available. To reset file numbering to "0001," delete all pictures (c 88) before selecting [Reset]. • All other settings, including [Date] (c 94), [Date counter] (c 99), [Language] (c 103), [USB], and [Video mode] in the [Interface] menu (c 103), [Battery Type] (c 106), [Select an image] in the [White balance] menu (c 80) remain unaffected.
.... (30 seconds) On On Others Option Default value Paper size (c 70, 71) Default • Choosing [Reset] also clears the current file number (c 108) from the lowest number available. To reset file numbering to "0001," delete all pictures (c 88) before selecting [Reset]. • All other settings, including [Date] (c 94), [Date counter] (c 99), [Language] (c 103), [USB], and [Video mode] in the [Interface] menu (c 103), [Battery Type] (c 106), [Select an image] in the [White balance] menu (c 80) remain unaffected.

L12 User's Manual
Page 126
... the to exit. Mode tioned correctly. K Picture is 63 connected. USB cable disconnected during transfer or printing. If PictureProject displays error, click [OK] to one of the three proper position. Resume operation after turning camera off and then 10 on computer or - Problem File not created with COOLPIX L12 Solution c View file on again. Slide the mode selector 8 Warning! current time zone Lens error J I This file cannot be deleted K Destination in same time - 96 New...
... the to exit. Mode tioned correctly. K Picture is 63 connected. USB cable disconnected during transfer or printing. If PictureProject displays error, click [OK] to one of the three proper position. Resume operation after turning camera off and then 10 on computer or - Problem File not created with COOLPIX L12 Solution c View file on again. Slide the mode selector 8 Warning! current time zone Lens error J I This file cannot be deleted K Destination in same time - 96 New...
L12 User's Manual
Page 129
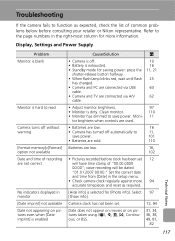
... reset as expected, check the list of common problems below before clock has been set . 12, 94 Date does not appear on movies or on pictures even when [Date imprint] is enabled Cause/Solution c • Camera is off. • Battery is exhausted. • Standby mode for saving power: press the shutter-release button halfway. • When flash lamp blinks red, wait until flash has charged. • Camera and PC are connected via USB cable...
... reset as expected, check the list of common problems below before clock has been set . 12, 94 Date does not appear on movies or on pictures even when [Date imprint] is enabled Cause/Solution c • Camera is off. • Battery is exhausted. • Standby mode for saving power: press the shutter-release button halfway. • When flash lamp blinks red, wait until flash has charged. • Camera and PC are connected via USB cable...
L12 User's Manual
Page 133
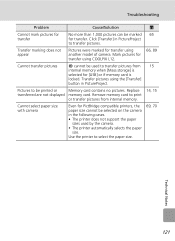
... 15 transferred are not displayed memory card. Transfer pictures using the [Transfer] button in PictureProject to transfer pictures. Mark pictures for transfer using COOLPIX L12. Cannot select paper size with camera Even for PictBridge compatible printers, the paper size cannot be marked 65 for transfer. Transfer marking does not appear Pictures were marked for transfer using 66, 89 another model of camera. Use the printer to print or transfer pictures from 15 internal memory when [Mass storage] is selected for [USB] or if memory card is locked. Troubleshooting Problem...
... 15 transferred are not displayed memory card. Transfer pictures using the [Transfer] button in PictureProject to transfer pictures. Mark pictures for transfer using COOLPIX L12. Cannot select paper size with camera Even for PictBridge compatible printers, the paper size cannot be marked 65 for transfer. Transfer marking does not appear Pictures were marked for transfer using 66, 89 another model of camera. Use the printer to print or transfer pictures from 15 internal memory when [Mass storage] is selected for [USB] or if memory card is locked. Troubleshooting Problem...

L12 User's Manual
Page 140
... viewing pictures 23 Playback menu 85 Power saving 11 Power switch 4, 10 Power-on lamp 10 Print set 73 printing date 74 shooting information 74 Printing pictures 67, 69, 70 direct printing 67 Protect 88 Q Quick startup 93 R Red-eye reduction 25 Reset all 104 RSCN 108 S Self-timer 26 Self-timer lamp 4 Setup menu 91 Shooting menu 76 Shutter-release button 4, 20, 21 Slide show 87 128 Small picture 47 Sound settings 101 Speaker 4 SSCN 108 Standby mode 11 Strap, camera 4 Sunset 33 T Television 62 connecting to 62 Time...
... viewing pictures 23 Playback menu 85 Power saving 11 Power switch 4, 10 Power-on lamp 10 Print set 73 printing date 74 shooting information 74 Printing pictures 67, 69, 70 direct printing 67 Protect 88 Q Quick startup 93 R Red-eye reduction 25 Reset all 104 RSCN 108 S Self-timer 26 Self-timer lamp 4 Setup menu 91 Shooting menu 76 Shutter-release button 4, 20, 21 Slide show 87 128 Small picture 47 Sound settings 101 Speaker 4 SSCN 108 Standby mode 11 Strap, camera 4 Sunset 33 T Television 62 connecting to 62 Time...


