Reference Manual
Page 7
... copyright notices The copying or reproduction of copyrighted creative works such as memory cards or built-in the malicious use of personal image data. v To erase the log data that is the user's responsibility. Do not use this product for the purpose of making illegal copies or to also replace any pictures selected for example, pictures of empty sky) (For the COOLPIX S9500, set the Record GPS data of the...
... copyright notices The copying or reproduction of copyrighted creative works such as memory cards or built-in the malicious use of personal image data. v To erase the log data that is the user's responsibility. Do not use this product for the purpose of making illegal copies or to also replace any pictures selected for example, pictures of empty sky) (For the COOLPIX S9500, set the Record GPS data of the...

Reference Manual
Page 23
Parts of the Camera and Main Functions Parts of the Camera and Main Functions The Camera Body 1 2 34 5 6 4 Flash raised 7 Lens cover closed 89 10 1 Mode dial 22 2 Shutter-release button 3, 26 3 Power switch/power-on lamp 19 4 Microphone (stereo 74, 82 5 GPS antenna (COOLPIX S9500 only 88 6 Wi-Fi (wireless LAN) antenna (COOLPIX S9500 only 93 7 Flash 50 11 12 Zoom control 25 f : Wide 25 8 g : Tele 25 h: Thumbnail playback 70 i : Playback zoom 69 j : Help 33 9 Self-timer lamp 53 AF-assist illuminator 97 10 Lens 11 Speaker 74, 87, 97 12 Lens cover 1
Parts of the Camera and Main Functions Parts of the Camera and Main Functions The Camera Body 1 2 34 5 6 4 Flash raised 7 Lens cover closed 89 10 1 Mode dial 22 2 Shutter-release button 3, 26 3 Power switch/power-on lamp 19 4 Microphone (stereo 74, 82 5 GPS antenna (COOLPIX S9500 only 88 6 Wi-Fi (wireless LAN) antenna (COOLPIX S9500 only 93 7 Flash 50 11 12 Zoom control 25 f : Wide 25 8 g : Tele 25 h: Thumbnail playback 70 i : Playback zoom 69 j : Help 33 9 Self-timer lamp 53 AF-assist illuminator 97 10 Lens 11 Speaker 74, 87, 97 12 Lens cover 1
Reference Manual
Page 25
... Function The Camera Body A Parts of the Camera and Main Functions Mode dial Zoom control Rotary multi selector Change the shooting mode. 22 Rotate toward g (i) (telephoto zoom position) to zoom in, and rotate toward f (h) (wide- 25 angle position) to zoom out. • While the shooting screen is displayed: 49 Display the setting screen for m (flash mode) by pressing up (H), for n (self-timer) by pressing left (J), for p (macro mode) by pressing down (I) and for creative slider or o (exposure...
... Function The Camera Body A Parts of the Camera and Main Functions Mode dial Zoom control Rotary multi selector Change the shooting mode. 22 Rotate toward g (i) (telephoto zoom position) to zoom in, and rotate toward f (h) (wide- 25 angle position) to zoom out. • While the shooting screen is displayed: 49 Display the setting screen for m (flash mode) by pressing up (H), for n (self-timer) by pressing left (J), for p (macro mode) by pressing down (I) and for creative slider or o (exposure...
Reference Manual
Page 28
... Apply selection move between menu levels. • k: Apply a selection. Image mode White balance Metering Continuous 29m 0s ISO sensitivity 970 AF area mode Autofocus mode 2 Use the Rotary multi selector to display the shooting screen. 6 Pressing K also applies a selection. • See "Switching Between Menu Icons" (A7) for more information. 3 After completing the settings, press the d button or shutter-release button. • Press the shutter-release button to select a menu item. • H or I: Select...
... Apply selection move between menu levels. • k: Apply a selection. Image mode White balance Metering Continuous 29m 0s ISO sensitivity 970 AF area mode Autofocus mode 2 Use the Rotary multi selector to display the shooting screen. 6 Pressing K also applies a selection. • See "Switching Between Menu Icons" (A7) for more information. 3 After completing the settings, press the d button or shutter-release button. • Press the shutter-release button to select a menu item. • H or I: Select...
Reference Manual
Page 29
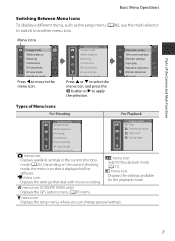
.... Shooting menu Image mode White balance Metering Continuous ISO sensitivity AF area mode Autofocus mode Press H or I to select the menu icon, and press the k button or K to the menu icon. Welcome screen Time zone and date Monitor settings Print date Vibration reduction Motion detection AF assist Types of the Camera and Main Functions Basic Menu Operations Switching Between Menu Icons To display a different menu, such as the setup menu (A96), use the multi selector to switch to another menu icon. c menu icon: Displays the settings available for the playback mode. Depending...
.... Shooting menu Image mode White balance Metering Continuous ISO sensitivity AF area mode Autofocus mode Press H or I to select the menu icon, and press the k button or K to the menu icon. Welcome screen Time zone and date Monitor settings Print date Vibration reduction Motion detection AF assist Types of the Camera and Main Functions Basic Menu Operations Switching Between Menu Icons To display a different menu, such as the setup menu (A96), use the multi selector to switch to another menu icon. c menu icon: Displays the settings available for the playback mode. Depending...
Reference Manual
Page 39
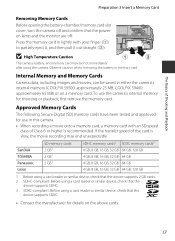
... camera. Internal Memory and Memory Cards Camera data, including images and movies, can be hot immediately after using a card reader or similar device, check that the device supports SDHC. 3 SDXC-compliant. To use in lightly with an SD speed class of Class 6 or higher is slow, the movie recording may be saved in either the camera's internal memory (COOLPIX S9500: approximately 23 MB, COOLPIX S9400: approximately 65 MB) or on the above cards. 17 Before using a card...
... camera. Internal Memory and Memory Cards Camera data, including images and movies, can be hot immediately after using a card reader or similar device, check that the device supports SDHC. 3 SDXC-compliant. To use in lightly with an SD speed class of Class 6 or higher is slow, the movie recording may be saved in either the camera's internal memory (COOLPIX S9500: approximately 23 MB, COOLPIX S9400: approximately 65 MB) or on the above cards. 17 Before using a card...
Reference Manual
Page 48
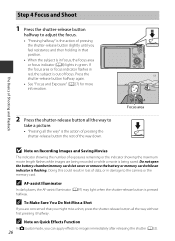
... on Recording Images and Saving Movies The indicator showing the number of exposures remaining or the indicator showing the maximum movie length flashes while images are concerned that position. • When the subject is being recorded or while a movie is in focus, the focus area or focus indicator (A8) lights in green. If the focus area or focus indicator flashes in red, the subject is flashing. Do not open the battery-chamber/memory card slot cover or remove the battery or memory card...
... on Recording Images and Saving Movies The indicator showing the number of exposures remaining or the indicator showing the maximum movie length flashes while images are concerned that position. • When the subject is being recorded or while a movie is in focus, the focus area or focus indicator (A8) lights in green. If the focus area or focus indicator flashes in red, the subject is flashing. Do not open the battery-chamber/memory card slot cover or remove the battery or memory card...
Reference Manual
Page 58
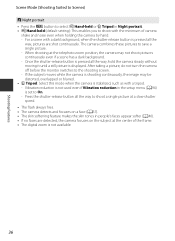
.... - The camera combines these pictures to the shooting screen. - Vibration reduction is not used even if Vibration reduction in the setup menu (A96) is set to shoot a single picture at the telephoto zoom position, the camera may be distorted, overlapped or blurred. • Z Tripod: Select this mode when the camera is shooting continuously, the image may not shoot pictures continuously even if a scene has a dark background. - Press the shutter-release button all...
.... - The camera combines these pictures to the shooting screen. - Vibration reduction is not used even if Vibration reduction in the setup menu (A96) is set to shoot a single picture at the telephoto zoom position, the camera may be distorted, overlapped or blurred. • Z Tripod: Select this mode when the camera is shooting continuously, the image may not shoot pictures continuously even if a scene has a dark background. - Press the shutter-release button all...
Reference Manual
Page 59
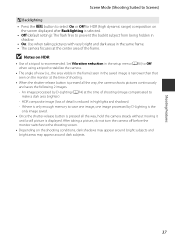
... Mode (Shooting Suited to Scenes) W Backlighting • Press the d button to select On or Off for HDR (high dynamic range) composition on the screen displayed after Backlighting is selected. • Off (default setting): The flash fires to prevent the backlit subject from being hidden in shadow. • On: Use when taking a picture, do not turn the camera off before the monitor switches to the shooting screen...
... Mode (Shooting Suited to Scenes) W Backlighting • Press the d button to select On or Off for HDR (high dynamic range) composition on the screen displayed after Backlighting is selected. • Off (default setting): The flash fires to prevent the backlit subject from being hidden in shadow. • On: Use when taking a picture, do not turn the camera off before the monitor switches to the shooting screen...

Reference Manual
Page 84
... On. Adjust colors in the Shooting Menu (A (Auto) Mode) Option Image mode White balance Metering Continuous ISO sensitivity AF area mode Autofocus mode Quick effects Description A Allow you to measure the brightness of image size and image quality used when saving images. E33 Set the mode used under most types of pictures. • The default setting is Single (i.e., only one picture is captured at a time). • When Continuous H, Continuous L, Pre-shooting cache or BSS (A40) is set, the pictures are shot continuously while the shutter-release button is...
... On. Adjust colors in the Shooting Menu (A (Auto) Mode) Option Image mode White balance Metering Continuous ISO sensitivity AF area mode Autofocus mode Quick effects Description A Allow you to measure the brightness of image size and image quality used when saving images. E33 Set the mode used under most types of pictures. • The default setting is Single (i.e., only one picture is captured at a time). • When Continuous H, Continuous L, Pre-shooting cache or BSS (A40) is set, the pictures are shot continuously while the shutter-release button is...
Reference Manual
Page 96
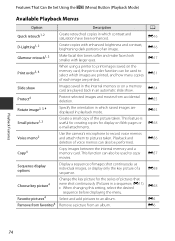
... eyes. E51 Slide show . Playback and deletion of pictures that were shot continuously (Pictures in an automatic slide show Images saved in the internal memory or on the memory card, the print order function can be used to copy movies. E17 Print order3, 4 When using a printer to print images saved on a memory card are displayed in which images are printed, and how many copies of an image. E55 Small picture1, 2 Create a small copy of a sequence. E57 Sequence display options Display a sequence of images shot continuously as individual images...
... eyes. E51 Slide show . Playback and deletion of pictures that were shot continuously (Pictures in an automatic slide show Images saved in the internal memory or on the memory card, the print order function can be used to copy movies. E17 Print order3, 4 When using a printer to print images saved on a memory card are displayed in which images are printed, and how many copies of an image. E55 Small picture1, 2 Create a small copy of a sequence. E57 Sequence display options Display a sequence of images shot continuously as individual images...
Reference Manual
Page 126
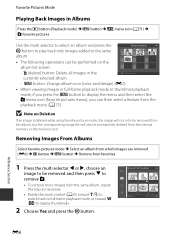
... using favorite pictures mode, the image will not only be removed from the album, but the corresponding image file will also be permanently deleted from the same album, repeat this step as necessary. • Rotate the zoom control (A25) toward g (i) to switch back to full-frame playback mode, or toward f (h) to display thumbnails. 2 Choose Yes and press the k button. Favorite Pictures Mode Playing Back Images in Albums Press the c button (Playback mode) M d button M N menu icon...
... using favorite pictures mode, the image will not only be removed from the album, but the corresponding image file will also be permanently deleted from the same album, repeat this step as necessary. • Rotate the zoom control (A25) toward g (i) to switch back to full-frame playback mode, or toward f (h) to display thumbnails. 2 Choose Yes and press the k button. Favorite Pictures Mode Playing Back Images in Albums Press the c button (Playback mode) M d button M N menu icon...
Reference Manual
Page 131
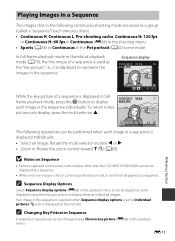
...) in the shooting menu • Sports (A38) or Continuous in the Pet portrait (A42) scene mode In full-frame playback mode or thumbnail playback mode (A70), the first image of a sequence is displayed in fullframe playback mode, press the k button to display each image in the sequence is selected when Sequence display options is set all sequences to be displayed using Choose key picture (E58) in : Rotate the zoom control toward g (i) (A69...
...) in the shooting menu • Sports (A38) or Continuous in the Pet portrait (A42) scene mode In full-frame playback mode or thumbnail playback mode (A70), the first image of a sequence is displayed in fullframe playback mode, press the k button to display each image in the sequence is selected when Sequence display options is set all sequences to be displayed using Choose key picture (E58) in : Rotate the zoom control toward g (i) (A69...
Reference Manual
Page 151
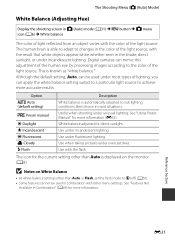
The Shooting Menu (A (Auto) Mode) White Balance (Adjusting Hue) Display the shooting screen in A (Auto) mode (A31) M d button M A menu icon (A6) M White balance The color of light reflected from an object varies with the color of lighting, you can apply the white balance setting suited to a particular light source to achieve more accurate results. This is automatically adjusted to changes in the color of the light source. Useful when shooting under fluorescent lighting. Use under unusual lighting. Use when taking pictures under incandescent lighting. B Notes on the monitor (A8...
The Shooting Menu (A (Auto) Mode) White Balance (Adjusting Hue) Display the shooting screen in A (Auto) mode (A31) M d button M A menu icon (A6) M White balance The color of light reflected from an object varies with the color of lighting, you can apply the white balance setting suited to a particular light source to achieve more accurate results. This is automatically adjusted to changes in the color of the light source. Useful when shooting under fluorescent lighting. Use under unusual lighting. Use when taking pictures under incandescent lighting. B Notes on the monitor (A8...

Reference Manual
Page 178
... Display Options Press the c button (Playback mode) M d button (A6) M Sequence display options Choose the method used to the memory card. The Playback Menu C Message: "Memory contains no images., is displayed. Press the d button and select Copy from the playback menu to copy the pictures stored in thumbnail playback mode (A70). See "Using the Screen for Selecting Images" (A76) for more information. Option Description Individual pictures Each picture in the camera's memory even if the camera is displayed, select a picture. C More Information See "File and Folder...
... Display Options Press the c button (Playback mode) M d button (A6) M Sequence display options Choose the method used to the memory card. The Playback Menu C Message: "Memory contains no images., is displayed. Press the d button and select Copy from the playback menu to copy the pictures stored in thumbnail playback mode (A70). See "Using the Screen for Selecting Images" (A76) for more information. Option Description Individual pictures Each picture in the camera's memory even if the camera is displayed, select a picture. C More Information See "File and Folder...

Reference Manual
Page 200
Charging time increases when images are transferred while the battery is charging. • When the camera is connected to a printer and turned on the computer, such as Nikon Transfer 2, may be charged with connection to a printer, even if the printer complies with connection to a computer. If the PictBridge startup screen is not displayed on the monitor after the battery has finished charging. • Depending upon computer specifications, settings, and power supply and allocation, it may...
Charging time increases when images are transferred while the battery is charging. • When the camera is connected to a printer and turned on the computer, such as Nikon Transfer 2, may be charged with connection to a printer, even if the printer complies with connection to a computer. If the PictBridge startup screen is not displayed on the monitor after the battery has finished charging. • Depending upon computer specifications, settings, and power supply and allocation, it may...

Reference Manual
Page 228
.... Clock battery is operated by remote control. Check camera clock regularly against more accurate E68 timepieces and reset as 96, watches. and movies are connected using Time zone and date in the setup menu has not been set. 20, 96, E68 Date not appearing on • A shooting mode that does not support print date is selected. 96, E72 pictures even • Another function that is set " indicator 20, 96, flashes during shooting), still pictures have a time stamp of recording are...
.... Clock battery is operated by remote control. Check camera clock regularly against more accurate E68 timepieces and reset as 96, watches. and movies are connected using Time zone and date in the setup menu has not been set. 20, 96, E68 Date not appearing on • A shooting mode that does not support print date is selected. 96, E72 pictures even • Another function that is set " indicator 20, 96, flashes during shooting), still pictures have a time stamp of recording are...
Reference Manual
Page 229
... repeating patterns (such as movie recording or sending images using an Eye-Fi card are connected using Continuous H: 120 fps, HS 240/8× or HS 480/4×, the colored stripes may not be seen in captured images or - Troubleshooting Problem Cause/Solution A Monitor is turned Battery temperature is operated by remote control. Turn off camera, and allow battery to shooting mode. After the lamp flashes for a long time, or when the camera is dark or low in...
... repeating patterns (such as movie recording or sending images using an Eye-Fi card are connected using Continuous H: 120 fps, HS 240/8× or HS 480/4×, the colored stripes may not be seen in captured images or - Troubleshooting Problem Cause/Solution A Monitor is turned Battery temperature is operated by remote control. Turn off camera, and allow battery to shooting mode. After the lamp flashes for a long time, or when the camera is dark or low in...
Reference Manual
Page 232
...; Pictures and movies taken with a USB cable. • Memory card contains no pictures. Technical Notes and Index F12 S9400 and images copied using the Copy option cannot be displayed in auto sort mode. • Images saved in the TV settings setup menu. • HDMI output is disabled when the camera is not correctly set in the internal memory or on the memory card may not be added to either a computer or printer with cameras other than the COOLPIX S9500/S9400. •...
...; Pictures and movies taken with a USB cable. • Memory card contains no pictures. Technical Notes and Index F12 S9400 and images copied using the Copy option cannot be displayed in auto sort mode. • Images saved in the TV settings setup menu. • HDMI output is disabled when the camera is not correctly set in the internal memory or on the memory card may not be added to either a computer or printer with cameras other than the COOLPIX S9500/S9400. •...

Reference Manual
Page 233
... print images when Auto is not recorded. Set the Charge by computer option in the following situations, even for about two hours, it takes time to identify the location. • The camera may be a deviation of up to a computer. E23, E24 - Difference between the actual shooting location and recorded position information. Troubleshooting Problem Nikon Transfer 2 does not start when camera is connected to a printer. The PictBridge startup screen is not displayed...
... print images when Auto is not recorded. Set the Charge by computer option in the following situations, even for about two hours, it takes time to identify the location. • The camera may be a deviation of up to a computer. E23, E24 - Difference between the actual shooting location and recorded position information. Troubleshooting Problem Nikon Transfer 2 does not start when camera is connected to a printer. The PictBridge startup screen is not displayed...


