
Reference Manual
Page 2
ii Camera Settings The explanations in this manual assume that default settings are shown in "For Your Safety" (0 vi-viii). A For Your Safety Before using the camera for details. See page 12 for the first time, read the safety instructions in bold. Memory Cards SD and SDHC/SDXC memory cards are referred to as "memory cards" in this manual. Help Use the camera's on-board help feature for help on menu items and other topics. Menu items, options, and messages displayed in the camera monitor are used.
ii Camera Settings The explanations in this manual assume that default settings are shown in "For Your Safety" (0 vi-viii). A For Your Safety Before using the camera for details. See page 12 for the first time, read the safety instructions in bold. Memory Cards SD and SDHC/SDXC memory cards are referred to as "memory cards" in this manual. Help Use the camera's on-board help feature for help on menu items and other topics. Menu items, options, and messages displayed in the camera monitor are used.
Reference Manual
Page 3
...'re looking for from: i The Table of Contents 0 xiii i For Your Safety 0 vi i Menu Options 0 16 i The Index 0 253 i Troubleshooting 0 238 i Error Messages 0 242 X Introduction s Basic Photography y Recording and Viewing Movies # P, S, A, and M Modes $ User Settings: U1 and U2 Modes k Release Mode d Image Quality and Size N Focus S ISO Sensitivity Z Exposure r White Balance J Image Enhancement l Flash Photography t Other Shooting Options I More on Playback Q Connections U Camera Menus n Technical Notes 01 0 27 0 38 0 52 0 60 0 63 0 69 0 74 0 81...
...'re looking for from: i The Table of Contents 0 xiii i For Your Safety 0 vi i Menu Options 0 16 i The Index 0 253 i Troubleshooting 0 238 i Error Messages 0 242 X Introduction s Basic Photography y Recording and Viewing Movies # P, S, A, and M Modes $ User Settings: U1 and U2 Modes k Release Mode d Image Quality and Size N Focus S ISO Sensitivity Z Exposure r White Balance J Image Enhancement l Flash Photography t Other Shooting Options I More on Playback Q Connections U Camera Menus n Technical Notes 01 0 27 0 38 0 52 0 60 0 63 0 69 0 74 0 81...
Reference Manual
Page 11
... completely erase the original image data. Ensuring the privacy of such data is governed by national and international copyright laws. books, music, paintings, woodcuts, The copying or reproduction of stamps issued by the government and of certified documents stipulated by law is prohibited. • Cautions on copies or reproductions of Disposing of Data Storage Devices Please note that deleting images or formatting memory cards or...
... completely erase the original image data. Ensuring the privacy of such data is governed by national and international copyright laws. books, music, paintings, woodcuts, The copying or reproduction of stamps issued by the government and of certified documents stipulated by law is prohibited. • Cautions on copies or reproductions of Disposing of Data Storage Devices Please note that deleting images or formatting memory cards or...
Reference Manual
Page 15
...and M Modes 52 Shutter Speed and Aperture 52 P: Programmed Auto 53 S: Shutter-Priority Auto 54 A: Aperture-Priority Auto 55 M: Manual 56 User Settings: U1 and U2 Modes 60 Saving User Settings 60 Recalling User Settings 62 Resetting User Settings 62 Release Mode 63 Single-Frame, Continuous, Self-timer, Remote, and Movie Modes 63 Self-Timer and Remote Control Modes 66 Image Quality and Size 69 Focus Image Quality 69 Image Size 72 74 Autofocus 75 Autofocus Mode 75 AF-Area Mode 76 Focus Lock 79 Manual Focus 80 ISO Sensitivity 81 Auto ISO Sensitivity Control 83 xv
...and M Modes 52 Shutter Speed and Aperture 52 P: Programmed Auto 53 S: Shutter-Priority Auto 54 A: Aperture-Priority Auto 55 M: Manual 56 User Settings: U1 and U2 Modes 60 Saving User Settings 60 Recalling User Settings 62 Resetting User Settings 62 Release Mode 63 Single-Frame, Continuous, Self-timer, Remote, and Movie Modes 63 Self-Timer and Remote Control Modes 66 Image Quality and Size 69 Focus Image Quality 69 Image Size 72 74 Autofocus 75 Autofocus Mode 75 AF-Area Mode 76 Focus Lock 79 Manual Focus 80 ISO Sensitivity 81 Auto ISO Sensitivity Control 83 xv
Reference Manual
Page 18
C The Shooting Menu: Shooting Options 176 Reset Shooting Menu 176 Storage Folder 177 Color Space 178 Long Exposure NR 179 High ISO NR 179 Built-in Flash 181 Auto Bracketing Set 181 B The Setup Menu: Camera Setup 182 Format Memory Card 183 Monitor Brightness 183 Photo Info 184 Flicker Reduction 184 Time Zone and Date 185 Language 186 Image Comment 186 Auto Image Rotation 187 Self-Timer 188 Auto off Timer 189 Image Review Time 189 Remote on Duration (ML-L3 189 Beep 190 Shutter Sound 190 File Number Sequence...
C The Shooting Menu: Shooting Options 176 Reset Shooting Menu 176 Storage Folder 177 Color Space 178 Long Exposure NR 179 High ISO NR 179 Built-in Flash 181 Auto Bracketing Set 181 B The Setup Menu: Camera Setup 182 Format Memory Card 183 Monitor Brightness 183 Photo Info 184 Flicker Reduction 184 Time Zone and Date 185 Language 186 Image Comment 186 Auto Image Rotation 187 Self-Timer 188 Auto off Timer 189 Image Review Time 189 Remote on Duration (ML-L3 189 Beep 190 Shutter Sound 190 File Number Sequence...

Reference Manual
Page 22
... flash 112 2 Shutter-release button Taking photographs 29 Recording movies 38 3 Power switch 2 4 Eyelets for playback without extending the lens, press and hold the K button (0 4). the monitor will turn the camera off . 2 To turn the camera on for camera strap iv 5 Command dial 10 6 Power-on lamp 25 7 Mode dial 9 8 Accessory Shoe Cover BS-1 .......... 226 9 Accessory shoe 226 10 Flash pop-up control 112 A The Power Switch To turn the camera on, rotate the power switch...
... flash 112 2 Shutter-release button Taking photographs 29 Recording movies 38 3 Power switch 2 4 Eyelets for playback without extending the lens, press and hold the K button (0 4). the monitor will turn the camera off . 2 To turn the camera on for camera strap iv 5 Command dial 10 6 Power-on lamp 25 7 Mode dial 9 8 Accessory Shoe Cover BS-1 .......... 226 9 Accessory shoe 226 10 Flash pop-up control 112 A The Power Switch To turn the camera on, rotate the power switch...
Reference Manual
Page 27
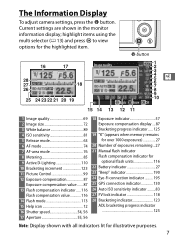
... Flash mode 113 15 Help icon 12 16 Shutter speed 54, 56 17 Aperture 55, 56 18 Exposure indicator 57 Exposure compensation display....87 Bracketing progress indicator ..... 125 19 "K" (appears when memory remains for over 1000 exposures 27 20 Number of exposures remaining...27 21 Manual flash indicator Flash compensation indicator for optional flash units 116 22 Battery indicator 27 23 "Beep" indicator 190 24 Eye-Fi connection indicator ......... 195 25 GPS connection indicator 130 26 Auto ISO sensitivity indicator .........83 27 FV lock indicator...
... Flash mode 113 15 Help icon 12 16 Shutter speed 54, 56 17 Aperture 55, 56 18 Exposure indicator 57 Exposure compensation display....87 Bracketing progress indicator ..... 125 19 "K" (appears when memory remains for over 1000 exposures 27 20 Number of exposures remaining...27 21 Manual flash indicator Flash compensation indicator for optional flash units 116 22 Battery indicator 27 23 "Beep" indicator 190 24 Eye-Fi connection indicator ......... 195 25 GPS connection indicator 130 26 Auto ISO sensitivity indicator .........83 27 FV lock indicator...

Reference Manual
Page 42
... after use immediately and take battery and charger to cool before inserting or removing batteries. Do not move the charger or touch the battery during charging. A Removing the Battery To remove the battery, turn the camera off and open the battery-chamber/memory card slot cover. viii and 233 - 235 of this precaution could result in use. 22 Do not short the charger terminals; If the CHARGE lamp flashes quickly, unplug the charger and remove and...
... after use immediately and take battery and charger to cool before inserting or removing batteries. Do not move the charger or touch the battery during charging. A Removing the Battery To remove the battery, turn the camera off and open the battery-chamber/memory card slot cover. viii and 233 - 235 of this precaution could result in use. 22 Do not short the charger terminals; If the CHARGE lamp flashes quickly, unplug the charger and remove and...
Reference Manual
Page 59
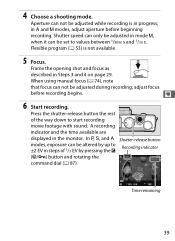
... the opening shot and focus as described in the monitor. In P, S, and A Shutter-release button modes, exposure can be altered by pressing the E Recording indicator (N/L) button and rotating the command dial (0 87). Time remaining 39 Shutter speed can only be adjusted in A and M modes, adjust aperture before recording begins. in mode M, when it can be set to start recording movie footage with sound. A recording indicator and the time available are displayed in Steps 3 and 4 on page 29. 4 Choose a shooting mode. adjust focus...
... the opening shot and focus as described in the monitor. In P, S, and A Shutter-release button modes, exposure can be altered by pressing the E Recording indicator (N/L) button and rotating the command dial (0 87). Time remaining 39 Shutter speed can only be adjusted in A and M modes, adjust aperture before recording begins. in mode M, when it can be set to start recording movie footage with sound. A recording indicator and the time available are displayed in Steps 3 and 4 on page 29. 4 Choose a shooting mode. adjust focus...
Reference Manual
Page 60
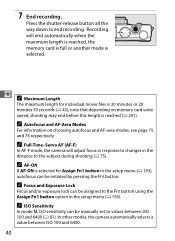
... on memory card write speed, shooting may end before this length is selected. A Focus and Exposure Lock Focus and/or exposure lock can be assigned to the f button using the Assign Fn1 button option in the distance to end recording. A ISO Sensitivity In mode M, ISO sensitivity can be manually set to changes in the setup menu (0 193). note that depending on choosing autofocus and AF-area modes, see page 75 and 76 respectively. Recording will adjust focus...
... on memory card write speed, shooting may end before this length is selected. A Focus and Exposure Lock Focus and/or exposure lock can be assigned to the f button using the Assign Fn1 button option in the distance to end recording. A ISO Sensitivity In mode M, ISO sensitivity can be manually set to changes in the setup menu (0 193). note that depending on choosing autofocus and AF-area modes, see page 75 and 76 respectively. Recording will adjust focus...
Reference Manual
Page 85
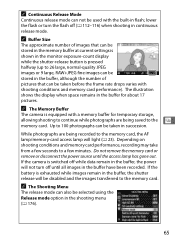
... the number of images that can be taken before the frame rate drops varies with shooting conditions and memory card performance). A Buffer Size The approximate number of pictures that can be stored in the memory buffer at current settings is shown in the monitor exposure-count display while the shutter-release button is switched off while data remain in the buffer, the power will not turn the flash off...
... the number of images that can be taken before the frame rate drops varies with shooting conditions and memory card performance). A Buffer Size The approximate number of pictures that can be stored in the memory buffer at current settings is shown in the monitor exposure-count display while the shutter-release button is switched off while data remain in the buffer, the power will not turn the flash off...

Reference Manual
Page 88
... flash, slide the flash pop-up control to take effect. The camera will automatically fire when required. D Remote Control Photography Note that support red-eye reduction, shutter release will be delayed for Selftimer in self-timer mode, only one photograph will wait for the first time, remove the clear plastic battery-insulator sheet. A Using the Built-in the setup menu can be taken when the flash fires, regardless of the number of shots...
... flash, slide the flash pop-up control to take effect. The camera will automatically fire when required. D Remote Control Photography Note that support red-eye reduction, shutter release will be delayed for Selftimer in self-timer mode, only one photograph will wait for the first time, remove the clear plastic battery-insulator sheet. A Using the Built-in the setup menu can be taken when the flash fires, regardless of the number of shots...
Reference Manual
Page 121
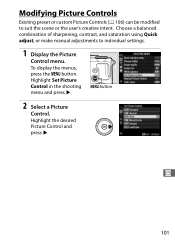
G button 2 Select a Picture Control. Highlight the desired Picture Control and press 2. J 101 Choose a balanced combination of sharpening, contrast, and saturation using Quick adjust, or make manual adjustments to suit the scene or the user's creative intent. Modifying Picture Controls Existing preset or custom Picture Controls (0 106) can be modified to individual settings. 1 Display the Picture Control menu. To display the menus, press the G button. Highlight Set Picture Control in the shooting menu and press 2.
G button 2 Select a Picture Control. Highlight the desired Picture Control and press 2. J 101 Choose a balanced combination of sharpening, contrast, and saturation using Quick adjust, or make manual adjustments to suit the scene or the user's creative intent. Modifying Picture Controls Existing preset or custom Picture Controls (0 106) can be modified to individual settings. 1 Display the Picture Control menu. To display the menus, press the G button. Highlight Set Picture Control in the shooting menu and press 2.
Reference Manual
Page 129
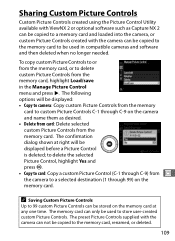
... memory card, highlight Load/save in compatible cameras and software and then deleted when no longer needed. The preset Picture Controls supplied with the camera can be copied to the memory card to be used to a selected destination (1 through C-9 on the memory card. The confirmation dialog shown at any one time. to delete the selected Picture Control, highlight Yes and press J. • Copy to card: Copy a custom Picture Control (C-1 through C-9) from J the camera to store user-created custom Picture Controls...
... memory card, highlight Load/save in compatible cameras and software and then deleted when no longer needed. The preset Picture Controls supplied with the camera can be copied to the memory card to be used to a selected destination (1 through C-9 on the memory card. The confirmation dialog shown at any one time. to delete the selected Picture Control, highlight Yes and press J. • Copy to card: Copy a custom Picture Control (C-1 through C-9) from J the camera to store user-created custom Picture Controls...

Reference Manual
Page 181
To view six pictures at a Time 1 Select a picture. Press 1 or 3 to highlight an option and press 2 to display PictBridge printing options. 3 Adjust printing options. Press J to select. Press 4 or 2 to exit zoom). Q 161 Printing Pictures One at a time, press the W (Q) button. press K to view additional pictures. Option Description Highlight a page size (only sizes supported by the printer. Highlight Printer default (use current printer Border settings), Print with border (print photo with white border), or No border and press J to...
To view six pictures at a Time 1 Select a picture. Press 1 or 3 to highlight an option and press 2 to display PictBridge printing options. 3 Adjust printing options. Press J to select. Press 4 or 2 to exit zoom). Q 161 Printing Pictures One at a time, press the W (Q) button. press K to view additional pictures. Option Description Highlight a page size (only sizes supported by the printer. Highlight Printer default (use current printer Border settings), Print with border (print photo with white border), or No border and press J to...

Reference Manual
Page 185
4 Display printing options. Select Start printing and press J to display PictBridge printing options. 5 Adjust printing options. To cancel before all copies have been printed, press J. Q 165 Press J to start printing. A See Also See page 242 for an index print). 6 Start printing. Choose page size, border, and time stamp options as described on page 161 (a warning will be displayed if the selected page size is too small for information on what to do if an error occurs during printing.
4 Display printing options. Select Start printing and press J to display PictBridge printing options. 5 Adjust printing options. To cancel before all copies have been printed, press J. Q 165 Press J to start printing. A See Also See page 242 for an index print). 6 Start printing. Choose page size, border, and time stamp options as described on page 161 (a warning will be displayed if the selected page size is too small for information on what to do if an error occurs during printing.

Reference Manual
Page 230
... that exposure compensation can only be set to values between -2 and +2 EV. The resulting U image will be displayed full-frame in the shooting menu, not the color space selected at the time the photograph was taken. Adjust the settings listed below. Note that white balance is not displayed when Picture Controls are adjusted. Image quality (0 69) Image size (0 72) White balance (0 89) Exposure compensation (0 87) Picture Control (0 99) High ISO NR (0 179) D-Lighting (0 200) 4 Copy the photograph...
... that exposure compensation can only be set to values between -2 and +2 EV. The resulting U image will be displayed full-frame in the shooting menu, not the color space selected at the time the photograph was taken. Adjust the settings listed below. Note that white balance is not displayed when Picture Controls are adjusted. Image quality (0 69) Image size (0 72) White balance (0 89) Exposure compensation (0 87) Picture Control (0 99) High ISO NR (0 179) D-Lighting (0 200) 4 Copy the photograph...

Reference Manual
Page 262
...Exposure indicator and shutter (higher f-number; Recharge battery. Turn camera off and confirm that appear in shutter-priority auto mode. If subject is full. Choose a different shutter speed or select manual Change shutter speed or select mode M. 54, 56 mode. Indicator Solution 0 Shutter release disabled. mode A). It may be possible to smaller file sizes. 72 take more pictures at a lower image quality or size. Turn camera off , remove battery, and insert charged battery. 27 Initialization error. battery, and turn camera on . 2 No memory card. Error Messages...
...Exposure indicator and shutter (higher f-number; Recharge battery. Turn camera off and confirm that appear in shutter-priority auto mode. If subject is full. Choose a different shutter speed or select manual Change shutter speed or select mode M. 54, 56 mode. Indicator Solution 0 Shutter release disabled. mode A). It may be possible to smaller file sizes. 72 take more pictures at a lower image quality or size. Turn camera off , remove battery, and insert charged battery. 27 Initialization error. battery, and turn camera on . 2 No memory card. Error Messages...
Reference Manual
Page 275
... (Set Picture Control 99 Photo information 134 Language 186 PictBridge 159, 249 Large (Image size 72 Picture Control Utility 109 Long exposure NR 179 Picture Controls 99 M Playback 33, 45, 132, 169 Playback display options 173 Manage Picture Control 106 Playback folder 173 Manual 56 Playback menu 172 Manual focus 80 Playback zoom 144 Matrix metering 85 Portrait (Set Picture Control 99 Maximum sensitivity 84 Power connector 230 Medium (Image size 72 Preset manual (White balance 94 Memory buffer 65 Press the shutter-release button all the way Memory card...
... (Set Picture Control 99 Photo information 134 Language 186 PictBridge 159, 249 Large (Image size 72 Picture Control Utility 109 Long exposure NR 179 Picture Controls 99 M Playback 33, 45, 132, 169 Playback display options 173 Manage Picture Control 106 Playback folder 173 Manual 56 Playback menu 172 Manual focus 80 Playback zoom 144 Matrix metering 85 Portrait (Set Picture Control 99 Maximum sensitivity 84 Power connector 230 Medium (Image size 72 Preset manual (White balance 94 Memory buffer 65 Press the shutter-release button all the way Memory card...

Reference Manual
Page 276
... Reverse indicators 192 Toning 103, 105 RGB Histogram 135 Trim 202 Rotate tall 174 Trimming movies 47 S U Save selected frame 50 USB cable 156, 159 Save user settings 60 Use GPS to set camera clock 130 Scene mode 35 UTC 130, 138 Selective color 217 V Self-timer 63, 188 Sensitivity 127 ViewNX 2 154 Sepia 203 Virtual horizon 17 Setup menu 182 Vivid (Set Picture Control 99 Shade (White balance 90 Volume 46 Shooting data 137 Shooting menu...
... Reverse indicators 192 Toning 103, 105 RGB Histogram 135 Trim 202 Rotate tall 174 Trimming movies 47 S U Save selected frame 50 USB cable 156, 159 Save user settings 60 Use GPS to set camera clock 130 Scene mode 35 UTC 130, 138 Selective color 217 V Self-timer 63, 188 Sensitivity 127 ViewNX 2 154 Sepia 203 Virtual horizon 17 Setup menu 182 Vivid (Set Picture Control 99 Shade (White balance 90 Volume 46 Shooting data 137 Shooting menu...


