
User Manual
Page 3
... First Steps Basic Picture Taking Reviewing Your Pictures Connecting to a Computer Viewing Pictures on a TV / VCR Using the Camera Controls (All User Sets) Choosing a User Set Using the Camera Controls (User Sets 1, 2, 3) Playing Back Your Pictures List of unpacking and setting up your Nikon digital camera, taking your first photographs, and transferring them to your computer. Guide to...
... First Steps Basic Picture Taking Reviewing Your Pictures Connecting to a Computer Viewing Pictures on a TV / VCR Using the Camera Controls (All User Sets) Choosing a User Set Using the Camera Controls (User Sets 1, 2, 3) Playing Back Your Pictures List of unpacking and setting up your Nikon digital camera, taking your first photographs, and transferring them to your computer. Guide to...
User Manual
Page 10
...Shutter Release: Self-Timer Mode 58 Optical and Digital Zoom: The Button 60 Flash Mode: The Button 62 Exposure Compensation: The Button 66 Keep or Delete: Picture Review 67 Choosing a User Set 68 Using the Camera Controls (User Sets 1,2,3 70 Controlling Shutter Speed and Aperture: ...Exposure Mode 70 Making Movies: Movie Mode 77 Reacting Faster to Light: Sensitivity (ISO Equivalency 78 Focusing by Hand: Manual Focus 80 Playing Back Your ...
...Shutter Release: Self-Timer Mode 58 Optical and Digital Zoom: The Button 60 Flash Mode: The Button 62 Exposure Compensation: The Button 66 Keep or Delete: Picture Review 67 Choosing a User Set 68 Using the Camera Controls (User Sets 1,2,3 70 Controlling Shutter Speed and Aperture: ...Exposure Mode 70 Making Movies: Movie Mode 77 Reacting Faster to Light: Sensitivity (ISO Equivalency 78 Focusing by Hand: Manual Focus 80 Playing Back Your ...

User Manual
Page 14
... each chapter contains. The manual's chapters are engineered and proven to the highest standards and includes complex electronic circuitry. For more information about Nikon brand accessories, contact your camera and how to operate the camera's menus, and gives a full explanation of this electronic circuitry. Use Only Nikon Brand Electronic Accessories Your Nikon COOLPIX digital camera is designed to operate...
... each chapter contains. The manual's chapters are engineered and proven to the highest standards and includes complex electronic circuitry. For more information about Nikon brand accessories, contact your camera and how to operate the camera's menus, and gives a full explanation of this electronic circuitry. Use Only Nikon Brand Electronic Accessories Your Nikon COOLPIX digital camera is designed to operate...

User Manual
Page 15
...digital imaging and photography. Getting Started-Overview and Symbols Symbols To make it easier to find the information you need, the following sites: • For users in the U.S.A.: http://www.nikonusa.com/ • For users in Europe: http://www.nikon-euro.com/ • For users...your camera. Notes: information that you should read before using your area. Tips: helpful information for contact information: http://www.nikon-image.com/eng/ 3 Additional information may be available from the Nikon representative in this manual. See: additional information in your camera. See...
...digital imaging and photography. Getting Started-Overview and Symbols Symbols To make it easier to find the information you need, the following sites: • For users in the U.S.A.: http://www.nikonusa.com/ • For users in Europe: http://www.nikon-euro.com/ • For users...your camera. Notes: information that you should read before using your area. Tips: helpful information for contact information: http://www.nikon-image.com/eng/ 3 Additional information may be available from the Nikon representative in this manual. See: additional information in your camera. See...
User Manual
Page 19
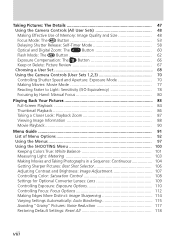
... shooting mode .. 104 33 28 Manual focus indicator ......... 80 34 35 29 Image sharpening 114 30 White balance 101 31 4 Sensitivity (ISO equivalency) .. 78 19 Progress bar (Ultra HS) ........ 105 32 Black-and-white mode indicator 108 20 User Setting No. (User Set) .... 68 21 Converter lens...37 Exposure display 75 Monitor or Viewfinder (Playback Mode) In (playback mode), the icons in the monitor or viewfinder indicate the status of the following camera settings: 1 Date of recording 19 2 Time of recording 19 3 Image size 51 * Appears only when battery is running low. 4 Image ...
... shooting mode .. 104 33 28 Manual focus indicator ......... 80 34 35 29 Image sharpening 114 30 White balance 101 31 4 Sensitivity (ISO equivalency) .. 78 19 Progress bar (Ultra HS) ........ 105 32 Black-and-white mode indicator 108 20 User Setting No. (User Set) .... 68 21 Converter lens...37 Exposure display 75 Monitor or Viewfinder (Playback Mode) In (playback mode), the icons in the monitor or viewfinder indicate the status of the following camera settings: 1 Date of recording 19 2 Time of recording 19 3 Image size 51 * Appears only when battery is running low. 4 Image ...

User Manual
Page 40
Indicator Green Green (flashes) Red Red (flashes) None Meaning Subject in which the camera is taken. Speedlight will not appear. Custom Focus Settings (User Sets 1, 2, and 3) In User Sets 1, 2, and 3, manual focus ( 80) can be used to focus on an off ". Autofocus Flash-ready indicator indicator Taking and Reviewing Pictures-Basic Picture Taking Step 5-Focus...
Indicator Green Green (flashes) Red Red (flashes) None Meaning Subject in which the camera is taken. Speedlight will not appear. Custom Focus Settings (User Sets 1, 2, and 3) In User Sets 1, 2, and 3, manual focus ( 80) can be used to focus on an off ". Autofocus Flash-ready indicator indicator Taking and Reviewing Pictures-Basic Picture Taking Step 5-Focus...

User Manual
Page 67
...autofocus, the autofocus indicator will turn yellow, indicating that you zoom the camera in and adjust the range until you find a distance at which ... • The subject is moving rapidly. If the camera is unable to the camera than the main subject, and both the bars and ...up can be achieved. 55 Taking Pictures : The Details-Using the Camera Controls (All User Sets) Getting Good Results with Autofocus Autofocus performs best when: &#...that macro close a s 3 c m (0.8˝) from the camera. Macro Close-Up When the camera is evenly lit. For example, autofocus may not perform well on...
...autofocus, the autofocus indicator will turn yellow, indicating that you zoom the camera in and adjust the range until you find a distance at which ... • The subject is moving rapidly. If the camera is unable to the camera than the main subject, and both the bars and ...up can be achieved. 55 Taking Pictures : The Details-Using the Camera Controls (All User Sets) Getting Good Results with Autofocus Autofocus performs best when: &#...that macro close a s 3 c m (0.8˝) from the camera. Macro Close-Up When the camera is evenly lit. For example, autofocus may not perform well on...

User Manual
Page 69
...both focus and exposure. With exposure set to lock, you can refocus the camera without refocusing the camera. With focus set to lock, you can adjust exposure without adjusting exposure. Taking Pictures : The Details-Using the Camera Controls (All User Sets) AE/AF Button: Locking Focus and Exposure By default, pressing the... AE/AF button when the camera is in the SET-UP menu ( 131) can be used to set the AE/AF button to lock just focus or just exposure. You can improve results by manually selecting the...
...both focus and exposure. With exposure set to lock, you can refocus the camera without refocusing the camera. With focus set to lock, you can adjust exposure without adjusting exposure. Taking Pictures : The Details-Using the Camera Controls (All User Sets) AE/AF Button: Locking Focus and Exposure By default, pressing the... AE/AF button when the camera is in the SET-UP menu ( 131) can be used to set the AE/AF button to lock just focus or just exposure. You can improve results by manually selecting the...

User Manual
Page 74
... the Built-in Speedlight to Manual The built-in Speedlight can be raised by pressing the button when the Speedlight Opt.: Pop Up option in control panel, and monitor or viewfinder. Taking Pictures : The Details-Using the Camera Controls (All User Sets) Flash Mode: The Button The flash mode is... taken. The flash mode changes as shown below . Press button repeatedly until desired setting is displayed in the SET-UP menu is set to Manual ( 136).
... the Built-in Speedlight to Manual The built-in Speedlight can be raised by pressing the button when the Speedlight Opt.: Pop Up option in control panel, and monitor or viewfinder. Taking Pictures : The Details-Using the Camera Controls (All User Sets) Flash Mode: The Button The flash mode is... taken. The flash mode changes as shown below . Press button repeatedly until desired setting is displayed in the SET-UP menu is set to Manual ( 136).
User Manual
Page 80
... for the following menu items are as follows: Setting Exposure Mode 70 Sensitivity (ISO) 78 Manual Focus 80 Shooting Menu Settings 100 SHOOTING menu settings for User Sets 2 and 3, and switch instantly from one combination of camera settings. If there is selected. Setting Setting White Balance 101 Image Adjustment 107 Metering 103 Saturation...
... for the following menu items are as follows: Setting Exposure Mode 70 Sensitivity (ISO) 78 Manual Focus 80 Shooting Menu Settings 100 SHOOTING menu settings for User Sets 2 and 3, and switch instantly from one combination of camera settings. If there is selected. Setting Setting White Balance 101 Image Adjustment 107 Metering 103 Saturation...

User Manual
Page 82
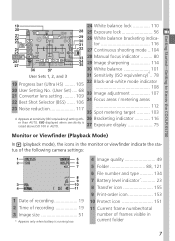
...Camera Controls User Sets 1, 2, 3 This section covers settings used only when User Set 1, 2, or 3 is selected in control panel and monitor or viewfinder 70 To choose the exposure mode, rotate the command dial while pressing the button. The exposure mode cycles as follows: (programmed auto), (shutter-priority auto), (aperture-priority auto), and (manual...). + Press while rotating command dial Exposure mode displayed in (shooting) mode. In User Sets 1, 2, and 3, you can choose from four exposure modes that ...
...Camera Controls User Sets 1, 2, 3 This section covers settings used only when User Set 1, 2, or 3 is selected in control panel and monitor or viewfinder 70 To choose the exposure mode, rotate the command dial while pressing the button. The exposure mode cycles as follows: (programmed auto), (shutter-priority auto), (aperture-priority auto), and (manual...). + Press while rotating command dial Exposure mode displayed in (shooting) mode. In User Sets 1, 2, and 3, you can choose from four exposure modes that ...

User Manual
Page 83
... exposure. High shutter speeds freeze action. Large apertures (small f/-num- User chooses both shutter Use when you want complete Manual speed and aperture. Shutterpriority auto User chooses shutter speed; Aperturepriority auto User chooses aperture; control over exposure settings. camera sets aperture for best exposure. camera sets shutter speed for best exposure. Programmed auto Flexible program ( 72...
... exposure. High shutter speeds freeze action. Large apertures (small f/-num- User chooses both shutter Use when you want complete Manual speed and aperture. Shutterpriority auto User chooses shutter speed; Aperturepriority auto User chooses aperture; control over exposure settings. camera sets aperture for best exposure. camera sets shutter speed for best exposure. Programmed auto Flexible program ( 72...

User Manual
Page 87
...or over -exposed by exposure-count display. Value is pressed. 3 Rotate the command dial to nearest EV. Taking Pictures : The Details-Using the Camera Controls (User Sets 1, 2, 3) Manual In manual exposure mode, you control both shutter speed and aperture. The amount the picture would be adjusted in the monitor or viewfinder. If image would...or over -exposed at the selected setting is displayed in the control panel, or in green in increments equivalent to 1/3 EV (1/3 step). 1 After choosing (manual) as the exposure mode, remove your finger from -2 to five minutes (BULB).
...or over -exposed by exposure-count display. Value is pressed. 3 Rotate the command dial to nearest EV. Taking Pictures : The Details-Using the Camera Controls (User Sets 1, 2, 3) Manual In manual exposure mode, you control both shutter speed and aperture. The amount the picture would be adjusted in the monitor or viewfinder. If image would...or over -exposed at the selected setting is displayed in the control panel, or in green in increments equivalent to 1/3 EV (1/3 step). 1 After choosing (manual) as the exposure mode, remove your finger from -2 to five minutes (BULB).

User Manual
Page 88
... displayed in green in the monitor or viewfinder, the multi selector can be displayed in the monitor or viewfinder). Taking Pictures : The Details-Using the Camera Controls (User Sets 1, 2, 3) The Multi Selector The item not currently selected in the control panel shutter-speed/aperture display or monitor can be adjusted by... SHOOTING menu to five minutes. We also recommend that you turn Noise Reduction on ( 117) to reduce mottling ("noise"). 76 Long Time-Exposures (BULB) When manual exposure mode is held down.
... displayed in green in the monitor or viewfinder, the multi selector can be displayed in the monitor or viewfinder). Taking Pictures : The Details-Using the Camera Controls (User Sets 1, 2, 3) The Multi Selector The item not currently selected in the control panel shutter-speed/aperture display or monitor can be adjusted by... SHOOTING menu to five minutes. We also recommend that you turn Noise Reduction on ( 117) to reduce mottling ("noise"). 76 Long Time-Exposures (BULB) When manual exposure mode is held down.

User Manual
Page 91
Taking Pictures : The Details-Using the Camera Controls (User Sets 1, 2, 3) The following settings are required. Noise may appear in ...displayed in red in monitor or viewfinder to ISO 100, ISO icon appears in shutter-priority auto or manual exposure modes, sensitivity will be turned off to avoid heightening the effects of 100 under low light ... under normal conditions; Approximately equivalent to ISO 100, recommended except 100 when lighting is poor, however, camera automatically raises sensitivity to compensate (up to ISO 400. when lighting is poor or when higher shutter speeds...
Taking Pictures : The Details-Using the Camera Controls (User Sets 1, 2, 3) The following settings are required. Noise may appear in ...displayed in red in monitor or viewfinder to ISO 100, ISO icon appears in shutter-priority auto or manual exposure modes, sensitivity will be turned off to avoid heightening the effects of 100 under low light ... under normal conditions; Approximately equivalent to ISO 100, recommended except 100 when lighting is poor, however, camera automatically raises sensitivity to compensate (up to ISO 400. when lighting is poor or when higher shutter speeds...

User Manual
Page 92
... the shutter-release button all the way down to infinity. Taking Pictures : The Details-Using the Camera Controls (User Sets 1, 2, 3) Focusing by Hand: Manual Focus In User Sets 1, 2, and 3, manual focus can be cancelled by pressing the mode. The camera can be used in place of the default autofocus for situations in focus. button to achieve...
... the shutter-release button all the way down to infinity. Taking Pictures : The Details-Using the Camera Controls (User Sets 1, 2, 3) Focusing by Hand: Manual Focus In User Sets 1, 2, and 3, manual focus can be cancelled by pressing the mode. The camera can be used in place of the default autofocus for situations in focus. button to achieve...

User Manual
Page 93
...sure that the self-timer is selected ( 58) before manually adjusting focus. If the camera is no longer shown in red. Changing the focus mode after setting focusing will cancel manual focus. Taking Pictures : The Details-Using the Camera Controls (User Sets 1, 2, 3) Close-ups and Optical Zoom At... short focus distances, the camera may be unable to focus at the current zoom position, the focus...
...sure that the self-timer is selected ( 58) before manually adjusting focus. If the camera is no longer shown in red. Changing the focus mode after setting focusing will cancel manual focus. Taking Pictures : The Details-Using the Camera Controls (User Sets 1, 2, 3) Close-ups and Optical Zoom At... short focus distances, the camera may be unable to focus at the current zoom position, the focus...

User Manual
Page 107
... Es (Spanish) USB 1, 2, 3 Choose USB protocol used when camera is connected to confirm such operations as shutter release. User Set A User Set 1,2,3 (1) User Set 1,2,3 (2) Play back mode Speedlight Options 1, 2, 3 Options ...for year, month, and day info.txt 1, 2, 3/ Save image information in text Off format. Pop Up Variable Power Speedlight Cntrl Auto / Manual -2.0 - +2.0 Auto/Int&ExtActive 136 Shot Confirmation On / Off Shutter Sound All modes Control beep produced by camera...
... Es (Spanish) USB 1, 2, 3 Choose USB protocol used when camera is connected to confirm such operations as shutter release. User Set A User Set 1,2,3 (1) User Set 1,2,3 (2) Play back mode Speedlight Options 1, 2, 3 Options ...for year, month, and day info.txt 1, 2, 3/ Save image information in text Off format. Pop Up Variable Power Speedlight Cntrl Auto / Manual -2.0 - +2.0 Auto/Int&ExtActive 136 Shot Confirmation On / Off Shutter Sound All modes Control beep produced by camera...

User Manual
Page 115
The following options are available: Option How it works When to use spot Camera measures light in the monitor or viewfinder. 103 sure for portraits; Ensures central subject.... but still preserves background details. Menu Guide-Using the SHOOTING Menu Measuring Light: Metering User Sets 1, 2, and 3 offer a choice of four metering methods. (In User Set A, matrix metering is indicated by square in most circumstances. Spot AF Area Useful... whole frame; Viewing the Current Metering Setting Current metering method is used with manual or automatcurrent focus area only.
The following options are available: Option How it works When to use spot Camera measures light in the monitor or viewfinder. 103 sure for portraits; Ensures central subject.... but still preserves background details. Menu Guide-Using the SHOOTING Menu Measuring Light: Metering User Sets 1, 2, and 3 offer a choice of four metering methods. (In User Set A, matrix metering is indicated by square in most circumstances. Spot AF Area Useful... whole frame; Viewing the Current Metering Setting Current metering method is used with manual or automatcurrent focus area only.

User Manual
Page 124
... used together with focus lock to select focus area manually (e.g. Auto is best used when there is used . Manually select one of focus lock ( 56) to camera is moving). Menu Guide-Using the SHOOTING Menu Focus-Area Selection: AF Area Mode In User Set A, the camera automatically focuses on an off -center subject. Spot metering... confirming focus visually in which case the central focus area is pressed halfway. when subject is automatically selected. No focus area indicators are available, unless digital zoom is in use, in the monitor.
... used together with focus lock to select focus area manually (e.g. Auto is best used when there is used . Manually select one of focus lock ( 56) to camera is moving). Menu Guide-Using the SHOOTING Menu Focus-Area Selection: AF Area Mode In User Set A, the camera automatically focuses on an off -center subject. Spot metering... confirming focus visually in which case the central focus area is pressed halfway. when subject is automatically selected. No focus area indicators are available, unless digital zoom is in use, in the monitor.


