
User Manual
Page 5
...jacks, use . CD-ROMs The CD-ROMs on battery power for an extended period, the battery may become hot during use only the cables provided or sold by Nikon for the purpose, to put your finger in your subject's... removing memory cards from the subject. Before removing the battery, turn the camera off and allow the battery to remove the battery when no less than one meter (39˝) from the... camera. Playing CD-ROMs on audio CD equipment. Particular care should be observed if photographing infants...
...jacks, use . CD-ROMs The CD-ROMs on battery power for an extended period, the battery may become hot during use only the cables provided or sold by Nikon for the purpose, to put your finger in your subject's... removing memory cards from the subject. Before removing the battery, turn the camera off and allow the battery to remove the battery when no less than one meter (39˝) from the... camera. Playing CD-ROMs on audio CD equipment. Particular care should be observed if photographing infants...
User Manual
Page 6
...every effort has been made to ensure that disconnecting the power source as described above may result in loss of any data not recorded to the attention of the Nikon representative in Canada CAUTION This class B digital apparatus meets all requirements of continued malfunction, contact your...and reconnect the adapter and turn the camera on Electronically-Controlled Cameras In extremely rare instances, unusual characters may appear in these manuals at the time the problem occurred. Note that the information in the control panel and the camera may stop functioning. Notices •...
...every effort has been made to ensure that disconnecting the power source as described above may result in loss of any data not recorded to the attention of the Nikon representative in Canada CAUTION This class B digital apparatus meets all requirements of continued malfunction, contact your...and reconnect the adapter and turn the camera on Electronically-Controlled Cameras In extremely rare instances, unusual characters may appear in these manuals at the time the problem occurred. Note that the information in the control panel and the camera may stop functioning. Notices •...

User Manual
Page 11
... Prints: Print Set 153 Selecting Images for Transfer: Auto Transfer 155 Technical Notes: Camera Care, Options, and Resources 157 Optional Accessories 158 Caring for the Camera and Battery 160 Web Resources 163 Troubleshooting 164 Specifications 171 Index ...175 ix Using the... SET-UP Menu 120 Organizing Your Pictures: Folders 121 Adjusting Monitor Settings: Monitor Options 126 Customizing Camera Controls: Controls 129 Controlling Zoom: Zoom Options 131 Conserving Battery Power...
... Prints: Print Set 153 Selecting Images for Transfer: Auto Transfer 155 Technical Notes: Camera Care, Options, and Resources 157 Optional Accessories 158 Caring for the Camera and Battery 160 Web Resources 163 Troubleshooting 164 Specifications 171 Index ...175 ix Using the... SET-UP Menu 120 Organizing Your Pictures: Folders 121 Adjusting Monitor Settings: Monitor Options 126 Customizing Camera Controls: Controls 129 Controlling Zoom: Zoom Options 131 Conserving Battery Power...

User Manual
Page 16
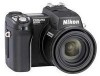
For more information on the function of the camera are identified below. Getting Started-Getting to the page numbers listed. Getting to Know the COOLPIX5700 Parts of the COOLPIX5700 The parts of each part, ... 26, 138 8 Lens 13, 162 9 Microphone 77 10 Self-timer/red-eye reduction/shot confirmation lamp .. 58, 63, 137 4 11 Power switch 22 12 Shutter-release button ......... 28 13 Eyelet for camera strap (x2) ... 13 14 Audio/video (A/V) out connector (under cover 46 15 DC-IN connector (under cover) 15 16 USB...
For more information on the function of the camera are identified below. Getting Started-Getting to the page numbers listed. Getting to Know the COOLPIX5700 Parts of the COOLPIX5700 The parts of each part, ... 26, 138 8 Lens 13, 162 9 Microphone 77 10 Self-timer/red-eye reduction/shot confirmation lamp .. 58, 63, 137 4 11 Power switch 22 12 Shutter-release button ......... 28 13 Eyelet for camera strap (x2) ... 13 14 Audio/video (A/V) out connector (under cover 46 15 DC-IN connector (under cover) 15 16 USB...

User Manual
Page 26
we recommend that the battery-chamber cover is properly latched. 14 Getting Started-First Steps Step 2-Insert the Battery Your camera is powered by a single rechargeable Nikon EN-EL1 lithium-ion battery (provided) or a non-rechargeable 2CR5 (DL245) lithium battery (available separately). 2.1 ...Charge the battery The EN-EL1 is provided with the charger. 2.2 Turn the camera off 2.3 Open the battery-chamber cover Slide the battery-...
we recommend that the battery-chamber cover is properly latched. 14 Getting Started-First Steps Step 2-Insert the Battery Your camera is powered by a single rechargeable Nikon EN-EL1 lithium-ion battery (provided) or a non-rechargeable 2CR5 (DL245) lithium battery (available separately). 2.1 ...Charge the battery The EN-EL1 is provided with the charger. 2.2 Turn the camera off 2.3 Open the battery-chamber cover Slide the battery-...

User Manual
Page 27
... supplied with the battery. After charging for the battery to power the camera for extended periods, use non-rechargeable 2CR5 (DL245) lithium batteries, available at a variety of back-up power. Alternative Power Sources Besides the Nikon EN-EL1, the COOLPIX5700 can provide roughly three days of ...retail outlets. Turn the camera off and wait for about ten hours, this power source can use an EH53 AC adapter or EH...
... supplied with the battery. After charging for the battery to power the camera for extended periods, use non-rechargeable 2CR5 (DL245) lithium batteries, available at a variety of back-up power. Alternative Power Sources Besides the Nikon EN-EL1, the COOLPIX5700 can provide roughly three days of ...retail outlets. Turn the camera off and wait for about ten hours, this power source can use an EH53 AC adapter or EH...

User Manual
Page 35
...panel, monitor or viewfinder Check the battery indicator to free up space on the card. Make sure the memory card has enough memory. Camera functions normally. Recharge EN-EL1 or replace with fully charged EN-EL1, or use a new 2CR5 No pictures can be possible to...more pictures at a different image quality or size ( 49). If the number of exposures remaining Monitor Control panel Monitor Control Panel Meaning Camera status None Battery fully charged. See the table below for battery indicator meanings. Taking and Reviewing Pictures-Basic Picture Taking 1.5 Check indicators in...
...panel, monitor or viewfinder Check the battery indicator to free up space on the card. Make sure the memory card has enough memory. Camera functions normally. Recharge EN-EL1 or replace with fully charged EN-EL1, or use a new 2CR5 No pictures can be possible to...more pictures at a different image quality or size ( 49). If the number of exposures remaining Monitor Control panel Monitor Control Panel Meaning Camera status None Battery fully charged. See the table below for battery indicator meanings. Taking and Reviewing Pictures-Basic Picture Taking 1.5 Check indicators in...

User Manual
Page 36
The / SEL Button Press the / SEL button to switch between the monitor and viewfinder when the monitor is effectively off and all camera functions are performed for the period of time specified in the Auto Off menu (default 30 seconds; 133). The monitor and viewfinder display... the same contents. 24 To reactivate the camera, press or press the shutter-release button halfway. The camera itself is open. In sleep mode, the monitor or viewfinder turn off . Taking and Reviewing Pictures-Basic Picture Taking ...
The / SEL Button Press the / SEL button to switch between the monitor and viewfinder when the monitor is effectively off and all camera functions are performed for the period of time specified in the Auto Off menu (default 30 seconds; 133). The monitor and viewfinder display... the same contents. 24 To reactivate the camera, press or press the shutter-release button halfway. The camera itself is open. In sleep mode, the monitor or viewfinder turn off . Taking and Reviewing Pictures-Basic Picture Taking ...
User Manual
Page 41
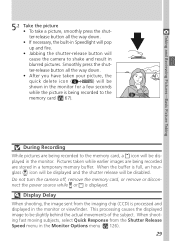
... While pictures are stored in the monitor. When the buffer is displayed. Smoothly press the shut- Do not turn the camera off, remove the memory card, or remove or disconnect the power source while or is full, an hourglass ( ) icon will be displayed and the shutter release will be displayed in ... moving subjects, select Quick Response from the imaging chip (CCD) is being recorded are being recorded to the memory card, a icon will cause the camera to shake and result in the Monitor Options menu ( 126). 29 ter-release button all the way down . • After you have taken your...
... While pictures are stored in the monitor. When the buffer is displayed. Smoothly press the shut- Do not turn the camera off, remove the memory card, or remove or disconnect the power source while or is full, an hourglass ( ) icon will be displayed and the shutter release will be displayed in ... moving subjects, select Quick Response from the imaging chip (CCD) is being recorded are being recorded to the memory card, a icon will cause the camera to shake and result in the Monitor Options menu ( 126). 29 ter-release button all the way down . • After you have taken your...

User Manual
Page 42
Taking and Reviewing Pictures-Basic Picture Taking Step 6-Put the Camera Away When you have finished using the camera, follow these steps before putting the camera away. 6.1 Turn the camera off Turn the camera off to save battery power. 6.2 Lower the built-in Speedlight If the built-in Speedlight is raised, lower it by gently pushing it down. 6.3 Close the monitor and replace the lens cap Close the monitor and replace the lens cap to protect the monitor and lens from dust and fingerprints. 30
Taking and Reviewing Pictures-Basic Picture Taking Step 6-Put the Camera Away When you have finished using the camera, follow these steps before putting the camera away. 6.1 Turn the camera off Turn the camera off to save battery power. 6.2 Lower the built-in Speedlight If the built-in Speedlight is raised, lower it by gently pushing it down. 6.3 Close the monitor and replace the lens cap Close the monitor and replace the lens cap to protect the monitor and lens from dust and fingerprints. 30
User Manual
Page 53
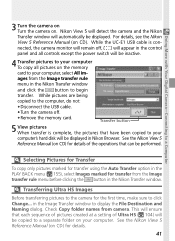
...be copied to the computer, do not: • Disconnect the USB cable. • Turn the camera off , will appear in the control panel and all controls except the power switch will be inactive. 4 Transfer pictures to your computer To copy all pictures on CD) for ... transfer is connected, the camera monitor will remain off . • Remove the memory card. Doing More with Your Digital Camera-Connecting to click Change... Check Copy folder names from the Image transfer rule menu in the Nikon Transfer window. in Nikon Browser. For details, see the Nikon View 5 Reference Manual ...
...be copied to the computer, do not: • Disconnect the USB cable. • Turn the camera off , will appear in the control panel and all controls except the power switch will be inactive. 4 Transfer pictures to your computer To copy all pictures on CD) for ... transfer is connected, the camera monitor will remain off . • Remove the memory card. Doing More with Your Digital Camera-Connecting to click Change... Check Copy folder names from the Image transfer rule menu in the Nikon Transfer window. in Nikon Browser. For details, see the Nikon View 5 Reference Manual ...

User Manual
Page 55
If in Mac OS 9 Before using the Nikon View 5 (version 5.1) to display pictures taken at a camera image-quality setting of RAW ( 49), allocate at least 72 MB of memory allocated to increase the memory allocation. If you to Nikon View 5, the pictures will display a message prompting... increasing the amount of memory to Nikon View 5. instead, the computer will not be sure that the battery is fully charged. Use a Reliable Power Source When transferring data between the camera and the computer, be opened; Doing More with Your Digital Camera-Connecting to a Computer Viewing RAW ...
If in Mac OS 9 Before using the Nikon View 5 (version 5.1) to display pictures taken at a camera image-quality setting of RAW ( 49), allocate at least 72 MB of memory allocated to increase the memory allocation. If you to Nikon View 5, the pictures will display a message prompting... increasing the amount of memory to Nikon View 5. instead, the computer will not be sure that the battery is fully charged. Use a Reliable Power Source When transferring data between the camera and the computer, be opened; Doing More with Your Digital Camera-Connecting to a Computer Viewing RAW ...

User Manual
Page 58
... 133). Doing More with Your Digital Camera-Viewing Pictures on a TV /...camera will turn off can connect the COOLPIX5700 to a TV or VCR. 1 Connect the cable to the camera Connect the black plug to the camera...'s A / V OUT connector. 2 Connect the cable to the video device Connect the yellow plug to the TV. Auto Off When using the camera with your camera, you connect the camera... the camera monitor or viewfinder, and the camera monitor...For extended use, connect the camera to (playback) mode The TV... the video channel 4 Turn camera on and set the mode...
... 133). Doing More with Your Digital Camera-Viewing Pictures on a TV /...camera will turn off can connect the COOLPIX5700 to a TV or VCR. 1 Connect the cable to the camera Connect the black plug to the camera...'s A / V OUT connector. 2 Connect the cable to the video device Connect the yellow plug to the TV. Auto Off When using the camera with your camera, you connect the camera... the camera monitor or viewfinder, and the camera monitor...For extended use, connect the camera to (playback) mode The TV... the video channel 4 Turn camera on and set the mode...
User Manual
Page 106
... camera enters sleep mode to save power. 133 30 s 1 M 5 M 30 M Seq. On Off Reset 134 CF Card Format All modes Format memory cards for storage, create, rename, and delete folders. No Format 135 94 tions of and AE/AF buttons. 129 Zoom Options 1, 2, 3 Control digital zoom, zoom speed and aperture during zooming. Options NIKON...
... camera enters sleep mode to save power. 133 30 s 1 M 5 M 30 M Seq. On Off Reset 134 CF Card Format All modes Format memory cards for storage, create, rename, and delete folders. No Format 135 94 tions of and AE/AF buttons. 129 Zoom Options 1, 2, 3 Control digital zoom, zoom speed and aperture during zooming. Options NIKON...

User Manual
Page 107
...info.txt 1, 2, 3/ Save image information in text Off format. Pop Up Variable Power Speedlight Cntrl Auto / Manual -2.0 - +2.0 Auto/Int&ExtActive 136 Shot Confirmation On / Off Shutter Sound All modes Control beep produced by camera On to a computer. 143 PTP Mass Storage 95 Menu Guide-List of Menu Options... Off 140 Date All modes Set time and date. 141 Year, Month, Day, hour, minute, display order for built-in which camera messages and menus are displayed. 142 De (German) En (English) Fr (French) (Japanese) Es (Spanish) USB 1, 2, 3 Choose USB...
...info.txt 1, 2, 3/ Save image information in text Off format. Pop Up Variable Power Speedlight Cntrl Auto / Manual -2.0 - +2.0 Auto/Int&ExtActive 136 Shot Confirmation On / Off Shutter Sound All modes Control beep produced by camera On to a computer. 143 PTP Mass Storage 95 Menu Guide-List of Menu Options... Off 140 Date All modes Set time and date. 141 Year, Month, Day, hour, minute, display order for built-in which camera messages and menus are displayed. 142 De (German) En (English) Fr (French) (Japanese) Es (Spanish) USB 1, 2, 3 Choose USB...

User Manual
Page 125
...-up. Option MF On Off Description Areas in focus will be taken even AF when subject is not in focus; As above, but saves battery power. Shots can be taken even when subject is not in the monitor or viewfinder when manual focus is given. 113 Shots can be sharply outlined...
...-up. Option MF On Off Description Areas in focus will be taken even AF when subject is not in focus; As above, but saves battery power. Shots can be taken even when subject is not in the monitor or viewfinder when manual focus is given. 113 Shots can be sharply outlined...

User Manual
Page 127
... made to any exposure setting (exposure mode, exposure compensation, shutter speed, aperture, sensitivity, flash mode, and Variable Power). • If the shutter-release button is bracketed around the exposure compensation value selected with the button ( 66).... of shots, "bracketing" a selected exposure compensation or white balance setting. Auto Bracketing can be taken. • Bracketing is automatically cancelled when the camera is turned off, or set to vary these settings automatically over a series of shots Exposure increment Bracketing order 3, ±0.3 3 3, ±0.7 ...
... made to any exposure setting (exposure mode, exposure compensation, shutter speed, aperture, sensitivity, flash mode, and Variable Power). • If the shutter-release button is bracketed around the exposure compensation value selected with the button ( 66).... of shots, "bracketing" a selected exposure compensation or white balance setting. Auto Bracketing can be taken. • Bracketing is automatically cancelled when the camera is turned off, or set to vary these settings automatically over a series of shots Exposure increment Bracketing order 3, ±0.3 3 3, ±0.7 ...

User Manual
Page 131
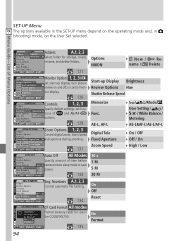
Menu Guide-Using the SHOOTING Menu SET-UP menu Setting Folders Monitor options Brightness Hue Controls Memorize Zoom options Digital tele Fixed aperture PLAY BACK menu Setting Folders Auto Off Slide show Frame Intvl Default NIKON 3 6 All options on Setting Auto off Speedlight options Variable power Speedlight control Shot confirmation Shutter sound On Off Default All folders 30 s 3 s Default 30 s ±0 Auto Off On 119
Menu Guide-Using the SHOOTING Menu SET-UP menu Setting Folders Monitor options Brightness Hue Controls Memorize Zoom options Digital tele Fixed aperture PLAY BACK menu Setting Folders Auto Off Slide show Frame Intvl Default NIKON 3 6 All options on Setting Auto off Speedlight options Variable power Speedlight control Shot confirmation Shutter sound On Off Default All folders 30 s 3 s Default 30 s ±0 Auto Off On 119

User Manual
Page 145
... enter sleep mode if no operations are performed for 30 seconds. Menu Guide-Using the SET-UP Menu Conserving Battery Power: Auto Off When operated on battery power, the camera will remain on for 30 minutes if no operations are performed, regardless of the time limit for (shooting) mode,... and is set from 30 seconds to all camera functions are deactivated and the camera itself is powered by pressing the shutter-release button halfway, moving the mode selector, or pressing , , or . The time limit for ...
... enter sleep mode if no operations are performed for 30 seconds. Menu Guide-Using the SET-UP Menu Conserving Battery Power: Auto Off When operated on battery power, the camera will remain on for 30 minutes if no operations are performed, regardless of the time limit for (shooting) mode,... and is set from 30 seconds to all camera functions are deactivated and the camera itself is powered by pressing the shutter-release button halfway, moving the mode selector, or pressing , , or . The time limit for ...

User Manual
Page 149
...If no external Speedlight is Off. 137 Shot Confirmation The red-eye reduction lamp can be fired after the shutter is released to the camera's accessory shoe ( 4). When attached, only external Speedlight fires. To turn shot confirmation on, select On in Speedlight fires at same ...time as external Speedlight. Menu Guide-Using the SET-UP Menu Controlling Flash Output: Variable Power This menu adjusts flash output. The default setting is attached, built-in Speedlight when using external Speedlights connected to let your subjects know...
...If no external Speedlight is Off. 137 Shot Confirmation The red-eye reduction lamp can be fired after the shutter is released to the camera's accessory shoe ( 4). When attached, only external Speedlight fires. To turn shot confirmation on, select On in Speedlight fires at same ...time as external Speedlight. Menu Guide-Using the SET-UP Menu Controlling Flash Output: Variable Power This menu adjusts flash output. The default setting is attached, built-in Speedlight when using external Speedlights connected to let your subjects know...


