42XM4/50XM5/61XM4 spec sheet
Page 1
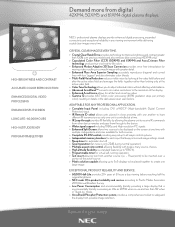
...at a time. ° IR Loop-through provides IR flexibility by allowing the plasma unit to receive IR commands from other device remotes and pass them through to the device. ° Wider signal support including 1080p and High resolution PC signals. ° Enhanced... AND CONTRAST ACCURATE COLOR REPRODUCTION ENHANCED DIGITAL VIDEO PROCESSING ENHANCED SPLIT SCREEN LONG LIFE > 60,000 HOURS HIGH ALTITUDE READY PROGRAMMABLE TIMER NEC's professional plasma displays provide enhanced digital processing, expanded connectivity and exceptional reliability in "Stand-by looking at 8 hours a day viewing...
...at a time. ° IR Loop-through provides IR flexibility by allowing the plasma unit to receive IR commands from other device remotes and pass them through to the device. ° Wider signal support including 1080p and High resolution PC signals. ° Enhanced... AND CONTRAST ACCURATE COLOR REPRODUCTION ENHANCED DIGITAL VIDEO PROCESSING ENHANCED SPLIT SCREEN LONG LIFE > 60,000 HOURS HIGH ALTITUDE READY PROGRAMMABLE TIMER NEC's professional plasma displays provide enhanced digital processing, expanded connectivity and exceptional reliability in "Stand-by looking at 8 hours a day viewing...
42XM4/50XM5/61XM4 spec sheet
Page 2
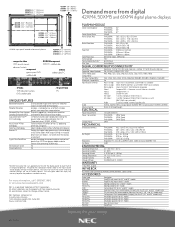
...life is an approximate time for 61" model Input Terminal Cover Stand Plug NEC 100523 Capsulated Color Filter™ CCF delivers realistic color reproduction creating the (...BOX AC Power Cord, User Manual, Remote Control, Batteries, Cable Clamps ACCESSORIES Order Code 4250WMK 61WMK PX-ST1U PX-61ST1U CMK FWMKPC TWMKPC CMKPC PX-42SP1U PX-50SP1U PX-61SP1U PX-CV2U PX-PL1U Description Fixed/Tilt wall mount ... Suite 400 Itasca, IL 60143-1248 PLASMA MODULE Screen Size (Diagonal) PX-42XM4A 42" PX-50XM5A 50" PX-61XM4A 61" Screen Aspect Ratio 16 to the projector. This time may...
...life is an approximate time for 61" model Input Terminal Cover Stand Plug NEC 100523 Capsulated Color Filter™ CCF delivers realistic color reproduction creating the (...BOX AC Power Cord, User Manual, Remote Control, Batteries, Cable Clamps ACCESSORIES Order Code 4250WMK 61WMK PX-ST1U PX-61ST1U CMK FWMKPC TWMKPC CMKPC PX-42SP1U PX-50SP1U PX-61SP1U PX-CV2U PX-PL1U Description Fixed/Tilt wall mount ... Suite 400 Itasca, IL 60143-1248 PLASMA MODULE Screen Size (Diagonal) PX-42XM4A 42" PX-50XM5A 50" PX-61XM4A 61" Screen Aspect Ratio 16 to the projector. This time may...

42XM4/50XM5/61XM4 UM
Page 5
... En-28 Option3 Settings Menu En-29 Rear View/ Terminal Board En-9 Using the timer En-29 Remote Control En-11 Setting the power on mode En-30 Basic Operations En-12 Enabling/disabling the front... panel controls En-30 POWER En-12 Enabling/disabling remote control wireless To turn the unit ON and OFF En-12 VOLUME En-12 To adjust the ... Settings Menu En-20 Adjusting the picture En-20 transmission En-31 Loop Out setting En-31 REMOTE ID setting En-31 ID number setting En-31 Video Wall setting En-32 Option4 Settings Menu ...
... En-28 Option3 Settings Menu En-29 Rear View/ Terminal Board En-9 Using the timer En-29 Remote Control En-11 Setting the power on mode En-30 Basic Operations En-12 Enabling/disabling the front... panel controls En-30 POWER En-12 Enabling/disabling remote control wireless To turn the unit ON and OFF En-12 VOLUME En-12 To adjust the ... Settings Menu En-20 Adjusting the picture En-20 transmission En-31 Loop Out setting En-31 REMOTE ID setting En-31 ID number setting En-31 Video Wall setting En-32 Option4 Settings Menu ...
42XM4/50XM5/61XM4 UM
Page 7
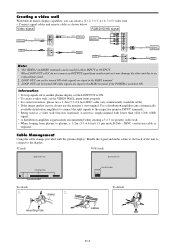
...OUT can create a (2ן2, 3ן3, 4ן4, 5ן5) video wall. • Connect signal cables and remote cables as shown below. Creating a video wall With built-in matrix display capability, you can be used as a video wall function, maximaly 4-screen is ...VIDEO 1 ( IN/OUT) VIDEO 2 BNC connector OUT VIDEO Signal RGB signal/ IN DVD/HD signal AUDIO 1 R L (MONO) VD Y DVD1 RGB 1 (IN / OUT) Remote IN control REMOTE OUT IN OUT Remote control Remote IN control IN REMOTE OUT OUT RGB signal/ DVD/HD signal OUT...
...OUT can create a (2ן2, 3ן3, 4ן4, 5ן5) video wall. • Connect signal cables and remote cables as shown below. Creating a video wall With built-in matrix display capability, you can be used as a video wall function, maximaly 4-screen is ...VIDEO 1 ( IN/OUT) VIDEO 2 BNC connector OUT VIDEO Signal RGB signal/ IN DVD/HD signal AUDIO 1 R L (MONO) VD Y DVD1 RGB 1 (IN / OUT) Remote IN control REMOTE OUT IN OUT Remote control Remote IN control IN REMOTE OUT OUT RGB signal/ DVD/HD signal OUT...
42XM4/50XM5/61XM4 UM
Page 8
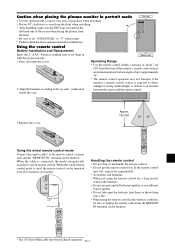
... angles of the screen when facing the plasma from the front when installing. • After installing, make sure the NEC logo is connected, the mode automatically switches to the remote control's remote jack and the "REMOTE IN" terminal on the monitor. * The 1/8 Stereo Mini cable must be purchased separately. from the front of the...
... angles of the screen when facing the plasma from the front when installing. • After installing, make sure the NEC logo is connected, the mode automatically switches to the remote control's remote jack and the "REMOTE IN" terminal on the monitor. * The 1/8 Stereo Mini cable must be purchased separately. from the front of the...
42XM4/50XM5/61XM4 UM
Page 9
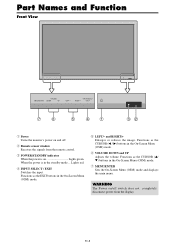
...INPUT SELECT RIGHT/ + / EXIT 7 6 5 4 1 32 q Power Turns the monitor's power on and off switch does not completely disconnect power from the remote control. Lights red. Functions as the CURSOR (v/ w) buttons in the standby mode ... Functions as the EXIT buttons in the On-Screen Menu (OSM) mode.... and RIGHT/+ Enlarges or reduces the image. y VOLUME DOWN and UP Adjusts the volume. w Remote sensor window Receives the signals from the display. En-8 WARNING The Power on Lights green. Part Names and Function Front View MENU/ ENTER ...
...INPUT SELECT RIGHT/ + / EXIT 7 6 5 4 1 32 q Power Turns the monitor's power on and off switch does not completely disconnect power from the remote control. Lights red. Functions as the CURSOR (v/ w) buttons in the standby mode ... Functions as the EXIT buttons in the On-Screen Menu (OSM) mode.... and RIGHT/+ Enlarges or reduces the image. y VOLUME DOWN and UP Adjusts the volume. w Remote sensor window Receives the signals from the display. En-8 WARNING The Power on Lights green. Part Names and Function Front View MENU/ ENTER ...
42XM4/50XM5/61XM4 UM
Page 10
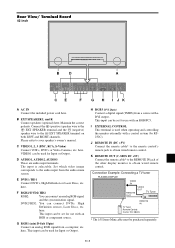
... the correct polarity. C VIDEO1, 2, 3 (BNC, RCA, S-Video) Connect VCR's, DVD's or Video Cameras, etc. here. Please refer to obtain wired remote control. This input can be used for Input or Output. E DVD1 / HD1 Connect DVD's, High Definition or Laser Discs, etc. I JK A AC IN... used for Input or Output. here. here. Connection Example: Connecting a TV tuner PLASMA DISPLAY VIDEO IN REMOTE OUT VIDEO OUT TV Tuner REMOTE IN TV Tuner Remote Control Carrier fHz: 38kHz * The 1/8 Stereo Mini cable must be used when operating and controlling the monitor...
... the correct polarity. C VIDEO1, 2, 3 (BNC, RCA, S-Video) Connect VCR's, DVD's or Video Cameras, etc. here. Please refer to obtain wired remote control. This input can be used for Input or Output. E DVD1 / HD1 Connect DVD's, High Definition or Laser Discs, etc. I JK A AC IN... used for Input or Output. here. here. Connection Example: Connecting a TV tuner PLASMA DISPLAY VIDEO IN REMOTE OUT VIDEO OUT TV Tuner REMOTE IN TV Tuner Remote Control Carrier fHz: 38kHz * The 1/8 Stereo Mini cable must be used when operating and controlling the monitor...
42XM4/50XM5/61XM4 UM
Page 11
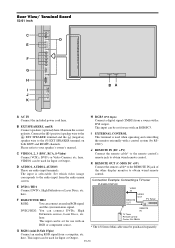
...) Connect the included power cord here. This input can be used for Input or Output. J REMOTE IN (DC +5V) C VIDEO1, 2, 3 (BNC, RCA, S-Video) Connect the remote cable* to obtain wired remote The input is used for use with a control system (by RS- the other display monitor to... DVD's, High Definition or Laser Discs, etc. Maintain the correct DVI output. here. here. DVD2/ HD2: You can connect an analog RGB signal REMOTE OUT VIDEO OUT TV Tuner and the syncronization signal. This input can be purchased separately. L (MONO) L (MONO) L (MONO) VIDEO 3 Rear...
...) Connect the included power cord here. This input can be used for Input or Output. J REMOTE IN (DC +5V) C VIDEO1, 2, 3 (BNC, RCA, S-Video) Connect the remote cable* to obtain wired remote The input is used for use with a control system (by RS- the other display monitor to... DVD's, High Definition or Laser Discs, etc. Maintain the correct DVI output. here. here. DVD2/ HD2: You can connect an analog RGB signal REMOTE OUT VIDEO OUT TV Tuner and the syncronization signal. This input can be purchased separately. L (MONO) L (MONO) L (MONO) VIDEO 3 Rear...

42XM4/50XM5/61XM4 UM
Page 12
.... i POINTER Press this button to access the OSM controls. When the SEAMLESS SW function is operating, this button to show a couple of pictures in the remote control. t MENU/ENTER Press this button to display the pointer. o ZOOM (+ /-) Enlarges or reduces the image. !0 VOLUME (+ /-) Adjusts the audio volume. ...on the sub screen. !9 AUTO ADJUST Press this button to select RGB/PC as the source. Press this button during the display of the remote cable (The 1/8 Stereo Mini cable) here when using the INPUT SELECT button on the monitor. When the PIC FREEZE function is displayed. @0...
.... i POINTER Press this button to access the OSM controls. When the SEAMLESS SW function is operating, this button to show a couple of pictures in the remote control. t MENU/ENTER Press this button to display the pointer. o ZOOM (+ /-) Enlarges or reduces the image. !0 VOLUME (+ /-) Adjusts the audio volume. ...on the sub screen. !9 AUTO ADJUST Press this button to select RGB/PC as the source. Press this button during the display of the remote cable (The 1/8 Stereo Mini cable) here when using the INPUT SELECT button on the monitor. When the PIC FREEZE function is displayed. @0...
42XM4/50XM5/61XM4 UM
Page 13
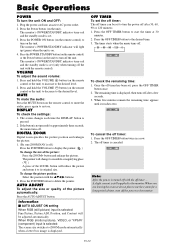
... off . → 30 → 60 → 90 → 120 → 0 OFF TIMER 30 To check the remaining time: 1. The off the unit with the remote control). The monitor's POWER/STANDBY indicator turns red and the standby mode is set , press the OFF TIMER button once. 2. The monitor's POWER/STANDBY indicator... ADJUST To adjust the size or quality of the picture: Press the ZOOM+ button and enlarge the picture. Press the POWER ON button (on the remote control) to the desired level. When RGB (motion picture), VIDEO, or Y/Pb/Pr (component) input is selected: The screen size switches to its ...
... off . → 30 → 60 → 90 → 120 → 0 OFF TIMER 30 To check the remaining time: 1. The off the unit with the remote control). The monitor's POWER/STANDBY indicator turns red and the standby mode is set , press the OFF TIMER button once. 2. The monitor's POWER/STANDBY indicator... ADJUST To adjust the size or quality of the picture: Press the ZOOM+ button and enlarge the picture. Press the POWER ON button (on the remote control) to the desired level. When RGB (motion picture), VIDEO, or Y/Pb/Pr (component) input is selected: The screen size switches to its ...
42XM4/50XM5/61XM4 UM
Page 14
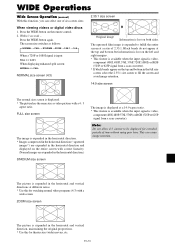
... screen sizes. Within 3 seconds ... Note: Do not allow 4:3 content to fulfill the entire screen at the top and bottom but information is lost on the remote control. 2. WIDE Operations Wide Screen Operation (manual) With this function, you can cause image retention. Press the WIDE button again. The picture is expanded to...
... screen sizes. Within 3 seconds ... Note: Do not allow 4:3 content to fulfill the entire screen at the top and bottom but information is lost on the remote control. 2. WIDE Operations Wide Screen Operation (manual) With this function, you can cause image retention. Press the WIDE button again. The picture is expanded to...
42XM4/50XM5/61XM4 UM
Page 15
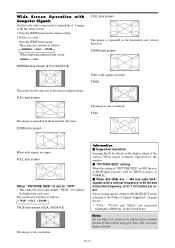
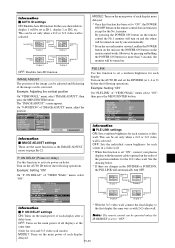
... will not be displayed for extended periods of time without using gray bars. Information Ⅵ Supported resolution See page En-40 for details on the remote control. 2. FULL When wide signals are input. This can cause image retention. ZOOM size screen The image is expanded in place of NORMAL. Ⅵ When...
... will not be displayed for extended periods of time without using gray bars. Information Ⅵ Supported resolution See page En-40 for details on the remote control. 2. FULL When wide signals are input. This can cause image retention. ZOOM size screen The image is expanded in place of NORMAL. Ⅵ When...
42XM4/50XM5/61XM4 UM
Page 18
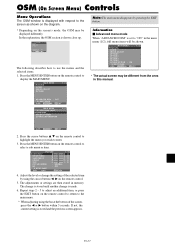
... Adjust the level or change is displayed with respect to "ON" in this manual. En-17 EXIT RETURN 4. Press the MENU/ENTER button on the remote control to highlight the menu you wish to display the MAIN MENU. MAIN MENU 1 / 2 PICTURE AUDIO IMAGE ADJUST OPTION 1 OPTION 2 OPTION 3 ... 1 / 2 ADVANCED OSM : OFF NEXT PAGE SEL. Press the cursor buttons v w on the remote control to enter. 3. ADJ. Repeat steps 2 - 5 to adjust an additional item, or press the EXIT button on the remote control to return to the main menu. * When adjusting using the cursor buttons ᮤ ᮣ...
... Adjust the level or change is displayed with respect to "ON" in this manual. En-17 EXIT RETURN 4. Press the MENU/ENTER button on the remote control to highlight the menu you wish to display the MAIN MENU. MAIN MENU 1 / 2 PICTURE AUDIO IMAGE ADJUST OPTION 1 OPTION 2 OPTION 3 ... 1 / 2 ADVANCED OSM : OFF NEXT PAGE SEL. Press the cursor buttons v w on the remote control to enter. 3. ADJ. Repeat steps 2 - 5 to adjust an additional item, or press the EXIT button on the remote control to return to the main menu. * When adjusting using the cursor buttons ᮤ ᮣ...
42XM4/50XM5/61XM4 UM
Page 20
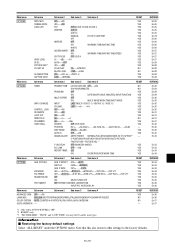
ON MODE CONTROL LOCK IR REMOTE LOOP OUT REMOTE ID ID NUMBER VIDEO WALL Sub menu 2 Sub menu 3 Sub menu 4 PRESENT TIME DAYLIGHT SAVING TIME OFF←→ON DAY/HOUR/MINUTES PROGRAM OFF ...
ON MODE CONTROL LOCK IR REMOTE LOOP OUT REMOTE ID ID NUMBER VIDEO WALL Sub menu 2 Sub menu 3 Sub menu 4 PRESENT TIME DAYLIGHT SAVING TIME OFF←→ON DAY/HOUR/MINUTES PROGRAM OFF ...
42XM4/50XM5/61XM4 UM
Page 23
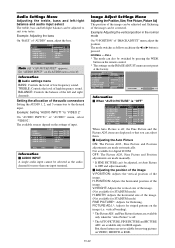
... are available only when the "Auto Picture" is pressed: NORMAL ↔ FULL * The mode can also be switched by pressing the WIDE button on the remote control. * The settings on VIDEO, HD/DVD or RGB.
... are available only when the "Auto Picture" is pressed: NORMAL ↔ FULL * The mode can also be switched by pressing the WIDE button on the remote control. * The settings on VIDEO, HD/DVD or RGB.

42XM4/50XM5/61XM4 UM
Page 24
... BNC INPUT : COMP. Example: Turning the DISPLAY OSM off On "OPTION1" menu, select "OSM", then press the MENU/ ENTER button. The DISPLAY button on the remote control will be set to 6. Ⅵ OSM ANGLE settings Sets the display format (landscape "H" or portrait "V"). D-SUB INPUT : RGB RGB SELECT : AUTO HD SELECT : 1080B...
... BNC INPUT : COMP. Example: Turning the DISPLAY OSM off On "OPTION1" menu, select "OSM", then press the MENU/ ENTER button. The DISPLAY button on the remote control will be set to 6. Ⅵ OSM ANGLE settings Sets the display format (landscape "H" or portrait "V"). D-SUB INPUT : RGB RGB SELECT : AUTO HD SELECT : 1080B...
42XM4/50XM5/61XM4 UM
Page 31
... PWR. ADJ. ADJ. Enabling/disabling the front panel controls This function enables/disables the front panel controls. ON MODE CONTROL LOCK : ON IR REMOTE : ON LOOP OUT : OFF REMOTE ID : ALL ID NUMBER : ALL VIDEO WALL NEXT PAGE SEL. EXIT RETURN 3 / 4 Information Ⅵ CONTROL LOCK settings ON: Disables the buttons on . On...
... PWR. ADJ. ADJ. Enabling/disabling the front panel controls This function enables/disables the front panel controls. ON MODE CONTROL LOCK : ON IR REMOTE : ON LOOP OUT : OFF REMOTE ID : ALL ID NUMBER : ALL VIDEO WALL NEXT PAGE SEL. EXIT RETURN 3 / 4 Information Ⅵ CONTROL LOCK settings ON: Disables the buttons on . On...
42XM4/50XM5/61XM4 UM
Page 32
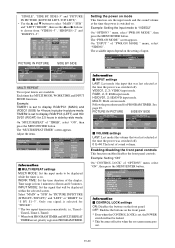
...POWER is present at the same time. On "ID NUMBER" of "OPTION3" menu, select "1". ADJ. OPTION 3 PREVIOUS PAGE TIMER PWR. Set "OFF" to the remote control. ADJ. To do so, see below. The "ID SELECT" screen appears. Example: Setting "OFF" • Press and hold the POWER STANDBY button, and... release the button when the power is set the ID number for each remote control to ON, the received signal will be looped out via PC1 terminal or VIDEO1 terminal. Example: Setting "ON" On "LOOP OUT" of "OPTION3...
...POWER is present at the same time. On "ID NUMBER" of "OPTION3" menu, select "1". ADJ. OPTION 3 PREVIOUS PAGE TIMER PWR. Set "OFF" to the remote control. ADJ. To do so, see below. The "ID SELECT" screen appears. Example: Setting "OFF" • Press and hold the POWER STANDBY button, and... release the button when the power is set the ID number for each remote control to ON, the received signal will be looped out via PC1 terminal or VIDEO1 terminal. Example: Setting "ON" On "LOOP OUT" of "OPTION3...
42XM4/50XM5/61XM4 UM
Page 34
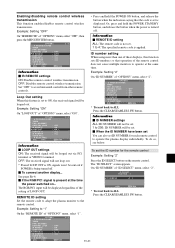
...215;2 or 3×3 video wall is selected. On "P. REMOTE IN No.1 No.2 No.4 No.3 Display 1 REMOTE OUT REMOTE IN No.1 No.2 No.4 No.3 Display 2 REMOTE OUT REMOTE OUT No.1 No.2 No.4 No.3 Display 4 REMOTE OUT REMOTE IN No.1 No.2 No.4 No.3 REMOTE IN Display 3 * With the 3×3 video wall, ... as the IMAGE ADJUST menu on the remote control works. REMOTE IN No.1 No.2 No.4 No.3 Display 1 REMOTE OUT REMOTE IN No.1 No.2 No.4 No.3 Display 2 REMOTE OUT REMOTE OUT No.1 No.2 No.4 No.3 Display 4 REMOTE OUT REMOTE IN No.1 No.2 No.4 No.3 REMOTE IN Display 3 OFF: Disables Auto ID...
...215;2 or 3×3 video wall is selected. On "P. REMOTE IN No.1 No.2 No.4 No.3 Display 1 REMOTE OUT REMOTE IN No.1 No.2 No.4 No.3 Display 2 REMOTE OUT REMOTE OUT No.1 No.2 No.4 No.3 Display 4 REMOTE OUT REMOTE IN No.1 No.2 No.4 No.3 REMOTE IN Display 3 * With the 3×3 video wall, ... as the IMAGE ADJUST menu on the remote control works. REMOTE IN No.1 No.2 No.4 No.3 Display 1 REMOTE OUT REMOTE IN No.1 No.2 No.4 No.3 Display 2 REMOTE OUT REMOTE OUT No.1 No.2 No.4 No.3 Display 4 REMOTE OUT REMOTE IN No.1 No.2 No.4 No.3 REMOTE IN Display 3 OFF: Disables Auto ID...
42XM4/50XM5/61XM4 UM
Page 40
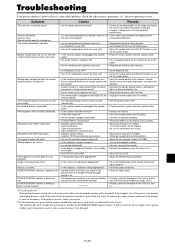
... is poor or colors are no sound is not correct level. • Improper control setting. Tint is produced. Nothing appears on when the remote control's power button is pressed. Cable interconnections. POWER/STANDBY indicator is blinking in green and red, or green. • Is the computer's... protector If the monitor becomes too hot, the overheat protector will be turned off mode? • Is LOOP OUT set for the main unit? Remote control operates erroneously. Checks Remedy • Are the image and sound normal? • If there are weak. The front panel buttons of the...
... is poor or colors are no sound is not correct level. • Improper control setting. Tint is produced. Nothing appears on when the remote control's power button is pressed. Cable interconnections. POWER/STANDBY indicator is blinking in green and red, or green. • Is the computer's... protector If the monitor becomes too hot, the overheat protector will be turned off mode? • Is LOOP OUT set for the main unit? Remote control operates erroneously. Checks Remedy • Are the image and sound normal? • If there are weak. The front panel buttons of the...


