
50MP1
Page 2
... following instructions. Refer all service to the unit, read carefully in a residential area is not liable for service. 2. Avoid damage to make sure there is damaged in a closed cabinet or shelves. Warnings and Safety Precaution The NEC plasma monitor is dangerous to the power cord, and do not produce light or remain lit. REFER SERVICING TO QUALIFIED SERVICE PERSONNEL. Do not cover rear...
... following instructions. Refer all service to the unit, read carefully in a residential area is not liable for service. 2. Avoid damage to make sure there is damaged in a closed cabinet or shelves. Warnings and Safety Precaution The NEC plasma monitor is dangerous to the power cord, and do not produce light or remain lit. REFER SERVICING TO QUALIFIED SERVICE PERSONNEL. Do not cover rear...
50MP1
Page 3
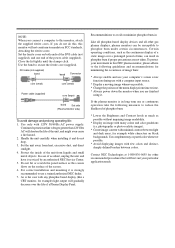
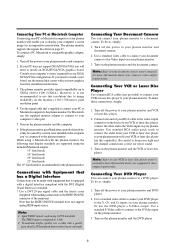
... displaying images with few colors and distinct, sharply defined borders between light and dark areas, for minimizing the occurrence of image burn: * Always enable and use your computer's screen saver function during use with a computer input source. * Display a moving image whenever possible. * Change the position of the power cable (supplied). If you are not taken. DVI cable (not supplied) band band Connector core (small) core (small) Power cable (supplied) core (large) band Set side (Plasma Monitor...
... displaying images with few colors and distinct, sharply defined borders between light and dark areas, for minimizing the occurrence of image burn: * Always enable and use your computer's screen saver function during use with a computer input source. * Display a moving image whenever possible. * Change the position of the power cable (supplied). If you are not taken. DVI cable (not supplied) band band Connector core (small) core (small) Power cable (supplied) core (large) band Set side (Plasma Monitor...
50MP1
Page 6
... at 800-836-0655. Any shipment of the original parts or products. f. Costs of initial technical adjustments (set forth below , this warranty covers all other legal theory, whether or not we will meet specifications of the product (claims must be presented as specified below , agrees to repair or replace (at 800-836-0655. LIMITATIONS OF LIABILITY Except...
... at 800-836-0655. Any shipment of the original parts or products. f. Costs of initial technical adjustments (set forth below , this warranty covers all other legal theory, whether or not we will meet specifications of the product (claims must be presented as specified below , agrees to repair or replace (at 800-836-0655. LIMITATIONS OF LIABILITY Except...
50MP1
Page 7
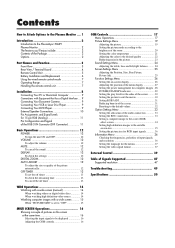
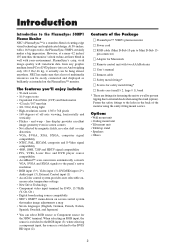
... 50MP1 Plasma Monitor 2 The features you'll enjoy include 2 Contents of the Package 2 Options 2 Part Names and Function 3 Front View 3 Rear View / Terminal Board 4 Remote Control Unit 5 Battery Installation and Replacement 6 Using the wired remote control mode 7 Operating Range 7 Handling the remote control unit 7 Installation 8 Connecting Your PC or Macintosh Computer 9 Connections with Equipment that has a Digital Interface ... 9 Connecting Your Document Camera 9 Connecting Your VCR or Laser Disc Player 9 Connecting Your DVD Player 9 External Speaker Connections 10...
... 50MP1 Plasma Monitor 2 The features you'll enjoy include 2 Contents of the Package 2 Options 2 Part Names and Function 3 Front View 3 Rear View / Terminal Board 4 Remote Control Unit 5 Battery Installation and Replacement 6 Using the wired remote control mode 7 Operating Range 7 Handling the remote control unit 7 Installation 8 Connecting Your PC or Macintosh Computer 9 Connections with Equipment that has a Digital Interface ... 9 Connecting Your Document Camera 9 Connecting Your VCR or Laser Disc Player 9 Connecting Your DVD Player 9 External Speaker Connections 10...
50MP1
Page 9
...player source compatibility • AccuBlend™ scan conversion automatically converts VGA, SVGA and SXGA signals to the panel's native resolution • RGB input (3*), Video input (3), DVD/HD input (2*), Audio input (3), External Control input (1) • AccuColor control system provides user selectable onscreen color temperature settings • New Drive Technology • Component video input terminal for DVD, 15.75kHz (Y, CB, CR ) • Digital broadcasting source compatibitly • NEC's OSM™ menu-driven on the PlasmaSync™ monitor. Options • Wall mount...
...player source compatibility • AccuBlend™ scan conversion automatically converts VGA, SVGA and SXGA signals to the panel's native resolution • RGB input (3*), Video input (3), DVD/HD input (2*), Audio input (3), External Control input (1) • AccuColor control system provides user selectable onscreen color temperature settings • New Drive Technology • Component video input terminal for DVD, 15.75kHz (Y, CB, CR ) • Digital broadcasting source compatibitly • NEC's OSM™ menu-driven on the PlasmaSync™ monitor. Options • Wall mount...

50MP1
Page 10
... off. Lights red. y Power Turns the monitor's power on Lights green. u Remote sensor window Receives the signals from the remote control unit. 3 and RIGHT/+ Enlarges or reduces the image. Functions as the EXIT buttons in the On-Screen Menu (OSM) mode. w VOLUME DOWN and UP Adjusts the volume. Functions as the CURSOR buttons in the standby mode ... RIGHT/+ INPUT SELECT /EXIT POWER/STANDBY q w e r t yu qPROCEED Sets the On-Screen Menu (OSM) mode and displays the main menu. Part Names and Function Front View INPUT SELECT VOLUME POWER/STANDBY VOLUME PROCEED...
... off. Lights red. y Power Turns the monitor's power on Lights green. u Remote sensor window Receives the signals from the remote control unit. 3 and RIGHT/+ Enlarges or reduces the image. Functions as the EXIT buttons in the On-Screen Menu (OSM) mode. w VOLUME DOWN and UP Adjusts the volume. Functions as the CURSOR buttons in the standby mode ... RIGHT/+ INPUT SELECT /EXIT POWER/STANDBY q w e r t yu qPROCEED Sets the On-Screen Menu (OSM) mode and displays the main menu. Part Names and Function Front View INPUT SELECT VOLUME POWER/STANDBY VOLUME PROCEED...

50MP1
Page 11
... "CONTROL LOCK" is set 's control panel do not function. here. J AUDIO1, AUDIO2, AUDIO3 These are operated externally (by external control). The input is selectable. H REMOTE CONTROL Connect the supplied remote cable here. C DVD1 / HD1 Connect DVD's, High Definition or Laser Discs, etc. F RGB3 (DVI 29pin) Inputs a digital RGB signal (TMDS). I A EXT SPEAKER L and R Connect speakers here. B VIDEO1, 2, 3 Connect VCR's, DVD's or Laser Discs, etc. here. Set which video image to allot them to on the set "ON", the buttons on the menu screen...
... "CONTROL LOCK" is set 's control panel do not function. here. J AUDIO1, AUDIO2, AUDIO3 These are operated externally (by external control). The input is selectable. H REMOTE CONTROL Connect the supplied remote cable here. C DVD1 / HD1 Connect DVD's, High Definition or Laser Discs, etc. F RGB3 (DVI 29pin) Inputs a digital RGB signal (TMDS). I A EXT SPEAKER L and R Connect speakers here. B VIDEO1, 2, 3 Connect VCR's, DVD's or Laser Discs, etc. here. Set which video image to allot them to on the set "ON", the buttons on the menu screen...

50MP1
Page 12
... button on the monitor. u EXIT Press this button to display the pointer. i POINTER Press this button to exit the OSM controls in the main menu. DVD/HD can also be selected using the INPUT SELECT button on the monitor. The input switches as follows each time the button is set. 5 Press this button during the display of the main menu to go to the sub menu. o ZOOM (+ /-) Enlarges or reduces the image. !0 VOLUME (+ /-) Adjusts...
... button on the monitor. u EXIT Press this button to display the pointer. i POINTER Press this button to exit the OSM controls in the main menu. DVD/HD can also be selected using the INPUT SELECT button on the monitor. The input switches as follows each time the button is set. 5 Press this button during the display of the main menu to go to the sub menu. o ZOOM (+ /-) Enlarges or reduces the image. !0 VOLUME (+ /-) Adjusts...

50MP1
Page 14
... AUDIO 1 VIDEO 1 VIDEO 2 VIDEO 3 L(MONO) R Y CB/PB CR/PR L(MONO) R RGB 1 R/CR/PR G/Y B/CB/PB HD VD L(MONO) R RGB 3 (Digital RGB) CONTROL LOCK ON /OFF REMOTE CONTROL EXTERNAL CONTROL CONTROL LOCK ON /OFF REMOTE CONTROL EXTERNAL CONTROL Remote Control Cable To Remote Jack LUME UP LEFT/- When the wired remote control mode is connected, the mode automatically switches to direct sunlight or strong artificial light, or if there is an obstacle between the sensor and the remote control unit. RIGHT/+ INPUT...
... AUDIO 1 VIDEO 1 VIDEO 2 VIDEO 3 L(MONO) R Y CB/PB CR/PR L(MONO) R RGB 1 R/CR/PR G/Y B/CB/PB HD VD L(MONO) R RGB 3 (Digital RGB) CONTROL LOCK ON /OFF REMOTE CONTROL EXTERNAL CONTROL CONTROL LOCK ON /OFF REMOTE CONTROL EXTERNAL CONTROL Remote Control Cable To Remote Jack LUME UP LEFT/- When the wired remote control mode is connected, the mode automatically switches to direct sunlight or strong artificial light, or if there is an obstacle between the sensor and the remote control unit. RIGHT/+ INPUT...
50MP1
Page 16
...not support analog RGB input source. Connecting Your Document Camera You can connect your computer's screen image for installation instructions. 3. Turn on page 47. The plasma monitor supports the signals described on the plasma monitor and the DVD player. 9 Note: Refer to your document camera owner's manual for more information about your plasma monitor to the Video input on your computer's video port. 5. Use a standard video cable to connect your document camera to a document camera. Connecting Your DVD Player You can connect your equipment's video output...
...not support analog RGB input source. Connecting Your Document Camera You can connect your computer's screen image for installation instructions. 3. Turn on page 47. The plasma monitor supports the signals described on the plasma monitor and the DVD player. 9 Note: Refer to your document camera owner's manual for more information about your plasma monitor to the Video input on your computer's video port. 5. Use a standard video cable to connect your document camera to a document camera. Connecting Your DVD Player You can connect your equipment's video output...

50MP1
Page 19
... POWER ON button (on the unit. Press the POWER OFF button (on the remote control unit or the unit) to decrease to turn the unit ON and OFF: 1. Press and hold the VOLUME button (on the remote control unit or the unit) to the desired level. The screen changes each time the DISPLAY button is selected ...... button will be adjusted automatically. Information Ⅵ AUTO ADJUST ON setting When RGB (still picture) input is set...
... POWER ON button (on the unit. Press the POWER OFF button (on the remote control unit or the unit) to decrease to turn the unit ON and OFF: 1. Press and hold the VOLUME button (on the remote control unit or the unit) to the desired level. The screen changes each time the DISPLAY button is selected ...... button will be adjusted automatically. Information Ⅵ AUTO ADJUST ON setting When RGB (still picture) input is set...

50MP1
Page 22
... SELECT mode referring to fill the entire screen. 1. TRUE The picture has the same size as follows: → TRUE → FULL TRUE size screen (VGA, SVGA 4:3) Information Ⅵ Supported resolution See page 47 for details on the display output of the various VESA signal standards supported by the monitor. Ⅵ "PICTURE SIZE" setting When the setting of "PICTURE SIZE" is set to "OFF" The screen size switches as the normal computer image. Press the WIDE button...
... SELECT mode referring to fill the entire screen. 1. TRUE The picture has the same size as follows: → TRUE → FULL TRUE size screen (VGA, SVGA 4:3) Information Ⅵ Supported resolution See page 47 for details on the display output of the various VESA signal standards supported by the monitor. Ⅵ "PICTURE SIZE" setting When the setting of "PICTURE SIZE" is set to "OFF" The screen size switches as the normal computer image. Press the WIDE button...

50MP1
Page 23
... RGB signals. VIDEO1, VIDEO 2, VIDEO 3, HD 1/DVD 1/DTV 1, or HD 2/ DVD 2/DTV 2 Ⅵ Multi screen operations may not be displayed in picture Adjusting the OSM controls 1. Side by side, and picture in picture) Pictures displayed Main screen .... Note: During multi mode, Auto Adjust does not affect the screen. If you wish to switch the setting of the picture, press the SELECT button to make the desired picture active. 2. The INPUT SELECT button on the screen (for picture in picture...
... RGB signals. VIDEO1, VIDEO 2, VIDEO 3, HD 1/DVD 1/DTV 1, or HD 2/ DVD 2/DTV 2 Ⅵ Multi screen operations may not be displayed in picture Adjusting the OSM controls 1. Side by side, and picture in picture) Pictures displayed Main screen .... Note: During multi mode, Auto Adjust does not affect the screen. If you wish to switch the setting of the picture, press the SELECT button to make the desired picture active. 2. The INPUT SELECT button on the screen (for picture in picture...
50MP1
Page 25
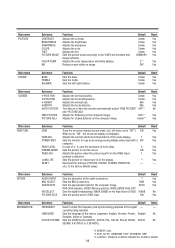
... H-WIDTH AUTO PICTURE FINE PICTURE PICTURE ADJ. Min*1 Adjusts for flickering on the computer image. Sets the treble. Sub menu AUDIO INPUT BNC SELECT RGB SELECT HD SELECT PICTURE SIZE Functions Default Sets the allocation of the signal - Center*1 Reset Yes Yes Yes Yes No Yes Yes Sub menu OSM OSM ADJ. Adjusts the sharpness. Adjusts the color. Adjusts for striped patterns on -screen display is distorted. Adjusts the brightness. Center Adjusts the horizontal position. Sets the VIDEO format...
... H-WIDTH AUTO PICTURE FINE PICTURE PICTURE ADJ. Min*1 Adjusts for flickering on the computer image. Sets the treble. Sub menu AUDIO INPUT BNC SELECT RGB SELECT HD SELECT PICTURE SIZE Functions Default Sets the allocation of the signal - Center*1 Reset Yes Yes Yes Yes No Yes Yes Sub menu OSM OSM ADJ. Adjusts the sharpness. Adjusts the color. Adjusts for striped patterns on -screen display is distorted. Adjusts the brightness. Center Adjusts the horizontal position. Sets the VIDEO format...

50MP1
Page 26
... ᮣ button is pressed within 5 seconds, the current setting is set and the previous screen reappears. 19 Example: Adjusting the contrast Press the PROCEED button on the screen, then... 1. Picture Settings Menu Adjusting the picture The contrast, brightness, sharpness, color and tint can be adjusted as desired. Use the L and M buttons to MEMORY. Once the adjustment is connected. Ⅵ Restoring the factory default settings Select "RESET" under the "PICTURE MODE" settings. Changes the picture's brightness. Adjusts picture detail of VIDEO display.
... ᮣ button is pressed within 5 seconds, the current setting is set and the previous screen reappears. 19 Example: Adjusting the contrast Press the PROCEED button on the screen, then... 1. Picture Settings Menu Adjusting the picture The contrast, brightness, sharpness, color and tint can be adjusted as desired. Use the L and M buttons to MEMORY. Once the adjustment is connected. Ⅵ Restoring the factory default settings Select "RESET" under the "PICTURE MODE" settings. Changes the picture's brightness. Adjusts picture detail of VIDEO display.

50MP1
Page 42
STILL To display VESA standard signals. (Use this mode for the specifications of input signals as follows each time the ᮤ or ᮣ button is completed ... Setting high definition images to the suitable screen size Use this mode for the details of the above settings. Ⅵ Restoring the factory default settings Select "RESET" under the function menu. The "OPTION" screen appears. 2. EXIT RETURN 3. To set RGB SELECT to WIDE1. ADJ. Press the EXIT button to return...
STILL To display VESA standard signals. (Use this mode for the specifications of input signals as follows each time the ᮤ or ᮣ button is completed ... Setting high definition images to the suitable screen size Use this mode for the details of the above settings. Ⅵ Restoring the factory default settings Select "RESET" under the function menu. The "OPTION" screen appears. 2. EXIT RETURN 3. To set RGB SELECT to WIDE1. ADJ. Press the EXIT button to return...

50MP1
Page 48
...) COLOR TEMP SELECT 17. Power OFF 03. CONTRAST Gain Data 13. Input MODE Request 15. BLUE Gain Data 20. Audio Select Set 23. AUDIO Mute On 07. TINT Gain Data 11. VOLUME Gain Data Function The external control equipment changes the VOLUME gain data of the plasma monitor. Power ON 02. VOLUME Gain Data 05. SCREEN MODE Select 06. AUDIO Mute Off 08. RED Gain Data 18. GREEN Gain Data 19. VIDEO ADJ...
...) COLOR TEMP SELECT 17. Power OFF 03. CONTRAST Gain Data 13. Input MODE Request 15. BLUE Gain Data 20. Audio Select Set 23. AUDIO Mute On 07. TINT Gain Data 11. VOLUME Gain Data Function The external control equipment changes the VOLUME gain data of the plasma monitor. Power ON 02. VOLUME Gain Data 05. SCREEN MODE Select 06. AUDIO Mute Off 08. RED Gain Data 18. GREEN Gain Data 19. VIDEO ADJ...

50MP1
Page 55
...ן768 line signal. *5 Normally the RGB select mode suite for the input signals listed in the table above , you may have to use the supplied monitor adapter (D-Sub 15-pin) to Macintosh computer, use the supplied RGB cable. *7 Other screen modes (ZOOM and STADIUM) are registered trademarks of IBM, Inc. If the picture is not displayed properly, set the RGB mode prepared for the input signals is 5:4. It is...
...ן768 line signal. *5 Normally the RGB select mode suite for the input signals listed in the table above , you may have to use the supplied monitor adapter (D-Sub 15-pin) to Macintosh computer, use the supplied RGB cable. *7 Other screen modes (ZOOM and STADIUM) are registered trademarks of IBM, Inc. If the picture is not displayed properly, set the RGB mode prepared for the input signals is 5:4. It is...
50MP1
Page 56
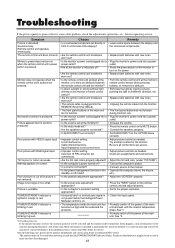
... monitor immediately and contact your NEC dealer for the monitor. Poor picture with RGB signal input. • Improper control setting. Nothing appears on screen. • Is the computer's power turned on? • Turn on the remote control unit and adjust properly. Picture is blinking in a different direction, etc. • Are the remote control unit's batteries worn out? • Replace both batteries with new ones. Cable interconnections. Image is noisy. the connected components. during Control Lock. Sound...
... monitor immediately and contact your NEC dealer for the monitor. Poor picture with RGB signal input. • Improper control setting. Nothing appears on screen. • Is the computer's power turned on? • Turn on the remote control unit and adjust properly. Picture is blinking in a different direction, etc. • Are the remote control unit's batteries worn out? • Replace both batteries with new ones. Cable interconnections. Image is noisy. the connected components. during Control Lock. Sound...
50MP1
Page 57
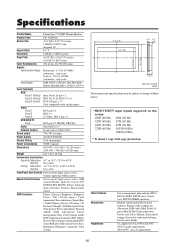
... 10 to 90% Front Panel User Controls Power on/off , Input source select, OSM control,Volume up/down, Cursor (UP, DOWN,LEFT, RIGHT), Pointer, Zoom up /down , Off timer, Wireless/ Wired remote control OSM Functions Picture (Contrast / Brightness / Sharpness/ Color / Tint / Picture mode / Color temperature/ Noise reductions), Sound (Bass / Treble/ Balance),Screen (V-Position / H- Specifications Product Name PlasmaSync™ 50MP1 Plasma Monitor Product Code PX- 50XM1A Screen Size 43.5"(H)ן24.5"(V) inches 1106(H)ן622...
... 10 to 90% Front Panel User Controls Power on/off , Input source select, OSM control,Volume up/down, Cursor (UP, DOWN,LEFT, RIGHT), Pointer, Zoom up /down , Off timer, Wireless/ Wired remote control OSM Functions Picture (Contrast / Brightness / Sharpness/ Color / Tint / Picture mode / Color temperature/ Noise reductions), Sound (Bass / Treble/ Balance),Screen (V-Position / H- Specifications Product Name PlasmaSync™ 50MP1 Plasma Monitor Product Code PX- 50XM1A Screen Size 43.5"(H)ן24.5"(V) inches 1106(H)ן622...


