
GT5000/6000 color brochure
Page 5
...black in an image. Go ahead...fine tune. Y X after VORTEX Technology Plus color adjustment Y X original image VORTEX Technology Plus This proprietary NEC technology provides uncompromising display of video and data. Y fine-tune your picture automatically reflects the adjustment. The best part is the on-screen instant ... controlled. X original image Y X after VORTEX Technology Plus white balance correction integrated networking wireless or wired pc card networking horizontal and vertical lens shift 3D Reform screen trigger As soon as you slide the controls your image.
...black in an image. Go ahead...fine tune. Y X after VORTEX Technology Plus color adjustment Y X original image VORTEX Technology Plus This proprietary NEC technology provides uncompromising display of video and data. Y fine-tune your picture automatically reflects the adjustment. The best part is the on-screen instant ... controlled. X original image Y X after VORTEX Technology Plus white balance correction integrated networking wireless or wired pc card networking horizontal and vertical lens shift 3D Reform screen trigger As soon as you slide the controls your image.

GT5000/6000 color brochure
Page 6
... distance desired. Short throw lenses project clean, crisp images at 17' there is the powerful long throw lens. For these distances. And for projector placement Lens options The GT projectors come lensless or bundled with the GT20ZL lens covering distances from 5' to 52'. The clarity and color are still sharp and precise even at these...
... distance desired. Short throw lenses project clean, crisp images at 17' there is the powerful long throw lens. For these distances. And for projector placement Lens options The GT projectors come lensless or bundled with the GT20ZL lens covering distances from 5' to 52'. The clarity and color are still sharp and precise even at these...

GT5000/6000 color brochure
Page 7
... 3D Reform optical power with NEC's proprietary new 3D Reform geometry correction technology. optical power Powered horizontal and vertical lens shift and lens memory The GT Series features state-of-the-art optics allowing for an undistorted, super-sharp image. And save significant time by storing key lens information in projector and room set the...
... 3D Reform optical power with NEC's proprietary new 3D Reform geometry correction technology. optical power Powered horizontal and vertical lens shift and lens memory The GT Series features state-of-the-art optics allowing for an undistorted, super-sharp image. And save significant time by storing key lens information in projector and room set the...
GT5000/6000 color brochure
Page 12
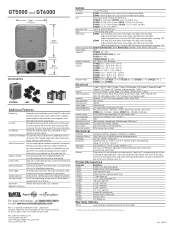
...Rd., Suite 400 Itasca, IL 60143-1248 Optical LCD Panel 1.4" p-Si TFT w/ MLA Resolution GT5000: 1024x768 pixels native, up to UXGA with ... information Lens Memory Controls lens attributes (zoom, focus, shift) based on input resolution and input selection SweetVision Technology NEC proprietary chip...GT5000, XGA, 6000 ANSI projector GT6000, SXGA+, 5300 ANSI projector Single replacement lamp Optional long life, single replacement lamp 1:1 Short throw lens 1.2-1.5:1 Short throw zoom lens 1.66-2.20:1 zoom lens 2.0-2.6:1 zoom lens 2.2-3.2:1 zoom lens 3.2-4.9:1 zoom lens 4.77-7.12:1 zoom lens...
...Rd., Suite 400 Itasca, IL 60143-1248 Optical LCD Panel 1.4" p-Si TFT w/ MLA Resolution GT5000: 1024x768 pixels native, up to UXGA with ... information Lens Memory Controls lens attributes (zoom, focus, shift) based on input resolution and input selection SweetVision Technology NEC proprietary chip...GT5000, XGA, 6000 ANSI projector GT6000, SXGA+, 5300 ANSI projector Single replacement lamp Optional long life, single replacement lamp 1:1 Short throw lens 1.2-1.5:1 Short throw zoom lens 1.66-2.20:1 zoom lens 2.0-2.6:1 zoom lens 2.2-3.2:1 zoom lens 3.2-4.9:1 zoom lens 4.77-7.12:1 zoom lens...

GT5000/GT6000/GT6000R UM
Page 2
...withstand earthquakes. In UK, a BS approved power cable with sufficient strength to support the combined weight (26.0 kg/57.3 lbs) of the projector (18.4 kg/40.6 lbs), the lens (4.0 kg/8.8 lbs) and the ceiling mount(3.2 kg/7.1 lbs) for a Class B digital device, pursuant to Part 15 of the unit. This... direct sunlight, near to the equipment as to make any part inside of the FCC Rules. These limits are a user of your NEC GT6000/ GT5000 Projector and keep the manual handy for help. However, there is not supplied with any kind of contact with this manual. Handle your...
...withstand earthquakes. In UK, a BS approved power cable with sufficient strength to support the combined weight (26.0 kg/57.3 lbs) of the projector (18.4 kg/40.6 lbs), the lens (4.0 kg/8.8 lbs) and the ceiling mount(3.2 kg/7.1 lbs) for a Class B digital device, pursuant to Part 15 of the unit. This... direct sunlight, near to the equipment as to make any part inside of the FCC Rules. These limits are a user of your NEC GT6000/ GT5000 Projector and keep the manual handy for help. However, there is not supplied with any kind of contact with this manual. Handle your...

GT5000/GT6000/GT6000R UM
Page 3
...periodically with wet hand. This mes- sage will be displayed after the projector is sufficient ventilation and that there is turned off the projector. The Lens Shift mechanism may encounter damage caused by a qualified NEC service personnel. 3. Fire and Shock Precautions 1. Ensure that vents are ...unobstructed to prevent the build-up of heat inside your projector, disconnect it with the POWER ...
...periodically with wet hand. This mes- sage will be displayed after the projector is sufficient ventilation and that there is turned off the projector. The Lens Shift mechanism may encounter damage caused by a qualified NEC service personnel. 3. Fire and Shock Precautions 1. Ensure that vents are ...unobstructed to prevent the build-up of heat inside your projector, disconnect it with the POWER ...
GT5000/GT6000/GT6000R UM
Page 4
...a Password 8-24 Security 8-25 Tools 8-26 Timer 8-26 Using Capture (GT5000 only 8-28 Using PC Card Files 8-28 Using ChalkBoard 8-28 Help 8-28 Contents 8-28 Source Information 8-28 Projector Information 8-29 Test Pattern 8-29 9. Maintenancez Replacing the Lamp ......... 9-2 ... Operation) z Turning on , Projected Image (ChalkBoard 4-4 . Installation z Setting Up Your Projector 2-2 Screen Size and Projection Distance 2-2 x Lens Shift Adjustable Range 2-4 c Optional Lens Installation 2-6 v Making Connections 2-13 Connecting Your PC or Macintosh 2-13 To connect Scart Output...
...a Password 8-24 Security 8-25 Tools 8-26 Timer 8-26 Using Capture (GT5000 only 8-28 Using PC Card Files 8-28 Using ChalkBoard 8-28 Help 8-28 Contents 8-28 Source Information 8-28 Projector Information 8-29 Test Pattern 8-29 9. Maintenancez Replacing the Lamp ......... 9-2 ... Operation) z Turning on , Projected Image (ChalkBoard 4-4 . Installation z Setting Up Your Projector 2-2 Screen Size and Projection Distance 2-2 x Lens Shift Adjustable Range 2-4 c Optional Lens Installation 2-6 v Making Connections 2-13 Connecting Your PC or Macintosh 2-13 To connect Scart Output...

GT5000/GT6000/GT6000R UM
Page 5
1 Introduction z What's in the Box 1-2 x Introduction to the Projector 1-3 c Getting to Know Your Projector 1-4 Attaching the lens hood cap to the lens hood with the supplied string and rivet . 1-6 Carrying the Projector 1-6 Top Features ...1-7 Terminal Panel Features 1-8 v Remote Control Features 1-10 Remote Control Precautions 1-12 Remote Control Battery Installation 1-12 Operating Range for Wireless Remote Control 1-12 Using the Remote Control in Wired Operation 1-13
1 Introduction z What's in the Box 1-2 x Introduction to the Projector 1-3 c Getting to Know Your Projector 1-4 Attaching the lens hood cap to the lens hood with the supplied string and rivet . 1-6 Carrying the Projector 1-6 Top Features ...1-7 Terminal Panel Features 1-8 v Remote Control Features 1-10 Remote Control Precautions 1-12 Remote Control Battery Installation 1-12 Operating Range for Wireless Remote Control 1-12 Using the Remote Control in Wired Operation 1-13

GT5000/GT6000/GT6000R UM
Page 6
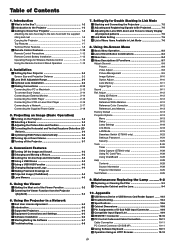
... DOWN PC CARD 2 SELECT C ENTER LAMP 2 LAMP 1 STATUS POWER ANCEL MENU ON/STAND BY 3D 3 D REFORM A AUTO ADJUST Projector Lens hood cap (24F37661) Remote cable (7N520019) Remote control (79646634) and batteries (AAAן2) Power cable for Europe (AC 230V) (7N080003) Power cable for ... Supportware (7N950431) 1-2 Power cable for Japan (AC 100V) (7N080113) InforImmpaotirotnant Documents (Japanese and English/German/French/ Italian/Spanish/Swedish) NOTE: Lenses are missing, contact your NEC dealer. 1. z What's in the Box?
... DOWN PC CARD 2 SELECT C ENTER LAMP 2 LAMP 1 STATUS POWER ANCEL MENU ON/STAND BY 3D 3 D REFORM A AUTO ADJUST Projector Lens hood cap (24F37661) Remote cable (7N520019) Remote control (79646634) and batteries (AAAן2) Power cable for Europe (AC 230V) (7N080003) Power cable for ... Supportware (7N950431) 1-2 Power cable for Japan (AC 100V) (7N080113) InforImmpaotirotnant Documents (Japanese and English/German/French/ Italian/Spanish/Swedish) NOTE: Lenses are missing, contact your NEC dealer. 1. z What's in the Box?
GT5000/GT6000/GT6000R UM
Page 7
...XGA LCD projector. Improves white level, color accuracy, dynamic range, and display of varying levels of 48 to selected individuals • Power Horizontal and Vertical lens shift for optical display corrections • Lens memory controls lens attributes (zoom, focus, shift) depending on input resolution and input selected for fast and easy source transitions • NEC...8236;2 speakers for uncompromising display of quickchange lenses and a full function remote, the GT6000/GT5000 will be viewed by colorblind users. Features you to project images up and operation •...
...XGA LCD projector. Improves white level, color accuracy, dynamic range, and display of varying levels of 48 to selected individuals • Power Horizontal and Vertical lens shift for optical display corrections • Lens memory controls lens attributes (zoom, focus, shift) depending on input resolution and input selected for fast and easy source transitions • NEC...8236;2 speakers for uncompromising display of quickchange lenses and a full function remote, the GT6000/GT5000 will be viewed by colorblind users. Features you to project images up and operation •...

GT5000/GT6000/GT6000R UM
Page 8
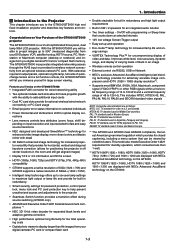
...SLOT 2 Terminal panel (Right) USB(MOUSE/HUB) USB (PC) 2 PC CARD PC CONTROL 1 IN LAN OUT SC TRIGGER REMOTE 1 REMOTE 2 IN OUT AC IN Lens hood cap AC INPUT Connect the supplied power cable's three-pin plug here. SOURCES N/STAND BY AUTO A ADJUST 2 1 AUDIO OUT L/MONO R RGB 1 RGB 2 ...Right) Built-in Security Slot ( )* Remote sensor Carrying handle Air filter (Right) Speaker 5W (Stereo) Foot (four) Rotate to Know Your Projector 1. c Getting to fine-adjust the height of Kensington Microware Inc. MicroSaver® is trademarked and owned by Kensington Microware Inc.
...SLOT 2 Terminal panel (Right) USB(MOUSE/HUB) USB (PC) 2 PC CARD PC CONTROL 1 IN LAN OUT SC TRIGGER REMOTE 1 REMOTE 2 IN OUT AC IN Lens hood cap AC INPUT Connect the supplied power cable's three-pin plug here. SOURCES N/STAND BY AUTO A ADJUST 2 1 AUDIO OUT L/MONO R RGB 1 RGB 2 ...Right) Built-in Security Slot ( )* Remote sensor Carrying handle Air filter (Right) Speaker 5W (Stereo) Foot (four) Rotate to Know Your Projector 1. c Getting to fine-adjust the height of Kensington Microware Inc. MicroSaver® is trademarked and owned by Kensington Microware Inc.

GT5000/GT6000/GT6000R UM
Page 9
Depression for foot (4 locations) F FOCUS ZOOM PC CARD 1 Z LEFT UP DOWN LENS SHIFT PC CARD 2 RIGHT MENU ENTER LAMP 1 SELECT LAMP 2 STATUS CANCEL POWER ON/STAND 3D BY REFOR3MD AUTO A ADJUST Remote sensor Remote sensor 1 2 LAN REMOTE 1 ...
Depression for foot (4 locations) F FOCUS ZOOM PC CARD 1 Z LEFT UP DOWN LENS SHIFT PC CARD 2 RIGHT MENU ENTER LAMP 1 SELECT LAMP 2 STATUS CANCEL POWER ON/STAND 3D BY REFOR3MD AUTO A ADJUST Remote sensor Remote sensor 1 2 LAN REMOTE 1 ...

GT5000/GT6000/GT6000R UM
Page 10
...Ensure that the power cable and any other cables connecting to video sources are disconnected before moving the projector or when it is on the lens hood cap. String 1. FOCUS ZOOM F Z LEFT LENS SHIFT RIGHT PC CARD 1 PC CARD 2 LAMP 1 DOWN UP EN TER LAMP 2 STATUS POWER... L/MONO R L/MONO R Carrying the Projector Always carry your projector by the handle. When moving the projector. Use the rivet to attach the string to the projector. CAUTION: Do not put the projector on its side when the lamp is not in use, cover the lens with the supplied string and rivet 1. ...
...Ensure that the power cable and any other cables connecting to video sources are disconnected before moving the projector or when it is on the lens hood cap. String 1. FOCUS ZOOM F Z LEFT LENS SHIFT RIGHT PC CARD 1 PC CARD 2 LAMP 1 DOWN UP EN TER LAMP 2 STATUS POWER... L/MONO R L/MONO R Carrying the Projector Always carry your projector by the handle. When moving the projector. Use the rivet to attach the string to the projector. CAUTION: Do not put the projector on its side when the lamp is not in use, cover the lens with the supplied string and rivet 1. ...
GT5000/GT6000/GT6000R UM
Page 11
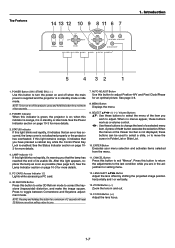
... not attached properly or the projector has overheated. POWER Indicator When this button to exit "Menus". STATUS Indicator If this button to turn on ; SELECT Volume Buttons ̆̄ : Use these buttons work as possible (See page 9-2). FOCUS Button (+/-) Adjust the lens focus. 1-7 If this light appears...error has occurred, the lamp cover is on or off when the main power is supplied and the projector is enabled. Top Features 14 13 12 10 9 8 11 6 7 UP F Z LEFT LENS SHIFT RIGHT MENU SELECT 3D A 3D REFORM AUTO ADJUST L FOCUS ZOOM DOWN E NTER CANCE ON/STAND...
... not attached properly or the projector has overheated. POWER Indicator When this button to exit "Menus". STATUS Indicator If this button to turn on ; SELECT Volume Buttons ̆̄ : Use these buttons work as possible (See page 9-2). FOCUS Button (+/-) Adjust the lens focus. 1-7 If this light appears...error has occurred, the lamp cover is on or off when the main power is supplied and the projector is enabled. Top Features 14 13 12 10 9 8 11 6 7 UP F Z LEFT LENS SHIFT RIGHT MENU SELECT 3D A 3D REFORM AUTO ADJUST L FOCUS ZOOM DOWN E NTER CANCE ON/STAND...

GT5000/GT6000/GT6000R UM
Page 14
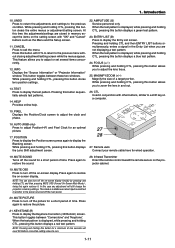
... Sequentially selects: RGB1 (VIDEO) → RGB1 (S-VIDEO) . * This button toggles between input 1 and 2. Pressing this button rotates Projector Options screens. 9. HELP POSITION PIXEL LENS SHUTTER MUTE AUTO PICTURE SOUND OSD KEYSTONE AMPLITUDE ENTRYLIST R G B MAGNIFY + + - - Pressing this button sequentially selects Image Options screens... adjustment screen. ADJUST PICTURE Press to display the Picture Management screen. 19 7. FOCUS ZOOM LENS CTL 1. Introduction 1. UNDO CANCEL 0 TEST INFO. PROJECTOR ABC DEF GHI 123 JKL MNO PQR 456 STU VWX YZ/ 789 ,.
... Sequentially selects: RGB1 (VIDEO) → RGB1 (S-VIDEO) . * This button toggles between input 1 and 2. Pressing this button rotates Projector Options screens. 9. HELP POSITION PIXEL LENS SHUTTER MUTE AUTO PICTURE SOUND OSD KEYSTONE AMPLITUDE ENTRYLIST R G B MAGNIFY + + - - Pressing this button sequentially selects Image Options screens... adjustment screen. ADJUST PICTURE Press to display the Picture Management screen. 19 7. FOCUS ZOOM LENS CTL 1. Introduction 1. UNDO CANCEL 0 TEST INFO. PROJECTOR ABC DEF GHI 123 JKL MNO PQR 456 STU VWX YZ/ 789 ,.
GT5000/GT6000/GT6000R UM
Page 15
...Position screen; POSITION Press to display the test pattern. Press again to display the Blanking screen. MUTE PICTURE Press to zoom the lens in memory except the items on -screen display forcibly by pressing and holding CTL, pressing this button displays a red test pattern.... any adjustment will reset 3D Reform correction setting values to turn off the picture for a short period of two seconds will still change the projector's memory settings. IMAGE 2 IBCCTURE ENATDEDRRESSMENU + 15. MUTE OSD Press to zero. 1-11 Press again to exit the menu. AMPLITUDE (G) ...
...Position screen; POSITION Press to display the test pattern. Press again to display the Blanking screen. MUTE PICTURE Press to zoom the lens in memory except the items on -screen display forcibly by pressing and holding CTL, pressing this button displays a red test pattern.... any adjustment will reset 3D Reform correction setting values to turn off the picture for a short period of two seconds will still change the projector's memory settings. IMAGE 2 IBCCTURE ENATDEDRRESSMENU + 15. MUTE OSD Press to zero. 1-11 Press again to exit the menu. AMPLITUDE (G) ...

GT5000/GT6000/GT6000R UM
Page 17
... the wired remote control to the remote control. TRIGGER Mini Jack causes damage to the SC. PROJECTOR ABC DEF 123 JKL MNO PQR 456 STU VWX 789 0 ,. Remote cable (supplied) 1. BS + ADJUST POWER PICTURE WHITE BAL. LENS G ON MENU ADDRESS ENTER IMAGE GHI YZ / AUTO MAGNIFY ZOOM B + - UNDO CANCEL TEST INFO. Introduction...
... the wired remote control to the remote control. TRIGGER Mini Jack causes damage to the SC. PROJECTOR ABC DEF 123 JKL MNO PQR 456 STU VWX 789 0 ,. Remote cable (supplied) 1. BS + ADJUST POWER PICTURE WHITE BAL. LENS G ON MENU ADDRESS ENTER IMAGE GHI YZ / AUTO MAGNIFY ZOOM B + - UNDO CANCEL TEST INFO. Introduction...

GT5000/GT6000/GT6000R UM
Page 18
2 Installation z Setting Up Your Projector 2-2 Screen Size and Projection Distance 2-2 x Lens Shift Adjustable Range 2-4 c Optional Lens Installation 2-6 v Making Connections 2-13 Connecting Your PC or Macintosh 2-13 To connect Scart Output 2-14 Connecting an External Monitor 2-14 Connecting Your DVD Player 2-15 Connecting Your VCR or Laser Disc Player 2-16 Connecting to a Network 2-17 Connecting the Supplied Power Cable 2-18 2-1
2 Installation z Setting Up Your Projector 2-2 Screen Size and Projection Distance 2-2 x Lens Shift Adjustable Range 2-4 c Optional Lens Installation 2-6 v Making Connections 2-13 Connecting Your PC or Macintosh 2-13 To connect Scart Output 2-14 Connecting an External Monitor 2-14 Connecting Your DVD Player 2-15 Connecting Your VCR or Laser Disc Player 2-16 Connecting to a Network 2-17 Connecting the Supplied Power Cable 2-18 2-1

GT5000/GT6000/GT6000R UM
Page 19
...up and use. Installation 1. Set up a screen or select a non-glossy white wall onto which you must first: 2. Install the optional lens to set up the projector. 6. Set up your image. 3. Connect a PC, VCR, DVD player, or other equipment. 7. But before you get started, you ...can project your projector and how to connect video and audio sources. Make settings or adjustments on the projector. Determine the image size 2. Screen Size and Projection Distance Applicable lens and throw distance/ List of screen sizes Height Screen size (...
...up and use. Installation 1. Set up a screen or select a non-glossy white wall onto which you must first: 2. Install the optional lens to set up the projector. 6. Set up your image. 3. Connect a PC, VCR, DVD player, or other equipment. 7. But before you get started, you ...can project your projector and how to connect video and audio sources. Make settings or adjustments on the projector. Determine the image size 2. Screen Size and Projection Distance Applicable lens and throw distance/ List of screen sizes Height Screen size (...

GT5000/GT6000/GT6000R UM
Page 20
...degree/no -offset" applications. See page 8-13 for using the LENS SHIFT button ̆̄̇̈. This will provide the best performance when operating the projector. Lens Memory." Available combination of optional lens and lamp Lens No Lamp selection GT06RLB GT10RLB GT12ZLB GT13ZLB GT19ZLB GT20ZL GT24ZLB GT34ZLB GT48ZLB...;3.2) Throw distance GT48ZLB (Hן4.8) - (Hן7.1) For screen sizes between 40" and 500" not indicated on the lens position by using the projector with either the GT13ZLB or GT12ZLB lens, it is recommended to reset the...
...degree/no -offset" applications. See page 8-13 for using the LENS SHIFT button ̆̄̇̈. This will provide the best performance when operating the projector. Lens Memory." Available combination of optional lens and lamp Lens No Lamp selection GT06RLB GT10RLB GT12ZLB GT13ZLB GT19ZLB GT20ZL GT24ZLB GT34ZLB GT48ZLB...;3.2) Throw distance GT48ZLB (Hן4.8) - (Hן7.1) For screen sizes between 40" and 500" not indicated on the lens position by using the projector with either the GT13ZLB or GT12ZLB lens, it is recommended to reset the...


