

User Manual
Page 2
...to 1024 x 768 dots. ● About Trademarks IBM and PC/AT are displayed compressed to make OHP film inserts for purchasing the NEC DT20 LCD Projector. Windows is equipped with a high-resolution 2 million pixel single-array color CCD camera. After reading this manual carefully in a safe ...from the need to a super-slim chassis. This frees the user from the scanner. Personal computer screens can be enlarged to use the projector properly. This aids the user in a single body. Lower resolutions such as they are trademarks of U.S. Please read this , please keep...
...to 1024 x 768 dots. ● About Trademarks IBM and PC/AT are displayed compressed to make OHP film inserts for purchasing the NEC DT20 LCD Projector. Windows is equipped with a high-resolution 2 million pixel single-array color CCD camera. After reading this manual carefully in a safe ...from the need to a super-slim chassis. This frees the user from the scanner. Personal computer screens can be enlarged to use the projector properly. This aids the user in a single body. Lower resolutions such as they are trademarks of U.S. Please read this , please keep...
User Manual
Page 3
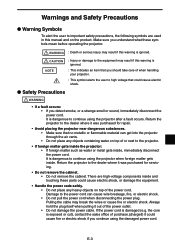
...E-3 If the power cord is exposed or cut), contact the sales office of purchase.(charged) it was purchased for repair. • Avoid placing the projector near dangerous substances. • Make sure that could cause electric shock. ● Safety Precautions WARNING • If a fault occurs: • If ...parts could cause fire or electric shock if you detect smoke, or a strange smell or sound, immediately disconnect the power cord. Return the projector to the dealer where it could cause electric shock, or damage the equipment. • Handle the power cade safely. • Do not...
...E-3 If the power cord is exposed or cut), contact the sales office of purchase.(charged) it was purchased for repair. • Avoid placing the projector near dangerous substances. • Make sure that could cause electric shock. ● Safety Precautions WARNING • If a fault occurs: • If ...parts could cause fire or electric shock if you detect smoke, or a strange smell or sound, immediately disconnect the power cord. Return the projector to the dealer where it could cause electric shock, or damage the equipment. • Handle the power cade safely. • Do not...

User Manual
Page 4
.... • Do not disassemble the alkaline batteries • Do not short-circuit, disassemble, or burn the alkaline batteries. Doing so could cause the projector to prevent paper or cloth from a nearby appliance - If the alkaline solution touches skin or clothes, wash them with clean water and see a doctor...Do not bump the glass surface • Do not bump the glass surface over , resulting in malfunctions. • Do not bump the projector. • Avoid bumping the projector when moving or handling. Do not touch those for a long time. • Do not block the lens front • Do not ...
.... • Do not disassemble the alkaline batteries • Do not short-circuit, disassemble, or burn the alkaline batteries. Doing so could cause the projector to prevent paper or cloth from a nearby appliance - If the alkaline solution touches skin or clothes, wash them with clean water and see a doctor...Do not bump the glass surface • Do not bump the glass surface over , resulting in malfunctions. • Do not bump the projector. • Avoid bumping the projector when moving or handling. Do not touch those for a long time. • Do not block the lens front • Do not ...

User Manual
Page 5
...; Avoid scratching the glass surface. • Take care not to explode during use a new battery and an old battery together. E-5 Inserting a battery in this projector and it is also designed to forcibly turn off the dirt, then use a dry cloth to pages E-54 and E-55). Wiping with hard or pointed... the packaging and can cause rupture or leakage, and could result in fire and injury or soil the surrounding area. • Do not use the projector for a long time, disconnect the power cord for a long period: • If you require new packaging. • Lamp implosion • An AC ...
...; Avoid scratching the glass surface. • Take care not to explode during use a new battery and an old battery together. E-5 Inserting a battery in this projector and it is also designed to forcibly turn off the dirt, then use a dry cloth to pages E-54 and E-55). Wiping with hard or pointed... the packaging and can cause rupture or leakage, and could result in fire and injury or soil the surrounding area. • Do not use the projector for a long time, disconnect the power cord for a long period: • If you require new packaging. • Lamp implosion • An AC ...

User Manual
Page 6
.... It will be careful if small children are near. • Do not use the rack unless the casters are locked when placing the projector on page E-54 for the adjusting procedure. • Do not disassemble the manganese batteries • Do not short-circuit, disassemble, or burn...Filter" on page E-56 for the procedure. • Avoiding malfunctions and accidents • Adjust the Adjustable feet to "Adjusting the Tilt" on the projector, rack, or stand. Especially be pieces of purchase. Do not hold or hang on . sure lamp gets extremely high. Note the following things &#...
.... It will be careful if small children are near. • Do not use the rack unless the casters are locked when placing the projector on page E-54 for the adjusting procedure. • Do not disassemble the manganese batteries • Do not short-circuit, disassemble, or burn...Filter" on page E-56 for the procedure. • Avoiding malfunctions and accidents • Adjust the Adjustable feet to "Adjusting the Tilt" on the projector, rack, or stand. Especially be pieces of purchase. Do not hold or hang on . sure lamp gets extremely high. Note the following things &#...

User Manual
Page 7
... cable (1) Lens cap(1) Batteries(2) (AA×2) Documents: User's manual (1) Registration card (1) Warranty Policy for U.S.A and Canada; Moving the projector with wet hands. DT20 Projector (1) Remote control(1) Power codes (2) For North America Three-pin type for Europe (1) E-7 For Europe Two-pin type for safety. •...lamp unit screws. Make sure your dealer. Please save the original box and packing materials if you do not plan to ship your DT20 Projector. Doing so could cause electric shock. • Be sure to melt down, resulting in the Box? You could cause the sheath...
... cable (1) Lens cap(1) Batteries(2) (AA×2) Documents: User's manual (1) Registration card (1) Warranty Policy for U.S.A and Canada; Moving the projector with wet hands. DT20 Projector (1) Remote control(1) Power codes (2) For North America Three-pin type for Europe (1) E-7 For Europe Two-pin type for safety. •...lamp unit screws. Make sure your dealer. Please save the original box and packing materials if you do not plan to ship your DT20 Projector. Doing so could cause electric shock. • Be sure to melt down, resulting in the Box? You could cause the sheath...

User Manual
Page 8
... Panel E-11 Buttons and Indicator Lights E-12 Remote Controller E-15 Remote Control Operations E-17 Battery Replacement E-17 How to Install the Projector E-18 Installation Sequence E-18 Adjusting the Tilt E-18 Projection Distance and Projected Image Size E-19 Typical Installation E-20 Compensating Keystone E-21 Connecting to a Personal Computer E-...
... Panel E-11 Buttons and Indicator Lights E-12 Remote Controller E-15 Remote Control Operations E-17 Battery Replacement E-17 How to Install the Projector E-18 Installation Sequence E-18 Adjusting the Tilt E-18 Projection Distance and Projected Image Size E-19 Typical Installation E-20 Compensating Keystone E-21 Connecting to a Personal Computer E-...

User Manual
Page 9
... Rotate the handle while pressing on the left and right balance of the projected image. Operation panel Buttons for operating the projector are projected through this cover. Projection Lens Images are located here. Lens cap Zoom lever Turn this to store it rotates 180˚...; and comes out. Tilt Adjustment Buttons Press this ring to prevent dust from getting inside the projector. Adjustable Feet These feet are for more information about the products. © 1998 Kensington Technology Group. Contact the following for adjusting the tilt...
... Rotate the handle while pressing on the left and right balance of the projected image. Operation panel Buttons for operating the projector are projected through this cover. Projection Lens Images are located here. Lens cap Zoom lever Turn this to store it rotates 180˚...; and comes out. Tilt Adjustment Buttons Press this ring to prevent dust from getting inside the projector. Adjustable Feet These feet are for more information about the products. © 1998 Kensington Technology Group. Contact the following for adjusting the tilt...

User Manual
Page 12
...; Only this button can be used when the lamp is off. • This LED blinks for ten seconds and lights when the temperature inside the projector has built up. • This LED lights while the lamp is on. • When the lamp is turned on, it blinks for about six seconds...
...; Only this button can be used when the lamp is off. • This LED blinks for ten seconds and lights when the temperature inside the projector has built up. • This LED lights while the lamp is on. • When the lamp is turned on, it blinks for about six seconds...
User Manual
Page 17
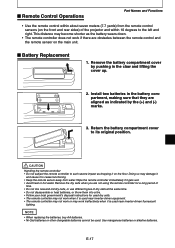
... not using the remote controller for a long period of time. • Do not mix new and old dry cells, or use different types of the projector and within about seven meters (7.7 yards) from water. Remove the battery compartment cover by pushing in the battery compartment, making sure that they are aligned...
... not using the remote controller for a long period of time. • Do not mix new and old dry cells, or use different types of the projector and within about seven meters (7.7 yards) from water. Remove the battery compartment cover by pushing in the battery compartment, making sure that they are aligned...

User Manual
Page 18
... both the left of the main unit takes in by turning only one side of the projector. Also, you can be sucked in accidents or failures. • Vent A on where the projector is reached. Install the projector. As air is taken in air to lift the main unit, and release them when the... cause an accident or failure. • The rubber feet may be adjusted by turning the adjustable foot located on page E-19. How to Install the Projector ■ Installation Sequence Check the installation site and image size.
... both the left of the main unit takes in by turning only one side of the projector. Also, you can be sucked in accidents or failures. • Vent A on where the projector is reached. Install the projector. As air is taken in air to lift the main unit, and release them when the... cause an accident or failure. • The rubber feet may be adjusted by turning the adjustable foot located on page E-19. How to Install the Projector ■ Installation Sequence Check the installation site and image size.

User Manual
Page 19
... and other means to darken the area around the screen. • Do not install the projector where it will be projected by adjusting the image with poor air circulation or any given projector location. • The projection distance that provides good focusing is difficult to 95°F). &#... within this range. Tele: The smallest image that the screen does not directly receive sunlight or other lighting. How to Install the Projector ■ Projection Distance and Projected Image Size Use the following diagrams to determine the projected image size and the type of screen required...
... and other means to darken the area around the screen. • Do not install the projector where it will be projected by adjusting the image with poor air circulation or any given projector location. • The projection distance that provides good focusing is difficult to 95°F). &#... within this range. Tele: The smallest image that the screen does not directly receive sunlight or other lighting. How to Install the Projector ■ Projection Distance and Projected Image Size Use the following diagrams to determine the projected image size and the type of screen required...

User Manual
Page 20
... the left or right so that it is perpendicular to 7°.) The position of the projected image ;;;;;;;;;;;;are ;;;;;;parallel. Select the installation site Place the projector on an even and stable surface such as a table. Adjust the adjustable feet to move the projected image to the desired height. (Adjust the tilt...
... the left or right so that it is perpendicular to 7°.) The position of the projected image ;;;;;;;;;;;;are ;;;;;;parallel. Select the installation site Place the projector on an even and stable surface such as a table. Adjust the adjustable feet to move the projected image to the desired height. (Adjust the tilt...
User Manual
Page 21
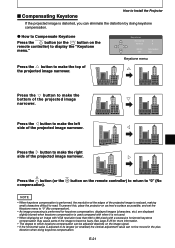
... (No compensation). NOTE • When keystone compensation is performed, the resolution at the edges of the projected image narrower. E-21 To prevent this, place the projector on as level a surface as possible, and set the Keystone menu to "0" (No compensation). • As image processing is performed for more information. •...; The degree to which keystone compensation can eliminate the distortion by doing keystone compensation. ■ Compensating Keystone How to Install the Projector If the projected image is reduced, making small characters difficult to read.
... (No compensation). NOTE • When keystone compensation is performed, the resolution at the edges of the projected image narrower. E-21 To prevent this, place the projector on as level a surface as possible, and set the Keystone menu to "0" (No compensation). • As image processing is performed for more information. •...; The degree to which keystone compensation can eliminate the distortion by doing keystone compensation. ■ Compensating Keystone How to Install the Projector If the projected image is reduced, making small characters difficult to read.

User Manual
Page 22
...iMac, Classic and some Performa models cannot be connected as they are displayed on a notebook PC LCD as iBook, Power Book 100, 140, 145B, 150, 170 cannot be able to connect the projector depending on the model of the notebook PC. • You may be provided with Mini D-...■ Connecting to a Personal Computer ● List of how to connect and use devices connected to the projector, refer to the User's Manual for each device to protect the projector and other connected devices. • For details of cables and adapters Manufacturer Type PC/AT compatible machine Apple Macintosh...
...iMac, Classic and some Performa models cannot be connected as they are displayed on a notebook PC LCD as iBook, Power Book 100, 140, 145B, 150, 170 cannot be able to connect the projector depending on the model of the notebook PC. • You may be provided with Mini D-...■ Connecting to a Personal Computer ● List of how to connect and use devices connected to the projector, refer to the User's Manual for each device to protect the projector and other connected devices. • For details of cables and adapters Manufacturer Type PC/AT compatible machine Apple Macintosh...

User Manual
Page 23
...r GND t NC y GND u GND i GND o NC !0 GND !1 NC !2 Pull up (+5V) !3 H.SYNC !4 V.SYNC !5 Pull up (+5V) NOTE • This projector uses a 15-pin RGB input and an analog type output terminals. E-23 r i Horizontal sync signal e Vertical sync signal u w q y t Horizontal sync signal q Cycle w Sync...H 768 H Non-interlaced NOTE • The screen is sometimes not displayed normally depending on the monitor or projector that signals are output from the RGB video output terminal. (XGA 60Hz speed or equivalent) The video signal output is determined by whether "PC/OHP" or "OHP" is ...
...r GND t NC y GND u GND i GND o NC !0 GND !1 NC !2 Pull up (+5V) !3 H.SYNC !4 V.SYNC !5 Pull up (+5V) NOTE • This projector uses a 15-pin RGB input and an analog type output terminals. E-23 r i Horizontal sync signal e Vertical sync signal u w q y t Horizontal sync signal q Cycle w Sync...H 768 H Non-interlaced NOTE • The screen is sometimes not displayed normally depending on the monitor or projector that signals are output from the RGB video output terminal. (XGA 60Hz speed or equivalent) The video signal output is determined by whether "PC/OHP" or "OHP" is ...

User Manual
Page 24
...List of the keys, F1 -F12. In most cases, because of the limitations of your notebook PC for details. The DT20 is sometimes not recognized by the projector. it is connected after the PC is started up. The correct images may be projected if only external output signals are ...Some notebook PCs require a special operation to transmit the signals from the PC, "No signal" is displayed on the personal computer. Even if the LCD screen of a notebook PC displays normal images, the projected images may be displayed incorrectly. Refer to the manuals of the notebook PC. ■ ...
...List of the keys, F1 -F12. In most cases, because of the limitations of your notebook PC for details. The DT20 is sometimes not recognized by the projector. it is connected after the PC is started up. The correct images may be projected if only external output signals are ...Some notebook PCs require a special operation to transmit the signals from the PC, "No signal" is displayed on the personal computer. Even if the LCD screen of a notebook PC displays normal images, the projected images may be displayed incorrectly. Refer to the manuals of the notebook PC. ■ ...

User Manual
Page 27
...an IBM Desktop and Compatible Cable supplied with monitor Signal Cable (supplied) To RGB-OUT terminal To RGB-IN1 or RGB-IN2 terminal DT20 NOTE When connecting the projector directly to the PC without using the monitor supplied with the PC, you can connect by the supplied cable only. ● ...100, 140, 145B, 150, 170 Display adapter for Power Book Signal cable (supplied) Conversion adapter (not supplied) To RGB-IN1 or RGB-IN2 terminal DT20 NOTE • When connecting the Power Book Duo, the Duo Dock or Mini Dock is required. • The Power Book display adapter is not supplied...
...an IBM Desktop and Compatible Cable supplied with monitor Signal Cable (supplied) To RGB-OUT terminal To RGB-IN1 or RGB-IN2 terminal DT20 NOTE When connecting the projector directly to the PC without using the monitor supplied with the PC, you can connect by the supplied cable only. ● ...100, 140, 145B, 150, 170 Display adapter for Power Book Signal cable (supplied) Conversion adapter (not supplied) To RGB-IN1 or RGB-IN2 terminal DT20 NOTE • When connecting the Power Book Duo, the Duo Dock or Mini Dock is required. • The Power Book display adapter is not supplied...

User Manual
Page 29
... standby mode, and the power indicator LED lights (red). Basic Operation ■ Preparation Basic Operation 2 1 1 1 Connect the power cord. ON/ STANDBY LAMP/ COVER TEMP The projector is displayed. Select the video source to be displayed from OHP, PC1/PC2, or VIDEO. The LAMP/COVER LED lights (green). Press the POWER button...
... standby mode, and the power indicator LED lights (red). Basic Operation ■ Preparation Basic Operation 2 1 1 1 Connect the power cord. ON/ STANDBY LAMP/ COVER TEMP The projector is displayed. Select the video source to be displayed from OHP, PC1/PC2, or VIDEO. The LAMP/COVER LED lights (green). Press the POWER button...

User Manual
Page 41
... power outlet if you press the POWER button if the LAMP/COVER LED is displayed on even if you are not going to use the projector for at least one minute. To turn off."
... power outlet if you press the POWER button if the LAMP/COVER LED is displayed on even if you are not going to use the projector for at least one minute. To turn off."

