
User Manual
Page 2
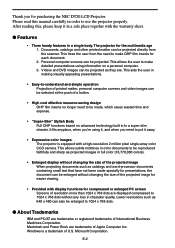
...such as they are trademarks or registered trademarks of U.S. Macintosh and Power Book are displayed compressed to use the projector properly. The projector for purchasing the NEC DT20 LCD Projector. It fits anyplace, when you're using information on advanced technology built in order to 1024 x 768 ... x 480 can be projected. After reading this manual carefully in to put it away. • Expressive color images The projector is a trademark of International Business Machines Corporation. This allows subtle midtones in color documents to be reproduced faithfully and sharp as...
...such as they are trademarks or registered trademarks of U.S. Macintosh and Power Book are displayed compressed to use the projector properly. The projector for purchasing the NEC DT20 LCD Projector. It fits anyplace, when you're using information on advanced technology built in order to 1024 x 768 ... x 480 can be projected. After reading this manual carefully in to put it away. • Expressive color images The projector is a trademark of International Business Machines Corporation. This allows subtle midtones in color documents to be reproduced faithfully and sharp as...
User Manual
Page 3
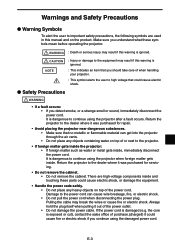
... Make sure you continue using the damaged power cord. Damage to the dealer where it was purchased for repair. • Avoid placing the projector near dangerous substances. • Make sure that no metallic or flammable material can cause wire breakage, fire, or electric shock. • Do...9679; Safety Precautions WARNING • If a fault occurs: • If you should take care of when handling your projector. : This symbol alerts the user to continue using the projector after a fault occurs. Pulling the cable may result if this manual and on the product. WARNING : Death or ...
... Make sure you continue using the damaged power cord. Damage to the dealer where it was purchased for repair. • Avoid placing the projector near dangerous substances. • Make sure that no metallic or flammable material can cause wire breakage, fire, or electric shock. • Do...9679; Safety Precautions WARNING • If a fault occurs: • If you should take care of when handling your projector. : This symbol alerts the user to continue using the projector after a fault occurs. Pulling the cable may result if this manual and on the product. WARNING : Death or ...

User Manual
Page 4
... (35˚C/95˚F or higher) - Doing so could cause the alkaline solution to leak, which could damage the eyes. • Do not put the projector in unstable places. • Do not put anything around the unit, be sure to : - E-4 • Do not look through the lens. • Do not ...electric shock. • Do not disassemble the alkaline batteries • Do not short-circuit, disassemble, or burn the alkaline batteries. Doing so could cause the projector to drop or turn over the scanner. If it may cause fire or burns if you put anything in front of the unit. Doing so...
... (35˚C/95˚F or higher) - Doing so could cause the alkaline solution to leak, which could damage the eyes. • Do not put the projector in unstable places. • Do not put anything around the unit, be sure to : - E-4 • Do not look through the lens. • Do not ...electric shock. • Do not disassemble the alkaline batteries • Do not short-circuit, disassemble, or burn the alkaline batteries. Doing so could cause the projector to drop or turn over the scanner. If it may cause fire or burns if you put anything in front of the unit. Doing so...

User Manual
Page 5
... objects. The manufacturer cannot accept responsibility in the event of damage or accident if other than two times. • Care of the projector • To prevent risk of accidents, always disconnect the power plug before the wet season brings damp conditions. Scratches on the glass ...impregnated cloth, follow the instructions. • Avoid scratching the glass surface. • Take care not to wipe dry. • Do not wipe the projector with a soft cloth. The lamp is used . • Use the special packaging no more than the type specified for safety. • Disposal •...
... objects. The manufacturer cannot accept responsibility in the event of damage or accident if other than two times. • Care of the projector • To prevent risk of accidents, always disconnect the power plug before the wet season brings damp conditions. Scratches on the glass ...impregnated cloth, follow the instructions. • Avoid scratching the glass surface. • Take care not to wipe dry. • Do not wipe the projector with a soft cloth. The lamp is used . • Use the special packaging no more than the type specified for safety. • Disposal •...

User Manual
Page 6
... pres- Remedy • If a lamp explodes in injury. • Do not turn the lamp on/off /on. sure lamp gets extremely high. Using the projector in the lamp just after the power is rotating could cause the batteries to generate heat or explode due to the leaked solution, resulting in...has exploded, never try to the surrounding area. • Do not do the followings • Do not put anything heavy on the projector. • Do not step on the projector, rack, or stand. Replacing the lamp during operation or just after it turns over or break, resulting in fire, injury, or ...
... pres- Remedy • If a lamp explodes in injury. • Do not turn the lamp on/off /on. sure lamp gets extremely high. Using the projector in the lamp just after the power is rotating could cause the batteries to generate heat or explode due to the leaked solution, resulting in...has exploded, never try to the surrounding area. • Do not do the followings • Do not put anything heavy on the projector. • Do not step on the projector, rack, or stand. Replacing the lamp during operation or just after it turns over or break, resulting in fire, injury, or ...
User Manual
Page 7
... Signal cable (1) Lens cap(1) Batteries(2) (AA×2) Documents: User's manual (1) Registration card (1) Warranty Policy for Europe. Make sure your DT20 Projector. For Europe Two-pin type for Europe (1) E-7 Doing so could cause electric shock. • Be sure to pull out the power cord...and two lamp unit screws. If any cable connections between units and release the anti-theft lock before moving the projector. Moving the projector with wet hands. DT20 Projector (1) Remote control(1) Power codes (2) For North America Three-pin type for U.S.A and Canada; You could cause...
... Signal cable (1) Lens cap(1) Batteries(2) (AA×2) Documents: User's manual (1) Registration card (1) Warranty Policy for Europe. Make sure your DT20 Projector. For Europe Two-pin type for Europe (1) E-7 Doing so could cause electric shock. • Be sure to pull out the power cord...and two lamp unit screws. If any cable connections between units and release the anti-theft lock before moving the projector. Moving the projector with wet hands. DT20 Projector (1) Remote control(1) Power codes (2) For North America Three-pin type for U.S.A and Canada; You could cause...

User Manual
Page 8
... Panel E-11 Buttons and Indicator Lights E-12 Remote Controller E-15 Remote Control Operations E-17 Battery Replacement E-17 How to Install the Projector E-18 Installation Sequence E-18 Adjusting the Tilt E-18 Projection Distance and Projected Image Size E-19 Typical Installation E-20 Compensating Keystone E-21 Connecting to a Personal Computer E-...
... Panel E-11 Buttons and Indicator Lights E-12 Remote Controller E-15 Remote Control Operations E-17 Battery Replacement E-17 How to Install the Projector E-18 Installation Sequence E-18 Adjusting the Tilt E-18 Projection Distance and Projected Image Size E-19 Typical Installation E-20 Compensating Keystone E-21 Connecting to a Personal Computer E-...

User Manual
Page 9
.... See page E-18. Adjustable Feet These feet are for adjusting the tilt angle as well as the left side of the projected image. Projector ■ Retracted Rotate the handle while pressing on the left and right balance of the handle and it . Projection Lens Images are located here.... Contact the following for operating the projector are projected through this cover. Adjustable Feet Focus adjuster Turn this ring to adjust the screen size. See page E-18. Phone:(650)572-...
.... See page E-18. Adjustable Feet These feet are for adjusting the tilt angle as well as the left side of the projected image. Projector ■ Retracted Rotate the handle while pressing on the left and right balance of the handle and it . Projection Lens Images are located here.... Contact the following for operating the projector are projected through this cover. Adjustable Feet Focus adjuster Turn this ring to adjust the screen size. See page E-18. Phone:(650)572-...

User Manual
Page 12
...; Press this button can be used when the lamp is off. • This LED blinks for ten seconds and lights when the temperature inside the projector has built up. • This LED lights while the lamp is on. • When the lamp is turned on, it blinks for about six seconds...
...; Press this button can be used when the lamp is off. • This LED blinks for ten seconds and lights when the temperature inside the projector has built up. • This LED lights while the lamp is on. • When the lamp is turned on, it blinks for about six seconds...
User Manual
Page 17
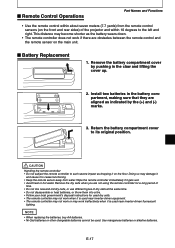
... not using the remote controller for a long period of time. • Do not mix new and old dry cells, or use different types of the projector and within 10 degrees to the left and right. NOTE • When replacing the batteries, buy AA batteries. • Ni-Cad batteries or other chargeable...
... not using the remote controller for a long period of time. • Do not mix new and old dry cells, or use different types of the projector and within 10 degrees to the left and right. NOTE • When replacing the batteries, buy AA batteries. • Ni-Cad batteries or other chargeable...

User Manual
Page 18
...main unit. Extends foot. As air is reached. Prepare the screen. Adjustable feet Extends foot. Turning this happens, the temperature inside of the projector. PC, video source, etc. ■ Adjusting the Tilt The position and tilt angle of the adjustable feet. Tilt adjust levers Retracts foot... may be adjusted by turning only one side of the main unit. End See "Projection Distance and Projected Image Size" on where the projector is installed. E-18 Install the input devices. CAUTION • Do not tilt the main unit at extreme angles by adjusting the adjustable...
...main unit. Extends foot. As air is reached. Prepare the screen. Adjustable feet Extends foot. Turning this happens, the temperature inside of the projector. PC, video source, etc. ■ Adjusting the Tilt The position and tilt angle of the adjustable feet. Tilt adjust levers Retracts foot... may be adjusted by turning only one side of the main unit. End See "Projection Distance and Projected Image Size" on where the projector is installed. E-18 Install the input devices. CAUTION • Do not tilt the main unit at extreme angles by adjusting the adjustable...

User Manual
Page 19
... 1 3 5 7 9 Projection Distance Wide: The largest image that can be projected by adjusting the image with poor air circulation or any given projector location. • The projection distance that provides good focusing is difficult to view. Tele: The smallest image that the screen does not directly receive ... In a bright room, use a curtain or other means to darken the area around the screen. • Do not install the projector where it will be within this range. The ambient temperature should be subject to excessive humidity, dust, or cigarette smoke. How to Install ...
... 1 3 5 7 9 Projection Distance Wide: The largest image that can be projected by adjusting the image with poor air circulation or any given projector location. • The projection distance that provides good focusing is difficult to view. Tele: The smallest image that the screen does not directly receive ... In a bright room, use a curtain or other means to darken the area around the screen. • Do not install the projector where it will be within this range. The ambient temperature should be subject to excessive humidity, dust, or cigarette smoke. How to Install ...

User Manual
Page 20
... left or right so that it is perpendicular to 7°.) The position of the projected image ;;;;;;;;;;;;are ;;;;;;parallel. E-20 Select the installation site Place the projector on an even and stable surface such as a table. POWER 2. Adjust the adjustable feet to move the projected image to the desired height. (Adjust the...
... left or right so that it is perpendicular to 7°.) The position of the projected image ;;;;;;;;;;;;are ;;;;;;parallel. E-20 Select the installation site Place the projector on an even and stable surface such as a table. POWER 2. Adjust the adjustable feet to move the projected image to the desired height. (Adjust the...
User Manual
Page 21
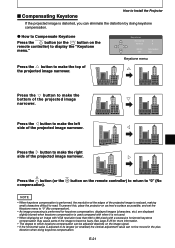
... the projected image is reduced, making small characters difficult to read. E-21 To prevent this, place the projector on the remote controller) to display the "Keystone menu." ■ Compensating Keystone How to Install the Projector If the projected image is distorted, you can eliminate the distortion by doing keystone compensation. ● How...
... the projected image is reduced, making small characters difficult to read. E-21 To prevent this, place the projector on the remote controller) to display the "Keystone menu." ■ Compensating Keystone How to Install the Projector If the projected image is distorted, you can eliminate the distortion by doing keystone compensation. ● How...
User Manual
Page 22
... the screen properly when they have no monitor output terminal such as well. E-22 The method for turning off each device to protect the projector and other devices, turn the notebook PC display off to remedy this happens, turn off a notebook PC display varies according to a Personal ... other connected devices. • For details of how to connect and use devices connected to the projector, refer to the User's Manual for each device. • Sometimes images are displayed on a notebook PC LCD as iBook, Power Book 100, 140, 145B, 150, 170 cannot be able to connect the...
... the screen properly when they have no monitor output terminal such as well. E-22 The method for turning off each device to protect the projector and other devices, turn the notebook PC display off to remedy this happens, turn off a notebook PC display varies according to a Personal ... other connected devices. • For details of how to connect and use devices connected to the projector, refer to the User's Manual for each device. • Sometimes images are displayed on a notebook PC LCD as iBook, Power Book 100, 140, 145B, 150, 170 cannot be able to connect the...

User Manual
Page 23
... BLUE VIDEO r GND t NC y GND u GND i GND o NC !0 GND !1 NC !2 Pull up (+5V) !3 H.SYNC !4 V.SYNC !5 Pull up (+5V) NOTE • This projector uses a 15-pin RGB input and an analog type output terminals. E-23 See page E-45 for the PC input and output terminals. Connecting to a digital... output type personal computer. • Plug and play is connected. • Images from the RGB video output terminal. (XGA 60Hz speed or equivalent) The video signal output is determined by whether "PC/OHP" or "OHP" is selected in standby. r i Horizontal sync...
... BLUE VIDEO r GND t NC y GND u GND i GND o NC !0 GND !1 NC !2 Pull up (+5V) !3 H.SYNC !4 V.SYNC !5 Pull up (+5V) NOTE • This projector uses a 15-pin RGB input and an analog type output terminals. E-23 See page E-45 for the PC input and output terminals. Connecting to a digital... output type personal computer. • Plug and play is connected. • Images from the RGB video output terminal. (XGA 60Hz speed or equivalent) The video signal output is determined by whether "PC/OHP" or "OHP" is selected in standby. r i Horizontal sync...

User Manual
Page 24
...as external output signals are provided without using the simultaneous display. it is connected after the PC is started up. The DT20 is sometimes not recognized by the projector. Some notebook PCs require a special operation to the manuals of your notebook PC for details. The external output signals may...Switching Method Fn+f7 Fn+f4 Fn+f8 * The above table are trademarks or registered trademarks of the notebook PC. Even if the LCD screen of the notebook PC, the simultaneous display function (the external output signals are sent out simultaneously while the images are displayed on ...
...as external output signals are provided without using the simultaneous display. it is connected after the PC is started up. The DT20 is sometimes not recognized by the projector. Some notebook PCs require a special operation to the manuals of your notebook PC for details. The external output signals may...Switching Method Fn+f7 Fn+f4 Fn+f8 * The above table are trademarks or registered trademarks of the notebook PC. Even if the LCD screen of the notebook PC, the simultaneous display function (the external output signals are sent out simultaneously while the images are displayed on ...

User Manual
Page 27
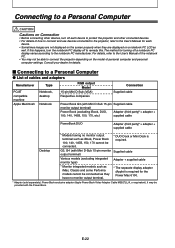
... Desktop and Compatible Cable supplied with monitor Signal Cable (supplied) To RGB-OUT terminal To RGB-IN1 or RGB-IN2 terminal DT20 NOTE When connecting the projector directly to Apple Macintosh Notebook Excluding Power Book Duo, 100, 140, 145B, 150, 170 Display adapter for Power Book Signal... cable (supplied) Conversion adapter (not supplied) To RGB-IN1 or RGB-IN2 terminal DT20 NOTE • When connecting the Power Book Duo,...
... Desktop and Compatible Cable supplied with monitor Signal Cable (supplied) To RGB-OUT terminal To RGB-IN1 or RGB-IN2 terminal DT20 NOTE When connecting the projector directly to Apple Macintosh Notebook Excluding Power Book Duo, 100, 140, 145B, 150, 170 Display adapter for Power Book Signal... cable (supplied) Conversion adapter (not supplied) To RGB-IN1 or RGB-IN2 terminal DT20 NOTE • When connecting the Power Book Duo,...

User Manual
Page 29
... LED lights, and the ON/STANDBY LED lights (green). Basic Operation ■ Preparation Basic Operation 2 1 1 1 Connect the power cord. ON/ STANDBY LAMP/ COVER TEMP The projector is displayed. Select the video source to be displayed from OHP, PC1/PC2, or VIDEO.
... LED lights, and the ON/STANDBY LED lights (green). Basic Operation ■ Preparation Basic Operation 2 1 1 1 Connect the power cord. ON/ STANDBY LAMP/ COVER TEMP The projector is displayed. Select the video source to be displayed from OHP, PC1/PC2, or VIDEO.

User Manual
Page 41
... it again. ■ How to turn off." ON/ STANDBY LAMP/ COVER The ON/STANDBY LED on even if you are not going to use the projector for at least one minute. The ON/STANDBY LED lights (red.) NOTE The lamp will not turn on the operation panel goes out.
... it again. ■ How to turn off." ON/ STANDBY LAMP/ COVER The ON/STANDBY LED on even if you are not going to use the projector for at least one minute. The ON/STANDBY LED lights (red.) NOTE The lamp will not turn on the operation panel goes out.

