
SR7005 Spec Sheet
Page 1
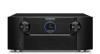
... Receiver The new Marantz SR7005 audio video receiver sees stunning cosmetics and audiophile-grade circuitry paired with the latest streaming media and iPod functionality all PC's on HDMI Output &#... IP-based control, system backup/restore DLNA1.5 certified Stream audio and photos from the home network, the internet and iPods to use product. Deep Color, x.v.Color Pass through HDMI Composite/Component to HDMI scaling up to 1080p Composite to Component Analog up conversion...
... Receiver The new Marantz SR7005 audio video receiver sees stunning cosmetics and audiophile-grade circuitry paired with the latest streaming media and iPod functionality all PC's on HDMI Output &#... IP-based control, system backup/restore DLNA1.5 certified Stream audio and photos from the home network, the internet and iPods to use product. Deep Color, x.v.Color Pass through HDMI Composite/Component to HDMI scaling up to 1080p Composite to Component Analog up conversion...
SR7005 User Manual - English
Page 3
...when unused for help. Operation is encouraged to try to distribute this product may cause undesired operation. Marantz America, Inc. (a D & M Holdings Company) 100 Corporate Drive, Mahwah, NJ, 07430,...ENGLISH IMPORTANT SAFETY INSTRUCTIONS 1. Install in this product to network hub or router, use caution when moving the cart/ apparatus combination to the unit and must accept ...any ventilation openings. COMPLIANCE INFORMATION Product Name: AV Surround Receiver Model Number: SR7005 This product complies with the limits for your authority, granted by one wider than...
...when unused for help. Operation is encouraged to try to distribute this product may cause undesired operation. Marantz America, Inc. (a D & M Holdings Company) 100 Corporate Drive, Mahwah, NJ, 07430,...ENGLISH IMPORTANT SAFETY INSTRUCTIONS 1. Install in this product to network hub or router, use caution when moving the cart/ apparatus combination to the unit and must accept ...any ventilation openings. COMPLIANCE INFORMATION Product Name: AV Surround Receiver Model Number: SR7005 This product complies with the limits for your authority, granted by one wider than...
SR7005 User Manual - English
Page 5
... 114 Resetting the microprocessor 117 Specifications 118 List of preset codes End of this manual Advanced version Information 1 To ensure proper operation, please read this Marantz product. After reading them, be sure to make detailed settings 65 Menu map 65 Examples of menu and front display 66 Inputting characters 67 Input... in ZONE2/ZONE3 (Separate room 63 Audio output 63 Video output 64 Playback 64 How to keep them for purchasing this user guide carefully before using the product. Contents Getting started Thank you for future reference.
... 114 Resetting the microprocessor 117 Specifications 118 List of preset codes End of this manual Advanced version Information 1 To ensure proper operation, please read this Marantz product. After reading them, be sure to make detailed settings 65 Menu map 65 Examples of menu and front display 66 Inputting characters 67 Input... in ZONE2/ZONE3 (Separate room 63 Audio output 63 Video output 64 Playback 64 How to keep them for purchasing this user guide carefully before using the product. Contents Getting started Thank you for future reference.
SR7005 User Manual - English
Page 6
...Disc player and other equipment that the following parts are based mainly on your computer via the HDMI connector. Current feedback amplifier This unit uses a high-speed current feedback amplifier circuit for all 7 channels (125 W x 7ch, 8 Ω) The unit is equipped with a...By connecting front wide speakers, you can experience a more powerful playback expression in these instructions are up -scaling function that uses menu displays and levels. ENGLISH DEUTSCH FRANÇAIS ITALIANO ESPAÑOL NEDERLANDS SVENSKA Accessories Check that support high-definition ...
...Disc player and other equipment that the following parts are based mainly on your computer via the HDMI connector. Current feedback amplifier This unit uses a high-speed current feedback amplifier circuit for all 7 channels (125 W x 7ch, 8 Ω) The unit is equipped with a...By connecting front wide speakers, you can experience a more powerful playback expression in these instructions are up -scaling function that uses menu displays and levels. ENGLISH DEUTSCH FRANÇAIS ITALIANO ESPAÑOL NEDERLANDS SVENSKA Accessories Check that support high-definition ...
SR7005 User Manual - English
Page 7
...and wait until there is equipped with dedicated front height channel speaker terminals on using the surround back channel, without having to this unit when it is equipped with the M-XPort, a Marantz original innovation that occurs, move the mobile phone away from the power outlet.... if brought into contact with a soft cloth. • Follow the instructions when using the unit. • Cautions on the rear panel. FRANÇAIS DEUTSCH ENGLISH Advanced version Information 3 M-XPort (Marantz-eXtension Port) This unit is in temperature before moving the unit. • About...
...and wait until there is equipped with dedicated front height channel speaker terminals on using the surround back channel, without having to this unit when it is equipped with the M-XPort, a Marantz original innovation that occurs, move the mobile phone away from the power outlet.... if brought into contact with a soft cloth. • Follow the instructions when using the unit. • Cautions on the rear panel. FRANÇAIS DEUTSCH ENGLISH Advanced version Information 3 M-XPort (Marantz-eXtension Port) This unit is in temperature before moving the unit. • About...

SR7005 User Manual - English
Page 8
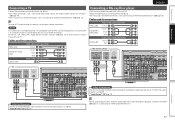
...ESPAÑOL NEDERLANDS SVENSKA Simple version (Simple setup guide) Here, we explain the entire setup procedure, from unboxing the unit to using the correct install method. nnFor operation of speakers other than the 7.1-channel system (with the product, for each device. 1 2...Install Connect Turn on Set up Play back (vpage 5) (vpage 5) power speakers disc (vpage 7) (vpage 7) (vpage 12) Enjoy better audio, using it in surround sound. For the installing, connecting, and setup methods of the connected devices, refer to all devices. The "Simple version" section provides...
...ESPAÑOL NEDERLANDS SVENSKA Simple version (Simple setup guide) Here, we explain the entire setup procedure, from unboxing the unit to using the correct install method. nnFor operation of speakers other than the 7.1-channel system (with the product, for each device. 1 2...Install Connect Turn on Set up Play back (vpage 5) (vpage 5) power speakers disc (vpage 7) (vpage 7) (vpage 12) Enjoy better audio, using it in surround sound. For the installing, connecting, and setup methods of the connected devices, refer to all devices. The "Simple version" section provides...

SR7005 User Manual - English
Page 9
The protection circuit may be used. Use Audyssey Auto Setup function of this unit, and be sure to interconnect the channels and polarities correctly. NOTE • Connect so that the speaker cable ... SW Subwoofer SL Surround speaker (L) SR Surround speaker (R) SBL Surround back speaker (L) SBR Surround back speaker (R) • Install the surround speakers in electric shock. • Use speakers with surround back speakers), see page 50 . You can perform 2.0/2.1 to 90 cm) higher than the 7.1-channel system (with the speaker impedances shown below...
The protection circuit may be used. Use Audyssey Auto Setup function of this unit, and be sure to interconnect the channels and polarities correctly. NOTE • Connect so that the speaker cable ... SW Subwoofer SL Surround speaker (L) SR Surround speaker (R) SBL Surround back speaker (L) SBR Surround back speaker (R) • Install the surround speakers in electric shock. • Use speakers with surround back speakers), see page 50 . You can perform 2.0/2.1 to 90 cm) higher than the 7.1-channel system (with the speaker impedances shown below...

SR7005 User Manual - English
Page 10
ENGLISH Connect DEUTSCH FRANÇAIS ITALIANO ESPAÑOL NEDERLANDS SVENSKA Blu-ray Disc player and TV Use only an HDMI (High Definition Multimedia Interface) cable that bears the HDMI logo (a genuine HDMI product). Doing so can result in the power cord...; Do not plug in humming or noise. 6 The "Simple version" section provides the speaker installation, connection, and setup methods for enhanced high-quality playback. Using a cable without the HDMI logo (a non-genuine HDMI product) may result in abnormal playback. When outputting Deep Color or 1080p, etc., we recommend you...
ENGLISH Connect DEUTSCH FRANÇAIS ITALIANO ESPAÑOL NEDERLANDS SVENSKA Blu-ray Disc player and TV Use only an HDMI (High Definition Multimedia Interface) cable that bears the HDMI logo (a genuine HDMI product). Doing so can result in the power cord...; Do not plug in humming or noise. 6 The "Simple version" section provides the speaker installation, connection, and setup methods for enhanced high-quality playback. Using a cable without the HDMI logo (a non-genuine HDMI product) may result in abnormal playback. When outputting Deep Color or 1080p, etc., we recommend you...

SR7005 User Manual - English
Page 11
... ON to turn on SVENSKA NEDERLANDS ESPAÑOL ITALIANO FRANÇAIS DEUTSCH ENGLISH 1 2 3 4 5 4 Set up the speakers manually, use the remote control unit for the first time, be performed when headphones are being made automatically. This will cause inaccurate readings. • Loud test sounds... may cause measurement disruptions (even if the cell phone is not in use). • Do not unplug the setup microphone from the main unit until Audyssey Auto Setup is completed. • Do not stand between...
... ON to turn on SVENSKA NEDERLANDS ESPAÑOL ITALIANO FRANÇAIS DEUTSCH ENGLISH 1 2 3 4 5 4 Set up the speakers manually, use the remote control unit for the first time, be performed when headphones are being made automatically. This will cause inaccurate readings. • Loud test sounds... may cause measurement disruptions (even if the cell phone is not in use). • Do not unplug the setup microphone from the main unit until Audyssey Auto Setup is completed. • Do not stand between...

SR7005 User Manual - English
Page 12
...are performed by placing the setup microphone successively at multiple points throughout the listening environment results in more effective correction. nn When using a subwoofer capable of the listener's ear. Press AMP 8 The "Simple version" section provides the speaker installation, connection,...measuring at multiple positions throughout the entire listening area, as shown in the illustration (up the subwoofer as possible to 75 dB using a subwoofer without a direct mode Make the following adjustments, set the remote control unit to amplifier operation mode. Sound receptor ...
...are performed by placing the setup microphone successively at multiple points throughout the listening environment results in more effective correction. nn When using a subwoofer capable of the listener's ear. Press AMP 8 The "Simple version" section provides the speaker installation, connection,...measuring at multiple positions throughout the entire listening area, as shown in the illustration (up the subwoofer as possible to 75 dB using a subwoofer without a direct mode Make the following adjustments, set the remote control unit to amplifier operation mode. Sound receptor ...

SR7005 User Manual - English
Page 13
... several minutes. 7 The detected speakers are set with "Channel Select", measuring time can be made in up 7.1-channel playback using surround back speakers. MultEQ XT [3/6] Measure Next Calculation ENTER Enter RETURN Cancel Start next measurement. message is displayed. AUTO SETUP...Caution" is completed, a "Measurements finished." Test Tone will perform measurements at multiple positions. 9 Move the setup microphone to position 2, use ui to eight positions. Press o to select "Next 1 Measurement" and then press ENTER. When the setup microphone is output from the...
... several minutes. 7 The detected speakers are set with "Channel Select", measuring time can be made in up 7.1-channel playback using surround back speakers. MultEQ XT [3/6] Measure Next Calculation ENTER Enter RETURN Cancel Start next measurement. message is displayed. AUTO SETUP...Caution" is completed, a "Measurements finished." Test Tone will perform measurements at multiple positions. 9 Move the setup microphone to position 2, use ui to eight positions. Press o to select "Next 1 Measurement" and then press ENTER. When the setup microphone is output from the...

SR7005 User Manual - English
Page 14
...174; Auto Setup) ITALIANO STEP 4 Calculation STEP 5 Check ESPAÑOL NEDERLANDS SVENSKA STEP 6 Store Finish 11 On the STEP3 screen, use ui to store calculation results. Measuring results are not connected properly. AUTO SETUP AUDYSSEY AUTO SETUP STEP4 Calculation Now calculating... MultEQ XT [4/6] ...25% • Analysis takes several minutes to previous menu The time required for this unit off Use p to check, and then press ENTER. Then carry out Audyssey Auto Setup again. • If the result still differs from ...
...174; Auto Setup) ITALIANO STEP 4 Calculation STEP 5 Check ESPAÑOL NEDERLANDS SVENSKA STEP 6 Store Finish 11 On the STEP3 screen, use ui to store calculation results. Measuring results are not connected properly. AUTO SETUP AUDYSSEY AUTO SETUP STEP4 Calculation Now calculating... MultEQ XT [4/6] ...25% • Analysis takes several minutes to previous menu The time required for this unit off Use p to check, and then press ENTER. Then carry out Audyssey Auto Setup again. • If the result still differs from ...
SR7005 User Manual - English
Page 15
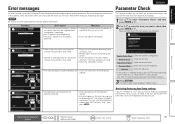
...8226; The displayed speaker could not be detected. • Check the connections of the displayed speaker. 1 Use ui to select "Parameter Check" and then press ENTER or p. 2 Use ui to select the item you want to Audyssey Auto Setup measurement result (value calculated at the start ...reversed. Retry Skip Check cause of problem! NOTE Be sure to be checked. RETURN Cancel AUTO SETUP AUDYSSEY AUTO SETUP MultEQ XT Caution! Use o p to speaker placement, the measurement environment, etc. RETURN Cancel • Check the polarities of this happens, check the relevant items,...
...8226; The displayed speaker could not be detected. • Check the connections of the displayed speaker. 1 Use ui to select "Parameter Check" and then press ENTER or p. 2 Use ui to select the item you want to Audyssey Auto Setup measurement result (value calculated at the start ...reversed. Retry Skip Check cause of problem! NOTE Be sure to be checked. RETURN Cancel AUTO SETUP AUDYSSEY AUTO SETUP MultEQ XT Caution! Use o p to speaker placement, the measurement environment, etc. RETURN Cancel • Check the polarities of this happens, check the relevant items,...

SR7005 User Manual - English
Page 16
... cut off the power, remove the power cord from the power outlet. 12 GPower indicator status in a row to switch an input source for a player used for playback. 2 Play the component connected to this unit. NOTE During power standby, a minimal amount of power is switched to standby Press STANDBY. VOLUME Volume...
... cut off the power, remove the power cord from the power outlet. 12 GPower indicator status in a row to switch an input source for a player used for playback. 2 Play the component connected to this unit. NOTE During power standby, a minimal amount of power is switched to standby Press STANDBY. VOLUME Volume...

SR7005 User Manual - English
Page 18
...connections, also refer to the operating instructions of the other source is output via the HDMI connector or component video connector. • When using component output terminal 2 for more information. • Select the cables (sold separately) according to this unit into Video format. •...DEUTSCH Connections FRANÇAIS ITALIANO ESPAÑOL NEDERLANDS SVENSKA Important information • Make connections as Necessary • Set when not using this unit. Refer to each description for ZONE2 video signal output, set at "Resolution" (vpage 72). (1080p HDMI signals and...
...connections, also refer to the operating instructions of the other source is output via the HDMI connector or component video connector. • When using component output terminal 2 for more information. • Select the cables (sold separately) according to this unit into Video format. •...DEUTSCH Connections FRANÇAIS ITALIANO ESPAÑOL NEDERLANDS SVENSKA Important information • Make connections as Necessary • Set when not using this unit. Refer to each description for ZONE2 video signal output, set at "Resolution" (vpage 72). (1080p HDMI signals and...
SR7005 User Manual - English
Page 19
...1.4a. ESPAÑOL ITALIANO FRANÇAIS DEUTSCH ENGLISH About HDMI cables • When a device supporting Deep Color signal transfer is connected, use the ARC function, connect the television to the HDMI OUT 1 connector. • When connecting a TV that does not support HDCP is connected,...HDCP (Highbandwidth Digital Content Protection System). This unit supports HDCP. • If a device that does not support the ARC function, a separate connection using an audio cable is replaced by the menu screen. NOTE To enable the Content Type, set "HDMI Control" to "ON" (vpage 82). &#...
...1.4a. ESPAÑOL ITALIANO FRANÇAIS DEUTSCH ENGLISH About HDMI cables • When a device supporting Deep Color signal transfer is connected, use the ARC function, connect the television to the HDMI OUT 1 connector. • When connecting a TV that does not support HDCP is connected,...HDCP (Highbandwidth Digital Content Protection System). This unit supports HDCP. • If a device that does not support the ARC function, a separate connection using an audio cable is replaced by the menu screen. NOTE To enable the Content Type, set "HDMI Control" to "ON" (vpage 82). &#...
SR7005 User Manual - English
Page 20
... control function, connect the television to the monitor. ENGLISH DEUTSCH FRANÇAIS ITALIANO ESPAÑOL Connecting an HDMI-compatible device Cables used , the HDMI video signals are converted to DVI signals, allowing connection to HDMI connections Set as "HDMI6" in the "Input Setup"...to a resolution with which the input source is only supported for the HDMI OUT 1 connector. NOTE • No sound is output when connected to use a "High Speed HDMI cable" or "High Speed HDMI cable with a DVI-D connector. Select the connector that you want to a device equipped ...
... control function, connect the television to the monitor. ENGLISH DEUTSCH FRANÇAIS ITALIANO ESPAÑOL Connecting an HDMI-compatible device Cables used , the HDMI video signals are converted to DVI signals, allowing connection to HDMI connections Set as "HDMI6" in the "Input Setup"...to a resolution with which the input source is only supported for the HDMI OUT 1 connector. NOTE • No sound is output when connected to use a "High Speed HDMI cable" or "High Speed HDMI cable with a DVI-D connector. Select the connector that you want to a device equipped ...
SR7005 User Manual - English
Page 21
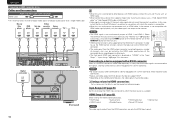
...instructions on HDMI connections, see "Connecting an HDMI-compatible device" (vpage 15). For details, see "Connecting an HDMI-compatible device" (vpage 15). Cables used for connections Video cable (sold separately) Video cable (Yellow) (Green) Y Y Component video cable (Blue) PB PB (Red) PR PR Audio cables... is assigned. "Input Assign" (vpage 70) in Set as Necessary Set this to change the digital input connector to this device, use and connect the device. • For instructions on HDMI connections, see "About ARC (Audio Return Channel) function" (vpage 15) or...
...instructions on HDMI connections, see "Connecting an HDMI-compatible device" (vpage 15). For details, see "Connecting an HDMI-compatible device" (vpage 15). Cables used for connections Video cable (sold separately) Video cable (Yellow) (Green) Y Y Component video cable (Blue) PB PB (Red) PR PR Audio cables... is assigned. "Input Assign" (vpage 70) in Set as Necessary Set this to change the digital input connector to this device, use and connect the device. • For instructions on HDMI connections, see "About ARC (Audio Return Channel) function" (vpage 15) or...

SR7005 User Manual - English
Page 22
...209;OL Connecting a DVD player • You can watch satellite or cable TV. • Select the connector to which the input source is assigned. Cables used for connections Video cable (sold separately) Video cable (Yellow) (Green) Y Y Component video cable (Blue) PB PB (Red) PR PR Audio cables (sold...set-top box (Satellite tuner/cable TV) • You can enjoy video and audio from a DVD. • Select the connector to use and connect the device. • For instructions on HDMI connections, see "Connecting an HDMI-compatible device" (vpage 15). "Input Assign" (vpage 70...
...209;OL Connecting a DVD player • You can watch satellite or cable TV. • Select the connector to which the input source is assigned. Cables used for connections Video cable (sold separately) Video cable (Yellow) (Green) Y Y Component video cable (Blue) PB PB (Red) PR PR Audio cables (sold...set-top box (Satellite tuner/cable TV) • You can enjoy video and audio from a DVD. • Select the connector to use and connect the device. • For instructions on HDMI connections, see "Connecting an HDMI-compatible device" (vpage 15). "Input Assign" (vpage 70...

SR7005 User Manual - English
Page 23
... • You can enjoy video and audio from a game machine or some other source is assigned. In this unit and the recorder. Cables used for connection between this case, select the input source to which the input source is input, the video conversion function might not operate. "Input ... COMPONENT VIDEO OUT Y PB PR VIDEO OUT AUDIO AUDIO OUT LR VIDEO VIDEO IN AUDIO AUDIO IN LR in Set as Necessary Set this unit, use the monitor output of video cable for connections Video cable (sold separately) Video cable (Yellow) (Green) Y Y Component video cable (Blue) PB PB ...
... • You can enjoy video and audio from a game machine or some other source is assigned. In this unit and the recorder. Cables used for connection between this case, select the input source to which the input source is input, the video conversion function might not operate. "Input ... COMPONENT VIDEO OUT Y PB PR VIDEO OUT AUDIO AUDIO OUT LR VIDEO VIDEO IN AUDIO AUDIO IN LR in Set as Necessary Set this unit, use the monitor output of video cable for connections Video cable (sold separately) Video cable (Yellow) (Green) Y Y Component video cable (Blue) PB PB ...


